Crossfire HD-350 Скачать руководство пользователя страница 12


Page 

10 

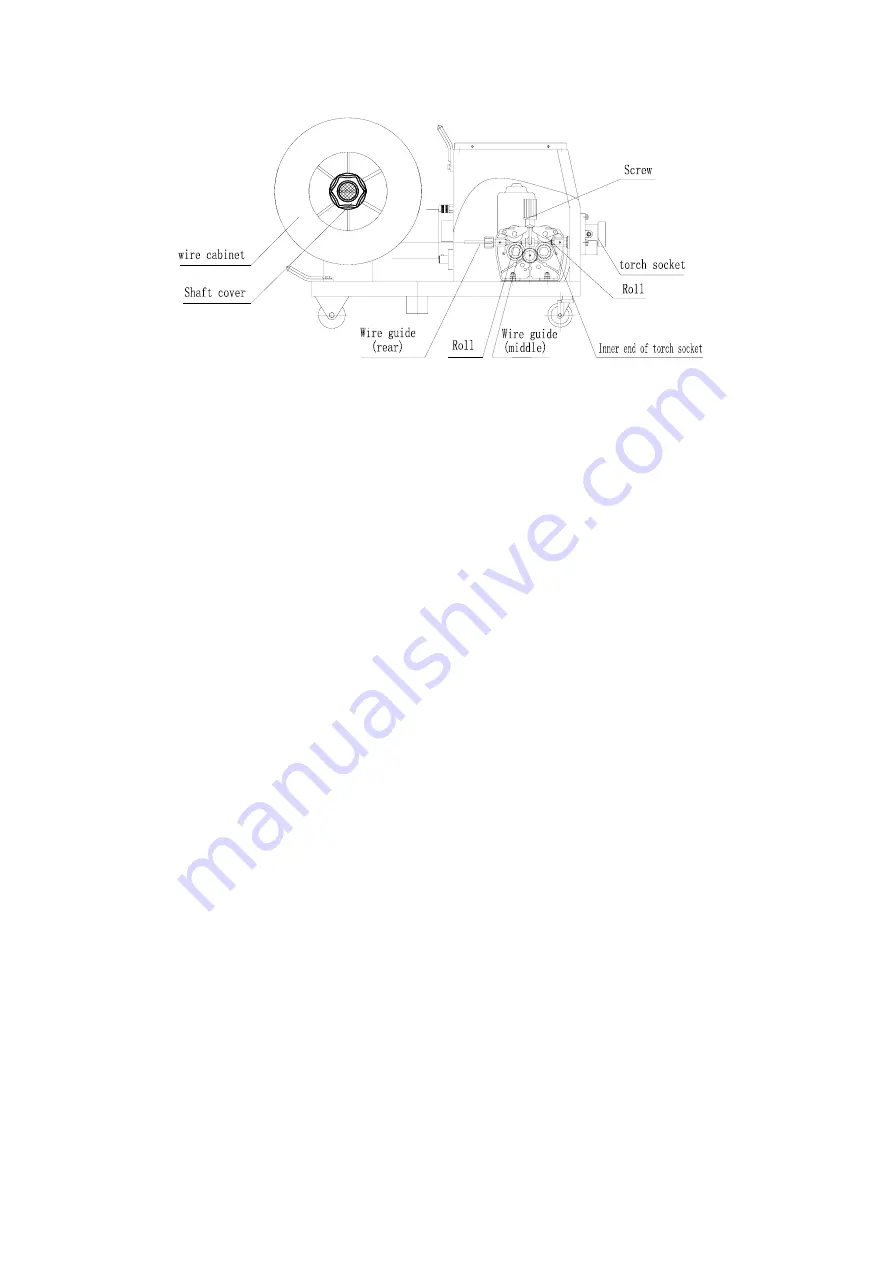
5.5 Installation and Connection for Wire Feeder System (See Chart) 


* Select suitable wire 

for the

 welding job. The wire diameter must be matched with drive roll; wire guide pipe 

liner and contact tip (Please Refer to Table 3). 

* Open the cover of wire cabinet, put wire spool on the shaft. Attention: Wire end under the wire spool 

opposite wire feeder. 

* There is damping screw device in the wire spool (hex head screw will be seen when open the cover).Pull the 

wire reel with hand when coarsely adjust. If resistance is over large, may adjust damping bolt, screw 

clockwise will enlarge, and vice versa. The cover must be screwed firmly after adjustment. 

* Feed wire into “Wire Guide Rear” of wire feeder, align wire with roll groove through “Feed Roll”. 

5.1.6 Connection between HD and Torch 

* Connect torch head with “Torch Socket” on front panel. 

5.1.7 Connection between HD and Work Piece 

Connect quick connector (male) of earth cable to the socket on the front panel of welding machine, and 

twist the quick connector (male) clockwise to ensure the tight connection. The other end clamps work 

piece.  

6.


Operation 


Notice: 

* Cut off power and close valve when finished welding or leave the job site temporary. 

* The welding worker should wear protected gear. 

* Isolating light screen must be placed around the job site in case of arc light influence. 

* Inflammable or explosive materials are prohibited to access the job site. 

6.1 Wo r k  P i e c e   C l e a n i n g  B e f o re  We l di ng  

Weld site must be cleaned, no existing rust, greasy dirt, water and paint etc. 

6.2  A d j u s tm e n t  a n d  Te s t  b e fo re   We l di ng  

* The fan will work after connecting. 

* Pressure data will be shown after open the valve of CO

2

 cylinder. 

* Open the valve of gas regulator (rotate clockwise), loose “feed roll”, press torch switch, adjust gas flow to 

meet the requirements of technology and then press “feed roll”. 

* Press torch switch and feed the wire to torch head. 

* The torch cable must be pulled a line in case of wire jam. 

* The nozzle and contact tip must be dismantled when testing wire feeding to prevent wire jam at torch head. 

* First, please observe the wire whether through the groove of feed roll when wire feeding, if not, adjust. 

Second, please observe whether wire feeding speed is even. If not, the reason may be that the pressing roll 

is too firm or loose. You should adjust it to assure of even feeding. 

Содержание HD-350

Страница 1: ...Warning Please read Owner s Manual before installation operation or repair of Crossfire welding equipment WARNING ONLY QUALIFIED PERSONELL SHOULD OPERATE OR MAINTAIN THIS MACHINE PLEASE READ THE OWER...

Страница 2: ...our welder maintained by a qualified technician in accordance with local state and national codes Always be aware of your work environment Be sure to keep other people especially children away from yo...

Страница 3: ...ound Do not attempt to repair or maintain the welder while the power is on Inspect all cables and cords for any exposed wire and replace immediately if found Use only recommended replacement cables an...

Страница 4: ...e precautions to ensure that flying sparks do not cause fires or explosions in hidden areas cracks or areas you cannot see Keep a fire extinguisher close in the case of fire Wear garments that are oil...

Страница 5: ...ar moving parts such as drive rolls of fan HD 350USE AND CARE Do not modify the machine in any way Unauthorized modification may impair the function and or safety and could affect the life of the equi...

Страница 6: ...r use approved respiratory protection Please remember to keep arc rays away from the other people when welding 2 2 Attention The voltage taps should not be changed while welding otherwise it will be d...

Страница 7: ...round the operation places 3 2 Requirement for Main Supply The voltage oscillogram should display actual sine wave the oscillation of the frequency should not exceed 1 of the rated value The oscillati...

Страница 8: ...rrent X Duty Cycle I1max A Rated Maximum Input Current I1eff A Maximum Virtual Input Current I2 Rated Welding Current U0 V Rated No load Voltage U1 V Rated Input Voltage U2 Conventional load voltage 6...

Страница 9: ...lding arc 4 2 Main Technical Data See Table 1 Table 1 ITEM HD 250 HD 350 HD 500 Power voltage V 3 575 3 575 3 575 Frequency Hz 60 60 60 Open circuit voltage V 18 36 19 40 20 51 Welding voltage V 16 5...

Страница 10: ...feed button 10 spool shaft 11 2 4 step switch 12 handle 13 Burn back time knob 14 Slow wire feeding switch 15 wire feeder motor 16 Welding cable connector 17 Cable connector 18 Gas connector 4 4 1 2...

Страница 11: ...pply Table 3 ITEM HD 350 Air Switch A 30 Power Cable mm2 4 5 3 Connection between HD and Wire Feeder Connect quick connector male of connecting cable to the socket on the back panel of welding machine...

Страница 12: ...er end clamps work piece 6 Operation Notice Cut off power and close valve when finished welding or leave the job site temporary The welding worker should wear protected gear Isolating light screen mus...

Страница 13: ...essories supply and service back up when they feel unable to work out the technical hitch or problems Maintenance job should be conducted by the trained personnel If the welder is not in use either fo...

Страница 14: ...lack phase Connect 3 phase power 5 Low OCV Main circuit diode break down lead to lacking phase Change main circuit diode Incorrect welding norm selected current doesn t match with voltage Adjust weldi...

Страница 15: ...t and make them on one direct line Liner inner diameter is too little or too large Replace liner Liner block up Clean the liner 10 Others Please contact distributor 8 Circuit Diagram The circuit chart...

Страница 16: ...s Shielded Welder 1 unit Wire Feeder 1 Product Certificate 1 Warranty Card 1 Operator s Manual 1 Accessories Torch 1 Wire Feeder Liner HD 350 1 Gas hose 1 Earth Cable clamp 1 Welding Cable 1 Control C...

Страница 17: ...r dust The tolerable temperature ranges from 25 55 and the relative humidity can not be more than 90 After the package has been opened it is suggested to repack the product as per prior requirement fo...

Страница 18: ...57 942 4 pin contactor 1 18 2 07 57 942 M mig gun conactor 1 19 2 07 10 043 potentiometer 3 20 2 07 11 009 potentiometer knob I 1 21 2 07 80 634 button switch 2 22 2 07 80 371 switch 1 23 2 07 57 942...

Страница 19: ...019 fuse 1 9 2 07 52 028 fuse holder 1 10 2 07 57 757 socket I 1 11 1 1 01 05 0144 hanger 1 12 2 07 57 119 quick connector 1 13 1 2 07 01 0124 input cable 1 14 1 1 01 04 0379 gas cylinder holder 1 15...

Страница 20: ...digital ammeter 2 37 1 1 01 05 0138 handle 1 38 2 01 31 061 left holder 1 39 2 01 31 062 right holder 1 40 1 1 02 01 0957 heat seak holder 2 41 2 07 37 551 rectifier bridge 1 42 2 07 42 009 diverter...

Страница 21: ...Page 19...

Отзывы: