background image

English


Stereo System Connection 

RCA Jacks 

  The RCA Jacks output analog line-level signals and could be connected 

directly with a pair of active/powered speakers or the appropriate input of your 
stereo system.  

  The Red plug connects with the Right channel and the White plug connects 

with the Left channel. 

Note: The RCA Jacks are not designed to be connected directly to the passive/unpowered 
speakers. If connected to the passive speakers, the volume level will be very low.  
 

Spring clip speaker terminals 

The spring clip speaker terminals deliver amplified, speaker-level signals as 
output and should be connected with the passive speakers.  


Aux Input Connection 

You can connect an audio device to this unit and play your music through its 
speakers. To do this, connect the 3.5mm auxiliary cable between your audio 

device and the Aux In Jack of this unit, press the Phono/AUX/  button to set to 
Aux In mode, and start playing.  

Note: The aux in connection will automatically override the turntable or Bluetooth function. 
To resume using the turntable or Bluetooth function, unplug the auxiliary cable from the aux 
in jack. 


Turntable Operation 

1.  Rotate the On/Off Volume Knob to turn on the power.


2.  Press the Phono/AUX/  Button to set the unit to Phono mode. 
3.  Set the Speed Switch accordingly. 
4.  Place the record on the turntable. Use the 45 RPM Adapter if necessary.  
5.  Remove the stylus protector from the stylus assembly. 

Note: To avoid stylus damage, make certain the included stylus protector is in place 
whenever the turntable is being moved or cleaned.  

6.  Release the tonearm Hold Down Clip. 

Note: When the turntable is not in use, remember to lock back hold down clip.


7.  Use the Tonearm Lever to lift up the tonearm. 
8.  Gently move the tonearm over the record where play is desired to begin. Set 

the Tonearm Lever back to the down position, the tonearm will descend 
slowly onto the record and begin to playback. 

Содержание Eclipse CR7014A

Страница 1: ...014A Eclipse Entertainment System Instruction Manual Questions problems missing parts Before returning to the store call Customer Service 8 a m 6 p m EST Monday Friday 1 888 CROSLEY www crosleyradio c...

Страница 2: ...self as opening or removing covers may expose you to dangerous voltage or other hazards Refer all servicing to qualified service personnel 8 Changes or modifications to this unit not expressly approve...

Страница 3: ...ing materials for exchange or return purposes Specifications Power 120 V 60Hz Power consumption 28 W Speaker 4 15 W X 2 Turntable Speed 33 1 3 45 78 RPM Replacement Needle Crosley NP 6 Note Design and...

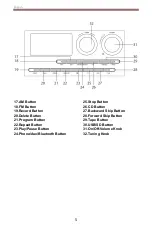
Страница 4: ...Screen 3 Bluetooth Indicator 4 Cassette Door 5 Record Button 6 Play Button 7 Rewind Button 8 Fast Forward Button 9 Stop Eject Button 10 Pause Button 11 CD Tray 12 SD Card Slot 13 USB Port 14 Aux In Ja...

Страница 5: ...on 20 Delete Button 21 Program Button 22 Repeat Button 23 Play Pause Button 24 Phono Aux Bluetooth Button 25 Stop Button 26 CD Button 27 Backward Skip Button 28 Forward Skip Button 29 Tape Button 30 U...

Страница 6: ...Spindle 34 Turntable Platter 35 45 RPM Adapter 36 Tonearm Lever 37 Auto Stop Switch 38 Hold Down Clip 39 Tonearm Rest 40 Speed Switch 41 Tonearm 42 RCA Jacks 43 Spring Clip Speaker Terminals 44 FM Wir...

Страница 7: ...er outlet Remote Control Prepare the Remote Control First time use The unit has a pre installed lithium CR2025 battery Remove the protective tab to activate the remote control battery Replace the Remo...

Страница 8: ...unit press the Phono AUX button to set to Aux In mode and start playing Note The aux in connection will automatically override the turntable or Bluetooth function To resume using the turntable or Blu...

Страница 9: ...lly when the record plays to the end In some rare occasion if the turntable stops playing before the end of the record set the switch to OFF position the turntable should overcome this issue Needle Re...

Страница 10: ...h the unit you will hear a short confirmation sound from the unit 5 Play and stream music from your device to the unit Note Bluetooth version 5 0 CD Playback Operation 1 Rotate the On Off Volume Knob...

Страница 11: ...e which is to be edited 4 Repeat steps 2 3 for additional sound tracks that you would like to play The tracks can be in any number and repeated A maximum of 20 tracks can be programmed at one time 5 P...

Страница 12: ...Press the USB SD button to set the unit to USB or SD mode 2 Insert a cassette tape and press the RECORD and PLAY button to record the sounds from USB SD Note To prevent accidental recording break off...

Страница 13: ...rding break off the cassette tab from side A or B 4 To pause recoding press the Pause button Press it again to resume playback 5 To stop recording press the Stop Eject button Bluetooth to TAPE 1 Press...

Страница 14: ...evice Note To prevent accidental recording break off the cassette tab from side A or B 4 To pause recoding press the Pause button Press it again to resume playback 5 To stop recording press the Stop E...

Страница 15: ...lete DEL button again to confirm 4 DEL will show on the display while the file track are being deleted until the deletion is complete Deleting a folder 1 Insert a USB device and SD card then select US...

Страница 16: ...Forward Skip button to select USB or SD for recording and press the record button to confirm the desired media 4 Lower the tone arm to start playback of the record 5 When you have finished recording p...

Страница 17: ...eshooting There is no power No power at the power outlet To help save power consumption some models will comply with ERP energy saving standard When there is no audio input for 20 minutes their powers...

Страница 18: ...ption which can be determined by turning the equipment off and on the user is encouraged to try to correct the interference by one or more of the following measures Reorient or relocate the receiving...

Отзывы: