Loading Patches from a Computer
Folder Structure Revisited
Earlier in this chapter, we went over the required folder structure for a usable USB drive.
Now that the drive is connected to a computer, let’s see the same structure in a more
familiar, graphical view.
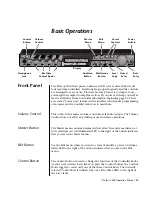
The top-level of my USB drive, whose disk name is
ORGANELLE
, is shown above. Inside of
the top-level
Patches
folder, the folders for the first four patches are selected (with blue
coloration), and their contents are exposed.
Again, the requirement here is that each folder contains a
main.pd
file that serves as the
primary file for that patch. As long as this file is in place, that patch will appear in
Organelle’s patches menu as the folder name. So in the example shown above, the first four
patches shown on Organelle would be
32 Oscillators
,
Analog Style
,
Arpeggio -
Double
, and
Basic Poly
.
Making Changes to the USB Drive
Assuming your USB drive is formatted correctly and the
Patches
folder is appropriately
named and located, making changes to your available patches is as simple as working with
files on your computer.
To add a patch to your Organelle’s USB drive:
copy the properly formatted patch folder
into the USB drive’s
Patches
folder.
To backup a patch:
copy the patch’s folder to a location on your computer.
Page
!
of
!
30
51