background image

Page 25

Feature #10   Unlock #2 When Ignition Is Turned Off


(Factory Default Setting  Off)

Explained in the previous feature,  if Driver’s Door Priority is installed this feature
controls the automatic unlocking when the ignition key is turned off of all doors
except the driver’s door.  When programming, press the transmitter Upper Left
“Lock” Button to turn on Unlock #2 When Ignition turned Off”; or press the Upper
Right “Unlock” Button to turn it off.

Feature #11   Open Door Bypass Of Ignition Locking


(Factory Default Setting  On)

This feature cancels the automatic locking or unlocking of the vehicle’s doors should
one of the doors is open when the ignition switch is turned on or off.  When
programming, press the transmitter Upper Left “Lock” Button to turn on the “Open
Door Bypass”, or press the Upper Right “Unlock” Button to turn it off.

Feature #12   Doors Lock With Last Door Arming


(Factory Default Setting Off)

This feature adds the automatic locking of the doors to the Last Door Arming
operation.  If this feature is added to feature #4, when the system becomes armed 30
seconds after closing the last door the doors will also lock .   This feature will operate
only if feature #4 is turned on.  When programming, press the transmitter Upper Left
“Lock” Button to turn on the automatic door locking, or press the Upper Right
“Unlock” Button to turn it off.

Feature #13   Doors Lock With Automatic Rearming


(Factory Default Setting  Off)

This feature adds the automatic locking of the doors to the Automatic Rearming
operation.  If this feature is added to feature #5, when the system rearms itself 90
seconds after being disarmed the doors will also lock.  This feature will operate only
if feature #5 is turned on.  When programming, press the transmitter Upper Left
“Lock” Button to turn on the automatic door locking, or press the Upper Right
“Unlock” Button to turn it off.

Feature #14   Ignition Activated Vehicle Recovery

  (Factory Default Setting  Off)

This form of Vehicle Recovery is initiated by the ignition key being turned on.  The
Vehicle Recovery operation, and the three ways to initiate it are described on page
17.  When programming this feature, press the transmitter’s Upper Left “Lock”
Button to turn it on, or press the Upper Right “Unlock” Button to turn it off.

alarm cycles. After the third alarm cycle the system will automatically rearm
and bypass the open zone until that zone returns to a non-violated state.
• Once the system resets after it has been activated, upon disarming the

audible and visual confirmation will change to indicate the activation.
This is the “Activation Alert”, which is explained on the next page.

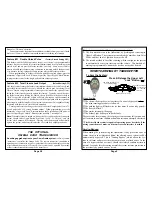
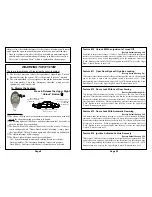
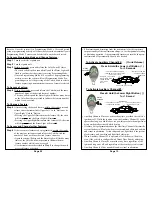
There are two methods of Disarming the security system:
1-

The first is to press and release the transmitter’s Upper Right “Unlock”
Button to disarm the system. This is the normal “daily use” method.

2-

The second method is for emergencies, should the transmitter become
lost or inoperable.  This is the “Emergency Override”, which uses the
ignition key and Valet Switch.

 DISARMING THE SYSTEM

THE SIREN WILL CHIRP

ONCE TO CONFIRM
DISARMING

THE PARKING LIGHTS

WILL ILLUMINATE

TO CONFIRM

DISARMING

THE DOORS WILL UNLOCK;

Either All or Drivers Only


Upon Disarming:

 The siren will chirp once (or three times if an alarm activation occurred)

unless the silent disarming procedure is followed.

 The parking lights will flash once and then illuminate for 30 seconds, or

until the ignition key is turned on.

 The doors will unlock, either all doors or driver’s door only.  If the sys-

tem is configured with “Driver Door Priority Unlocking”, simply press
the Upper Right “Unlock” Button again, and all of the doors will unlock.

 The starter interrupt will disengage.

 The Status Light will show one of these conditions:

-Off = System disarmed (Automatic Rearming feature not selected).
-Flashing rapidly = The Automatic Rearming feature is in progress.
-Flash /Pause =  Indicates violated zone if system has been activated.

Page 8

To Disarm the System:

Press & Release the Upper Right

“Unlock” Button (    )

Содержание 533i 4

Страница 1: ...NUAL 533i 4 FRONT COVER PRINTER S NOTE production front cover is to be printed with different color artwork this is a place marker cover BACK COVER PRINTER S NOTE production back cover is to be printed with different color artwork this is a place marker cover ...

Страница 2: ...vehicle from Passenger Car then to Pickup Truck and then to Van SUV When the desired type is flashing press and release the P button the Time s Hours will flash and may be set now 4 Press and release the button to advance the hours or press and release the button to reverse the hours When the Hours are correct please note AM or PM press and release the P button The Time s Minutes will flash and ma...

Страница 3: ...ese are played with remote starting Programming these features is a sequential process the controller is placed into programming mode then each programmable operation is accessed in turn and either changedasdesired orleftasis andthenthenextstepisaccessed Programmingisdone using the Echo unit s three round side buttons Programming the Echo The CARJACK icon within the vehicle s front tag frame indic...

Страница 4: ...ives back a signal which causes it to chirp emulating the siren anddisplaytheappropriate icons Brief descriptions of the icons are The Valet Switch has three main functions 1 The Valet Switch can be used to turn off the security operation of the system including the Last Door Arming feature if used This is placing the system into Valet Mode 2 The Valet Switch can also be used in conjunction with t...

Страница 5: ...for 2 Button operation Extra replacement oroptionaltransmittersareavailablefromyourCrimeGuard dealer or visit www caralarm com on the Internet for ordering information THE OPTIONAL OMEGA ECHO TRANSCEIVER An exiting upgrade option to your Crime Guard system is a 2 way remote transceiver controller the Omega Echo The remote transceiver in addition to operating your system also receives signals from ...

Страница 6: ...s over Page 27 Lower Right Button highest chirp volume 50mS system responds with 4 chirps Lower Left Button medium high chirp volume 30mS system responds with 3 chirps Upper Right Unlock Button medium low chirp volume 12mS system responds with 2 chirps Upper Left Lock Button lowest chirp volume 8mS system responds with 1 chirp While programming this feature the buttons can be repeatedly and sequen...

Страница 7: ... steady siren output Feature 15 Door Activated Vehicle Recovery Factory Default Setting Off This form of Vehicle Recovery is initiated by a door being opened The Vehicle Recovery operation and the three ways to initiate it are described on page 17 When programming this feature press the transmitter s Upper Left Lock Button to turn it on or press the Upper Right Unlock Button to turn it off again a...

Страница 8: ...d Vehicle Recovery Factory Default Setting Off This form of Vehicle Recovery is initiated by the ignition key being turned on The Vehicle Recovery operation and the three ways to initiate it are described on page 17 When programming this feature press the transmitter s Upper Left Lock Button to turn it on or press the Upper Right Unlock Button to turn it off alarm cycles After the third alarm cycl...

Страница 9: ...starts which is indicated by a rapidly flashing Status Light During this 90 Page 24 case the system should also disarm This feature configures the system to disarm when Auxiliary Channel 2 is used or to not disarm When programming this feature pressing the transmitter s Upper Left Lock Button will have the system disarm when Auxiliary Channel 2 is used programming by pressing the Upper Right Unloc...

Страница 10: ...ter the SecureCode by pressing and releasing the Valet Switch once The system will disarm Page 10 to chirp the total number entered Valet switch entry Important Now let the system exit Programming Mode by allowing the 10 secondtimelimittoexpirewithoutanyfurtherprogrammingactivity Donotexit Programming Mode by turning on the ignition switch Feature 6 Auxiliary Channel 2 Also Disarms System Factory ...

Страница 11: ...esses The system will not disarm after the initial Valet Switch entry but pause and chirp the siren before continuing to sound At this point the stage 2 entry must be made within 10 seconds If both stages entries are correct the system will disarm shortly after the stage 2 entry After a failed attempt to achieve SecureCode the ignition switch must be turned off then on again before another attempt...

Страница 12: ...ORS WILL LOCK IF ARMING UNLOCK IF DISARMING To Silently Arm or Disarm the System THE PARKING LIGHTS WILL FLASH ONCE IF ARMING TWICE IF DISARMING Silent Arming and Silent Disarming are both operated by double pressing the same transmitter button Press 2 X THE SIREN WILL NOT CHIRP Press Release the Lower Left Button Twice Page 21 Repeat this Step 6 for each additional feature until all features are ...

Страница 13: ...and Change Features features Once the system is in Programming Mode a 10 second period without programming activity will cause the system to automatically exit Programming Mode Features can be selected in any order as desired Step 4 Within 10 seconds press and release the Valet Switch the same number of times as the desired feature s number The siren will chirp and the Status Light will flash as m...

Страница 14: ...ion of standard Crime Guard transmitter or if your system is upgraded the optional Omega Echo 2 way transceiver controller Regardless of which the transmitter or transceiver must be programmed to the system to operate it excepting the original transmitters which were programmed at the factory This programming procedure is identical for a transmitter or an Echo transceiver Haveallofthetransmitterso...

Страница 15: ...ng Slow indicates that the alarm operation is fully armed Flashing Fast indicates that Last Door Arming or Automatic Rearming is in progress Page 18 Your Crime Guard system offers the most comprehensive and advanced securitysafeguards especiallyinoneofthemostcriticalsystemcomponents the remote control transmitter As the transmitter sends a signal over the air to operate the system it is quite poss...

Страница 16: ...ored and the Starter Interrupt will operate while the system is armed The backup battery should be replaced every 18 months or any time the backup battery has operated the systemonitsown Thebackupbatteryisinsidethesystem scontrolmodule so it is best replaced by a qualified installer Page 17 Your system is equipped with three separately programmable Vehicle Recoveryprotectionfeatures whichalsoprovi...

Отзывы: