background image

Crestron 

TPS-12G/15G/17G-QM

 Isys

®

 G-Series Touchpanels


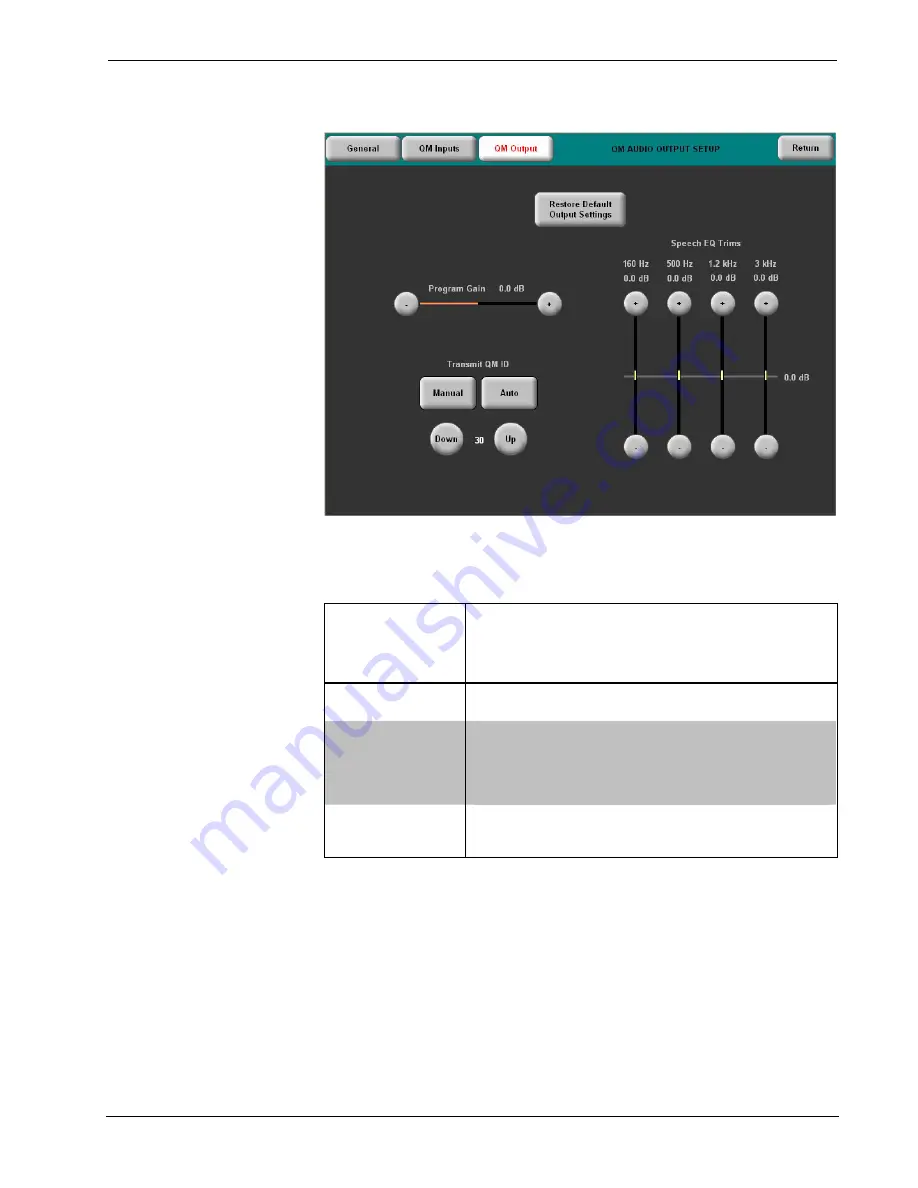
QM AUDIO OUTPUT SETUP 


Refer to the following table for additional QM AUDIO OUTPUT SETUP menu 
details. 

QM Audio Output Setup Details 

QM AUDIO 

OUTPUT SETUP 

SCREEN 

CONTROL 

DESCRIPTION 

Program Gain 

Adjusts the level of the QM output with the 

 and 

+


buttons. 

Transmit QM ID 

Allows transmission of touchpanel’s QM ID for use in QM 
systems utilizing auto compensation*. 

Manual

 will 

transmit a specific QM ID, adjustable with the 

Down

 and 

Up

 Buttons. 

Auto

, the default setting, will transmit the 

Cresnet ID as the QM ID. 

Speech EQ Trims 

Adjust relative level of the QM output at four speech 
related frequencies with the 

 and 

+

 buttons. These will 

alter the tonality of the QM audio output. 

*  Auto compensation automatically recalls microphone EQ settings, source compensation settings and 

peak and boost preset values of multiple QM origination points when acting as an endpoint. 


Operations Guide – DOC. 6415B 

Isys

®

 G-Series Touchpanels: TPS-12G/15G/17G-QM  

  37 

Содержание Isys TPS-12G-QM

Страница 1: ...Crestron TPS 12G 15G 17G QM Isys G SeriesTouchpanelswith QuickMedia TransportTechnology Operations Guide ...

Страница 2: ...n by the Technical Documentation department at Crestron Electronics Inc 15 Volvo Drive Rockleigh NJ 07647 1 888 CRESTRON All brand names product names and trademarks are the property of their respective owners 2009 Crestron Electronics Inc ...

Страница 3: ...ended Cleaning 48 Programming Software 49 Earliest Version Software Requirements for the PC 49 Programming with Crestron SystemBuilder 49 Programming with SIMPL Windows 49 Programming with VisionTools Pro e 52 Example Program 55 Uploading and Upgrading 56 Establishing Communication 56 Programs Projects and Firmware 57 Program Checks 58 Problem Solving 59 Troubleshooting 59 Check Network Wiring 60 ...

Страница 4: ......

Страница 5: ...ign the Isys TPS 12G 15G 17G QM features a spectacular display offering exceptional brightness and contrast for stunning control graphics high resolution images and full motion HD video Crestron touchpanels offer an ideal user interface for multimedia presentation video conferencing home automation and much more providing a wide open canvas for the creation of custom control screens tailored to th...

Страница 6: ... Synapse The Crestron exclusive Synapse Image Rendering Algorithm enables system programmers to produce amazing graphics faster and easier Advanced antialiasing delivers crisper sharper objects and text Enhanced 3D effects add new depth and style Since Synapse is native to the touchpanel memory requirements and upload time are substantially reduced Windows SideShow Enabled New support for Windows ...

Страница 7: ...nd RGB signals QuickMedia All audio and video connections are facilitated using our revolutionary QuickMedia transport providing a flexible yet remarkably simple wiring solution Through QuickMedia QM the TPS 12G 15G 17G QM interfaces directly with other QM based products using inexpensive CAT5e type cable The two QM input ports each support non interlaced RGB up to 1600 x 1200 pixels as well as co...

Страница 8: ...justment from 45 to 90 degrees and features an integral cable strain relief system and rear cover to secure and hide the connections at the back of the touchpanel Five backlit pushbuttons are also provided allowing for quick access to commonly used functions 4 Isys G Series Touchpanels TPS 12G 15G 17G QM Operations Guide DOC 6415B ...

Страница 9: ...PS 12G 15G 17G QM in a Lecture Hall Application TPS 15G QM Shown For more information on this and other QM applications refer to the latest revision of the Crestron MediaManager Applications Guide Doc 6244 which is available from the Crestron website www crestron com manuals Operations Guide DOC 6415B Isys G Series Touchpanels TPS 12G 15G 17G QM 5 ...

Страница 10: ...m The following diagram represents the switching abilities of the TPS 12G 15G 17G QM The diagram depicts the video audio and connectivity paths available Internal Block Diagram of the TPS 12G 15G 17G QM 6 Isys G Series Touchpanels TPS 12G 15G 17G QM Operations Guide DOC 6415B ...

Страница 11: ...7G QM 24 bit 16 7M colors Illumination Backlit fluorescent Viewing Angle TPS 12G QM 70º horizontal 45 55º vertical TPS 15G QM 85º horizontal and vertical TPS 17G QM 88º horizontal and vertical Touchscreen Resistive membrane Processor CPU 32 bit Freescale Coldfire Microprocessor Memory DDR RAM 128 MB Flash 64 MB Compact Flash Accepts up to 4 GB Type II CF not included Maximum Project Size 160 MB Gr...

Страница 12: ...fication Biamplified mono 5 Watts for high frequency 5 Watts for low frequency Power Requirements Cresnet Power Usage TPS 12G QM 50 Watts 2 08 Amps 24 Volts DC TPS 15G QM 75 Watts 3 13 Amps 24 Volts DC TPS 17G QM 84 Watts3 3 5 Amps 24 Volts DC Power Supply TPS 12G QM PW 2420RU sold separately TPS 15G QM must use Cresnet power supply TPS 17G QM PW 2435RU included Default NET ID 03 Minimum 2 Series ...

Страница 13: ... SMK 12 15 17 Swivel Mount Kit ST PK Programming Cable Kit 1 Applies to part number 6500247 only 2 One or more QuickMedia devices are required to facilitate the input and output of audio video and RGB signals 3 The TPS 17G QM should be powered by the supply included with the touchpanel 4 The latest software versions can be obtained from the Crestron website Refer to the NOTE following these footno...

Страница 14: ...15G 17G QM Physical Description This section provides information on the connections controls and indicators available on your TPS 12G 15G 17G QM TPS 12G QM Physical View 10 Isys G Series Touchpanels TPS 12G 15G 17G QM Operations Guide DOC 6415B ...

Страница 15: ...Crestron TPS 12G 15G 17G QM Isys G Series Touchpanels TPS 15G QM Physical View TPS 17G QM Physical View Operations Guide DOC 6415B Isys G Series Touchpanels TPS 12G 15G 17G QM 11 ...

Страница 16: ... QM or TPS 12G QM TPS 15G QM and TPS 17G QM units TPS 12G 15G QM Overall Dimensions Front View 11 94 in 30 33 cm 10 43 in 26 49 cm 12 85 in 32 64 cm 14 94 in 37 95 cm 11 30 in 28 71 cm 12 45 in 31 62 cm 14 17 in 36 00 cm TPS 17G QM Overall Dimensions Front View 17 64 in 44 79 cm 11 93 in 30 31 cm 14 17 in 36 00 cm 11 30 in 28 71 cm 12 Isys G Series Touchpanels TPS 12G 15G 17G QM Operations Guide D...

Страница 17: ...verall Dimensions Side View 13 75 in 34 91 cm 12 45 in 31 62 cm 14 17 in 36 00 cm 14 17 in 36 00 cm NOTE The TPS 12G 15G 17G touchpanels share an identical base unit 10 10 in 25 65 cm 7 40 in 18 80 cm Operations Guide DOC 6415B Isys G Series Touchpanels TPS 12G 15G 17G QM 13 ...

Страница 18: ...ys G Series Touchpanels Crestron TPS 12G 15G 17G QM TPS 12G 15G 17G QM Buttons 1 TPS 12G 15G 17G QM Connectors 2 7 9 3 6 8 10 4 5 14 Isys G Series Touchpanels TPS 12G 15G 17G QM Operations Guide DOC 6415B ...

Страница 19: ...e event that modular cables or an RJ 11 to DB9F adapter is not available the following diagram provides information so that the cable can be fabricated on site Alternatively Crestron cable number STCP 502PC is sold separately 3 RS 232 1 2 3 4 5 6 7 8 9 1 3 6 5 4 2 2 3 5 7 8 1 CTS GND RXD TXD RTS n c TO PC COM PORT TO RS 232 PORT Part 748047 1 Part 641337 Part AWC10152 A 4 G 1 6 32 screw chassis gr...

Страница 20: ...t slave port Connects to Cresnet control network 24 Power 24 Volts DC Y Data Z Data G Ground 8 USB 1 2 3 4 2 USB Type A female USB 1 1 ports for mouse or touchscreen input PIN DESCRIPTION 1 5 VDC 2 Data 3 Data 4 Ground 9 MEMORY EXP PC CARD A B 1 Type II Compact Flash card slot for memory expansion 2 Type II PC Card slots reserved for future applications Continued on following page 16 Isys G Series...

Страница 21: ...IM cable Maximum cable length QM IN 1 450 feet 137 meters aggregate distance from QM origination QM IN 2 Video HDTV 450 300 feet 137 91 meters aggregate distance from QM origination RGB 60 Hz 216 feet 66 meters for 640 x 480 140 feet 43 meters for 800 x 600 84 feet 26 meters for 1024 x 768 70 feet 21 meters for 1280 x 768 30 feet 9 meters for 1600 x 1200 using CresCAT QM or CresCAT IM cable QM OUT...

Страница 22: ...S 17G QM may be powered via this port or via the TPS 17G QM L IMC Power Interface Module included using the power supply provided 6 The eight pin RJ 45 QuickMedia transport port accepts CAT5E CAT6 carrying audio video and microphone signals The QM input port conforms to the 568B wiring standard Refer to the following table for connector pinouts RJ 45 PIN NUMBER WIRE COLORS EIA 568B QM ASSIGNMENT R...

Страница 23: ...igital device pursuant to part 15 of the FCC Rules These limits are designed to provide reasonable protection against harmful interference in a residential installation This equipment generates uses and can radiate radio frequency energy and if not installed and used in accordance with the instructions may cause harmful interference to radio communications However there is no guarantee that interf...

Страница 24: ...e high speed Ethernet for communications between the device and a control system computer digital media server and other IP based devices For information on connecting Ethernet devices in a Crestron system refer to the latest version of the Crestron e Control Reference Guide Doc 6052 which is available for download from the Crestron website QuickMedia Wiring The Crestron QuickMedia cable sold unde...

Страница 25: ... meters for standard definition video Refer to the QM Input 2 Maximum Cable Length table on that follows QM Input 2 Maximum Cable Length SIGNAL TYPE RESOLUTION MAXIMUM CABLE LENGTH FEET Video S video 480i 576i 450 Component 480p 576p 300 Component 720p 300 Component 1080i 300 RGB 1024 x 768 75 Hz 69 RGB 1280 x 1024 75 Hz 40 RGB 1600 x 1200 60 Hz 30 RGB 640 x 480 60 Hz 216 RGB 800 x 600 60Hz 140 RG...

Страница 26: ...ideo at the touchpanel s native resolution and aspect ratio Refer to the following illustration QM Network Topology with TPS 12G 15G 17G QM Acting as an Endpoint and a Transmitter QM WMC QM WMC QM QM QM Origination Points QM Endpoints TPS 12G 15G 17G QM This QM RMCRX BA does not violate the two midpoint rule as it is receiving an RGB signal from the TPS 12G 15G 17G QM transmitter QM RMCRX BA QM MD...

Страница 27: ...the SIMPL Windows program Each device using IP to communicate with a control system must have a unique IP ID Configuring the Touchpanel NOTE The only connection required to configure the touchpanel is power supplied via Cresnet Refer to Hardware Hookup which starts on page 45 for details To configure the unit it may be necessary to access a series of setup screens prior to viewing run time screens...

Страница 28: ...eft appears centered on the panel with a cross hair in the upper left corner Touch the center of the cross hair in the corner of the screen to initiate calibration Another message Touch Upper Right appears with a cross hair in the correct corner Touch the center of the cross 24 Isys G Series Touchpanels TPS 12G 15G 17G QM Operations Guide DOC 6415B ...

Страница 29: ...buttons which open additional menus and displays and are detailed in subsequent paragraphs The SETUP MENU also provides Down Up buttons to control Screen Brightness Key Backlight Brightness and Standby Timeout The Hardkey Test Results indicators will light when each respective button is pushed on the touchpanel After setup parameters have been selected touch Return to go back to the MAIN MENU NOTE...

Страница 30: ...ich screen and backlight levels change when you select a different screen or backlight brightness Touch Return to go back to the SETUP MENU ADVANCED OPTIONS MENU Touch Graphics Options to enter the GRAPHICS MENU GRAPHICS MENU 26 Isys G Series Touchpanels TPS 12G 15G 17G QM Operations Guide DOC 6415B ...

Страница 31: ...From the ADVANCED OPTIONS MENU touch LCD Level Settings to enter the Screen Brightness Settings menu Screen Brightness Settings The Screen Brightness Settings menu provides and controls to adjust Current LCD Brightness High Brightness Level Medium Brightness Level and Low Brightness Level The Press To Trigger Level Now buttons allow for immediate setting of screen brightness level to HIGH MEDIUM o...

Страница 32: ...e correctly specified or communication will not occur To set communication parameters touch the Interface button located on the SETUP MENU and display the INTERFACE MENU shown on the following page The Cresnet network identity number CRESNET ID also known as the Net ID is displayed on the INTERFACE MENU Net ID is the two digit hexadecimal number The hexadecimal number can range from 03 to FE and m...

Страница 33: ...buttons determine the status of the touchpanel s Ethernet communications NOTE The TPS 12G 15G 17G QM does not support a wireless Ethernet connection There may be Ethernet devices i e a control system on the network that communicate with the touchpanel via CIP Cresnet Internet Protocol Two buttons located on the INTERFACE MENU determine if the touchpanel is capable of this type of communication Tou...

Страница 34: ...x Refer to the TCP IP Communications section of Establishing Communication which starts on page 56 for additional Ethernet setup details Touch Ethernet Status Test for details such as the IP Address Subnet Mask Default Router IP Table etc The ETHERNET SETUP MENU also provides and controls to set the CTP Port Touch Set Default Port to return the CTP Port setting to its factory default Touch Return ...

Страница 35: ...nels ETHERNET SETUP MENU DHCP Disabled Each of the Static IP Options has its own menu as shown in the illustrations below and on the following page ETHERNET STATIC IP SETTINGS Operations Guide DOC 6415B Isys G Series Touchpanels TPS 12G 15G 17G QM 31 ...

Страница 36: ...Isys G Series Touchpanels Crestron TPS 12G 15G 17G QM ETHERNET DNS SETTINGS ETHERNET WINS SETTINGS 32 Isys G Series Touchpanels TPS 12G 15G 17G QM Operations Guide DOC 6415B ...

Страница 37: ... to control the touchpanel For convenience the RS 232 MENU also permits the selection of the RS 232 communication options Baud Rate Data Bits Stop Bits Parity RTS On Off and XON XOFF On Off Touch the communication option to select communication parameters and then touch Save and Return to save the RS 232 settings and go back to the SETUP MENU Default settings Console mode Baud Rate 115200 data bit...

Страница 38: ...t on the GENERAL AUDIO SETUP menu displays the QM AUDIO INPUT SETUP menu This menu allows adjustment of volume levels for QM audio inputs After audio parameters have been set touch Return to go back to the SETUP MENU GENERAL AUDIO SETUP Refer to the following table for additional GENERAL AUDIO SETUP menu details General Audio Setup Details GENERAL AUDIO SETUP SCREEN CONTROL DESCRIPTION QM Inputs S...

Страница 39: ...lume as a pre loaded WAV file plays Headphone Volume Adjusts the level of the headphone output with the and buttons This control is visible only when headphones are connected Bass Adjusts the overall bass output with the and buttons Treble Adjusts the overall treble output with the and buttons Headphone Balance Adjusts the left right balance of the headphone output with the and buttons This contro...

Страница 40: ...he level of the respective QM input with the and buttons QM 1 QM 2 Mic1 Volume Adjusts the level of Mic1 on the respective QM input with the and buttons QM 1 QM 2 Mic2 Volume Adjusts the level of Mic2 on the respective QM input with the and buttons To open the QM AUDIO OUTPUT SETUP menu touch QM Output on the GENERAL AUDIO SETUP menu The QM AUDIO OUTPUT SETUP menu offers controls for Program Gain ...

Страница 41: ...ng auto compensation Manual will transmit a specific QM ID adjustable with the Down and Up Buttons Auto the default setting will transmit the Cresnet ID as the QM ID Speech EQ Trims Adjust relative level of the QM output at four speech related frequencies with the and buttons These will alter the tonality of the QM audio output Auto compensation automatically recalls microphone EQ settings source ...

Страница 42: ...sence of QM Audio on channel 2 Setup QM 1 Displays the QM 1 SETUP menu By default the QM 1 SETUP menu displays video controls Peak Boost Skew Red Skew Green and Skew Blue in the lower right quadrant of the menu Video Pressing this before pressing the Setup QM 1 button will open the QM 1 SETUP menu in Video mode S Video Pressing this before pressing the Setup QM 1 button will open the QM 1 SETUP me...

Страница 43: ...tup QM 2 button will open the QM 2 SETUP menu in Component mode RGB Pressing this before pressing the Setup QM 2 button will open the QM 2 SETUP menu in RGB mode To open the QM 1 SETUP menu touch Setup QM 1 on the QM SETUP menu The QM 1 SETUP menu offers controls for Peak Boost Skew Red Skew Green and Skew Blue in Video S Video Component and RGB modes After QM 1 parameters have been set touch Retu...

Страница 44: ...ecrement and increment the displayed value Load Preset Will load the selected QM 1 Preset Store Preset Will store any changes you have made to the QM 1 setup at the displayed preset number Restore Default QM Settings Returns the QM settings to their factory defaults Peak Peak adjusts for high frequency attenuation that can occur over long cable lengths Boost Boost compensates for overall signal lo...

Страница 45: ...ribing the video menu controls follows the illustrations Touching Video on the SETUP MENU will open the screen shown below From here you can enter the setup screens for both Video 1 and Video 2 by touching their respective buttons VIDEO SETUP Refer to the following table for additional VIDEO SETUP menu details Video Setup Details VIDEO SETUP SCREEN CONTROL DESCRIPTION QM Audio 1 Detects the presen...

Страница 46: ... on the right side of the menu Video Pressing this before pressing the Setup Video 2 button will open the VIDEO 2 SETUP menu in Video mode S Video Pressing this before pressing the Setup Video 2 button will open the VIDEO 2 SETUP menu in S Video mode Component Pressing this before pressing the Setup Video 2 button will open the VIDEO 2 SETUP menu in Component mode RGB Pressing this before pressing...

Страница 47: ...store Default Color Settings Returns the video settings to their factory defaults Color Control When Video S Video or Component is selected as the video type these controls are available The Restore Default Color Settings button places the controls at their midpoint Brightness 1 2 Adjusts video image brightness with the and buttons Contrast 1 2 Adjusts video image contrast with the and buttons Sat...

Страница 48: ...B signal s characteristics If it cannot find one it automatically performs a calibration In Manual Mode the panel will not attempt to find a matching preset nor will it automatically perform a calibration In either mode you can always adjust the settings Position Size Phase Coarse Phase Fine manually Settings are not saved to a preset unless the user presses the Store Preset button Position This c...

Страница 49: ...e venting holes should not be obstructed under any circumstances To prevent overheating do not operate this product in an area that exceeds the environmental temperature range listed in the table of specifications Consider using forced air ventilation to reduce overheating Connect the Device Make the necessary connections as called out in the illustration on the following page Refer to Network Wir...

Страница 50: ... L IMC Power Interface Module guide Doc 6783 for details CAUTION Do not connect the TPS 17G QM directly to the Cresnet network bus NOTE Ensure the unit is properly grounded CAUTION Do not apply excessive pressure to the touchscreen display during handling Doing so can crack the screen and damage the touchpanel NOTE The maximum continuous current from equipment under any external load conditions sh...

Страница 51: ... All signal routing occurs automatically under the command of the control system For more information refer to the latest version of the QM TX Operations Guide Doc 6334 Cable Management The TPS 12G 15G 17G QM uses a built in strain relief to prevent the accidental disconnection of vital cables and provides strain relief for connectors on the cables and the touchpanel Refer to the following illustr...

Страница 52: ...face of the touchscreen free of dirt dust or other materials that could degrade optical properties Long term contact with abrasive materials can scratch the surface which may detrimentally affect image quality For best cleaning results use a clean damp non abrasive cloth with any commercially available non ammonia glass cleaner Bezels may not provide a complete watertight seal Therefore apply clea...

Страница 53: ... crestron com versiontracker Programming with Crestron SystemBuilder Crestron SystemBuilder is the easiest method of programming but does not offer as much flexibility as SIMPL Windows For additional details download SystemBuilder from the Crestron website and examine the extensive help file Programming with SIMPL Windows NOTE While SIMPL Windows can be used to program the TPS 12G 15G 17G QM it is...

Страница 54: ... 17G QM from the Touchpanels Touchpanels Ethernet folder of the Device Library and drop it in the System Views Locating the TPS 12G 15G 17G QM Ethernet in the Device Library The system tree of the control system displays the device in the appropriate slot with a default Net ID or IP ID as shown in the following illustration 50 Isys G Series Touchpanels TPS 12G 15G 17G QM Operations Guide DOC 6415B...

Страница 55: ...xpansion Ethernet interface C2Net Device Slot 8 and 9 Additional TPS 12G 15G 17G QM devices are assigned different Net ID for Cresnet devices or IP ID for Ethernet devices numbers as they are added If necessary double click a device to open the Device Settings window and change the Net ID or IP ID as shown in the following figure TPS 17G QM Cresnet Device Settings Window Same as window for TPS 12G...

Страница 56: ... The single most advanced VisionTools Pro e high performance programming technique involving the TPS 12G 15G 17G QM is the concept of multi mode objects A multi mode object i e button legend etc is an object drawn on a VT Pro e page that can have one or more active and inactive visible settings modes For examples refer to www crestron com exampleprograms and search for multi mode object examples T...

Страница 57: ...its of video memory for every screen pixel contain a value referring to a location in an 8 bit color table In this way any one of the specific 256 color table locations is assigned to a pixel A 16 bit highcolor system is considered sufficient to provide life like colors It is encoded using 5 bits to represent red 5 bits to represent blue and since the human eye is more sensitive to the color green...

Страница 58: ...e image size using the Image Properties window A reduction in image size will save a considerable amount of memory space for your project In VisionTools Pro e the Compress checkbox permits the image to be compressed when compiling The 16 Bits checkbox converts a 24 bit or 32 bit image to 16 bits This conversion to a 16 bit image may cause the loss of some subtle shading To compensate for this use ...

Страница 59: ... text on buttons and indirect text on buttons No Isys touchpanel firmware changes are required in either case Indirect text on a button is entered in VT Pro e and the actual string to be displayed is entered in SIMPL Windows As of this publication date only completely single byte or completely multibyte strings may be entered or they will not be compiled correctly in SIMPL Windows In other words y...

Страница 60: ...ENT PC RUNNING CRESTRON TOOLBOX TPS 12G 15G 17G QM The RS 232 port on the TPS 12G 15G 17G QM connects to the serial port on the PC via a serial cable Crestron STCP 502PC or equivalent Use the Address Book in Crestron Toolbox to create an entry using the expected serial communication protocol RS 232 auto detect baud rate no parity 8 data bits 1 stop bit XON XOFF disabled RTS CTS disabled Display th...

Страница 61: ...e icon and select the TPS 12G 15G 17G QM entry Programs Projects and Firmware Program project or firmware files may be distributed from programmers to installers or from Crestron to dealers Firmware upgrades are available from the Crestron website as new features are developed after product releases One has the option to upload programs and projects via the programming software or to upload and up...

Страница 62: ...s For Ethernet connections display the System Info window click the icon and select the Functions menu to display actions that can be performed on the TPS 12G 15G 17G QM Be sure to use the Crestron Toolbox to create the TPS 12G 15G 17G QM IP table Select Functions IP Table Setup Add modify or delete entries in the IP table The TPS 12G 15G 17G QM can have only one IP table entry A defined IP table ...

Страница 63: ...ot communicating with the network Use Toolbox to poll the network Verify network connection to the touchpanel TPS 12G 15G 17G QM does not function Brightness is set too low Adjust touchpanel brightness Refer to Setup Menu which starts on page 25 Incorrect network wiring Touch the screen to remove the message and verify correct wiring to all connectors Touchpanel Cresnet ID is not set to match the ...

Страница 64: ...he same IP address Obtain new touchpanel static IP address Check Network Wiring Use the Right Wire In order to ensure optimum performance over the full range of your installation topology Crestron Certified Wire and only Crestron Certified Wire may be used Failure to do so may incur additional charges if support is required to identify performance deficiencies because of using improper wire Calcul...

Страница 65: ...or Strip and Tin Wire When daisy chaining Cresnet units strip the ends of the wires carefully to avoid nicking the conductors Twist together the ends of the wires that share a pin on the network connector and tin the twisted connection Apply solder only to the ends of the twisted wires Avoid tinning too far up the wires or the end becomes brittle Insert the tinned connection into the Cresnet conne...

Страница 66: ...sers will need to establish a user account to fully benefit from all available features Future Updates As Crestron improves functions adds new features and extends the capabilities of the TPS 12G 15G 17G QM additional information may be made available as manual updates These updates are solely electronic and serve as intermediary supplements prior to the release of a complete technical documentati...

Страница 67: ...mmands data or instructions from or to another computer b for local campus or wide area network internet or web hosting services or c pursuant to any rental sharing or service bureau arrangement The Software is designed as a software development and customization tool As such Crestron cannot and does not guarantee any results of use of the Software or that the Software will operate error free and ...

Страница 68: ...inety 90 days from the date of receipt and b that any hardware accompanying the Software will be subject to its own limited warranty as stated in its accompanying written material Crestron shall at its option repair or replace or refund the license fee for any Software found defective by Crestron if notified by you within the warranty period The foregoing remedy shall be your exclusive remedy for ...

Страница 69: ...or 90 days batteries and incandescent lamps are not covered This warranty extends to products purchased directly from CRESTRON or an authorized CRESTRON dealer Purchasers should inquire of the dealer regarding the nature and extent of the dealer s warranty if any CRESTRON shall not be liable to honor the terms of this warranty if the product has been used in any application other than that for whi...

Страница 70: ...Crestron Electronics Inc Operations Guide DOC 6415B 15 Volvo Drive Rockleigh NJ 07647 2013896 Tel 888 CRESTRON 01 09 Fax 201 767 7576 Specifications subject to www crestron com change without notice ...

Отзывы: