PROGRAMMING P-SERIES
Page 27 of 99
Memory Reset
To reset memory enter the AUTO “Auto Test” menu and scroll to the option to reset the memory. Press select
button 1 to select this option and follow the displayed prompts. Once the machine has cleared its memory it will
be ready to program.
EPROM REPLACEMENT
Software changes / upgrades are accomplished by changing the EPROM on the Control Board.
SBC (Single Board Controller) Software Update Procedure
This document describes how to update software on the Single Board Controller (SBC).
Note:
All existing
software revisions, except software version 804,920,870.01, will automatically update the software revision 804,
920,870.01 or higher upon installation. For SBC boards using 804, 920,870.01 software menu programming is
required to manually update the software.
Important:
EPROM’s containing software is sensitive to Electrostatic Discharge (ESD). Failure to handle the
EPROM carefully could cause damage, which may result in a failed Single Board Controller (SBC).
ALWAYS KEEP THE EPROM IN THE ESD TUBE. GROUND YOURSELF ON THE VENDER CABINET
BEFORE REMOVING THE EPROM FROM THE ESD TUBE OR CONTROL BOARD. AN EPROM CAN BE
USED TO PROGRAM MANY VENDERS, AS LONG AS CARE IS TAKEN NOT TO DAMMAGE THE EPROMS
LEGS.
ALWAYS TURN POWER OFF BEFORE REMOVING OR INSTALLING EPROMS IN THE CONTROL BOARD.
Note
: Use the SBC programming manual to program a vender that has a Single Board Controller (SBC) installed.
I. EPROM
removal
•
Power down the Vender.
Ground yourself on the vender cabinet before removing the
EPROM from the ESD tube or control board.
•
If the EPROM is present in the SBC, remove the existing EPROM from the SBC.
•
Note: An EPROM does not need to be in the board after the SBC has been programmed.
The EPROM can be used to reprogram other boards.
•
Verify the pins of the new EPROM are not bent before installing in the EPROM socket.
•
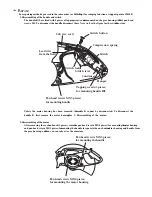
Install the new EPROM in the EPROM socket. Ensure the EPROM is oriented correctly with its
reference marker (locator) in the same direction as the reference marker (locator) of the EPROM
socket. Do not rely on the EPROM label for orientating the EPROM. See Figure 1.
II. Automatic Reprogramming (all 804, 920,870.01 software revisions)
•
Turn power on to Vender. When auto-updating, the display will remain blank while the red LED
on the board blinks rapidly for 3-4 seconds. Verify the new software version is shown on the
display. If the new software version (the software version of the newly installed EPROM)
displays, the SBC software has been successfully updated. If not, verify the EPROM is seated
properly, with the reference marker oriented correctly and follow instructions for manual update if
updating from 804, 920,870.01. If problems still exist, contact the Dixie-Narco Technical Service
Department.
Note:
To remove the EPROM after programming is complete turn power off,
ground yourself
on the vender cabinet before removing the EPROM
, remove the EPROM, turn power on, test
vender for proper operation.
III. Manual Reprogramming (all 804, 920,870.01 or if an EPROM does not automatically reprogram the SBC)
•
At power up, the current software version will be displayed. To manually program the control
board with the new software, press the blue service switch on the SBC to enter the service menu.
Advance to the “Auto Test” menu by holding buttons 1& 2 simultaneously. Enter Auto Test by
pressing button 1, and advance to the “Reprogramming Microprocessor” submenu by holding
buttons 1& 2 simultaneously.
Содержание Dixie-Narco 504 P Series
Страница 32: ...TROUBLESHOOTING FLOWCHARTS P SERIES Page 32 of 99 ALL BILLS ARE REJECTED ...
Страница 33: ...TROUBLESHOOTING FLOWCHARTS P SERIES Page 33 of 99 INCORRECT CHANGE DISPENSED ...
Страница 36: ...TROUBLESHOOTING FLOWCHARTS P SERIES Page 36 of 99 COMPRESSOR WILL NOT START ...
Страница 37: ...TROUBLESHOOTING FLOWCHARTS P SERIES Page 37 of 99 MACHINE NOT COOLING Review Storage Enable Temp ...
Страница 39: ...TROUBLESHOOTING FLOWCHARTS P SERIES Page 39 of 99 LIGHTS ARE NOT ON ...
Страница 41: ...TROUBLESHOOTING FLOWCHARTS P SERIES Page 41 of 99 SOLD OUT ...
Страница 43: ...TROUBLESHOOTING FLOWCHARTS P SERIES Page 43 of 99 CAN T READ THE DISPLAY ...
Страница 44: ...WIRING DIAGRAMS AND SCHEMATICS P SERIES Page 44 of 99 10 SELECT 10 COLUMN ...
Страница 47: ...PARTS LIST P SERIES Page 47 of 99 MAIN DOOR EXTERIOR Dr Pepper V4 3 10 18 11 13 14 16 9 2 8 1 ...
Страница 48: ...PARTS LIST P SERIES Page 48 of 99 MAIN DOOR EXTERIOR Dr Pepper SL5 1 3 4 7 8 16 10 11 9 2 6 3 18 5 ...
Страница 49: ...PARTS LIST P SERIES Page 49 of 99 MAIN DOOR EXTERIOR Chameleon 11 13 8 14 16 10 2 18 9 3 1 ...
Страница 50: ...PARTS LIST P SERIES Page 50 of 99 MAIN DOOR EXTERIOR Dual Display 2 9 11 3 18 13 10 19 8 1a 2 3 3 3 16 1 14 ...
Страница 55: ...PARTS LIST P SERIES Page 55 of 99 MAIN DOOR INTERIOR A Generic Round Magnum Circular 9 8 19 18 17 4 1 3 10 ...
Страница 56: ...PARTS LIST P SERIES Page 56 of 99 MAIN DOOR INTERIOR A Dual Display 10 8 9 17 1 3 2 18 ...
Страница 57: ...PARTS LIST P SERIES Page 57 of 99 MAIN DOOR INTERIOR A DP SL5 1 2 7 9 8 19 18 6 10 ...
Страница 58: ...PARTS LIST P SERIES Page 58 of 99 MAIN DOOR INTERIOR A Chameleon 11 18 17 4 1 9 8 3 10 ...
Страница 63: ...PARTS LIST P SERIES Page 63 of 99 MAIN DOOR INTERIOR B 1b 1 4 5 13 9 11 6 16 8 DP V4 Chameleon DP SL5 ...
Страница 71: ...PARTS LIST P SERIES Page 71 of 99 T 8 LIGHTING Generic Round Magnum Circular 3 11 23 6 13 6 12a 4 13 ...
Страница 72: ...PARTS LIST P SERIES Page 72 of 99 T 8 LIGHTING CONTINUED Dual Display 6 2 24 15 5 9 7 18 17 8 1 4 14 ...
Страница 73: ...PARTS LIST P SERIES Page 73 of 99 T 8 LIGHTING CONTINUED DP SL5 3 12f 5 6 12c 12f 6 12d 11 4 6 ...
Страница 74: ...PARTS LIST P SERIES Page 74 of 99 T 8 LIGHTING CONTINUED DP V4 Chameleon 12 11 5 12 4 6 20 6 19 3 6 ...
Страница 77: ...PARTS LIST P SERIES Page 77 of 99 ELECTRONIC COMPONENTS 4 6 7 2 2 1 SL5 2 A 2 B ...
Страница 79: ...PARTS LIST P SERIES Page 79 of 99 INNER DOOR ASSEMBLY 9 8 2 7 5 11 10 4 5 6 16 1 17 ...
Страница 82: ...PARTS LIST P SERIES Page 82 of 99 HARNESSING Single Board Controller 6 7 5 4 3 2 ...
Страница 84: ...PARTS LIST P SERIES Page 84 of 99 POWER DISTRIBUTION 11 12 10 5 7 5 4 3 8 2 1 9 ...
Страница 86: ...PARTS LIST P SERIES Page 86 of 99 CABINET AND VEND MECHANISM Section 1 10 5 23 2 17 11 19 12 14 13 20 24 ...
Страница 88: ...PARTS LIST P SERIES Page 88 of 99 CABINET AND VEND MECHANISM Section 2 14 6 11 8 2 4 1 13 10 9 7 3 5 ...
Страница 93: ...PARTS LIST P SERIES Page 93 of 99 RERFRIGERATION SYSTEM 5 6 7 13 12 15 11 10 2 4 3 1 8 14 ...
Страница 95: ...PARTS LIST P SERIES Page 95 of 99 SCREWS NUTS ...
Страница 97: ...PARTS LIST P SERIES Page 97 of 99 WASHERS BOLTS MISC HARDWARE ...