Coulomb Technologies ChargePoint CT500-DSTAND Скачать руководство пользователя страница 22

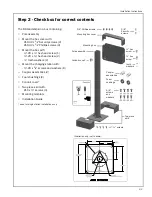
ChargePoint® Charging Stations

A-2

Third Party Products

The above Limited Warranty and Five-Year Extended Warranty are exclusive of products manufactured by third parties (“

Third 

Party Products

”). If such third party manufacturer provides a separate warranty with respect to the Third Party Product, 

COULOMB will include such warranty in the packaging of the COULOMB Product.

OBTAINING WARRANTY SERVICE 

To obtain warranty service you must: (a) obtain a return materials authorization number (“

RMA#

”) from COULOMB by contacting 

1-877-370-3802 (or for customers outside the U.S., contact 408-370-3802) and ask for Customer Service, and (b) deliver the 
Product, in accordance with the instructions provided by COULOMB, along with proof of purchase in the form of a copy of the bill 
of sale including the Product’s serial number, contact information, RMA# and detailed description of the defect, in either its 
original package or packaging providing the Product with a degree of protection equivalent to that of the original packaging, to 
COULOMB at the address below. You agree to obtain adequate insurance to cover loss or damage to the Product during shipment.

If you obtain an RMA# and return the defective Product as described above, COULOMB will pay the cost of returning the Product 
to COULOMB. Otherwise, you agree to bear such cost, and prior to receipt by COULOMB, you assume risk of any loss or damage to 
the Product. COULOMB is responsible for the cost of return shipment to you if the COULOMB Product is found to be defective.

Returned products which are found by COULOMB to be not defective, returned out-of-warranty or otherwise ineligible for warranty 
service will be repaired or replaced at COULOMB’s standard charges and shipped back to you at your expense.

At COULOMB’s sole option, COULOMB may perform repair service on the Product at your facility, and you agree to provide 
COULOMB with all reasonable access to such facility and the Product, as required. On-site repair service is not available outside 
the United States.

All replaced parts, whether under warranty or not, are the property of COULOMB. 

WARRANTY LIMITATIONS

The LIMITED warrantY set forth above IS exclusive and no other warranty, whether written or oral, is expressed or implied BY 
COULOMB, TO THE MAXIMUM EXTENT PERMITTED BY LAW. THERE ARE NO OTHER WARRANTIES RESPECTING THE PRODUCT AND 
DOCUMENTATION AND SERVICES PROVIDED UNDER THIS AGREEMENT, INCLUDING WITHOUT LIMITATION ANY WARRANTY OF 
DESIGN, MERCHANTABILITY, FITNESS FOR A PARTICULAR PURPOSE (EVEN IF COULOMB OR DISTRIBUTOR HAS BEEN INFORMED 
OF SUCH PURPOSE) OR AGAINST INFRINGEMENT.

Some states or jurisdictions do not allow the exclusion of express or implied warranties so the above exclusions may not apply to 
you.   IF ANY IMPLIED WARRANTY CANNOT BE DISCLAIMED UNDER APPLICABLE LAW, THEN SUCH IMPLIED WARRANTY SHALL BE 
LIMITED IN DURATION TO THE LIMITED WARRANTY PERIOD DESCRIBED ABOVE. NO WARRANTIES APPLY AFTER THE TOTAL 
WARRANTY PERIOD. Some states or jurisdictions do not allow limitations on how long an implied warranty lasts, so the above 
limitation may not apply to you.

NO AGENT OF COULOMB IS AUTHORIZED TO ALTER OR EXCEED THE WARRANTY OBLIGATIONS OF COULOMB.

COULOMB SPECIFICALLY DOES NOT WARRANT THAT ANY SOFTWARE WILL BE ERROR FREE OR OPERATE WITHOUT 
INTERRUPTION. 

THE REMEDIES IN THIS LIMITED PRODUCT WARRANTY ARE YOUR SOLE AND EXCLUSIVE REMEDIES. 

LIMITATIONS OF LIABILITY

You acknowledge and agree that the consideration which you paid to COULOMB or one of its authorized distributors does not 
include any consideration by COULOMB or one of its authorized distributors of the risk of consequential, indirect or incidental 
damages which may arise in connection with your use of, or inability to use, the Product. THUS, COULOMB OR ONE OF ITS 
AUTHORIZED DISTRIBUTORS WILL NOT BE LIABLE FOR ANY INDIRECT, INCIDENTAL, SPECIAL, PUNITIVE OR CONSEQUENTIAL 
DAMAGES, INCLUDING WITHOUT LIMITATION LOST PROFITS, LOST BUSINESS, LOST DATA, LOSS OF USE, OR COST OF COVER 
INCURRED BY YOU ARISING OUT OF OR RELATED TO YOUR PURCHASE OR USE OF, OR INABILITY TO USE, THIS PRODUCT OR THE 
SERVICES, UNDER ANY THEORY OF LIABILITY, WHETHER IN AN ACTION IN CONTRACT, STRICT LIABILITY, TORT (INCLUDING 
NEGLIGENCE) OR OTHER LEGAL OR EQUITABLE THEORY, EVEN IF COULOMB KNEW OR SHOULD HAVE KNOWN OF THE 
POSSIBILITY OF SUCH DAMAGES. IN ANY EVENT, THE CUMULATIVE LIABILITY OF COULOMB OR ONE OF ITS AUTHORIZED 
DISTRIBUTORS FOR ALL CLAIMS WHATSOEVER RELATED TO THIS PRODUCT OR THE SERVICE WILL NOT EXCEED THE PRICE YOU 
PAID FOR THIS PRODUCT.

THE LIMITATIONS SET FORTH HEREIN ARE INTENDED TO LIMIT THE LIABILITY OF COULOMB AND SHALL APPLY 
NOTWITHSTANDING ANY FAILURE OF ESSENTIAL PURPOSE OF ANY LIMITED REMEDY.

Содержание ChargePoint CT500-DSTAND

Страница 1: ...tallation Guide Part Number 75 001061 01 Revision 1 0 Coulomb Technologies Inc 1692 Dell Ave Campbell CA 95008 6901 USA US toll free 1 877 370 3802 www coulombtech com www mychargepoint net by Coulomb Technologies ...

Страница 2: ...nd other information in this manual are subject to change at any time without prior notice Warranty information and disclaimer Your use of or modification to the ChargePoint Charging Station in a manner in which the ChargePoint Charging Station is not intended to be used or modified will void the limited warranty Other than any such limited warranty the Coulomb products are provided AS IS and Coul...

Страница 3: ...upler to charging station s 2 4 Step 4 Attach mounting box to pole assembly 2 5 Step 5 For single station installations only attach conduit cover 2 6 Step 6 Run wiring into mounting box 2 7 Step 7 Mount pole assembly 2 8 Step 8 Mount charging station s 2 9 Step 9 Connect ground wires 2 10 Step 10 Connect L1 and L2 wiring to charging station s 2 11 Step 11 Install top cover 2 12 Step 12 Install ski...

Страница 4: ......

Страница 5: ... Instructions Familiarize yourself with the installation procedure for the type of charging station s you are installing For example if you are installing CT500 charging stations review the CT500 Installation Guide Installation guides are shipped in the box containing the charging station and are also available at www coulombtech com library php Specifications Model CT500 DSTAND Operating Environm...

Страница 6: ......

Страница 7: ...ite see page 2 2 2 Check box for correct contents see page 2 3 3 Attach coupler to charging station s see page 2 4 4 Attaching mounting box to pole assembly see page 2 5 5 For single station installations only attach conduit cover see page 2 6 6 Run wiring into mounting box see page 2 7 7 Mount pole assembly see page 2 8 8 Mount charging station s see page 2 9 9 Connect ground wires see page 2 10 ...

Страница 8: ...using the three J Bolt pattern To ensure correct location of the J Bolts use the supplied template IMPORTANT The concrete block must measure at least 18 46 cm on all sides Check local codes to ensure compliance The J Bolts must extend at least 2 6 4 cm above the concrete The conduit must extend 12 to 24 30 to 61 cm above the concrete or according to local codes The wiring must extend at least six ...

Страница 9: ...t cover Two piece skirt with 10 x screws 4 Mounting template Installation Guide used for single station installations only D Stand Installation Guide Part Number 75 001061 01 Revision 1 0 Coulomb Technologies Inc 1692 Dell Ave Campbell CA 95008 6901 USA US toll free 1 877 370 3802 www coulombtech com www mychargepoint net by Coulomb Technologies Coupler assemblies Two piece skirt Mounting box Pole...

Страница 10: ...h charging station as shown NOTE The Coulomb Technologies CT500 family of charging stations have four conduit openings but only the left rear opening is used with the D Stand You will need to remove the cover from this opening and attach the coupler as shown Relocate the cover to the lower left opening ...

Страница 11: ...ly seated Fasten using the two hex screws and tooth washers as shown and tighten to 8 ft lbs 10 9 Nm The two brackets inside the mounting box are designed to fit over the top of the pole Fasten with the longer hex screw and tooth washer on the side with the terminal block Fasten with the shorter hex screw and tooth washer on this side ...

Страница 12: ...to the D Stand you will need to cover the unused conduit opening on the mounting box Skip this step if you are installing two stations Using a straight screwdriver loosen the screw on the conduit cover do not remove then insert the rectangular section through the unused opening Center the conduit cover over the opening and tighten until snug ...

Страница 13: ...into mounting box Run the wiring up through the pole TIP This is easier to accomplish with the D Stand assembly laying on its side Run wiring from the stub up through the bottom of the pole and then place the D Stand over the stub up and the J Bolts ...

Страница 14: ...ase plate to the J Bolts using the installer supplied nuts and washers as shown Adjust the nuts as necessary to ensure the D Stand s mounting pole is level When level tighten the nuts IMPORTANT Ensure the base plate pole assembly is level by adjusting the nuts underneath the base plate Position a level on the mounting pole Adjust these nuts as necessary to ensure the mounting pole is level ...

Страница 15: ...s and washers four for each charging station For detailed instructions on how to install the charging station refer to the charging station s installation guide NOTE Ensure that the holster has already been attached to the charging station s as described in the charging station s installation guide before mounting to the D Stand ...

Страница 16: ...ide hole on the D stand s grounding block Run these ground wires through the conduits and connect to the terminal block on the charging station s NOTE Use 10 AWG stranded THHN or equivalent ground wire Strip wires 6 mm insert into grounding block and tighten screws to 18 inch lbs 2 1 Nm Connect main ground wire to center hole Connect ground wires from the side holes to the charging stations ...

Страница 17: ...harging station s Connect the 240 VAC L1 and L2 wires to each charging station s terminal block as described in the charging station installation guide Strip wires 3 7 6 mm insert in terminal block as shown and tighten screws to 18 inch lbs 2 1 Nm Strip Length 3 7 6 mm ...

Страница 18: ...The top cover includes four pre drilled holes These holes allow a sign to be installed on top of the D Stand If installing a sign refer to the hole pattern measurements provided below If you are not installing a sign insert the four supplied Phillips screws into the pre drilled holes TOP COVER HOLE PATTERN not to scale 10 254 mm 2 51 mm 10 32 THREAD HOLE 28 FULL THREAD DEPTH ...

Страница 19: ...nder the base plate to ensure that the skirt can not slide up the pole Insert and firmly tighten the four screws Ensure that the tabs on the bottom skirt Attach the charging station s antenna s and front cover as described in the charging station s installation guide You have now finished installing the D Stand Insert two screws into the top Insert the other two screws into the sides ...

Страница 20: ......

Страница 21: ...ssociated with the repair or replacement of any defective Product COULOMB s OPTIONS You acknowledge that replacement products provided by Coulomb under each of the Limited Warranty and the Five Year Extended Warranty may be remanufactured or reconditioned Products or if the exact Product is no longer manufactured by COULOMB a Product with substantially similar functionality Replacement Products An...

Страница 22: ...OMB TO THE MAXIMUM EXTENT PERMITTED BY LAW THERE ARE NO OTHER WARRANTIES RESPECTING THE PRODUCT AND DOCUMENTATION AND SERVICES PROVIDED UNDER THIS AGREEMENT INCLUDING WITHOUT LIMITATION ANY WARRANTY OF DESIGN MERCHANTABILITY FITNESS FOR A PARTICULAR PURPOSE EVEN IF COULOMB OR DISTRIBUTOR HAS BEEN INFORMED OF SUCH PURPOSE OR AGAINST INFRINGEMENT Some states or jurisdictions do not allow the exclusi...

Страница 23: ...f the State of California U S A exclusive of its conflict of laws principles The U N Convention on Contracts for the International Sale of Goods shall not apply This Limited Product Warranty is the entire and exclusive agreement between you and COULOMB with respect to its subject matter and any modification or waiver of any provision of this statement is not effective unless expressly set forth in...

Страница 24: ......

Страница 25: ......

Страница 26: ...Coulomb Technologies Inc 1692 Dell Ave Campbell CA 95008 6901 USA US toll free 1 877 370 3802 www coulombtech com www mychargepoint net ...

Отзывы: