


ChargePoint® Charging Stations
2-6
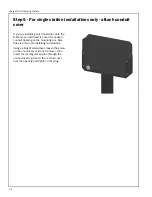
Step 5 -
For single station installations only
- attach conduit
cover
If you are installing only one station onto the
D-Stand, you will need to cover the unused
conduit opening on the mounting box. Skip
this step if you are installing two stations.
Using a straight screwdriver, loosen the screw
on the conduit cover (do not remove), then
insert the rectangular section through the
unused opening. Center the conduit cover
over the opening and tighten until snug.