


VIP Vision NVR Quick Start Guide - Version: VIPNVR-Q119
6
2.1.5 Configuring TCP/IP, P2P, and Remote View
NOTE:
For the following section, please ensure the LAN (Local Area Network) is connected to your router or switch
and that your Internet connection is available. Also, have your Internet connected phone or tablet ready for configuring
surveillance remote view.
Network
setup will be prompted next, enabling you to connect your NVR to the Internet. First ensure that your NVR
is connected to your switch or router via the included CAT5 cable (detailed in Section 1.3). For the simplest setup we
recommend using DHCP to connect to the Internet. You will then be prompted to configure
P2P
for remote view on
your device.
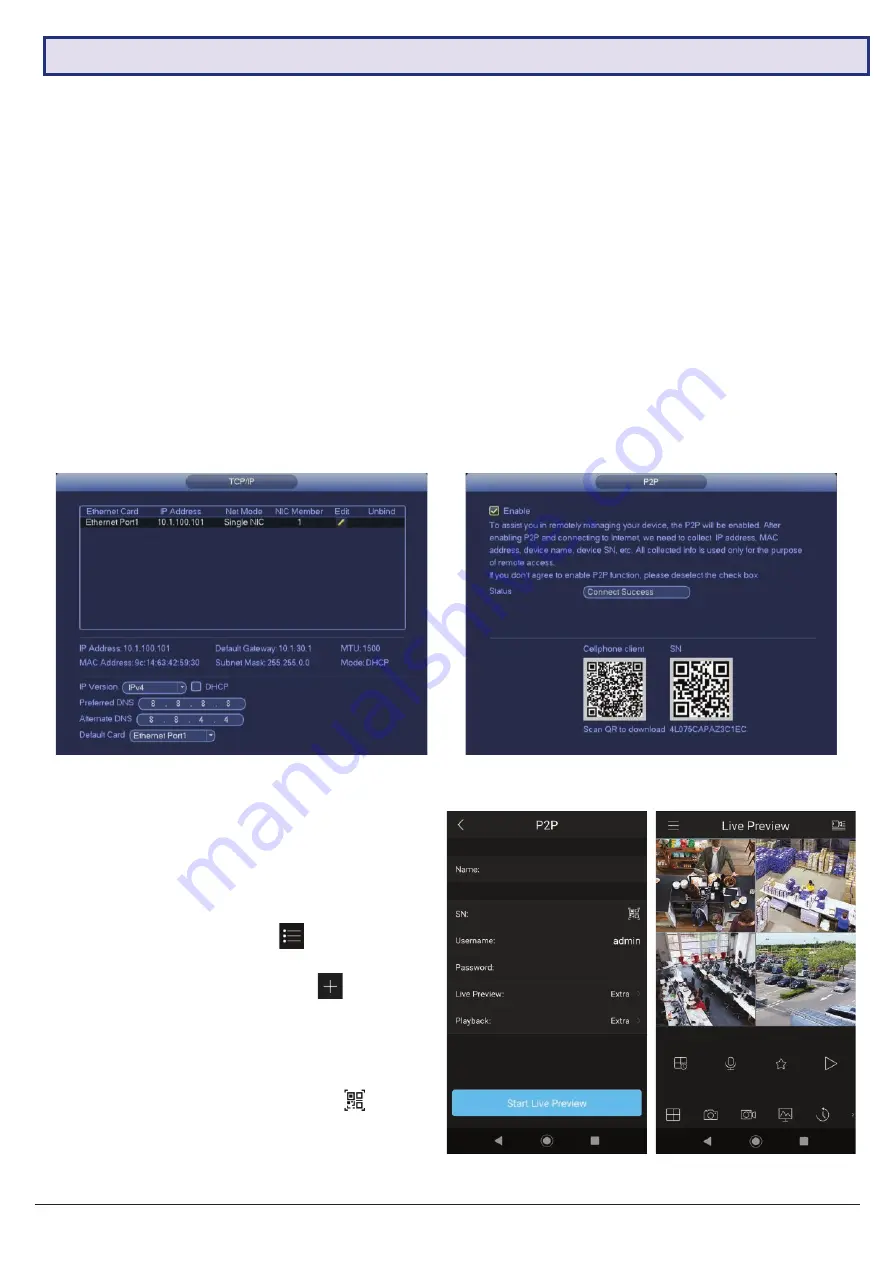
Fig. 2.7:
TCP/IP setup section settings (example only)
Fig. 2.8:
P2P setup section, with QR codes (example only)
1. In the
TCP/IP
section, see Fig. 2.7. The IP address
of the NVR will be shown.
2. Select
IPv4
and
DHCP
(Dynamic Host Configuration
Protocol).
3. Should you wish to use a static address, contact
your Internet administrator for details.
4. Click
Next
to continue.
5. Click
Enable
to enable P2P remote view.
6. NVR
Status
should read
Online
. This indicates an
active Internet connection. (This may take a few
minutes).
7. Scan the left QR code,
Cell Phone Client
, or search
your App Store to download the
iDMSS/gDMSS
or
the
EasyviewerLite
app.
2.1 First Boot and Startup Wizard (continued)
Fig. 2.9:
Add Device menu and Live Preview for Android
1. Select the
Camera
button on the app home screen.
2. Open the application menu
and select the
Device Manager
tab.
3. To add your NVR, select add device
.
4. In the
Add Device
menu, select
Wired Device
, then
select
P2P
.
5. Name
your NVR and enter your
admin password
.
6. In the
SN
field, select the QR code icon
.
7. Scan the
Device SN
QR code (shown in Fig. 2.9).
The SN will be auto-filled if the scan is successful.
8. Select
Start Live Preview
to view your cameras.
The following details configuring remote view via the
iDMSS (Apple iOS) or gDMSS
(Android)
on your
device. Depending on the device, menus may function
or appear slightly different to those explained below.


