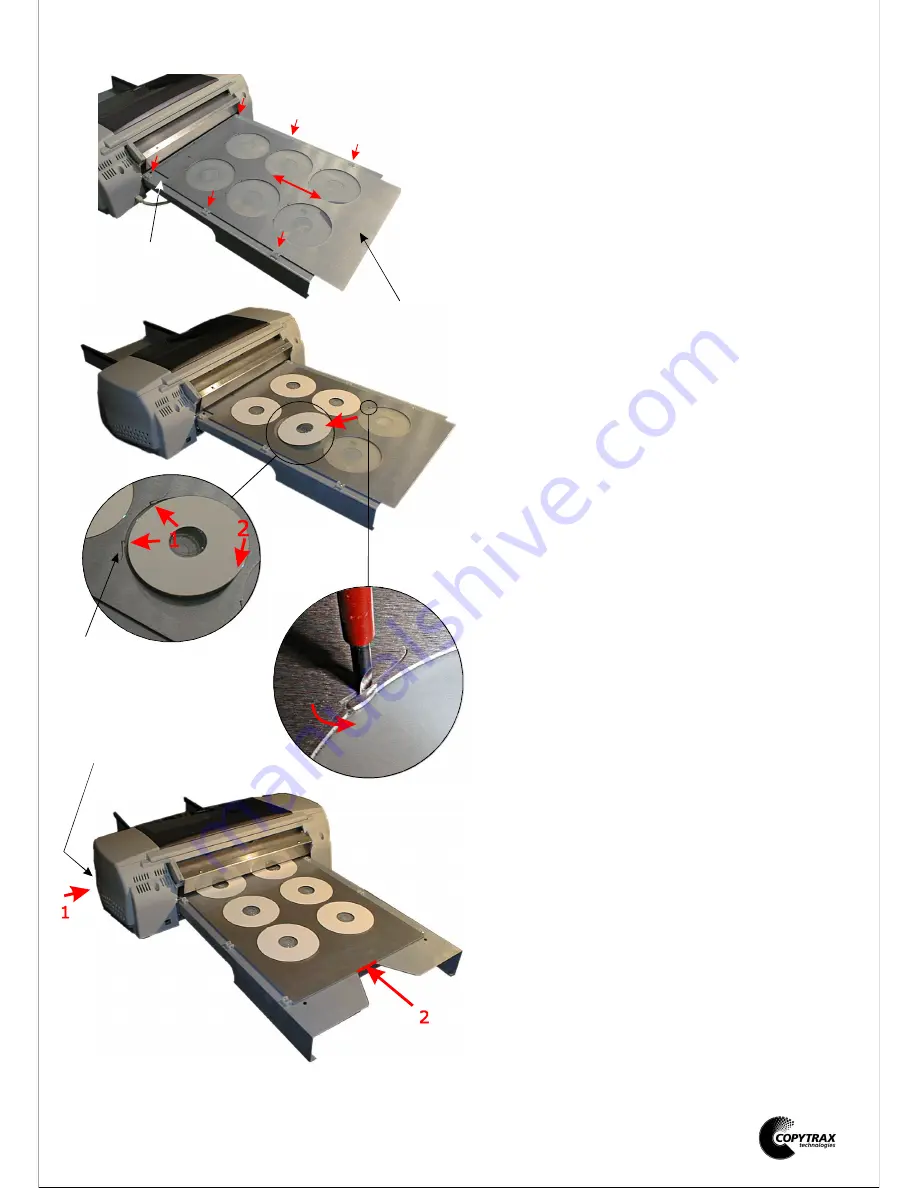
DaVinci Pro CD printer.
Printing CDs.
1.
Place the empty CD tray onto the input
guide.
The tray fits between the 6 nylon guide blocks
and should run freely between them.
2.
The CD tray holds 6 CDs, all 6 CDs must be
loaded before attempting to print. If only 1
CD is required the remaining positions must
still be filled.
Load the CDs, one at a time, by pushing them
against the two fingers in the tray cutout
and then pushing the opposite side of the CD
down into the cutout (2). Finally,
push
down all the CD edge into the cutout.
3.
The fingers lightly clamp the CD during
printing, preventing movement and rotation
caused by printer vibration. If the fingers do
not touch the CDs, they can be twisted
slightly until they do by removing the CD and
inserting a screwdriver into the slit behind the
finger and twisting slightly.
Take care not to bend the finger up above the
tray surface as it may rub against the print
head during printing.
4.
The print image must be spooled to the
printer before pushing in the tray.
When the print image is received by the
printer it will make certain movements and
noises and prepare to print.
Wait until the red light on the control panel is
lit.
Press the feed/clean button on the control
panel whilst pushing firmly against the middle
of the rear edge of the CD tray. The printer
will draw in the CD tray. Stop pushing the CD
tray when your finger reaches the edge of the
cutout in the input guide.
The printer will now print the CDs.
Positioning the CD tray.
Loading the tray with Cds.
Adjusting the fit of the CD.
Printing.
The corner cutout, in the tray, is
positioned towards the printer and the
cutouts for the CDs to the top of the tray.
CDs are loaded into the tray after it has been
positioned on the input guide.
(1)
firmly
Cut out
CD tray
Fingers
Red light and feed/clean button
1
3
2
4
Содержание DaVinci pro 6 photo
Страница 2: ......


