4
5
SEELEY INTERNATIONAL
–
OWNER
’
S MANUAL
®
OPERATING THE COOLER
OPERATING THE COOLER cont.
M3000 Coolmaster Portable Evaporative Cooler
I L L 2 2 7 - A
1
9
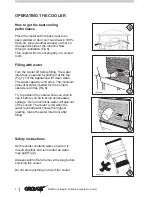
Filling with water
Turn the cooler off before filling. The water
inlet door is opened by pulling it at the top
(Fig 7). Fill the appliance with clean water.
The water capacity is 18 litres. The minimum
amount of water needed for the pump to
operate is 4 litres (Fig 8).
Try to position the cooler where you wish to
use it before you fill to avoid unnecessary
spillage. Do not overfill as water will spill out
of the cooler! The cooler is full when the
water level indicator shows the highest
reading. Close the water inlet door after
filling.
I L L 2 2 5 - A
6
How to get the best cooling
performance
Place the cooler with its back near to an
open window or door so it can draw in 100%
fresh air. Open another window or door on
the opposite side of the room for 'flow
through' ventilation (Fig 6).
This cooler will not cool properly in a closed
room.
Safety instructions
As this cooler contains water, ensure it is
moved carefully and is not tilted as water
may spill (Fig 9).
Always switch off and remove the plug before
servicing the cooler.
Do not store anything on top of the cooler.
7
6
7
8
9
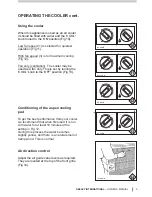
Using the cooler
Low fan speed
High fan speed
Fan only (ventilation)
(1) is selected for quietest
operation (Fig 11).
(3) is for maximum cooling
(Fig 12).
.
When this appliance is used as an air cooler
it should be filled with water and the 'COOL'
knob turned to the 'ON' position (Fig 10).
The cooler may be
used as a fan only. This is set by turning the
'COOL' knob to the 'OFF' position (Fig 13).
Conditioning of the aspen cooling
pad
To get the best performance from your cooler,
we recommend that when first used it is run
with water for at least 10 minutes at the
setting in Fig 12.
During this process the water becomes
slightly yellow, and there is a natural smell of
damp wood. This is normal.
Air direction control
Adjust the air guide vane levers as required.
They are located at the top of the front grille
(Fig 14).
I L L 2 2 8 - A
10
I L L 2 2 9 - A
AIR
0
2
3
1
COOL
On
Off
10
I L L 1 4 3 9 - A
AIR
0
2
3
1
COOL
On
Off
11
I L L 2 3 0 - A
AIR
0
2
3
1
COOL
On
Off
13
I L L 2 3 1 - A
AIR
0
2
3
1
COOL
On
Off
12
14


