background image

12

Please note:

• 

If the amplifier detects an error in its’ settings memory it will restore itself 

to factory default settings. 

• 

The amplifier will exit Engineer Mode if the “On/Off” button is pressed at 

any time or if no button has been pressed for a period of 2 minutes. 

Status

8

7

6

5

4

3

2

1

Vol Out

Increase drive

Decrease drive

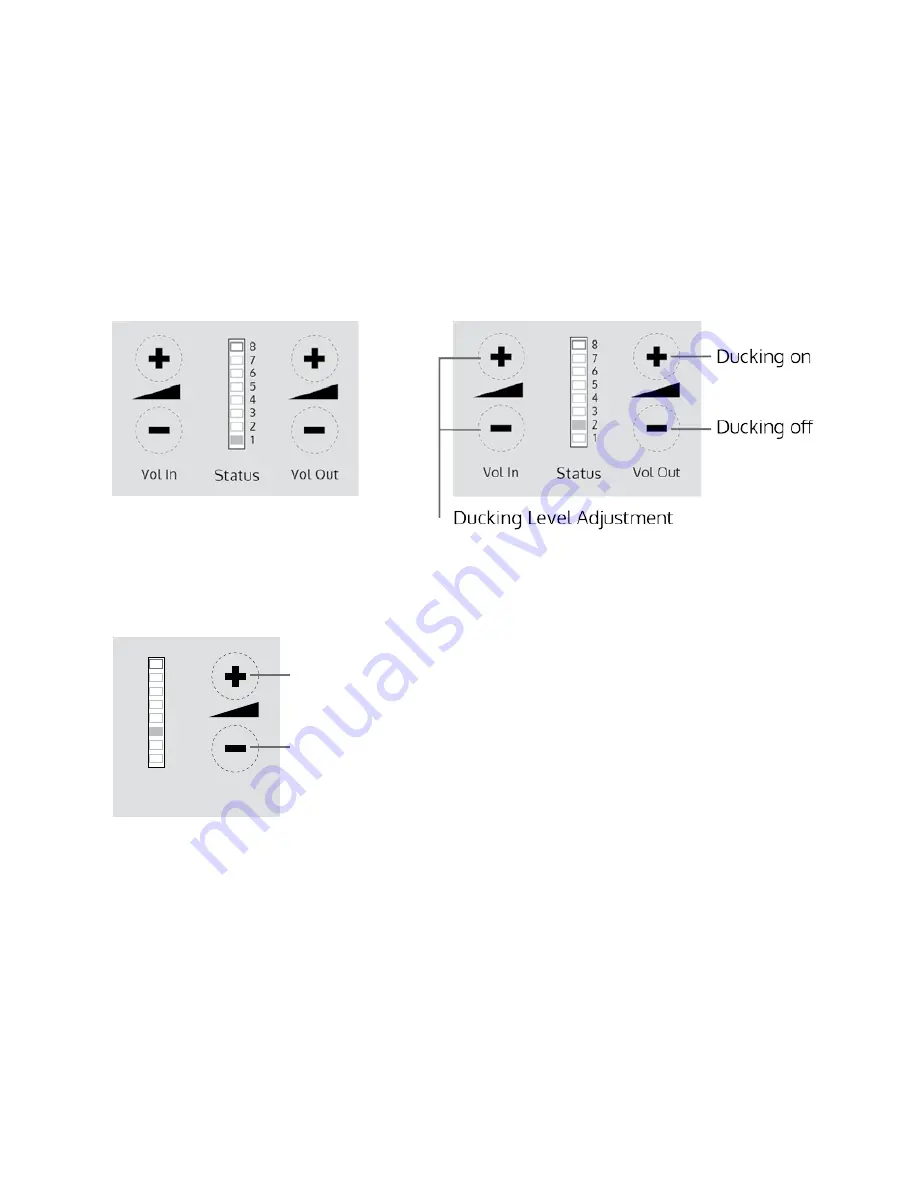
Setup area 3:

Hearing loop drive adjustment

Drive level increase/decrease

using the below buttons

The drive level should be adjusted so

the red LED 8 is illuminated only when 

there are peals in the speech volume

(once every few minutes max.)

If the amplifier does not have a loop

attached you can turn off the red 

loop fault LED 8 by adjusting the drive

down to off

The drive level should be adjusted so the red LED 8 is illuminated only when 

there are peaks in the speech volume. 

If the amplifier does not have a loop attached, you can turn off the red loop 

fault LED 8 by adjusting the drive down to off.

Setup Area 3:

Hearing Loop Drive Adjustment

Drive level increase/decrease using 

the below buttons.

Whilst in Engineer Mode, there are 3 editable Setup Areas. You will always 

enter Setup Area 1 first. The green LED will flash to indicate which Setup Area 

you are in.

Setup Areas

Setup Area 2:

Ducking Adjustment

Turn on/off and increase/decrease 


ducking levels using the below buttons.

Setup Area 1:

Maximum Volume Adjustment

Set the maximum volume using 

the below buttons.

Содержание STS-K015-01

Страница 1: ...Speech Transfer System STS K015 01 Installation User Guide August 2016 v1 0 ...

Страница 2: ...it into your outlet consult an electrician for replacement of the obsolete outlet 10 Protect the power cord from being walked on or pinched particularly at plugs convenience receptacles and the point where they exit from the apparatus 11 Only use attachments accessories specified by the manufacturer 12 Use only with the cart stand tripod bracket or table specified by the manufacturer or sold with ...

Страница 3: ... plug from the power outlet and contact your local dealer Ensure the aerial is taped down securely Do not leave any trailing leads that may cause a trip hazard Thank you for purchasing this system Before using please read the following guide to ensure correct usage After reading store this guide in a safe place for future reference Incorrect handling of this product could possibly result in person...

Страница 4: ...Engineer Mode Initial Set Up Troubleshooting 5 5 6 7 10 11 13 14 Contacta has a policy of continuous product development and therefore small specification changes may not be reflected in this manual Images labels packaging accessories and product colours are subject to change without notice ...

Страница 5: ...hearing loop facility included which provides additional assistance for hearing device wearers 1 Installation and User Manual 2 Amplifier 3 Overhead Speaker x2 4 Bridge Bar Unit 5 Staff Microphone 6 7 8 9 10 Hearing Loop Sticker IEC Lead Hearing Loop Aerial Power Supply Mounting Bracket 1 4 9 1 Adhesive Clip x10 2 No 6 x 1 2 Countersunk Screws x15 3 P Clips x6 Also included is a Fixing Kit which c...

Страница 6: ...drivers Flat or Blade 2 5mm and Phillips Head PH2 Battery or Mains Drill Drillbits 2mm 3mm 5mm and 7mm Allen Key Set Cable Tacking Gun 10mm Wire Cutters Strippers Pliers Tape Measure Pencil or Marker Pen Torch Cable Ties Electrical Insulation Tape Trunking ...

Страница 7: ...the supplied screws 5 Use the cable management hole to run the staff microphone cable back to the amplifier If there is not already a cable management hole one will need to be drilled in a suitable location near the rear of the counter Staff Microphone Amplifier and Overhead Loudspeakers Installation Instructions Install the Staff Microphone Amplifier Overhead Loudspeakers Bridge Bar Unit and Surf...

Страница 8: ...ixing screws 4 Drill pilot holes and a cable hole and attach the assembly with the supplied screws 6 Feed wiring through the cable hole back to the amplifier Using provided fixing holes and screws attach the bridge bar cover carefully to avoid damage to wiring Bridge Bar Unit and Surface Mic 1 Position the bridge bar unit on the customer side of the counter top in a central location or around the ...

Страница 9: ...rizontally under the counter and the other half mounted vertically facing the customer as in the first scenario below Position the aerial under the counter using either the provided P clips or another fixing method of your choice See the diagram below for recommended positioning Ensure all hearing loop signage is displayed clearly X X ...

Страница 10: ...ck of the amplifier Bare approximately 6mm of the cable ends for connection to the 2 pin plugs see diagram below Rear Amplifier Connections Connect all green plugs to the back of the amplifier observing the correct locations printed about the sockets see below diagram Power input connection for the provided power supply ...

Страница 11: ...e the power To do this either Switch the power off at the wall socket and back on again or Remove the power connector and re insert it 1 Simultaneously press and release Settings button Volume In increase button Volume Out increase button Overview of Front Panel Buttons Volume In Increase and decrease Volume Out Increase and decrease The on off and settings buttons in Engineer Mode operate as foll...

Страница 12: ...e a loop attached you can turn off the red loop fault LED 8 by adjusting the drive down to off The drive level should be adjusted so the red LED 8 is illuminated only when there are peaks in the speech volume If the amplifier does not have a loop attached you can turn off the red loop fault LED 8 by adjusting the drive down to off Setup Area 3 Hearing Loop Drive Adjustment Drive level increase decre...

Страница 13: ...k is heard 4 Decrease customer Volume Out volume until feedback is just eliminated Factory Default Settings To return to the factory default settings 1 Unplug the power supply and then reconnect it 2 Press the On Off button and Volume In button together then release 3 The status LED bar graph will show a fixed pattern of LEDs indicating the firmware revision number followed by all LEDs illuminated...

Страница 14: ... loop tester has a new set of batteries 1 Unscreened or poorly earthed third party equipment is being used in close proximity 2 Internal volume gain set to high 3 Incorrect power supply being used 1 Switch off any third party equipment to identify the source of interference 2 Access the amplifier Engineer Mode to adjust the internal settings 3 Ensure that our grounded power supply unit is connecte...

Страница 15: ...15 ...

Страница 16: ...Contact your local distributor for further information www contacta co uk ...

Отзывы: