background image

User Manual Rapsody N36 

Page


18


Copyright 2008 by Simpex & Ceptra – Alterations and omissions excepted – reproduction & publication is only allowed after obtaining prior permission 


4.  Operating the device 

4.1. Navigation/Main menu 

After switching on, the N36 takes about 10 seconds to initialise the hard disk and the operating 
system. No picture appears on the output device during this time.  

When the initialisation is completed the main menu is displayed. With the arrow left/right keys, 
you can select a menu item and enter it with the OK key. You can also reach each of the main 
menu's sub items directly with a key on the remote control. 


NDAS Disk / HDD 

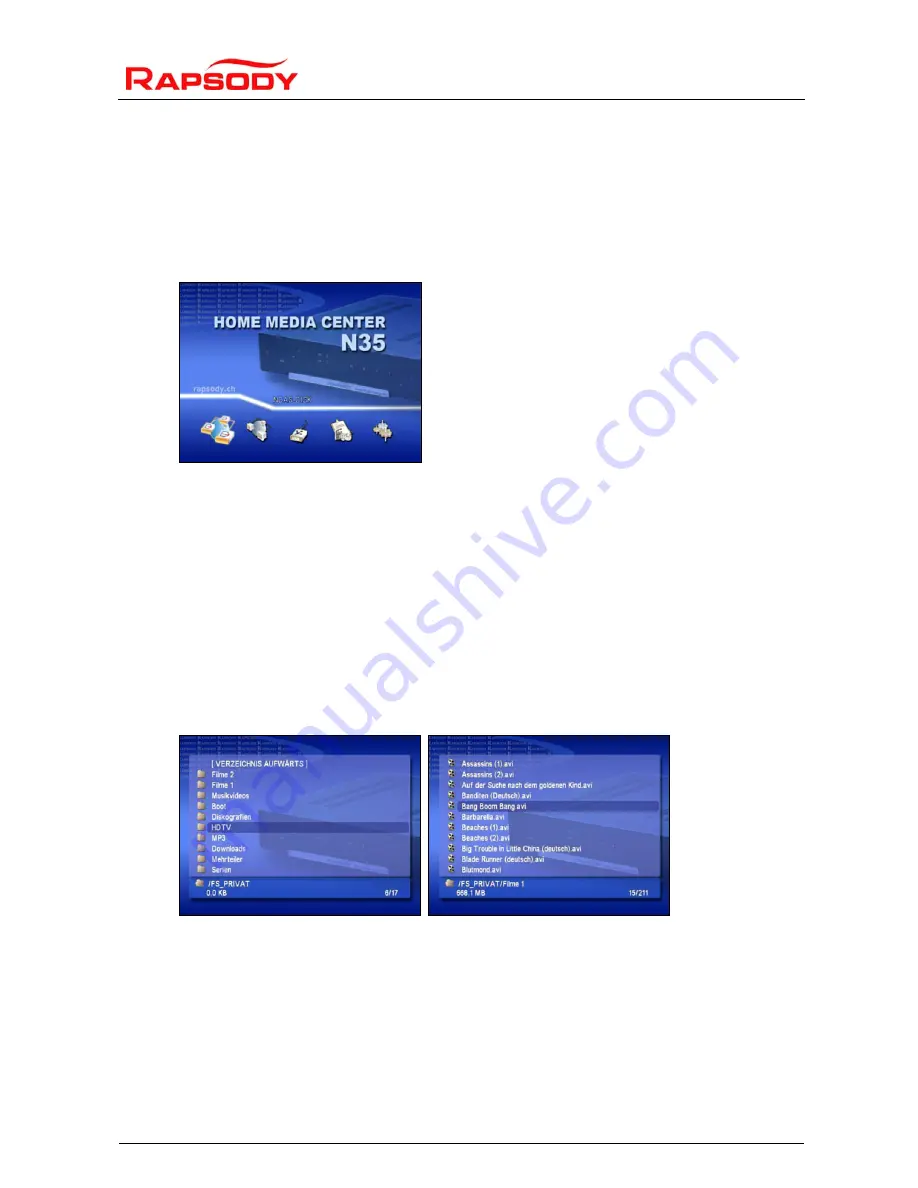
You can play back multi media files from the internal hard disk here. After selecting the menu 
item you will first see a list with available NDAS devices. This will normally be the internal hard 
disk.  After selecting, the list with the partitions on the internal hard disk is displayed. Select the 
partition that you want. 

You will now see the folder structure that you created when saving the data on the hard disk; 
you can navigate in this structure with the arrow keys. The OK key switches to a folder that is 
selected or, respectively, runs the file if one is selected (see item 4.2). 

The Stop/Back key moves up one folder hierarchy or, respectively, stops playback. 

By pressing the number keys you can skip directly to files that are located further back. This is 
useful for folders containing many files. For instance, if you enter 345 you will skip to the 345th 
file in the folder. At the bottom right you will see the total number of files in this folder. 

Only such files will be displayed that have a file extension that can normally be played back. 


Содержание RAPSODY N36

Страница 1: ...User manual Rapsody N36 Date 10 March 2008 www rapsody ch...

Страница 2: ...User Manual Rapsody N36 Page 2 Copyright 2008 by Simpex Ceptra Alterations and omissions excepted reproduction publication is only allowed after obtaining prior permission...

Страница 3: ...Video outputs 6 2 7 LAN connection 7 2 8 USB host 7 2 9 PAL NTSC switch 7 2 10 Protective film 7 2 11 Cleaning 7 3 Set up 8 3 1 Transmit picture to output device 8 3 2 Set up 8 3 3 Network settings fo...

Страница 4: ...sing a PC Apart from televisions or stereos you can use also use practically any multi media device such as beamers or plasma screens as the output medium The possibilities are unlimited Thanks to a h...

Страница 5: ...ta cable to the hard disk PATA which has to be jumpered as master and place it in the corresponding frame in the housing Make sure that the connecting cables do not get caught underneath the hard disk...

Страница 6: ...ut here for connecting to any end devices as you wish Multi media contents with multi channel tone will be reduced to stereo output Optical AC3 output Your Rapsody has a TOSLINK jack suitable for a fi...

Страница 7: ...connecting to a modern TV is provided 2 7 LAN connection This is a RJ 45 10 100 LAN jack Please read section 3 3 Network settings for the device for information about connecting and installing 2 8 US...

Страница 8: ...y press the TV Out key lower right on your remote control and wait a moment each time your press a key to see if a picture is displayed Depending on the receiver it may take a moment until a picture i...

Страница 9: ...t to the component output A further menu item is activated depending on the mode selected not with C S video in which you can select the output resolution System TV type TV Typ Here you can specify th...

Страница 10: ...ck In analogue DPCM mode a 2 channel stereo audio signal is sent to the analogue and digital output jacks In Encoded Digital mode analogue output is turned off and only the digital signal is outputted...

Страница 11: ...l be positioned at the language selection menu item Press SETUP on the remote control above right the player will now change to the setup menu Now press the arrow down key once the arrow right key twi...

Страница 12: ...in your network requires an IP This is a unique number with which a device can be addressed With your N36 the IP is specified in Setup under Network If the network includes a DHCP router it can automa...

Страница 13: ...other PCs or network devices such as printers in the network and you are unsure about this After entering the IP you must enter a netmask subnet mask The preset value 255 255 255 0 is usually the rig...

Страница 14: ...CD under Windows the setup assistant normally starts automatically If this does not happen you can initiate the start with a double click from Windows Explorer on the drive letter of the CD drive Choo...

Страница 15: ...switched on and that it is connected with the network Clicking on the NDAS symbol opens the menu Click on Register a New Device After clicking on Next you will be requested to supply a name for the de...

Страница 16: ...possible but the Rapsody can not access the internal hard disk The hard disk is either faulty or incorrectly jumpered must be master Partitioning and formatting the hard disk If you have bought your...

Страница 17: ...er will restart after completing the update Be sure to always run an initialisation in Setup Warning Make sure that the power supply is not switched off accidentally during the update A faulty update...

Страница 18: ...you will first see a list with available NDAS devices This will normally be the internal hard disk After selecting the list with the partitions on the internal hard disk is displayed Select the parti...

Страница 19: ...n network resources You navigate in the same way as with the internal hard disk see HDD By right clicking on a folder under Windows 2000 XP you can release it directly for sharing in the network Pleas...

Страница 20: ...been replaced by the new Autoplay function AUTOPLAY Autoplay allows media in a particular folder internal HDD network resource USB to be played back automatically when the N36 starts up The procedure...

Страница 21: ...ield in which you can select other audio files during playback and play them directly using the Play key Viewing photos Select a photo file and start it by pressing the OK or Play key Photos are displ...

Страница 22: ...to the hard disk together with the menus and all the features of a DVD To do this simply copy the DVD files to a directory and run the IFO file from there Make sure that you do not infringe upon any...

Страница 23: ...p Back This key interrupts playback and returns to the menu or allows you to navigate to a higher folder Volume You can change the playback volume of your Rapsody N36 here Skip With these keys you can...

Страница 24: ...playing a DVD Zoom With this key you can adjust the picture with photo and video playback to suit the display device e g if it is distorted Full screen enlarges the contents to fill out the screen sta...

Страница 25: ...aining prior permission Repeat This button switches between the different repeat modes These are All files in the folder will be played consecutively over and over again All files will be played at ra...

Страница 26: ...playback of video files you can set bookmarks at particular positions enabling you to skip there directly later on If you are not currently playing back a file pressing the Bookmark key will provide y...

Страница 27: ...data transmission with some USB devices or also a data transfer rate that is too high for the Rapsody s chipset For example unpacked AVI files or extremely high resolution HDTV streams can cause prob...

Страница 28: ...P TRP Audio playback MP3 WMA WAV AAC Ogg Vorbis Pictures JPEG Video output Composite with PAL NTSC resolution component and DVI with 720p 1080i and 1080p resolution DVI also1600x1200 Audio output 2 ch...

Страница 29: ...ocuments Unauthorised use copying or distribution of individual contents or entire pages is prohibited A licence for the use of intellectual property is not granted with this user manual All trade mar...

Отзывы: