Gigabit Network Adapter
Version 06/10
Item-No. 97 37 79
°
Intended Use
The product is intended to be used for connecting a USB device (e.g. a USB hard disk or a USB
printer) to a 10/100/1000MBit network.
This product complies with the applicable National and European requirements. All names of
companies and products are the trademarks of the respective owner. All rights reserved.
Package Contents
• Network adapter
• Wall plug transformer
• CD with software and the manufacturer’s comprehensive English-language instructions
• Quick guide
Safety Instructions
Ꮨ
Please read all of the operating instructions before using the product for the
first time; they contain important information about the correct operation. The
warranty will be void in the event of damage caused by failure to observe these
safety instructions! We do not assume any liability for any consequential
damage!
We do not accept liability for damage to property or personal injury caused by
improper handling or non-compliance with the safety instructions! The
warranty will be null and void in such cases.
• The unauthorised conversion and/or modification of the product is inadmissible
because of safety and approval reasons (CE). Never dismantle the product!
• The design of the wall plug transformer complies with protection class II. As a
voltage source, only a proper power socket connected to the mains supply system
may be used.
• This product is not a toy, and should be kept out of the reach of children. Children
cannot assess the dangers arising from incorrect use of electrical devices. Be
especially careful if children are around.
• Only use in dry indoor locations. The product must be protected from damp and
wet, as there is a risk of a fatal electric shock! Never touch the product with wet
hands.
• Do not expose the product to extreme temperatures (< 0°C or > +40°C), direct
strong sunlight, strong vibrations, high humidity or strong mechanical stress.
• Do not leave packaging material lying around carelessly. It may become a
dangerous plaything for children.
• Never use the product immediately after it has been brought from a cold room into
a warm one. Condensation that forms might destroy the device. Furthermore,
there is a danger of an electric shock.
Wait until the product reaches room temperature and the condensation has
evaporated. This may take several hours.
Then connect the wall plug transformer with the mains supply and put the product
into operation.
• Handle the product with care, it can be damaged by impacts, blows, or accidental
drops, even from a low height.
Getting started
• Connect the round, low-voltage plug from the wall plug transformer with the appropriate jack
on the network adapter.
• Connect the RJ45 connector on the network adapter to your network switch or router via a 1:1-
connected network cable.
• Connect the wall plug transformer to a mains socket. The left LED by the network socket
should light up (power LED function); the second LED should blink indicating data transfer.
• Connect a USB device (e.g. an external USB hard disk) to the USB port on the network adapter
and switch it on.
• Place the enclosed CD into an appropriate drive on your computer.
At the time of preparation of these operating instructions, the installation programme
„Install.exe“ was contained in the directory „USB2.0 Device“ and from there in the directory
„Est_E3868“.
Please consult the manufacturer’s English instruction manual.
O P E R A T I N G I N S T R U C T I O N S
www.conrad.com
• Follow all the software instructions. Windows may need to be restarted after completing the
installation!
• There should be a new icon on the desktop, with which the software for the network adapter
can be started.
If not done so yet, connect your USB device with the USB port on the network adapter.
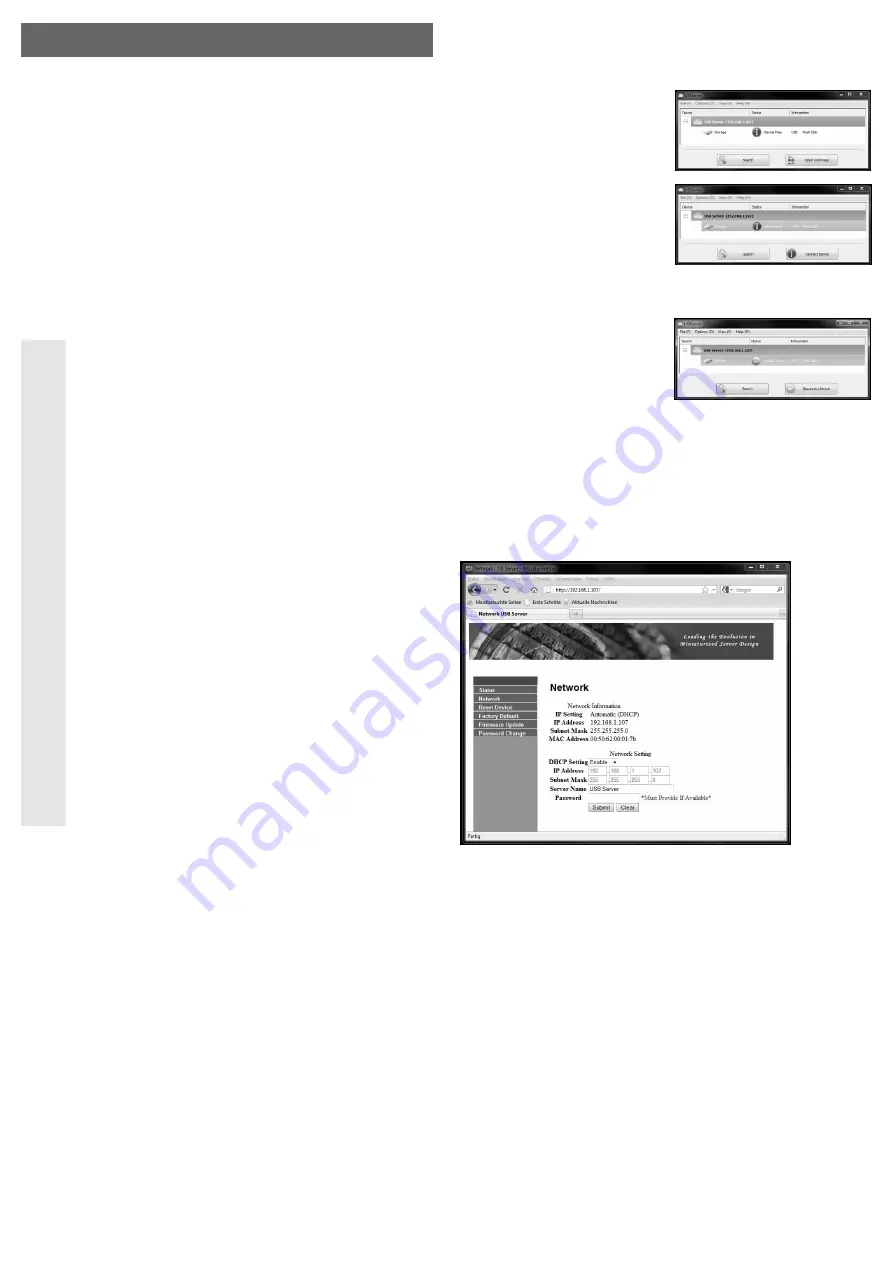
• To connect the computer to a USB device
connected to the network adapter, click on the
„Search“ icon and the network is then searched
for available network adapters.
• When a network adapter is found, the USB
device connected to it is also shown below (a
USB stick in the picture at the right).
Click on the device and then click on „Connect
Device“, in order to make a connection
between the connected USB device and the
computer.
After this, Windows detects the new hardware, if applicable, and the driver for the USB device
must be installed.
• If the device needs to be disconnected, click on the
USB device first and then click on „Disconnect
Device“.
After this, the USB device can by used by
another computer in the network.
No DHCP server available in the network?
In this case, the network adapter has an IP address 192.168.1.50 (if there is no DHCP server in
the network).
Enter the IP address e.g. 192.168.1.1 in your computer (if it is not allocated yet, otherwise try
e.g. 192.168.1.2 or 192.168.1.3). This has to be done in the Windows network settings.
The network adaptor can then be searched for using the software.
By right-clicking on the network adaptor recognised by the software you can select the option
„Open webpage“. The IP address of the network adaptor has to be changed here, from
„Network“, so it matches your network (e.g. 192.168.0.x).
The first three digits are the same for all devices used on the network (e.g. 192.168.0.x or
192.168.1.x), the last number („x“) can take values from 1 to 254. Please observe that each IP
address can only to be assigned once in the entire network!
To set a fixed IP address for the network adapter, set the option „DHCP Setting“ to „Disable“ and
enter the desired IP address, so that it matches the IP addresses of your network (e.g. if you use
fixed IP addresses in the range 192.168.1.x enter 192.168.1.150, as long as the „150“ is not
used).
The „Subnet-Mask“ has to be the same for all devices in the network (Standard for Windows
XP/Vista/7 is usually 255.255.255.0).
By clicking „Submit“, it is transferred to the USB network adaptor and saved.
Please note: If the network adapter has a USB device already connected to it, and it
is „connected“ to a computer, the configuration cannot be changed. Disconnect, by
clicking on „Disconnect“, or unplugging the USB device from the network adapter.
After configuring the network adapter, the computer used for setting the configuration can be
reset to the original IP address.


