4-21
4.11 Setting the Clock
The clock is only visible while in the Last Fault
Display and the purpose of the clock is only to
“Date/Time Stamp” system faults.
1) To set the clock, turn the Main power on.
While the unit is powering up, press the PC
key until a tone occurs. This action will place
the system in the Last Fault Code Mode
(LFC).
2) For 3 seconds: “LF[” will be displayed in the
Cut Window, which is for Last Fault Codes.
The Coag window will display “rX”, (where X
is a numeric value for the software revision).
3) If any errors are stored in memory, the Cut
Window will next display “Err”; the Coag
window will display the error code (a numeric
value); and the Bipolar Window will display
the storage location of that error code.
4) Press PC key: the display will show the DIP
switch settings on the Controller Assembly.
5) Press PC key: the “Date” will be displayed
as MO – DAY – YEAR. Press the Power
Adjustment Keys associated with each win-
dow to set the date. Once the date is set,
Press the STORE” key that is below the
Program Window scroll key to lock the date
in memory.
6) Press PC key: the “Time” will be displayed as
HOUR – MINUTE – SECONDS. Press the
Power Adjustment Keys associated with each
window to set the time. The Cut Window
has either a “P” for PM. or “A” for AM. Once
the time is set, Press the STORE” key that is
below the Program Window scroll key to lock
the time in memory.
7) Press PC key to return to the error code dis-
play. To exit the Last Fault Code Mode, it is
necessary to turn off the main power.
4.12 Troubleshooting
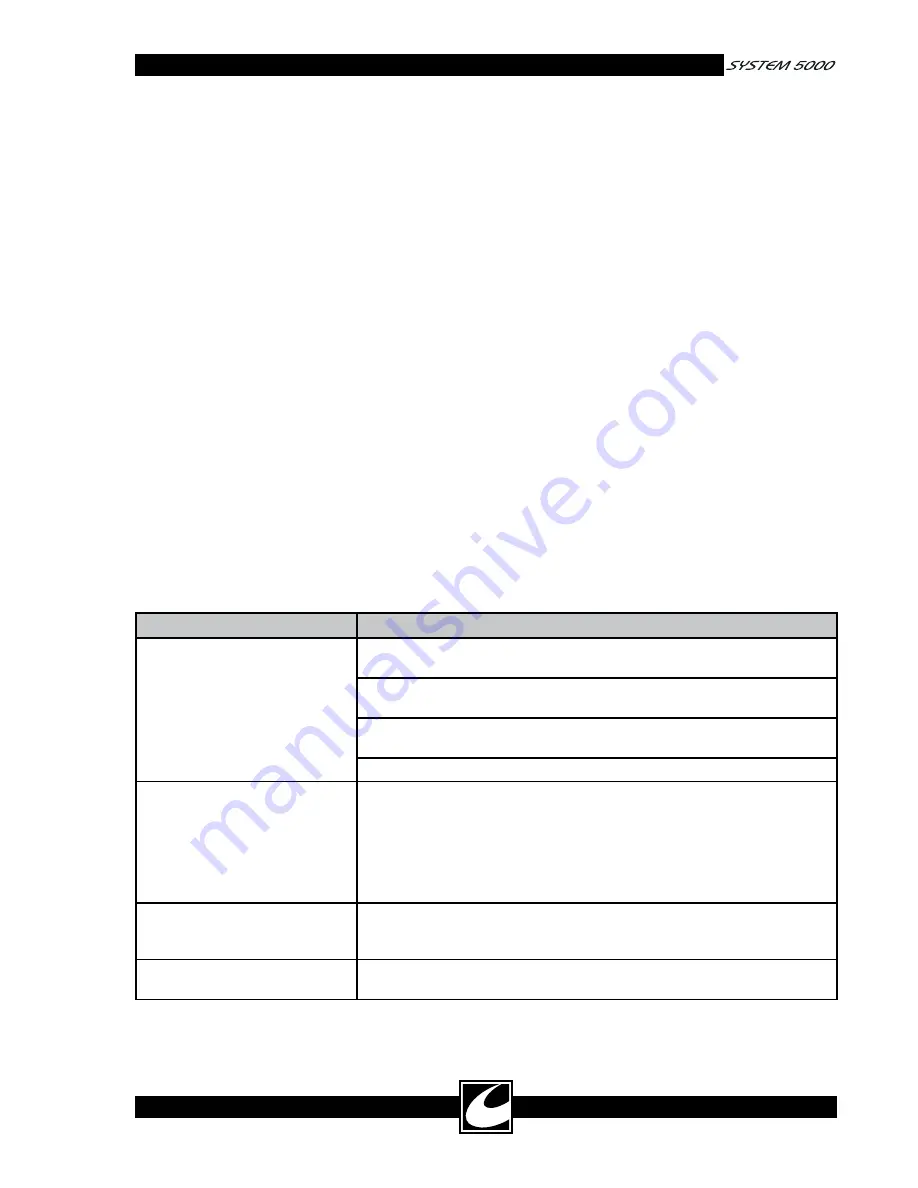
Listed in Table 4.11 are potential errors that
may occur and problem solving ideas for each.
All error codes (Err xxx) can only be cleared by
cycling power. When an error code is displayed,
reset the system to determine if the error can be
cleared with a System Reset or if further service
is required. Error codes are stored as Last Fault
Codes (See Last Fault Codes).
Table 4.11 Troubleshooting
Problem
Possible Cause
Display Panel Blank when System is
Powered on
Verify the power cord is fully seated in the power receptacle on the back of the
System.
With the power cord disconnected, verify fuses are good and are installed prop-
erly in the receptacles on the back panel of the generator.
Remove the top cover and verify that the controller board and all harnesses are
properly seated.
Check the Low Voltage Power Supply for +5V and +15V.
Display:
A[[
xxx
Accessory error – Faulty accessory is connected, a hand controlled accessory
is erroneously actuated, or a footswitch is erroneously actuated. Ensure that
footswitches are not stacked on top one another.
A[[ rH
and
A[[ LH
, indicate
problems with the accessories connected to the right-hand and left-hand Hand
Controlled Monopolar Accessory Receptacles, respectively.
A[[ FS
indicates a
problem with the footswitch connected to either of the Monopolar or Bipolar
Footswitch Connectors.
Display:
A[[ [P
xx
Control Panel error – Check for a faulty push button on the front control panel,
a control panel push button that has been pushed while the unit is being turned
on, or a faulty cable connection between the front panel and the display board.
Display:
LF[
xxx
Last Fault Codes – the Remote Power Control Key was pressed while power was
initialized. The generator must be reset to clear this condition. See section 4.8.


