background image

3

Description

I n s t a l l a t i o n     l    

3 - 1 3

C o n n e c t i n g   t h e   R T D   S e n s o r s  

( c o n t i n u e d )

3

Route the process protection RTD cable to the control center.  Plug the con-
nector into the receptacle in the side of the control center labeled “Protection”.
Hand tighten the connector.  Coil any excess cable and secure it with a wire tie.

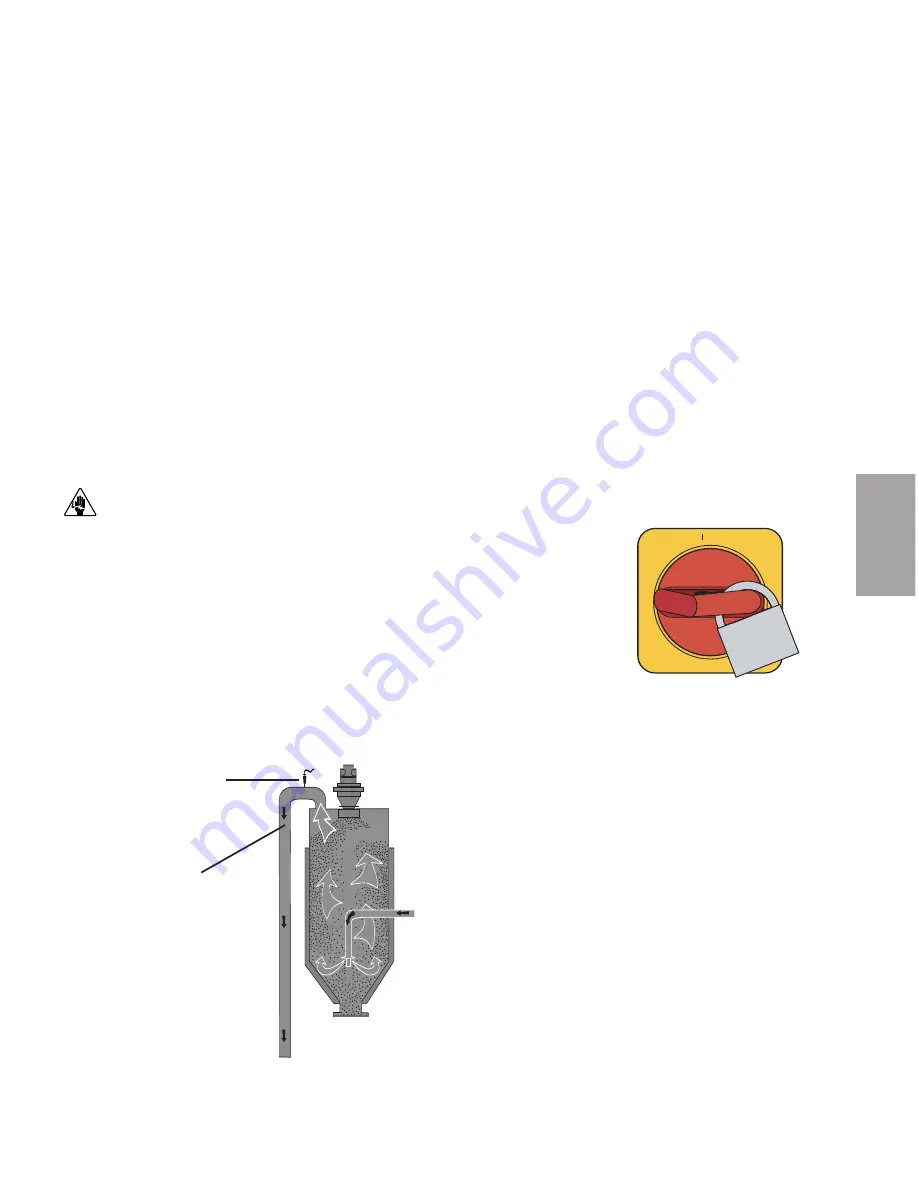
Process Setback RTD Probe (Optional)

The optional process setback RTD probe is a sensor in the outlet of the hopper and
is normally supplied with a closed loop dehumidifying dryer system.  The purpose
of the setback option is to reduce the energy consumption and prevent over drying
when material stops flowing through the hopper.

CAUTION: 

Always disconnect and lock out the main power sources before mak-

ing electrical connections. Electrical connections should be made only by quali-
fied personnel.

1

Turn the disconnect dial on the control center door to the Off or O posi-
tion. 
Lock out the main power (see Page 1-5 for complete lock out informa-
tion).  

2

Insert the process setback RTD probe into the hopper outlet.  Center the end
of the probe in the process air outlet of the hopper so that the tip does not touch
the outlet tube walls.  Tighten the nuts to lock the RTD probe in place.

ON

O   OFF

Typical Hopper

Process
Setback RTD
Location

Process Air
Outlet

(continued)

Note: 

If the length of the setback

RTD is too short for your installation,

contact Conair Parts Department

(800.458.1960) to purchase an

extension cable. From outside the

United States, call 814.437.6861.

Содержание Hopper Temperature Controller

Страница 1: ...it works Specifications HTC Carousel Plus process air dryer Specifications HTC models 600 5000 Specifications HTC for HAD INSTALLATION Unpacking the boxes Preparing for instal lation Installation of t...

Страница 2: ...d all manuals engineering prints and parts lists together for documentation of your equipment Date Manual Number UGD031 0106 Serial Number s Model Number s DISCLAIMER The Conair Group Inc shall not be...

Страница 3: ...works 2 4 Specifications HTC Models 600 5000 2 6 Specifications HTC for Hot Air Dryers HAD 2 7 3 1 Installation Unpacking the boxes 3 2 Preparing for installation 3 3 Installation of the HTC control m...

Страница 4: ...the installation 3 15 4 1 Operation The HTC process air heater control panel DC 4 2 HTC DC control functions 4 3 Control function flow charts 4 3 Control function descriptions 4 6 HTC DC control alarm...

Страница 5: ...lacing the heating elements 6 12 Replacing the air flow differential pressure switch 6 14 A Appendix We re here to help A 1 How to contact customer service A 1 Before you call A 1 Equipment guarantee...

Страница 6: ...iv l Table of Contents...

Страница 7: ...the user guide 1 2 How the guide is organized 1 2 Your responsibilities as a user 1 3 ATTENTION Read this so no one gets hurt 1 4 How to use the lockout device 1 5 S E C T I O N 1 Introduction l 1 1 1...

Страница 8: ...ized Symbols have been used to help organize the User Guide and call your attention to important information regarding safe installation and operation Symbols within triangles warn of conditions that...

Страница 9: ...s include Thorough review of this User Guide paying particular attention to hazard warnings appendices and related diagrams Thorough review of the equipment itself with careful attention to voltage so...

Страница 10: ...n Always maintain a safe ground Do not operate the equipment at power levels other than what is specified on the machine serial tag and data plate WARNING Voltage hazard This equipment is powered by t...

Страница 11: ...below To use the lockout device 1 1 Stop or turn off the equipment 2 2 Isolate the equipment from the electric power Turn the rotary disconnect switch to the OFF or O position 3 3 Secure the device w...

Страница 12: ...1 6 l Introduction...

Страница 13: ...Description What is the HTC process air heater 2 2 Typical applications 2 3 How it works 2 4 Specifications HTC models 600 5000 2 6 Specifications HTC for Hot Air Dryers HAD 2 7 S E C T I O N 2 2 D e...

Страница 14: ...erature of air that was dehumidified at a central dryer or from a blower as part of hot air drying The HTC includes a control center heater box with electric heating elements an airflow differential p...

Страница 15: ...l drying system Requires separate HTCs hoppers The ability to easily take a hopper off line for cleaning without shutting down the entire central drying system Hot Air Dryer HAD The HTC process air he...

Страница 16: ...he heating elements if they get too hot and an alarm is generated An air flow differential pressure switch detects air flow by sensing the natural drop of pressure due to flow through the heater This...

Страница 17: ...s Drying Hopper Temperature Control 2 1 3 4 5 6 8 7 1 Centrifugal Blower Assembly 2 Control Center 3 Electric Heater Assembly 4 Hose 15 ft 5 Insulated Hose 3 ft 6 RTD Process Temperature 7 RTD Process...

Страница 18: ...of inlet nozzle 10 6 7 1 8 10 13 15 4 below the heater box 26 9 18 0 20 3 25 4 33 0 39 1 Installed weight lb kg 38 17 37 17 78 35 93 43 102 46 131 59 Control center dimensions Height F 24 0 61 0 24 0...

Страница 19: ...eater box E Height of inlet nozzle below the heater box 8 0 20 3 11 4 30 0 8 0 20 3 11 0 27 9 13 0 33 0 13 0 33 0 Installed weight lb kg 37 17 58 26 78 35 93 42 102 46 131 59 Control center dimensions...

Страница 20: ...2 8 l Description...

Страница 21: ...assembly models 30 60 and 90 3 5 Location and mounting of the HTC heater assembly model HTC 120 3 5 Location and mounting of the HTC heater assembly models 180 and 270 3 5 Connecting the HTC heater as...

Страница 22: ...ack 1 Carefully remove all components from their shipping containers 2 Remove all packing material protective paper tape and plastic 3 Carefully inspect all components to make sure no damage occurred...

Страница 23: ...e HTC control center should be mounted so that its display panel can be seen and touched easily by an operator Process air lines installed from the dryer to the HTC location For easy maintenance we re...

Страница 24: ...e structural integrity of this installation 1 Move the control center into its final location for operation see figure to the right The control center must be posi tioned close enough to the hop per t...

Страница 25: ...ght Use the locking fasteners provided to securely mount the heater assembly to the floor stand to prevent vibration induced loosening The heater is prewired to the control box on HTC Model 120 Locati...

Страница 26: ...upplied insulated hose The insulation is important from an energy standpoint and for personnel protection Be careful not to block off any heater sensor mounting locations Make sure all hoses are secur...

Страница 27: ...lower 1 Turn the disconnect dial on the control center door to the Off or O posi tion Lock out the main power see Page 1 5 for complete lock out informa tion 2 Install one isolation valve in the retur...

Страница 28: ...ld be made only by qualified personnel 2 Turn the disconnect dial on the control center door to the Off or O posi tion Turn the captive screw and swing the control center door open 3 Insert the main p...

Страница 29: ...e ground lug as shown 8 Insert the other end of heater power wire through the knockout in the side of the heater assembly Secure the wire with a rubber compression fitting or strain relief if conduit...

Страница 30: ...bly terminal block Note The connection between the heater and control center should be made with properly sized conductors and properly protected with appropriate conduit cus tomer supplied The routin...

Страница 31: ...delivery air inlet The connection is 1 8 NPT The sensor should be located to of the way in to the diameter of the inlet to obtain the best temperature reading The controller uses this RTD to monitor a...

Страница 32: ...s an alarm A 49 or A 50 and shuts the heater off if the air temperature exceeds the process protection setpoint The element for this sensor is to be mounted in the heater assembly outlet nozzle before...

Страница 33: ...opper CAUTION Always disconnect and lock out the main power sources before mak ing electrical connections Electrical connections should be made only by quali fied personnel 1 Turn the disconnect dial...

Страница 34: ...Sensors continued 3 Route the process setback RTD cable to the control center Plug the connector into the lower receptacle in the side of the control center Hand tighten the con nector Coil any exces...

Страница 35: ...ce leg to leg and leg to ground to make sure that each heater and blower are wired correctly The three legs should have equal resistance 5 The resistance to ground should be 20 megohms or higher 4 Tur...

Страница 36: ...lower is running in the correct direction and the dryer is ready for operation 6 Start the dryer 7 Adjust the setpoint to the desired hopper inlet temperature Use the Setpoint Adjust or buttons to set...

Страница 37: ...ol functions 4 3 Control function flow charts 4 3 Control function descriptions 4 6 HTC DC control alarms 4 19 Initial operation for HAD only 4 20 Initial operation for Carousel Plus dryer HTC 4 21 Au...

Страница 38: ...ting Section 6 and to Autotune the con troller see Autotuning Section 4 Setpoint Display Shows the set point value Increment Decrement Buttons Used to increase or decrease values Actual Display Shows...

Страница 39: ...utton until the function you want to set or monitor appears in the LED display Control Function Flow Charts The following flow charts provide a quick summary of the control functions For an explanatio...

Страница 40: ...t Hi Alarm SP Press Scroll again to view next screen Press Scroll again to view next screen 9 10 Lbt Process Loop Break Time 19 10 H dL Protect Hi Alarm Delay Press Scroll again to view next screen Pr...

Страница 41: ...screens become visable if tSt screen 41 is turned on 30 Setback Setup Screens Press Scroll Button and key at the same time again for 2 sec to get in To get out at any time Press Scroll button and key...

Страница 42: ...l is setup for a wheel dryer 2 or HAD This is the default screen It shows the process air temperature setpoint and the actual temperature measured at the inlet to the drying hopper The buttons can be...

Страница 43: ...Setback Setpoint When setback is enabled this is the hopper outlet temperature at which the setback becomes active Setback Screen 2 Process Setpoint The process setpoint is the temperature the con tro...

Страница 44: ...t the high limit for the process temperature setpoint The buttons can be used to change this value If set at 250 F the operator cannot set the process setpoint above 250 F This is the process loop bre...

Страница 45: ...shutdown the heater and display the alarm The buttons can be used to change the setpoint This is the process proportional band screen It is used to change the propor tional band value for the process...

Страница 46: ...unction The autotune pro cedure should be performed when setting up the system the first time or if the con trol is inconsistent Autotuning may take a minute or so to complete When finished the displa...

Страница 47: ...creen It indicates that all items below it pertain to the process protection actual temperature and alarms This screen shows the actual temperature measured at the process protection RTD This is the p...

Страница 48: ...11 minus the actual process temperature screen 4 page 4 6 exceeds this setpoint for the length of the process differential alarm delay screen 21 this alarm A50 will trigger and the heater will shutdow...

Страница 49: ...he Scroll and buttons at the same time This is the setback option setup screen It indicates that all items below it pertain to the setback option This shows the actual return air tempera ture measured...

Страница 50: ...k load rate setpoint Not available at this time This is the load rate reading Not available at this time This is the setback on temperature It turns the setback on temperature option on or off This co...

Страница 51: ...the process heater alarm delay It is used to delay the process heater alarm This number is the delay time in seconds that an alarm will occur on loss of process heat This is the airflow alarm delay I...

Страница 52: ...hipped with this function set to On unless the HTC is sold with an HAD For HAD and W dryer models only This screen turns the setback On or Off The HTC is shipped with function set to On if the setback...

Страница 53: ...n OFF will be displayed If the input is closed ON will be dis played Digital input 1 on a heater is the process high temperature switch This switch is closed during normal operation It opens when it d...

Страница 54: ...does not come on because it does not have power This is the output 5 screen Press the key to jog output 5 Output 5 on a heater is the process heater power isolation con tactor signal Pressing the key...

Страница 55: ...ed If the alarm condition is still active the HTC cannot start it will flash the alarm code again If the alarm condition is not active the display should return to the normal default screen display an...

Страница 56: ...by closing the damper If the airflow is too low then the heater will go into stand by If the airflow is too high the setpoint might not be achievable WARNING Fire potential The electric heating elemen...

Страница 57: ...g through the heater could ignite embers and shoot sparks into the hopper which could catch fire 2 Auto tuning When the unit is fully assembled and ready for operation it should be tuned to the actual...

Страница 58: ...e control remains on screen 6 the difference between the setpoint and the actual temperature is not at least the required minimum 7 Enable the heater after the system stabilizes The following will dis...

Страница 59: ...and then back to Enable 11 If Tune Error 1 is displayed the autotune was not successful and the process must be repeated The most likely reason for this error is that the difference between the starti...

Страница 60: ...sconnect dial is in the ON position This powers up the control and the display lights will illuminate 5 Set the drying temperature Press the Adjust Setpoint or t buttons to select the temperature 7 Tu...

Страница 61: ...3 Turn off the blower or dryer 4 Be sure to disconnect and lockout the main power if you have stopped the HTC to perform maintenance or repair CAUTION Improper shut down can cause damage to your heate...

Страница 62: ...4 26 l Operation...

Страница 63: ...Maintenance Preventative maintenance checklist 5 2 S E C T I O N 5 M a i n t e n a n c e 5 Maintenance l 5 1...

Страница 64: ...utlet hoses Tighten the hose clamps if loose Replace the hose if worn or damaged Inspect the filter if equipped Clean or replace the filter as necessary Monthly or as often as needed Inspect the main...

Страница 65: ...lem 6 4 Shut down alarms 6 5 Passive alarms 6 8 REPAIR Replacing fuses 6 9 Checking heater solid state relays 6 10 Checking or replacing temperature sensors 6 11 Replacing the heating elements 6 12 Re...

Страница 66: ...tch from Enable to Standby 4 Cycle the heater switch from Standby to Enable to restart normal con trol If the alarm reappears the problem was not fixed If the alarm is a passive alarm you will see P i...

Страница 67: ...oper corrective action can lead to hazardous conditions and should never be attempted to sustain production WARNING Only qualified service personnel should examine and correct problems that require op...

Страница 68: ...ed this problem could lead to a condition that will shut down the dryer When the alarm light is displayed 1 Press the Acknowledge Alarm button to silence the alarm see page 4 2 2 Find the error messag...

Страница 69: ...he hoses Tighten any loose hoses Replace the SSR Replace the board Check the process RTD and tighten if needed Check the heater fuses and resistance across each leg of the process heater Straighten an...

Страница 70: ...ure for the RTD is loose The connection of the RTD plug on the control board is loose One of the RTDs has failed The RTD is enabled but wired incorrect ly Internal control board problem Solution Remov...

Страница 71: ...erature setpoint it shuts down the dryer Defaults are set to 175 F 325 C for 180 sec see screen 21 page 4 12 Possible cause The Process RTD temperature probe is not installed correctly The air lines a...

Страница 72: ...red Problem P1 Process Temperature Deviation The process tem perature exceeds the deviation band as entered for the speci fied time Default values are 10 F 6 C for 5 sec Possible cause One of the soli...

Страница 73: ...e out and replace it with a fuse of the same type and rating Fuse Blocks To locate the appropriate fuse and replacement part refer to the wiring diagrams that came with your HTC IMPORTANT Always refer...

Страница 74: ...with your heater 4 Check the resistance using an ohmmeter 6 10 l Troubleshooting IMPORTANT Always refer to the wiring diagrams that came with your heater to locate specific electrical components Illus...

Страница 75: ...he sensors are touching the wall of an air hose or pipe or if the sen sor or wiring is damaged The tip of the sensor should be centered within the air hose or pipe Sensor wires should be attached to t...

Страница 76: ...allation section page 3 13 and determine which heater s is not functioning 5 Remove the screws securing the electrical cover plate to the heating element enclosure Remove the electrical cover plate 6...

Страница 77: ...e the original insulation over the new heater or if the insulation was cut for removal wrap the cut insulation sleeve around the new heater and secure it with duct tape 14 Set the new heating element...

Страница 78: ...ng the top away from the enclosure slightly then lifting the cover up and away from the enclo sure 4 Note their location then remove the two wires connected to the pressure switch 5 Note their locatio...

Страница 79: ...re side of the switch 9 Connect the two wires to their original location on the pressure switch 10 Test the system to insure that the new air flow differential switch is detect ing the pressure drop b...

Страница 80: ...6 16 l Troubleshooting...

Страница 81: ...If you do have a problem please complete the following checklist before calling Conair Make sure you have all model control type from the serial tag and parts list numbers for your particular equipme...

Страница 82: ...tions Inspect the equipment and perform alterations or adjustments to satisfy performance claims Charges for such inspections and corrections will be waived unless failure to meet warranty is due to m...

Страница 83: ...Partial shipments are sometimes made The units are skidded boxed or crated to fully comply with rail or trucking requirements for shipment Accessories are sometimes shipped separately due to handling...

Страница 84: ...ent putting the fan structure into a bind by bolting it down on an uneven surface As a general rule if vibration isolators are used the fan should first be bolted to a structural steel base and the is...

Страница 85: ...bly 3 Route the main power cable through the power control box Secure the power cable with a rubber compression fitting or strain relief or use conduit Verify that the incoming power is securely attac...

Страница 86: ...supply line must agree with the motor nameplate rating The motor should be wired and fused in accordance with the National Electric Code NEC and local codes 5 Ducts Duct connections from the fan to th...

Страница 87: ...2 Throttle the blower discharge damper open It is shown fully open in this photo 3 The fan may now be brought up to speed Watch for anything unusual such as vibration over heating of bearings and moto...

Страница 88: ...vibration levels do not change significantly from those achieved at the factory It is recommended that the velocity values in the table below are not exceeded by more than 10 when field installed Fan...

Страница 89: ...ls hot to the touch Place a pyrometer or contact thermometer against the pillow block and check the temperature Pillow block and flange mount bearings can have housing surface tempera tures of 200 F 9...

Страница 90: ...ortant not to over grease This is especially true if the bearings are equipped with extended grease lines and the bearings are not visible In this case more bearing failures occur due to over greasing...

Страница 91: ...run and lubricate until the new grease appears at the grease relief Allow the motor to run for ten 10 minutes to expel any excess grease Replace the pipe plugs Motors not having pipe plugs or grease...

Страница 92: ...ed at the factory It can result from dif ferences between test stand conditions and operating conditions A factory test stand has different bearings bearing spans structural response stiffness mechani...

Страница 93: ...ct direction or rotation Unstable foundation fan bolted to an uneven foundation not shimmed or grout ed properly Foreign material in fan causing unbal ance Solution Reduce the system restrictions by s...

Страница 94: ...Fan rotation in wrong direction Vibration transmitted to the fan from some other source Solution Replace the worn bearings Replace the damaged wheel and or motor Tighten or replace all loose bolts an...

Страница 95: ...on Remove and excess grease see Fan Bearing Maintenance page AD 8 and Motor Maintenance page AD 9 for lubrication instructions Replace the damaged wheel or driver Replace the motor Make sure all space...

Страница 96: ...5 Description of the part required 6 Part number if the part is a casting 7 Special materials paints and or coatings Wheel Be sure to indicate direction of rotation as viewed from drive side type of w...

Страница 97: ...07 42 107 42 107 42 107 B Width 33 84 33 84 33 84 33 84 33 84 33 84 C Length 39 99 39 99 42 107 42 107 80 203 82 208 Weight Installed weight lb kg 250 113 320 145 380 172 500 227 700 317 900 408 Volta...

Отзывы: