

GAMPS2-WCONT30
PS2 2.4GHz Wireless
Controller
PlayStation®2 Blue Light Wireless Controller
Also works with PSone
TM
and PlayStation®
Your PlayStation®2 Blue Light Wireless Controller includes:
PlayStation®2 Blue Light Wireless Controller
PlayStation®2 Wireless Receiver
Instruction manual
How to use the 2.4GHz Blue Light Wireless Controller
1-
Auto scan mode:
Place 3 A AA batteries into Blue Light Wireless Controller.
Plug the wireless receiver into the desired game port.
Turn on the console and the controller via the power switch.
The controller will search for a signal and the receiver’s orange LED will illuminate when
the connection has been made.
2-
Manual scan mode:
If you are unable to get a connection with the Blue Light wireless Controller, you may make the
connection using the manual scan mode.
Press the connect button on the receiver;
Then immediately press select and L3 buttons of controller.
The orange LED will illuminate to indicate that the connection is a success. This may take
as long as 20 seconds.
Note:
If 2.4 GHz Wireless Controller does not find a connection, please repeat 1 & 2 all over
again to insure that your operation is right. If not again, please check your video gaming console
for other issues.
Remarks:
If your want to use 2.4GHz Blue Light Wireless Controllers. Please connect the 1P-
2.4GHz Wireless Controller and 1P-wireless receiver
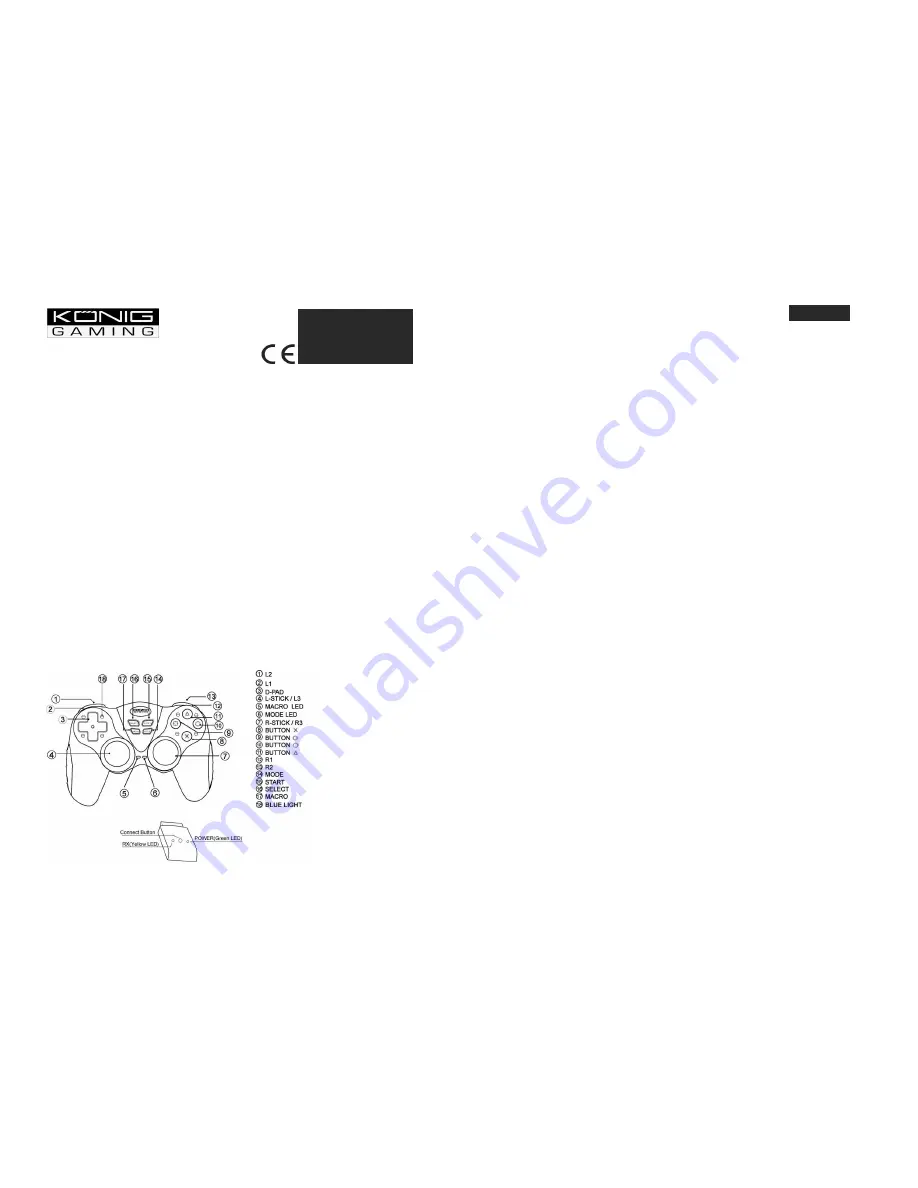
Controller Diagram
Directional Pad
The D-Pad controls the direction in which the character moves. This is the primary directional
control in digital mode.
Analog Sticks
The two analogs sticks each control two axes (X- and Y-axis). Different games will allow you to
modify the way the analog sticks react. While in Analog Mode, any game that is vibration
compatible will cause the controller to vibrate at different levels, depending on what actions are
taking place in the game (e.g. fighting, crashing, or shooting). Not all games are vibration
compatible. Read the game’s instruction manual to find out if it is Vibration Function Compatible.
Shoulder Action Buttons (L1, L2, R1, and R2)
These action buttons functions depend on the game being used.
Action Buttons (Circle, Square, Triangle, Cross)
These buttons are used to perform various actions, depending on the game. For more details,
see the game’s instruction manual.
Start Button
This button is generally used to make selections in the menu and for starting and pausing the
game. For more details, see the game’s instruction manual.
Select Button
This is a standard button that allows you to select various items in the menu or game,
depending on the game. For more details, see the game’s instruction manual.
Mode Button
The controller has two different modes, analog and digital mode. The red LED light will be on
when the controller is in analog mode, and off when the controller is in digital mode.
Macro Button
This button allows you to program a complicated move requiring many buttons and recall the
move by pushing a single button. See the “Macro Function” section of this instruction manual.
Control Modes and Function
There are two different modes you can choose from, depending on your style of play. You can
change modes by pressing the MODE button. The mode LED light will be on or off depending
on which mode you are in.
Switching from digital to analog mode:
Analog Mode-When the mode LED light is on; the controller is in analog mode. Games that are
Vibration Function Compatible will only vibrate if the controller is in analog mode.
Digital Mode -When the mode LED light is off, the controller is in digital mode, and the analog
function is disabled. This is the standard mode for PSone
TM
and PlayStation®.
Sleep and Wake Function
This product will automatically enter sleep mode after 3 minutes of non-use in order to assist the
battery life. To exit sleep mode (Wake), press the "Start" button.
How to Program the Controller:
1.
Press the
MACRO button
until the
MACRO LED
is illuminated to indicate that the
programming function is active.
2.
Select a button
(L2, L3, R2, and R3)
to be programmed by pressing that button until the
MACRO LED
flashes.
3.
Press the desired button(s) or D-Pad position(s) to be programmed into the selected
button above. Each button pressed during this step will be acknowledged by one blink on
the
MACRO LED
.
Note:
if the maximum numbers of buttons are pressed for programming
(16), the PlayStation®2 controller will not accept further input and the
MACRO LED
will be
turn off.
4.
Press the
MACRO button
to turn the programming function OFF when the desired button
assignments are finished. The
MACRO LED
will turn off.
5.
Repeat the procedures above to program another button.
ENGLISH
INSTRUCTIONS
EN


