


44
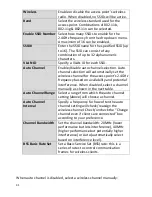
Broadcast SSID
Enable or disable SSID broadcast. When
enabled, the SSID will be visible to clients as an
available Wi-Fi network. When disabled, the
SSID will not be visible as an available Wi-Fi
network to clients – clients must manually
enter the SSID in order to connect. A hidden
(disabled) SSID is typically more secure than a
visible (enabled) SSID.
Wireless Client
Isolation
Enable or disable wireless client isolation.
Wireless client isolation prevents clients
connected to the access point from
communicating with each other and improves
security. Typically, this function is useful for
corporate environments or public hot spots
and can prevent brute force attacks on clients’
usernames and passwords.
Load Balancing
Load balancing limits the number of wireless
clients connected to an SSID. Set a load
balancing value (maximum 50).
Authentication
Method
Select an authentication method from the drop
down menu and refer to the information
below appropriate for your method.
Additional
Authentication
Select an additional authentication method
from the drop down menu and refer to the
information below (
IV-3-1-3-6.
) appropriate for
your method.
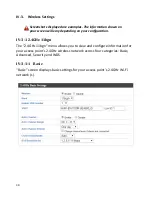
IV-3-2-4 WDS
Wireless Distribution System (WDS) can bridge/repeat access points together
in an extended network. WDS settings can be configured as shown below.
When using WDS, configure the IP address of each access point to
be in the same subnet and ensure there is only one active DHCP
server among connected access points, preferably on the WAN
side.
Содержание WAP-EN1750R
Страница 1: ...1 WAP EN1750R AC1750 Outdoor Mount Access Point User Manual Version 1 0 July 5 2016 ...
Страница 20: ...20 3 Fix the wall mount with AP to the pole using stainless tie back straps ...
Страница 55: ...55 IV 3 5 MAC Filter The MAC Filter allows you add MAC address to filter access ...
Страница 70: ...70 ...
Страница 72: ...72 ...
Страница 74: ...74 4 Click Properties ...
Страница 76: ...76 ...
Страница 79: ...79 side 5 Choose your connection and right click then select Properties ...
Страница 82: ...82 5 Enter the IP address 192 168 2 10 and subnet mask 255 255 255 0 Click on Apply to save the changes ...


