
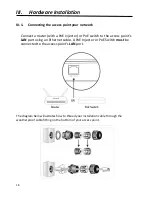


31
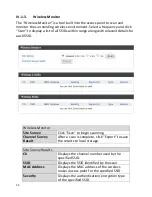
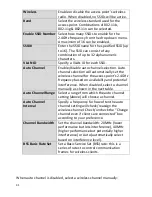
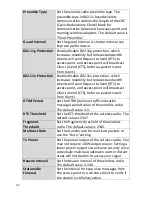
Wireless
Enable or disable the access point’s wireless
radio. When disabled, no SSIDs will be active.
Band
Select the wireless standard used for the
access point. Combinations of 802.11b,
802.11g & 802.11n can be selected.
Enable SSID Number
Select how many SSIDs to enable for the
2.4GHz frequency from the drop down menu.
A maximum of 16 can be enabled.
SSID#
Enter the SSID name for the specified SSID (up
to 16). The SSID can consist of any
combination of up to 32 alphanumeric
characters.
VLAN ID
Specify a VLAN ID for each SSID.
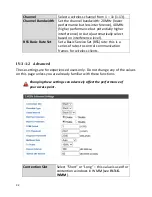
Auto Channel
Enable/disable auto channel selection. Auto
channel selection will automatically set the
wireless channel for the access point’s 2.4GHz
frequency based on availability and potential
interference. When disabled, select a channel
manually as shown in the next table.
Auto Channel Range
Select a range from which the auto channel
setting (above) will choose a channel.
Auto Channel
Interval
Specify a frequency for how often the auto
channel setting will check/reassign the
wireless channel. Check/uncheck the “Change
channel even if clients are connected” box
according to your preference.
Channel Bandwidth
Set the channel bandwidth: 20MHz (lower
performance but less interference), 40MHz
(higher performance but potentially higher
interference) or Auto (automatically select
based on interference level).
BSS Basic Rate Set
Set a Basic Service Set (BSS) rate: this is a
series of rates to control communication
frames for wireless clients.
When auto channel is disabled, select a wireless channel manually:
Содержание WAP-EN1750R
Страница 1: ...1 WAP EN1750R AC1750 Outdoor Mount Access Point User Manual Version 1 0 July 5 2016 ...
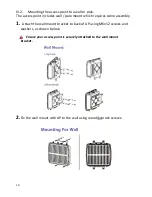
Страница 20: ...20 3 Fix the wall mount with AP to the pole using stainless tie back straps ...
Страница 55: ...55 IV 3 5 MAC Filter The MAC Filter allows you add MAC address to filter access ...
Страница 70: ...70 ...
Страница 72: ...72 ...
Страница 74: ...74 4 Click Properties ...
Страница 76: ...76 ...
Страница 79: ...79 side 5 Choose your connection and right click then select Properties ...
Страница 82: ...82 5 Enter the IP address 192 168 2 10 and subnet mask 255 255 255 0 Click on Apply to save the changes ...


