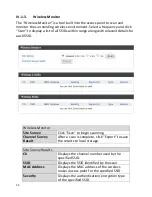
background image

14 


2.


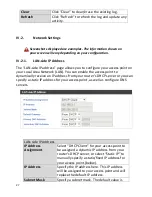
  Enter the IP address settings you wish to use for your access point. Click 

“Apply” to save the changes the wait a few moments for the access point 

to reload. 


When you change your access point’s IP address, you need to use 

the new IP address to access the browser based configuration 

interface instead of the default IP 

192.168.2.


3.


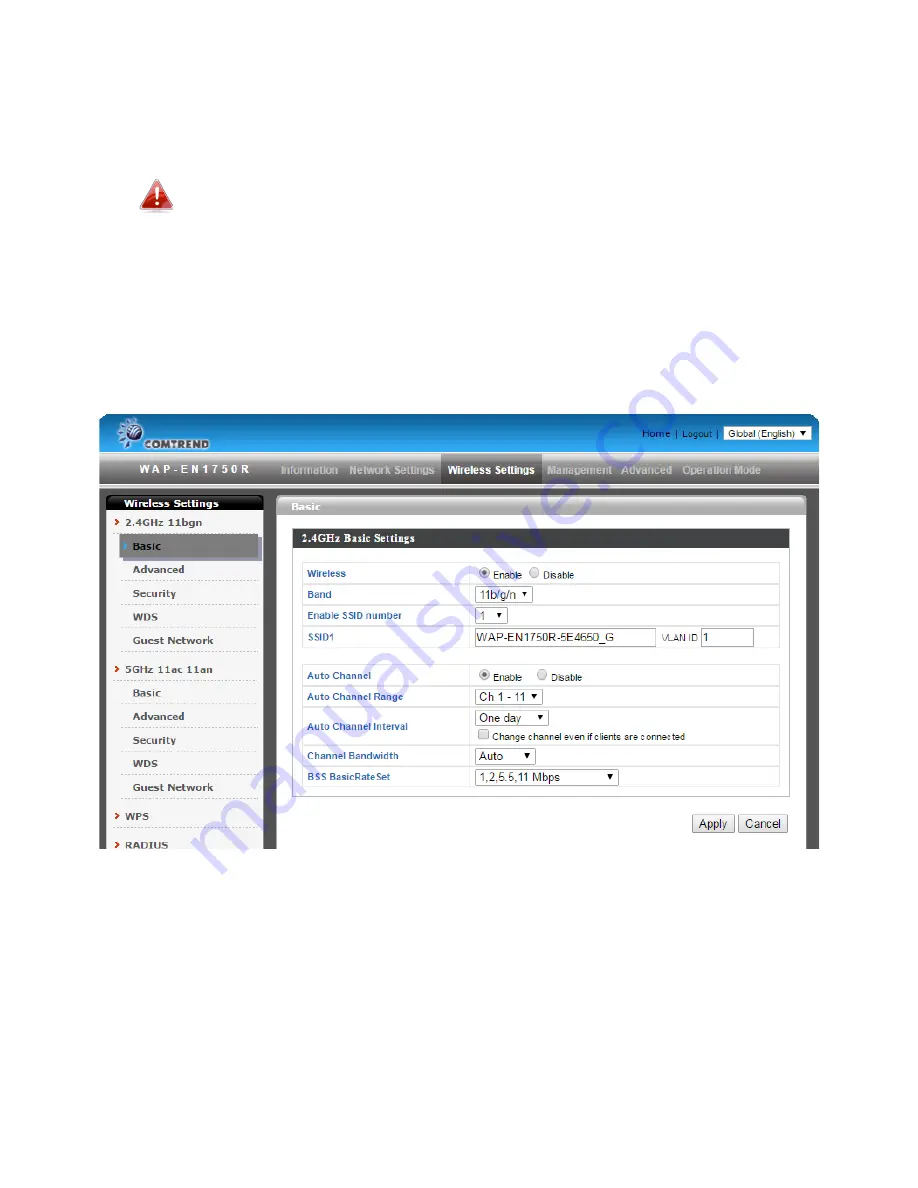
  To change the SSID and password of your access point’s wireless 

network(s), go to 

“Wireless Setting” > “2.4GHz” > “Basic”

. Enter the new 

SSID for your 2.4GHz wireless network in the “SSID1” field and click 

“Apply”. 


Содержание WAP-EN1750R

Страница 1: ...1 WAP EN1750R AC1750 Outdoor Mount Access Point User Manual Version 1 0 July 5 2016 ...

Страница 2: ...d by the party responsible for compliance could void the user s authority to operate the equipment To comply with the FCC RF exposure compliance requirements this device and its antenna must not be co located or operating to conjunction with any other antenna or transmitter This equipment should be installed and operated with minimum distance 20cm between the radiator your body Copyright Copyright...

Страница 3: ...nter and processed separate from domestic waste The cardboard box the plastic contained in the packaging and the parts that make up this router can be recycled in accordance with regionally established regulations Never dispose of this electronic equipment along with your household waste you may be subject to penalties or sanctions under the law ...

Страница 4: ...II 2 Mounting the access point to a wall or pole 19 IV Browser Based Configuration Interface 21 IV 1 Information 23 IV 1 1 System Information 23 IV 1 2 Wireless Clients 23 IV 1 3 Wireless Monitor 25 IV 1 4 Log 26 IV 2 Network Settings 27 IV 2 1 LAN side IP Address 27 IV 2 2 LAN Port 28 IV 2 3 IGMP Snooping 29 IV 2 4 VLAN 29 IV 3 Wireless Settings 30 IV 3 1 2 4GHz 11bgn 30 IV 3 1 1 Basic 30 IV 3 1 ...

Страница 5: ...V 4 1 Admin 59 IV 4 2 Date and Time 61 IV 4 3 Syslog Server 62 IV 4 4 Ping Test 63 IV 4 5 I m Here 63 IV 5 Advanced 64 IV 5 1 LED Settings 64 IV 5 2 Update Firmware 64 IV 5 3 Save Restore Settings 65 IV 5 4 Factory Default 66 IV 5 5 Reboot 67 IV 6 Operation Mode 67 V Appendix 68 V 1 Configuring your IP address 68 V 1 1 Windows XP 69 V 1 2 Windows Vista 71 V 1 3 Windows 7 73 V 1 4 Windows 8 77 V 1 ...

Страница 6: ...r your access point is AP Mode AP Mode is a regular access point for your network Managed AP Mode acts like a Slave access point in an access point array Controlled by the AP Controller Master The user interface will change depending on which mode is selected This manual covers AP Mode ...

Страница 7: ...7 I Product Information I 1 Package Contents 1 Access Point 2 Antennas x 6 2 4Gx3 5Gx3 3 Wall Mount Bracket x 1 4 Wall Pole Mount Screws Kits 5 Quick Installation Guide 1 2 3 4 5 ...

Страница 8: ...irements Existing cable DSL modem router Computer with web browser for access point configuration I 3 Hardware Overview A LAN port with Power over Ethernet PoE PD IN B 3 LEDs and Reset Interface A LAN PoE B 3LED 1 Reset ...

Страница 9: ... receiving Off Wireless Disable I 5 Reset If you experience problems with your access point you can reset the device back to its factory settings This resets all settings back to default 1 Press and hold the reset button on the access point for at least 10 seconds then release the button You may need to use a wrench to open the weather proof cover to access the reset button 2 Wait for the access p...

Страница 10: ...f reach of children 5 Do not place the access point on paper cloth or other flammable materials The access point may become hot during use 6 There are no user serviceable parts inside the access point If you experience problems with the access point please contact your dealer of purchase and ask for help 7 The access point is an electrical device and as such if it becomes wet for any reason do not...

Страница 11: ... access point is ready when the LED is green 4 Set your computer s IP address to 192 168 2 x where x is a number in the range 3 100 If you are unsure how to do this refer to V 1 Configuring your IP address for more information DHCP is enabled on the access by default If no DHCP Service is found the access point will default to IP address 192 168 2 2 5 Enter the access point s default IP address 19...

Страница 12: ...12 6 You will be prompted for a username and password Enter the default username admin and the default password admin 7 You will arrive the System Information screen shown below ...

Страница 13: ...e II 2 Basic Settings The instructions below will help you to configure the following basic settings of the access point It is recommended you configure these settings before using the access point LAN IP Address 2 4 GHz and 5 GHz SSID Security Login Password Time Date 1 To change the access point s LAN IP address go to Network Settings LAN side IP Address and you will see the screen below ...

Страница 14: ... you change your access point s IP address you need to use the new IP address to access the browser based configuration interface instead of the default IP 192 168 2 3 To change the SSID and password of your access point s wireless network s go to Wireless Setting 2 4GHz Basic Enter the new SSID for your 2 4GHz wireless network in the SSID1 field and click Apply ...

Страница 15: ... 2 4GHz wireless network in the Pre shared Key field and click Apply 5 Go to Wireless Setting 5GHz 11ac 11an and repeat steps 3 4 for the access point s 5GHz wireless network 6 To change the login password for the browser based configuration interface go to Management Admin ...

Страница 16: ...16 7 Complete the Administrator Name Administrator Password and Confirm fields and click Apply 8 To set the correct time for your access point go to Management Date and Time ...

Страница 17: ...ork Time Protocol so alternatively you can enter the host name or IP address of a time server Click Apply when you are finished 10 The basic settings of your access point are now configured Please refer to III Hardware Installation for guidance on connecting your access point to a router with PoE Injector or PoE switch ...

Страница 18: ...PoE Injector or PoE switch to the access point s LAN port using an Ethernet cable A PoE Injector or PoE Switch must be connected to the access point s LAN port The diagram below illustrates how to thread your installation cable through the weatherproof cable fitting on the bottom of your access point ...

Страница 19: ...es wall pole mount which requires some assembly 1 Attach the wall mount bracket to back of AP using M6x12 screws and washers as shown below Ensure your access point is securely attached to the wall mount bracket 2 Fix the wall mount with AP to the wall using wood gyprock screws ...

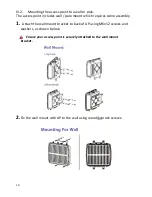
Страница 20: ...20 3 Fix the wall mount with AP to the pole using stainless tie back straps ...

Страница 21: ... If no DHCP Service is found the access point s default IP address is 192 169 2 2 3 You will be prompted for a username and password The default username is admin and the default password is admin though it was recommended that you change the password during setup see II 2 Basic Settings If you cannot remember your password reset the access point back to its factory default settings Refer to I 5 R...

Страница 22: ... Apply to save changes and reload the access point or Cancel to cancel changes Wait a few seconds for the access point to reload after you Apply changes as shown below 7 Refer to the following chapters for full descriptions of the browser based configuration interface features ...

Страница 23: ...vary depending on your configuration IV 1 1 System Information The System Information page displays basic system information about the access point IV 1 2 Wireless Clients The Wireless Clients page displays information about all wireless clients connected to the access point on the 2 4GHz frequency ...

Страница 24: ...plays the total data packets received by the specified client Signal Displays the wireless signal strength for the specified client Connected Time Displays the total time the wireless client has been connected to the access point Idle Time Client idle time is the time for which the client has not transmitted any data packets i e is idle Vendor The vendor of the client s wireless adapter is display...

Страница 25: ...ch SSID Wireless Monitor Site Survey Click Scan to begin scanning Channel Survey Result After a scan is complete click Export to save the results to local storage Site Survey Results Ch Displays the channel number used by the specified SSID SSID Displays the SSID identified by the scan MAC Address Displays the MAC address of the wireless router access point for the specified SSID Security Displays...

Страница 26: ...of the specified SSID Vendor Displays the vendor of the wireless router access point for the specified SSID IV 1 4 Log The Log Page displays system operation information such as up time and connection processes Save Click Save and you will be prompted example shown below to save the log on your computer as txt file ...

Страница 27: ...ccess point to dynamically receive an IP address from your router s DHCP server or you can specify a static IP address for your access point as well as configure DNS servers LAN side IP Address IP Address Assignment Select DHCP Client for your access point to be assigned a dynamic IP address from your router s DHCP server or select Static IP to manually specify a static fixed IP address for your a...

Страница 28: ... Users can manually enter a value when DNS server s primary address is set to User Defined IV 2 2 LAN Port The LAN Port page allows you to configure the settings for your access point s wired LAN Ethernet port Wired LAN Port Identifies LAN port 1 Speed Duplex Select a speed duplex type for LAN port or use the Auto value LAN ports can operate up to 1000Mbps and full duplex enables simultaneous data...

Страница 29: ... of physically and allows you to group together or isolate users from each other VLAN IDs 1 4094 are supported VLAN Interface Wired LAN Port Wireless Identifies LAN port 1 and wireless SSIDs VLAN Mode Select Tagged Port or Untagged Port for LAN interface VLAN ID Set a VLAN ID for specified interface if Untagged Port is selected Management VLAN VLAN ID Specify the VLAN ID of the management VLAN Onl...

Страница 30: ...ding on your configuration IV 3 1 2 4GHz 11bgn The 2 4GHz 11bgn menu allows you to view and configure information for your access point s 2 4GHz wireless network across four categories Basic Advanced Security and WDS IV 3 1 1 Basic Basic screen displays basic settings for your access point s 2 4GHz Wi Fi network s ...

Страница 31: ...int s 2 4GHz frequency based on availability and potential interference When disabled select a channel manually as shown in the next table Auto Channel Range Select a range from which the auto channel setting above will choose a channel Auto Channel Interval Specify a frequency for how often the auto channel setting will check reassign the wireless channel Check uncheck the Change channel even if ...

Страница 32: ...ic Rate Set Set a Basic Service Set BSS rate this is a series of rates to control communication frames for wireless clients IV 3 1 2 Advanced These settings are for experienced users only Do not change any of the values on this page unless you are already familiar with these functions Changing these settings can adversely affect the performance of your access point Contention Slot Select Short or ...

Страница 33: ...cess point and access point will broadcast Clear to Send CTS before a packet is sent from client DTIM Period Set the DTIM delivery traffic indication message period value of the wireless radio The default value is 1 RTS Threshold Set the RTS threshold of the wireless radio The default value is 2347 Fragment Threshold Set the fragment threshold of the wireless radio The default value is 2346 Multic...

Страница 34: ...not be read by anyone who does not know the correct encryption key It s essential to configure wireless security in order to prevent unauthorised access to your network Select hard to guess passwords which include combinations of numbers letters and symbols and change your password regularly SSID Selection Select which SSID to configure security settings for ...

Страница 35: ...vent brute force attacks on clients usernames and passwords Load Balancing Load balancing limits the number of wireless clients connected to an SSID Set a load balancing value maximum 50 Authentication Method Select an authentication method from the drop down menu and refer to the information below appropriate for your method Additional Authentication Select an additional authentication method fro...

Страница 36: ...36 WDS must be configured on each access point using correct MAC addresses All access points should use the same wireless channel and encryption method ...

Страница 37: ...s encryption method Local MAC Address Displays the MAC address of your access point WDS Peer Settings WDS Enter the MAC address for up to four other WDS devices you wish to connect WDS VLAN VLAN Mode Specify the WDS VLAN mode to Untagged Port or Tagged Port VLAN ID Specify the WDS VLAN ID when Untagged Port is selected above WDS Encryption method Encryption Select whether to use None or AES encryp...

Страница 38: ...twork Traffic Shaping and IP Filter settings will be applied to all traffic passing through the Guest Network SSID Guest Network 2 4GHz SSID Select the SSID that you want to apply the Guest Network settings to Guest Network Enable or Disable Guest Network settings Guest Access Policy Traffic Shaping Select Enable to apply bandwidth limitations on the Downlink and Uplink performance on the Guest Ne...

Страница 39: ...to apply as a filter Up to 3 IP Filters are supported IV 3 2 5GHz 11ac 11an The 5GHz 11ac 11an menu allows you to view and configure information for your access point s 5GHz wireless network across four categories Basic Advanced Security and WDS IV 3 2 1 Basic Basic screen displays basic settings for your access point s 5GHz Wi Fi network s ...

Страница 40: ...ess channel for the access point s 5GHz frequency based on availability and potential interference When disabled select a channel manually as shown in the next table Auto Channel Range Select a range from which the auto channel setting above will choose a channel Auto Channel Interval Specify a frequency for how often the auto channel setting will check reassign the wireless channel Check uncheck ...

Страница 41: ...sed on interference level BSS Basic Rate Set Set a Basic Service Set BSS rate this is a series of rates to control communication frames for wireless clients IV 3 2 2 Advanced These settings are for experienced users only Do not change any of the values on this page unless you are already familiar with these functions Changing these settings can adversely affect the performance of your access point...

Страница 42: ...cess point and access point will broadcast Clear to Send CTS before a packet is sent from client DTIM Period Set the DTIM delivery traffic indication message period value of the wireless radio The default value is 1 RTS Threshold Set the RTS threshold of the wireless radio The default value is 2347 Fragment Threshold Set the fragment threshold of the wireless radio The default value is 2346 Multic...

Страница 43: ...not be read by anyone who does not know the correct encryption key It s essential to configure wireless security in order to prevent unauthorised access to your network Select hard to guess passwords which include combinations of numbers letters and symbols and change your password regularly SSID Selection Select which SSID to configure security settings for ...

Страница 44: ...vent brute force attacks on clients usernames and passwords Load Balancing Load balancing limits the number of wireless clients connected to an SSID Set a load balancing value maximum 50 Authentication Method Select an authentication method from the drop down menu and refer to the information below appropriate for your method Additional Authentication Select an additional authentication method fro...

Страница 45: ...45 WDS must be configured on each access point using correct MAC addresses All access points should use the same wireless channel and encryption method ...

Страница 46: ... encryption method Local MAC Address Displays the MAC address of your access point WDS Peer Settings WDS Enter the MAC address for up to four other WDS devices you wish to connect WDS VLAN VLAN Mode Specify the WDS VLAN mode to Untagged Port or Tagged Port VLAN ID Specify the WDS VLAN ID when Untagged Port is selected above WDS Encryption method Encryption Select whether to use None or AES encrypt...

Страница 47: ...etwork Traffic Shaping and IP Filter settings will be applied to all traffic passing through the Guest Network SSID Guest Network 5GHz SSID Select the SSID that you want to apply the Guest Network settings to Guest Network Enable or Disable Guest Network settings Guest Access Policy Traffic Shaping Select Enable to apply bandwidth limitations on the Downlink and Uplink performance on the Guest Net...

Страница 48: ...p is a simple way to establish connections between WPS compatible devices WPS can be activated on compatible devices by pushing a WPS button on the device or from within the device s firmware configuration interface When WPS is activated in the correct manner and at the correct time for two compatible devices they will automatically connect PIN code WPS includes the use of a PIN code between the t...

Страница 49: ...nt s PIN code here and click Start to Process to activate PIN code WPS Refer to your wireless client s documentation if you are unsure of its PIN code IV 3 4 Radius The RADIUS sub menu allows you to configure the access point s RADIUS server settings categorized into three submenus RADIUS settings Internal Server and RADIUS accounts A RADIUS server provides user based authentication to improve sec...

Страница 50: ...V 3 4 1 Radius Settings Configure the RADIUS server settings for a primary and secondary backup RADIUS server RADIUS Type Select Internal to use the access point s built in RADIUS server or external to use an external RADIUS server RADIUS Server Enter the RADIUS server host IP address ...

Страница 51: ...isable RADIUS accounting Accounting Port When accounting is enabled above set the UDP port used in the accounting protocol of the RADIUS server Value must be between 1 65535 IV 3 4 2 Internal Server To use the Internal Radius Server as an additional authentication configure the Authentication Method in Wireless Settings Security to IEEE802 1x EAP Leave Additional Authentication set to No additiona...

Страница 52: ...e box next to Internal Server Select PEAP MS PEAP for EAP Internal Authentication Enter numbers or characters in the field Shared Secret Set Termination Action option to Reauthentication Radius Request Click Apply to save changes Example image below ...

Страница 53: ...53 IV 3 4 3 Radius Accounts Do the following to add Radius User Names and configure passwords Under Radius Radius Accounts enter a User Name in the window and click Add Example image below ...

Страница 54: ...e User Registration List and select Edit Example image below Enter a password for the selected User Click Apply to save changes Example image below Your access point is now setup to authenticate Users with the Internal Radius Server ...

Страница 55: ...55 IV 3 5 MAC Filter The MAC Filter allows you add MAC address to filter access ...

Страница 56: ...ireless traffic Traffic is sent to the following queues Background Low Priority High throughput non time sensitive bulk data e g FTP Best Effort Medium Priority Traditional IP data medium throughput and delay Video High Priority Time sensitive video data with minimum time delay Voice High Priority Time sensitive data such as VoIP and streaming media with minimum time delay Queues automatically pro...

Страница 57: ... transmission A shorter window has a higher probability priority of transmission CWMax Maximum Contention Window milliseconds This value is the upper limit to random backoff value doubling see above AIFSN Arbitration Inter Frame Space milliseconds Specifies additional time between when a channel goes idle and the AP client sends data frames Traffic with a lower AIFSN value has a higher priority Tx...

Страница 58: ...58 IV 3 7 Traffic Shaping Traffic Shaping allows an administrator to limit the bandwidth available to each SSID Providing a value between 0 1024Mbps A value of 0 indicates unlimited bandwidth ...

Страница 59: ...nge the password used to login to the browser based configuration interface here It is advised to do so for security purposes If you change the administrator password make a note of the new password In the event that you forget this password and are unable to login to the browser based configuration interface see I 5 Reset for how to reset the access point ...

Страница 60: ...for reference purposes Management Protocol Check uncheck the boxes to enable disable specified management interfaces see below When SNMP is enabled complete the SNMP fields below SNMP Version Select SNMP version appropriate for your SNMP manager SNMP Get Community Enter an SNMP Get Community name for verification with the SNMP manager for SNMP GET requests SNMP Set Community Enter an SNMP Set Comm...

Страница 61: ...the drop down menus Acquire Current Time from your PC Click Acquire Current Time from Your PC to enter the required values automatically according to your computer s current time and date NTP Time Server Use NTP The access point also supports NTP Network Time Protocol for automatic time and date setup Server Name Enter the host name or IP address of the time server if you wish Update Interval Spec...

Страница 62: ... another country region whose time zone is the same as yours IV 4 3 Syslog Server The system log can be sent to a server or e mailed Transfer Logs Check uncheck the box to enable disable the use of a syslog server and enter a host name domain or IP address for the server consisting of up to 128 alphanumeric characters ...

Страница 63: ... features a built in buzzer which can sound on command using the I m Here page This is useful for network administrators and engineers working in complex network environments to locate the access point The buzzer is loud Duration of Sound Set the duration for which the buzzer will sound when the Sound Buzzer button is clicked Sound Buzzer Activate the buzzer sound for the above specified duration ...

Страница 64: ...eference Power LED Select on or off Diag LED Select on or off IV 5 2 Update Firmware The Firmware page allows you to update the system firmware to a more recent version Updated firmware versions often offer increased performance and security as well as bug fixes You can download the latest firmware from the Comtrend website Do not switch off or disconnect the access point during a firmware upgrade...

Страница 65: ...firmware file to your access point IV 5 3 Save Restore Settings The access point s Save Restore Settings page enables you to save backup the access point s current settings as a file to your local computer and restore the access point to previously saved settings Save Restore Settings Using Device Select Using your PC to save the access point s settings to your local computer Save Settings to PC S...

Страница 66: ...ck the Open file with password box and enter the password in the field underneath IV 5 4 Factory Default If the access point malfunctions or is not responding then it is recommended that you reboot the device see IV 5 5 or reset the device back to its factory default settings You can reset the access point back to its default settings using this feature if the location of the access point is not c...

Страница 67: ...ick Reboot to reboot the device A countdown will indicate the progress of the reboot IV 6 Operation Mode Your access point can function in three different modes The default mode for your access point is AP Mode AP Mode is a regular access point for your network Managed AP Mode acts like a Slave access point in an access point array Controlled by the AP Controller Master The user interface will cha...

Страница 68: ...d to modify the IP address of your computer to be in the same IP address subnet e g 192 168 2 x x 3 254 The procedure for modifying your IP address varies across different operating systems follow the guide appropriate for your operating system In the following examples we use the IP address 192 168 2 10 though you can use any IP address in the range 192 168 2 x x 3 254 ...

Страница 69: ...ble click the Network and Internet Connections icon click Network Connections and then double click Local Area Connection The Local Area Connection Status window will then appear click Properties 2 Select Use the following IP address then input the following values IP address 192 168 2 10 Subnet Mask 255 255 255 0 Click OK when finished ...

Страница 70: ...70 ...

Страница 71: ...sks then click Manage Network Connections Right click Local Area Network then select Properties The Local Area Connection Properties window will then appear select Internet Protocol Version 4 TCP IPv4 and then click Properties 2 Select Use the following IP address then input the following values IP address 192 168 2 10 Subnet Mask 255 255 255 0 Click OK when finished ...

Страница 72: ...72 ...

Страница 73: ...dows 7 1 Click the Start button it should be located in the lower left corner of your computer then click Control Panel 2 Under Network and Internet click View network status and tasks 3 Click Local Area Connection ...

Страница 74: ...74 4 Click Properties ...

Страница 75: ...ect Internet Protocol Version 4 TCP IPv4 and then click Properties 6 Select Use the following IP address then input the following values IP address 192 168 2 10 Subnet Mask 255 255 255 0 Click OK when finished ...

Страница 76: ...76 ...

Страница 77: ... From the Windows 8 Start screen you need to switch to desktop mode Move your curser to the bottom left of the screen and click 2 In desktop mode click the File Explorer icon in the bottom left of the screen as shown below ...

Страница 78: ...78 3 Right click Network and then select Properties 4 In the window that opens select Change adapter settings from the left ...

Страница 79: ...79 side 5 Choose your connection and right click then select Properties ...

Страница 80: ...ect Internet Protocol Version 4 TCP IPv4 and then click Properties 7 Select Use the following IP address then input the following values IP address 192 168 2 10 Subnet Mask 255 255 255 0 Click OK when finished ...

Страница 81: ... your Macintosh computer operate as usual and click on System Preferences 2 In System Preferences click on Network 3 Click on Ethernet in the left panel 4 Open the drop down menu labeled Configure IPv4 and select Manually ...

Страница 82: ...82 5 Enter the IP address 192 168 2 10 and subnet mask 255 255 255 0 Click on Apply to save the changes ...

Страница 83: ...ser is sent to the proper IP address The DNS server IP address used by the computers on your home network is the location of the DNS server your ISP has assigned to you DSL Modem DSL stands for Digital Subscriber Line A DSL modem uses your existing phone lines to transmit data at high speeds Ethernet A standard for computer networks Ethernet networks are connected by special cables and hubs and mo...

Страница 84: ...ocated at the ISP s office ISP Internet Service Provider An ISP is a business that provides connectivity to the Internet for individuals and other businesses or organizations LAN Local Area Network A LAN is a group of computers and devices connected together in a relatively small area such as a house or an office Your home network is considered a LAN MAC Address MAC stands for Media Access Control...

Страница 85: ...which must be assigned by InterNIC TCP IP UDP Transmission Control Protocol Internet Protocol TCP IP and Unreliable Datagram Protocol UDP TCP IP is the standard protocol for data transmission over the Internet Both TCP and UDP are transport layer protocol TCP performs proper error detection and error recovery and thus is reliable UDP on the other hand is not reliable They both run on top of the IP...

Страница 86: ...2 3at PoE support 3 x LED 1 x Reset M25 interface Power Requirement Power over Ethernet IEEE 802 3at Antenna External N Type 2 4G 4dBi Antenna x 3 External N Type 5G 6dBi Antenna x 3 V 3 ENVIRONMENT PHYSICAL Temperature Range Operation 40 to 70 40 to 158 Storage 40 to 80 40 to 176 Humidity 90 or less Operating 95 or less Storage Certifications FCC CE Dimensions 256 7mm L x 226 7mm W x 90 3mm H Wei...

Страница 87: ...espect to the contents hereof and specifically disclaims any warranties merchantability or fitness for any particular purpose Any software described in this manual is sold or licensed as is Should the programs prove defective following their purchase the buyer and not this company its distributor or its dealer assumes the entire cost of all necessary servicing repair and any incidental or conseque...

Страница 88: ...d operation Any changes or modifications not expressly approved by the party responsible for compliance could void the authority to operate equipment FCC Radiation Exposure Statement This equipment complies with FCC radiation exposure limits set forth for an uncontrolled environment This equipment should be installed and operated with minimum distance 20cm between the radiator your body R TTE Comp...

Отзывы: