


7
Chapter 2 Installation
2.1 Hardware Setup
Follow the instructions below to complete the hardware setup.
Non-stackable
This device is not stackable – do not place units on top of each other, otherwise
damage could occur.
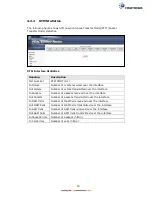
BACK PANEL
The figure below shows the back panel of the device.
Power ON
Press the power button to the OFF position (OUT). Connect the power adapter to the
power port. Attach the power adapter to a wall outlet or other AC source. Press the
power button to the ON position (IN). If the Power LED displays as expected then
the device is ready for setup (see section
2.2 LED Indicators
).
Caution 1:
If the device fails to power up, or it malfunctions, first verify that the
power cords are connected securely and then power it on again. If the
problem persists, contact technical support.
Caution 2:
Before servicing or disassembling this equipment, disconnect all power
cords and telephone lines from their outlets.
Reset Button
Restore the default parameters of the device by pressing the Reset button for 10
seconds. After the device has rebooted successfully, the front panel should display
as expected (see section
2.2 LED Indicators
for details).
NOTE:
If pressed down for more than 60 seconds, the NexusLink 3241u/3241eu
will go into a firmware update state (CFE boot mode). The firmware can
then be updated using an Internet browser pointed to the default IP
address.
Содержание NexusLink 3241eu
Страница 1: ...261103 018 NexusLink 3241u 3241eu Bonding IAD User Manual Version A1 0 May 17 2017...
Страница 16: ...15 STEP 3 After successfully logging in for the first time you will reach this screen...
Страница 63: ...62 A maximum of 100 entries can be added to the URL Filter list...
Страница 66: ...65 Click Enable to activate the QoS Queue Click Add to display the following screen...
Страница 82: ...81 5 11 DSL Bonding This page displays the bonding status of the connected xDSL line...
Страница 83: ...82 5 12 UPnP Select the checkbox provided and click Apply Save to enable UPnP protocol...
Страница 103: ...102 Enter a certificate name and click Apply to import the CA certificate...
Страница 115: ...114 Enter the MAC address in the box provided and click Apply Save...
Страница 118: ...117...
Страница 122: ...121 6 7 Site Survey 5GHz The graph displays wireless APs found in your neighborhood by channel...
Страница 133: ...132 Enter the MAC address in the box provided and click Apply Save...
Страница 139: ...138 6 15 Site Survey 2 4GHz The graph displays wireless APs found in your neighborhood by channel...
Страница 141: ...140 6 17 WiFi Passpoint Note This function is not supported on this release...
Страница 144: ...143 7 1 SIP Basic Setting...
Страница 149: ...148 7 2 SIP Advanced Setting...
Страница 150: ...149 7 2 1 Global Parameters This screen contains the advanced SIP configuration settings...
Страница 154: ...153 7 3 SIP Debug Setting This screen contains SIP configuration settings used for debugging...
Страница 157: ...156 7 4 SIP CCTK Setting The CCTK WEB setting allows the user to set up a digitmap for dialing number rule...
Страница 187: ...186 STEP 2 Click the Windows start button Then select Control Panel...
Страница 188: ...187 STEP 3 Select Devices and Printers STEP 4 Select Add a printer...
Страница 214: ...213 F2 4 PPP over ATM PPPoA IPv4 STEP 1 Click Next to continue...


