


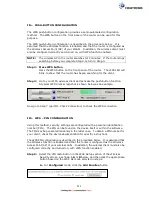


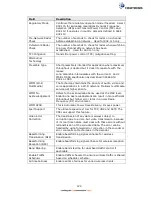


119
Field
Description
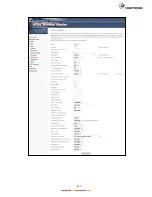
Fragmentation
Threshold
A threshold, specified in bytes, that determines whether
packets will be fragmented and at what size. On an
802.11 WLAN, packets that exceed the fragmentation
threshold are fragmented, i.e., split into, smaller units
suitable for the circuit size. Packets smaller than the
specified fragmentation threshold value are not
fragmented. Enter a value between 256 and 2346. If you
experience a high packet error rate, try to slightly increase
your Fragmentation Threshold. The value should remain
at its default setting of 2346. Setting the Fragmentation
Threshold too low may result in poor performance.
RTS Threshold
Request to Send, when set in bytes, specifies the packet
size beyond which the WLAN Card invokes its RTS/CTS
mechanism. Packets that exceed the specified RTS
threshold trigger the RTS/CTS mechanism. The NIC
transmits smaller packet without using RTS/CTS. The
default setting of 2347 (maximum length) disables RTS
Threshold.
DTIM Interval
Delivery Traffic Indication Message (DTIM) is also known as
Beacon Rate. The entry range is a value between 1 and
65535. A DTIM is a countdown variable that informs clients
of the next window for listening to broadcast and multicast
messages. When the AP has buffered broadcast or
multicast messages for associated clients, it sends the next
DTIM with a DTIM Interval value. AP Clients hear the
beacons and awaken to receive the broadcast and
multicast messages. The default is 1.
Beacon Interval
The amount of time between beacon transmissions in
milliseconds. The default is 100 ms and the acceptable
range is 1 – 65535. The beacon transmissions identify the
presence of an access point. By default, network devices
passively scan all RF channels listening for beacons coming
from access points. Before a station enters power save
mode, the station needs the beacon interval to know when
to wake up to receive the beacon (and learn whether there
are buffered frames at the access point).
Global Max Clients
The maximum number of clients that can connect to the
router.
Xpress
TM
Technology Xpress Technology is compliant with draft specifications of
two planned wireless industry standards.
54g™ Mode
Set the mode to 54g Auto for the widest compatibility.
Select the mode to 54g Performance for the fastest
performance
among 54g certified equipment. Set the mode to 54g LRS if
you are experiencing difficulty with legacy 802.11b
equipment.
54g™ Protection
In Auto mode the router will use RTS/CTS to improve
802.11g performance in mixed 802.11g/802.11b
networks. Turn protection off to maximize 802.11g
throughput
under most conditions.
Содержание NexusLink 3241eu
Страница 1: ...261103 018 NexusLink 3241u 3241eu Bonding IAD User Manual Version A1 0 May 17 2017...
Страница 16: ...15 STEP 3 After successfully logging in for the first time you will reach this screen...
Страница 63: ...62 A maximum of 100 entries can be added to the URL Filter list...
Страница 66: ...65 Click Enable to activate the QoS Queue Click Add to display the following screen...
Страница 82: ...81 5 11 DSL Bonding This page displays the bonding status of the connected xDSL line...
Страница 83: ...82 5 12 UPnP Select the checkbox provided and click Apply Save to enable UPnP protocol...
Страница 103: ...102 Enter a certificate name and click Apply to import the CA certificate...
Страница 115: ...114 Enter the MAC address in the box provided and click Apply Save...
Страница 118: ...117...
Страница 122: ...121 6 7 Site Survey 5GHz The graph displays wireless APs found in your neighborhood by channel...
Страница 133: ...132 Enter the MAC address in the box provided and click Apply Save...
Страница 139: ...138 6 15 Site Survey 2 4GHz The graph displays wireless APs found in your neighborhood by channel...
Страница 141: ...140 6 17 WiFi Passpoint Note This function is not supported on this release...
Страница 144: ...143 7 1 SIP Basic Setting...
Страница 149: ...148 7 2 SIP Advanced Setting...
Страница 150: ...149 7 2 1 Global Parameters This screen contains the advanced SIP configuration settings...
Страница 154: ...153 7 3 SIP Debug Setting This screen contains SIP configuration settings used for debugging...
Страница 157: ...156 7 4 SIP CCTK Setting The CCTK WEB setting allows the user to set up a digitmap for dialing number rule...
Страница 187: ...186 STEP 2 Click the Windows start button Then select Control Panel...
Страница 188: ...187 STEP 3 Select Devices and Printers STEP 4 Select Add a printer...
Страница 214: ...213 F2 4 PPP over ATM PPPoA IPv4 STEP 1 Click Next to continue...