background image

6-3

Audio Settings

Camera Settings

Chapter 6: Configuration

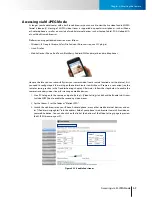
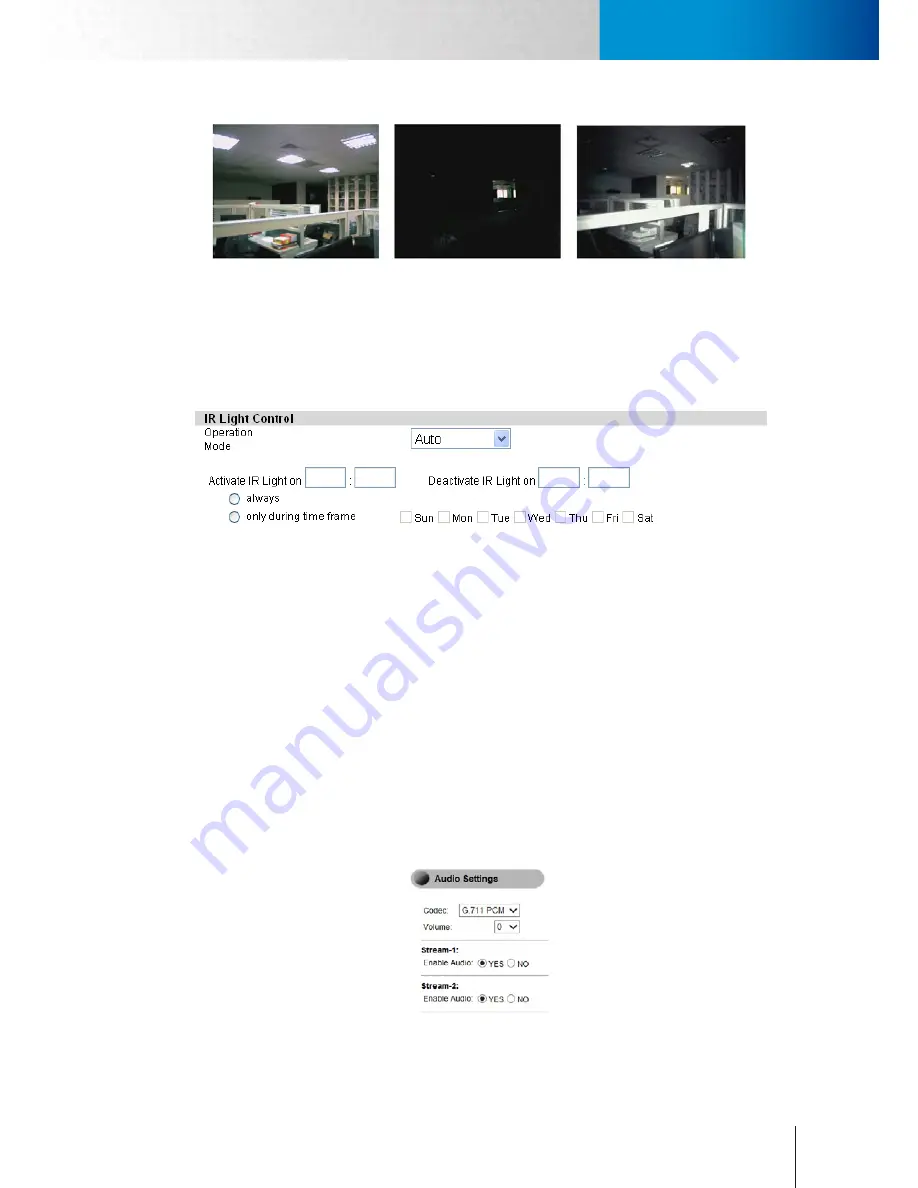
Normal lighting

(Indoor lights on)

Without IR LEDs

(Indoor lights off)

With IR LEDs

(Indoor lights off)

Figure 6-3. Effect of IR LEDs

The light sensor allows the camera to detect the lighting condition of the environment and to turn on/off the 
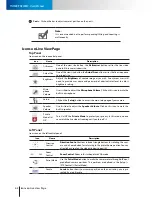
IR LEDs accordingly; you can configure the IR light operation mode to be [Auto], [Always On], [Always Off], or 
[By Schedule].

Figure 6-4. IR light control

For scheduling on/off time of the IR LEDs, you can directly input the desired On and Off time, and set the re-
peat option to be [always] or [only during time frame]. 

Embed Text and Image

You can embed text and/or image at 4 different locations on the live screen. (Upper Left, Upper Right, Lower 
Left, Lower Right). To embed an image, click on the Upload Image text link and choose a suitable image (limited 
to JPEG/BMP, 100x30 pixels, 128KB.) To remove an embedded image, press the [Clear] button.

Flip Mode

Enabling this option will flip the image vertically, making the image appear rotated 180 degrees. Enable this 
setting when you need to reposition your camera from standard position to ceiling mounting position. 

Audio Settings

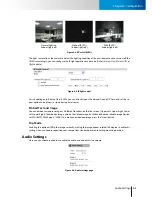
Here you can choose to enable or disable the audio and also adjust the volume. 

Figure 6-5. Audio settings page

Содержание TN900R

Страница 1: ...Network Camera Model No V1 140422 TN900R TN900RW ...

Страница 2: ...iction No part of this document may be copied or reproduced in any form or by any means without the prior written consent of Compro Technology Inc Disclaimer Compro Technology makes no warranties with respect to this documentation and disclaims any implied warranties of merchantability quality or fitness for any particular purpose The information in this document is subject to change without notic...

Страница 3: ...ation CD 3 4 With Ethernet Cable or Wireless Connection 3 4 Compro iDDNS 3 11 Mounting on the Wall or Ceiling 3 12 Chapter 4 Accessing the Camera 4 1 Ways of Viewing Live Video 4 1 Instant Monitoring 4 2 From C4Home iPhone Android App 4 2 From Android Phone Tablet App 4 5 From C4Home Website 4 5 Accessing via PC Web Browser 4 6 Accessing via M JPEG Mode 4 9 Accessing via 3GPP Mobile Phone 4 10 Cha...

Страница 4: ... 6 12 Recording History 6 13 Date Setup 6 13 Multi Camera 6 14 OSD 6 14 Chapter 7 Event Viewer 7 1 Chapter 8 Maintenance 8 1 Information 8 1 Log 8 1 Maintenance 8 1 Reboot Camera 8 1 Profile Management 8 1 Reset All Settings to Default 8 2 Firmware Update 8 2 Chapter 9 Troubleshooting 9 1 Reconfiguring Your Device 9 1 Cabling Check 9 1 Reset to Factory Default Settings 9 2 Trouble with the ActiveX...

Страница 5: ...xamples of Port Forwarding Setup on Routers 11 1 Abocom WAA813rn Port Forwarding Setup 11 1 ASUS RT N12 Virtual Server Setup 11 1 D Link DIR 655 Virtual Serve Setup 11 2 TP LINK wr1043n Virtual Server Setup 11 3 ...

Страница 6: ...TN900R TN900RW User sManual ...

Страница 7: ... or an experienced radio TV technician for help FCC Caution You are cautioned that changes or modifications not expressly approved by the party responsible for compli ance could void your authority to operate the equipment This device complies with Part 15 of the FCC Rules Operation is subject to the following two conditions 1 This device may not cause harmful interference and 2 This device must a...

Страница 8: ...are using this manual pay attention to some symbols and notations that are used to draw atten tion to special situations such as Caution Information provided here is critical to prevent damage to the product or injury to the user Important Here it provides instructions that a user must follow in order to complete a task Note Additional information or tips to help the user operate the product ...

Страница 9: ... If anything is missing please don t hesitate to contact your local distributor Quick Start Guide IP Camera Figure 2 1 Parts list Network Camera RJ 45 LAN Cable Power adapter 5V 2A and power cable Quick Start Guide Installation CD Wall mount plate Screw for ceiling mount x 3 screw mount x 3 camera pad x4 USB Wireless adapter TN900RW only ...

Страница 10: ...cordings Push Notification and Audio Alarm Air Firmware Update Share video and private mode Dropbox cloud storage support Smart Motion Detection Built in microphone and speaker for smartphone two way audio Upgradable Compro 802 11 b g n wireless adapter TN900RW package includes System Requirements For viewing PC Computer with 2 8GHz dual core processor and 2GB memory or above Operating system Wind...

Страница 11: ...ar view of TN900R TN900RW 1 IR transmitter 2 IR LEDs x 5 12 in total 3 Light sensor 4 Lens 5 IR LEDs x 6 12 in total 6 Microphone 7 LED status indicator 8 IR Receiver 9 Built in speaker 10 USB wireless adaptor connector 11 microSD SDHC card slot 12 Temperature sensor 13 Ethernet port 14 Audio output 15 Microphone output 16 Reset button WPS in TN900RW 17 Power connector ...

Страница 12: ...b lished the blue LED will remain lit 4 Connection established LED status indicator remains lit in blue 5 Connection failed Blue LED light flashing on and off Red LED Blue LED Indication On On System booting up Off On turn off 0 5 sec in every 5 sec Successfully established local network connection Off On Successfully established internet network connection On Off Performing hardware test Off Off ...

Страница 13: ...rs on Compro IP cameras You must setup the network camera with Ethernet cable connected then go to wireless setup Attach the power adapter to the camera s power connector and connect the power plug to a power out let When it power on successfully the LED indicator will shows blue light Make sure your smartphone is able to go to internet via your wireless router Then scan the QR code below for down...

Страница 14: ...ired Needs to installed the wireless adapter to the nerwork camera first Plug in the power of your nerwork camera Do not connect the Ethernet cable to the network camera If you connect the Ethernet cable the network camera will running the cable mode The LED indicator in the front of network camera will shows blinking red Press the WPS button on the wireless router about 3 sec to turn on the WPS s...

Страница 15: ...camera and your wireless AP router will negatively affect your wireless connection speed Generally the number of walls and ceilings shall be kept in minimum Materials and objects like solid metal aluminum steel water brick and concrete will weaken the strength of the wireless signal Allow the wireless signal from your wirelessly connected camera and your wireless AP router to pass through open doo...

Страница 16: ...Compro Do not use any other USB adapters on Compro IP cameras You have to setup the network camera with Ethernet cable connected then go to wireless setup Attach the power adapter to the camera s power connector and connect the power plug to a power out let When it power on successfully the LED indicator will shows blue light Complete the cable connection we provide 2 ways to add your camera Login...

Страница 17: ...re re plugging it When you unplug the power plug from the wall outlet while the cam era is still in operation wait for 4 seconds before plugging the power plug back in the wall outlet And avoid too frequent plugging and unplugging of power cable If the power cable and the network cable connected to the camera are not securely fastened it could lead to unstable connection Note You can add more Comp...

Страница 18: ...language for installation net work camera Figure 3 1 Language selection 2 Select your camera from the list and wait until the live video and camera informa tion are displayed on the right You can double check the device name and the MAC ID which are printed on the serial number sticker on the back of the camera and on the package Click Next when you re ready Figure 3 2 Camera selection 3 The defau...

Страница 19: ...fault server is www c4home com If C4Home service is enabled iDDNS service will not be available for use on the camera Figure 3 5 C4Home setup Note C4Home video streams are encrypted end to end and most of the streams are sent through direct channels and don t pass through C4Home server which helps protect user privacy 6 Choose to have the camera obtain IP ad dress automatically DHCP or manually as...

Страница 20: ...ure 3 7 Camera Orientation 8 For wireless connection setup If you are using TN900RW version nerwork camera you can choose to connect wirelessly by default The wizard will search for available access points Then select one access point to use Figure 3 8 Wireless connection setup 9 For wireless connection setup Enter the correct passphrase and choose the IP ad dress configuration Figure 3 9 Wireless...

Страница 21: ...se DDNS service to create a hostname that links to your home or office IP address Having created the iDDNS address name you can then enter http xxx input by yourself iddns org into your browser s address bar to remotely access your camera If your local LAN and router have firewall to block attack from outside you have to configure the HTTP port on your router For example if you set the HTTP port 2...

Страница 22: ...ew your settings before saving them Figure 3 12 Saving Changes 13 The iWizard performs system diagnosis based on your network settings and alert you for inappropriate settings marked with a question mark icon Figure 3 13 System Diagnostics 14 iWizard indicates the setup has completed successfully You can click on the URL to view the live video now Or click Yes if you wish you set up another camera...

Страница 23: ...te a hostname that links to your home or office IP address Having created the iDDNS address name you can then enter http xxx input by yourself iddns org into your browser s address bar to remote ly access your camera If your local LAN and router have firewall to block attack from outside you have to configure the HTTP port on your router For example if you set the HTTP port 2001 for your IP camera...

Страница 24: ... Screw the mounting plate into the mount ing surface Secure the IP camera to the ceiling plate Loosen the screw that fixes the trape zoid shaped fastening bracket Let the two tips of the fastening bracket slide into its position on the camera base as circled Push and hold the bracket to the right and tighten the screw Use a screwdriver to tighten the screw on the fastening bracket Make sure the br...

Страница 25: ... Safari are also support ed after a VLC plug in installation 3 View the live video stream on the mobile web browser of your iPhone iPod Android phone BlackBer ry PDA MID or any other mobile phones with a built in web browser Through live Motion JPEG video streaming you can view your Compro IP camera while on the go On the camera end the secondary video stream must be enabled the Motion JPEG mode o...

Страница 26: ...or tablet on hand C4Home Login Page Start the C4Home app from your smartphone you can login here with your own Account ID and Password If you forgot your password please click the Forgot your password button the system will send the password to your register email account Icon Name Description Create account Here you can create the new account please input the new account ID pass word and email ac...

Страница 27: ...ent Page List all the happened events by time includes the camera online offline and motion detection You can click the listed event to watch Liveview Watch the live video of network camera Snapshot Playback Download Playback and download the snapshots When the event trigger the camera will take 3 snapshots for record and you can know what s happened Video Playback Download Playback and download t...

Страница 28: ...one This feature allows you to use voice communication directly from your smartphone and the network camera s microphone speaker While you are watching the live video on your smartphone you can eavesdrop on the monitored area to know what s going on and you can broadcast your voice to intruders from your smartphone Please touch the talk icon on the left buttom with finger it will show the talk ico...

Страница 29: ...re in app setup page And also the Android version app support 4 camera monitoring at one screen as below Note 4 cameras monitoring not support iPhone and iPad Figure 4 4 C4Home app in Android phone From C4Home Website If you already enable the C4Home service in the installation procedure you can open the Internet Explorer on your PC and login to the C4Home website www c4home com than you can manag...

Страница 30: ...on of the monitored area via Internet Explorer which comes with all Win dows based computer system Please refer to the following steps to watch live view on WebVUer 1 Open the Internet Explorer 2 Enter the camera s IP address in the address bar e g 192 168 0 100 If you don t know the IP address of your camera use Compro iWizard to scan for your camera on your LAN network 3 A dialog box that reques...

Страница 31: ...ng Compro ActiveX 6 And then the reconfirmation dialog box will come up Please press Install to install the ComproClien tActiveX cab on your system Note Compro ActiveX components only support 32 bit Internet Explorer Hence if the viewing computer system is running 64 bit version of Win dows the 32 bit version of Internet Explorer must still be used to access the camera 7 Meanwhile the Windows Secu...

Страница 32: ... to enable ports 80 and 554 default HTTP RTSP port used by the camera in your firewall and link them to the internal IP address of the camera Should you have more than one IP cameras please increase the value of the above port by 1 e g the second camera will have port 81 and 555 Please refer to the manual of your router or firewall ...

Страница 33: ...view your camera video from a remote location over the Internet first you need to configure port forwarding on the network router to which your IP camera is connected see the remote viewing section in the Troubleshooting chapter Afterwards follow the steps below to enable the camera s secondary video stream for viewing on mobile devices 1 Use a PC to log on to the camera and go to Setup Video Sett...

Страница 34: ...of just one 2 User needs to enable DDNS function and obtain a valid Dynamic DNS DDNS address as detailed in ear lier sections of this manual 3 Ensure that an active internet connection is available for both the IP camera and the intended mobile phone 4 Port forwarding on the network router to which your IP camera is connected must be configured prop erly in order to enable remote viewing on your I...

Страница 35: ...scan mode Top control panel Let you adjust camera video and microphone and speaker volume Preset Point Changing the preset point allows you to change camera s current direction to a different one to view in a pre defined direction Please configure the preset points in Setup PTZ Control Magnifier icon Click on the magnifier icon to bring up the digital zoom control window Live video panel Live vide...

Страница 36: ...mute the built in microphone Setup Click on the Setup button to access the main setup page of your camera Speaker Volume Use its slider to adjust the Speaker Volume Click on this icon to mute the built in speaker Private Mode On Off Turn On Off the Private Mode to protect your privacy In this mode no one can watch the live video streaming until you turn off it Left Panel Icons seen on the left con...

Страница 37: ...gh camera s speaker See Voice Communication sec tion for details Record Record live video by pressing the Record button If your computer can not play mkv file format please download and install VLC media player or KMPlayer from the Internet Open Open a file browser to search and play back video files captured by the camera File format is mkv Others Other icons seen on this page Icon Name Descripti...

Страница 38: ...ton allows you to speak into your PC microphone and broadcast through the camera s speaker or audio line out To talk through the external speaker connected to the IP cam era place your cursor on the Communicate button the tool tip Right click to setup will appear and right click on the button and select Setting to choose input device and input source Figure 5 3 Communication setting Having configu...

Страница 39: ...include 3GPP checkbox to enable the secondary video stream and then the stream setting for the 2nd stream will be dis played For available video modes for stream 1 and 2 refer to the appendix section of this manual Video Buffer Setup video buffer for transmission Video Preference Click on the bar to set your video preference to stress motion smoothness or image quality The video pref erence bar ad...

Страница 40: ...uto Sunlight or Incandescent lamps mode Backlight Compensation According your light source to choose Disable Low or Hight backlight compensation Flickerless Here controls the flickerless mode 60 default or 50 Hz Low Light Behavior This lets you enable or disable the low light mode LED Indicator This lets you control the LED indicator at the front of camera Turn on the LED indicator or turn it off ...

Страница 41: ...set the re peat option to be always or only during time frame Embed Text and Image You can embed text and or image at 4 different locations on the live screen Upper Left Upper Right Lower Left Lower Right To embed an image click on the Upload Image text link and choose a suitable image limited to JPEG BMP 100x30 pixels 128KB To remove an embedded image press the Clear button Flip Mode Enabling thi...

Страница 42: ...emove Click here to Modify or Remove an existing viewer Add Click here to add a new viewer or administrator Allow anonymous viewer login Click here to allow anonymous viewer login without requiring user name and password but only to allow them to view the live video When you add a new user you need to provide the information on user name password and group type Figure 6 7 Adding Modifying user Net...

Страница 43: ...nd click Save to save the changes Figure 6 9 Wireless settings Network Diagnostic Here you can run the diagnostic tool for your current network settings and it will show error messages if any anomaly is detected For further information on error messages please refer to the FAQ section in this manual or visit www comprosecurity com for more information Network Bandwidth This automatic network conne...

Страница 44: ...e Port Forwarding section in this manual DDNS Click here to enable the DDNS Dynamic Domain Name Service service if you are using floating dynamic IP and want to tie your camera s current IP address to a domain name And instead of remembering a string of IP address you can use the easier to remember domain name to access your camera over the Internet Compro iDDNS service is recommended here for use...

Страница 45: ...g a different value for the DSCP Differentiated Services Code Point field in their IP packets The DSCP value that represents the top priority is 46 The default DSCP value is 0 which indicates normal priority meaning not using QoS The following is a table of the recommended DSCP values The drop precedence indicates the order in which IP packets shall be dropped when the network is congested Packets...

Страница 46: ...The Home position can be accessed on the live view page by pressing the Home button If you want the camera to always return to home position after a position change check Auto return to Home position input the period of time between 30 to 300 seconds in which the camera stays in the new position and press Save Then whenever the camera changes to a new position it will automatically return to its H...

Страница 47: ...s from the drop down list and then enter the duration for each checked and selected preset position Pres Save to apply settings Figure 6 13 Patrol ordering Patrol Speed Here you can choose the PTZ camera patrol speed between fast medium or slow After you have chosen a speed setting please press Save button Event Setup When an event happens a snapshot can be instantly sent to your E mail account FT...

Страница 48: ...ddress into sender receiver field xxxx xxxx com Other SSL webmail platforms have not been tested FTP server Here it provides the settings of the FTP server that can be used to store event snapshots taken by the camera when an event is triggered To start saving snapshots to a FTP server click on the text link to set up the FTP server Ensure that you have put in correct server information before sav...

Страница 49: ... Then go ahead to sign up to the Clickatell Central API service and follow Clickatell s online instructions to obtain an API ID 3 Choose Next to save the setting 4 Customize the SMS message content if wanted Choose Next 5 To receive a test message click on Send me a SMS message to the SMS Gateway Or choose Finish to save the configuration 6 To enable SMS notification go to Setup Event Setup and cl...

Страница 50: ...age and click Recording Setup Then follow the steps below 1 Recording Setting Here it displays the status of your SD card among other options Click Next to pro ceed SD Card Status Status verification SD Card Capacity Show available and total space in the card Format Click to format SD card Enable Recording during network failure Check to allow forced recording to SD card when network connection fa...

Страница 51: ...back menu as shown below Figure 6 17 Recording history To play a video clip first select a video clip on the list and press Playback File format AVI Function Key Description Playback Download Protect Unprotect Select All Deselect Delete Click to download then playback Click to download the video clip on your PC Selected clip s will never be erased File management Table 6 5 Management of recording ...

Страница 52: ...he IP address username and password field port numbers may be required if they have been different After pressing the Save button you will see the status of the cameras on the list To modify an existing camera simply choose a camera from the list and click Modify Figure 6 18 Multi Camera setting OSD You can setup the embedded OSD On Screen Display information on the video This information will dis...

Страница 53: ...lays the history of past events successfully triggered by motion or schedule the available types of event trigger depend on camera support Click on any type of event trigger to view its history Figure 7 1 Event Viewer Chapter 7 Event Viewer ...

Страница 54: ...7 2 TN900R TN900RW User sManual ...

Страница 55: ...ature allows installers and users to set up a group of cameras with similar configu rations at great ease After the current camera is properly configured users can export current camera s con figuration to a profile on PC and then load it into other cameras thereby making least changes possible like changes on IP address or a few other settings that might need to be modified individually when inst...

Страница 56: ...the Browse button and locate the download ed firmware file and press Upgrade button to update camera firmware Once the update process begins it must not be interrupted Figure 8 2 Firmware update If you log in to the live view page after camera is rebooted and find that some icons are in the wrong place try pressing Ctrl F5 to force a cache refresh of your browser Caution Before updating firmware p...

Страница 57: ... LAN network even if they are not on the same subnet The scanning generally takes around 1 minute to complete and once the scanning completes you will see the available IP cameras populating the list Figure 9 1 Camera selection Cabling Check If you didn t see your IP camera on the connected device list in iWizard go through the following steps to check your cabling 1 Check that the IP camera has b...

Страница 58: ...iently and start the IP Camera Utility later again to scan for the camera microSD DC5V WPS RESET AUDIO MIC OUT LAN IN Figure 9 2 Reset button Trouble with the ActiveX Client When you launch the Internet Explorer and enter the camera s IP address in the address field you ll be asked for the user name and password combination the default is admin admin case sensitive After that you will be prompted ...

Страница 59: ...installed but not enabled Ensure that the ActiveX had been correctly registered with your In ternet Explorer Please open Internet Explorer and check that you ve got both the ComproClientActivex and USActiveX control components registered and enabled under Tools Manage Add ons Figure 9 6 Add on management Trouble with the ActiveX Client ...

Страница 60: ...indows and delete the Compro Embedded folder found under OS Drive Program Files If you re using 64 bit windows look for OS Drive Program Files x86 And open your web browser and log in to the IP camera again to reinstall the ActiveX client In addition if you encountered the error which the browser returns 213 file not found please restart your computer as it should help in this situation Trouble wi...

Страница 61: ...it of your local network You can check the camera s image quality setting in Setup Video If your quality setting exceeds your upstream bandwidth limit you will experience stuttering video or black and blank screen 2 Check the ports used by the camera in Setup Network and note down the HTTP and RTSP server ports in this case ports 80 and 554 respectively Figure 9 9 Advanced network setup 3 Enable p...

Страница 62: ... change the HTTP and RTSP port on them manually so each one of them will use a different port E g changing the HTTP and RTSP port for the 2nd device to 81 and 555 respectively and accessing the 2nd device by logging on to http 61 220 20 16 81 When configuring port forwarding mapping on your router note that the public RTSP port must be qual to the internal RTSP port used by the IP camera For insta...

Страница 63: ...tup in iWizard The iDDNS is a free DDNS service provided by Compro If you are using dynamic IP you may want to apply for DDNS Dynamic Domain Name Server service to create a hostname that links to the IP address on your home or office network So even if the IP address changes you can still use an easy to remember URL to quickly ac cess your IP camera anytime anywhere After successfully obtaining th...

Страница 64: ...right click on the iWizard icon on your desktop and select Run as admin istrator If you re not sure whether your camera is on the same subnet with your PC reconnect your camera to your PC directly configure the IP address of your PC as 192 168 0 X and run iWizard again to reconfigure its subnet address to match that of your PC Then re connect it back to the router or switch and run iWizard again T...

Страница 65: ...the value of TTL Time to Live occasionally the DNS information changes e g your cam era acquires a new IP address but the old information is still stored in the cache result ing in connection failure When this happens try waiting a few minutes for the new IP information to be updated onto DNS server and then retry connection or try to decrease the TTL value If it still doesn t work refer to other ...

Страница 66: ...ve enabled port forwarding on your router and have allowed traffic on ports your IP camera is using Refer to the Remote Viewing via Internet Explorer section of this manual for more information Problem using DDNS service The user information is incorrect Go to main setup page On the left menu select Network DDNS and check if the ID and password is correct Also check with your service provider to s...

Страница 67: ...e setting in Setup Video 2 Run a network speed diagnostics on WebVUer to determine the bandwidth level of the currently connected network To do so log in to your camera using WebVUer and go to Setup Network Network Bandwidth When the speed diagnostics is done the WebVUer will advise you of the appropriate setting Consider the following actions to ensure sufficient download bandwidth at your remote...

Страница 68: ...mended When the signal level gets too low you may have to place your wireless Access Point in a different location use a wireless repeater or remove obstacles between the camera and the wire less AP Ghost image is seen Network quality is not good enough This is a common phenomenon when the quality of network is not good or the video setting is too high Please try to set the bit rate of the camera ...

Страница 69: ...s Adjustable image size and quality AGC AWB AES Configurable brightness contrast saturation and sharpness Audio Audio Communication Two way audio with built in microphone and speaker Audio compression G 711 PCM 64Kbit sec AAC Audio input out put MIC input Audio output Network Wireless Upgradable 802 11b g n wireless connectivity TN900RW bundles the wireless adapter Security User ID Password protec...

Страница 70: ...back for event recording Share video to others Watch 4 channels at the same screen Android only not support iOS MJPEG Mode Viewing of camera image via phone browsers 3GPP Mode Viewing of camera image via 3G phones 3GPP Streaming General Video Surveillance ComproView 32 channels video management software Local Storage microSD SDHC card slot supports local storage of snapshots and video recordings T...

Страница 71: ... are some examples of router configurations with reagrd to port forwarding port mapping virtual server on some popular router products You can also log on to portforward com for more port for warding setup examples on other router products Abocom WAA813rn Port Forwarding Setup ASUS RT N12 Virtual Server Setup Chapter 11 Appendix ...

Страница 72: ...11 2 Examples of Port Forwarding Setup on Routers D Link DIR 655 Virtual Serve Setup TN900R TN900RW User sManual ...

Страница 73: ...11 3 Examples of Port Forwarding Setup on Routers TP LINK wr1043n Virtual Server Setup Chapter 11 Appendix ...

Страница 74: ...ComproTechnology Inc 4F No 12 Alley 6 Lane 45 Pao Shin Road Hsintien District NewTaipei City 231 Taiwan Tel 886 2 29180169 Fax 886 2 29152389 w w w c o m p r o u s a c o m ...

Отзывы: