background image

'"

$

&

.,

)

%

0

'2

'"

$

&

.,

)

%

0

'2

2

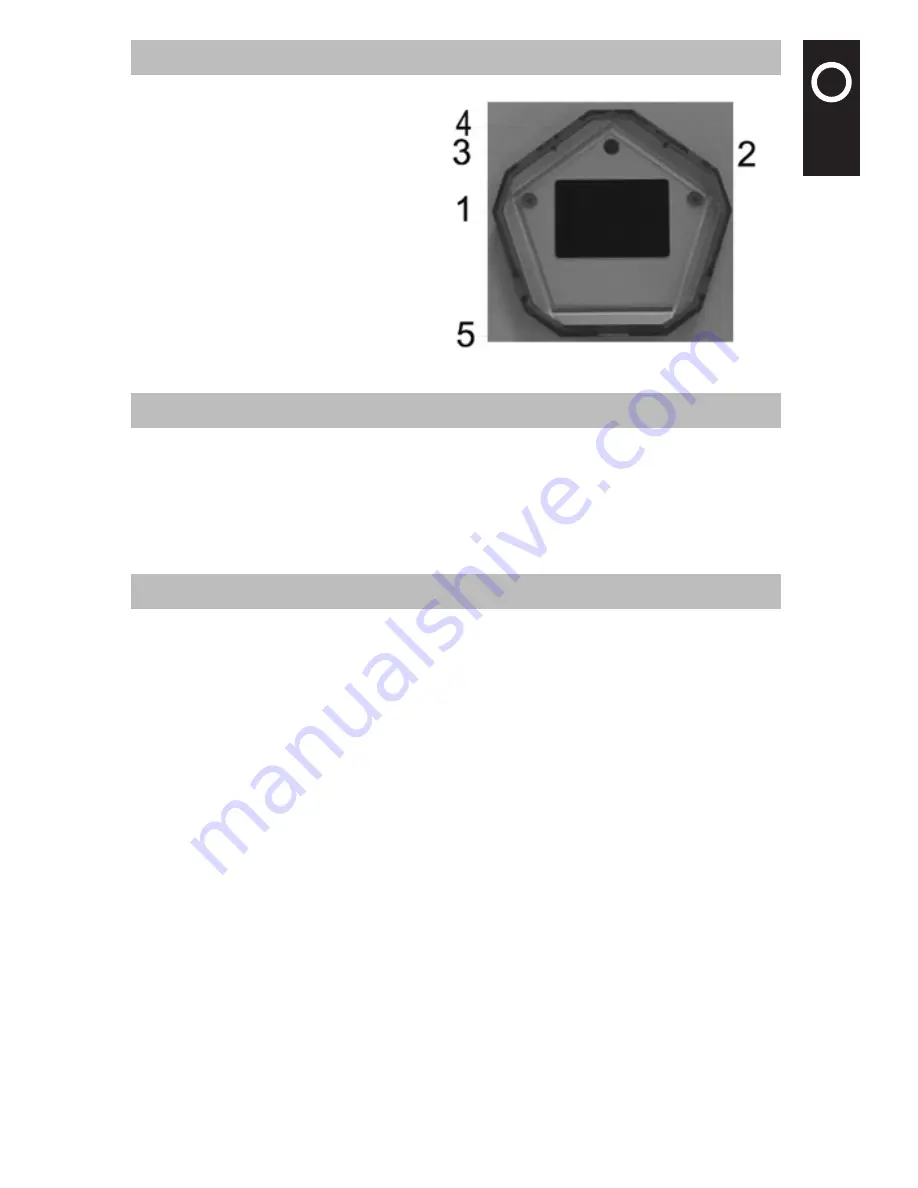
1. Description of Parts

1. LCD Screen

2. Power/Auto Play/Enter

3. Next/Delete All

4. Previous/Delete One

5. USB Port

2. Technical Specifications

Formats supported: BMP (RGB 24 bit), JPG, PNG, GIF and TIFF

Display: 1.0 inch LCD screen 

Storage capacity: 56 photos

Port: Standard USB 1.1 interface 

Power supply: Built-in 3.7V lithium battery or 5V power supply via USB port

3. Description of Buttons

·Power/Auto Play/Enter

Manual Power On/Off: In standby state, press and hold “Power” button to start the device. 

When it is on, press and hold “Power” button for 3 seconds to power off the device.

Auto Power Off: In on state (instead of auto play mode), if no operation is conducted within 2 

minutes, the system will power off automatically. 

Auto Play: After the digital photo frame is powered on, when there are two more (more than 

two) photos in the device, press “Auto Play” button to enter the auto play mode.  

When performing auto play, press “Auto Play” again to stop. 

·Previous/Delete One

 Backward by hand: After the digital photo frame is started, if there are more than two photos 

in the device, each time you press “Previous” button, the previous photo will be displayed. 

 Delete One: If “Auto Play” button is not pressed, press and hold “Previous” button for 2 

seconds, “ Delete?” will be shown on the screen. And a red dustbin icon will be displayed.  

Press “Enter” button to conform and press “Next” button to cancel. 

·Next/Delete All

Forward by hand: After the digital photo frame is started, if there are more than two photos 

in the device, each time you press “Next” button, the next photo will be displayed.

Delete All: If the “Auto Play” button is not pressed, press and hold “Previous” button for 2 

seconds, the “Delete all?” will be shown on the screen. And a red dustbin icon will be 

displayed. Press “Enter” button to cancel all photos and press “Next” button to cancel. 

Содержание pf 10.002 HEART

Страница 1: ...05 DIAMOND Design and specifications subject to change without further notice www compositor com User s Guide Benutzerhandbuch Mode d emploi Handleiding Guida dell utente Gui del usuario Moldura Digit...

Страница 2: ...han two photos in the device press Auto Play button to enter the auto play mode When performing auto play press Auto Play again to stop Previous Delete One Backward by hand After the digital photo fra...

Страница 3: ...n a shortcut icon will be shown on the screen 5 Software Interface and Photo View After the software is installed correctly and the digital photo frame is connected to the computer through USB cable t...

Страница 4: ...the size fitting for digital photo frame s screen When selecting the option of Whole Photo the added photo will be completely displayed in all images and the unoccupied place will be in black 2 Press...

Страница 5: ...opping photos and add the cropped photos to the New Collection Panel window Then press button to exist 5 3 Management of New Collection Panel Window The added photos are managed via the New Collection...

Страница 6: ...button to download photos to the digital photo frame The Download Program window will display the download progress As shown in Figure 5 after downloading the window will disappear Figure 5 5 5 Photo...

Страница 7: ...r corner to exit the Photo Viewer And then pull out USB cable 6 Battery Charge Connect the digital photo frame to the computer by inserting the USB cable to the USB port for charging When the battery...

Страница 8: ...cards LCD screen is fragile please keep away from any impact moisture and heat Only use a soft dry cotton to clean the screen Guarantee This Compositor Digital Photo Frame is guaranteed against defec...

Страница 9: ...en genie en Fangen Sie Ihre sch nsten Erinnerungen ein Geniet van het leven beleef die mooie momenten opnieuw Godi la vita rivivi i tuoi momenti meravigliosi Disfruta de la vida captura tus momentos m...

Отзывы: