background image

2-2                                                    Chapter 2:  Installing the Adapter

p


Using BNC (thin coaxial) cable:

Using thin coaxial cable: Connect a T-connector
to the BNC connector on the media coupler.
Attach both ends of the T-connector to thin
coaxial cables.  If the card is at the end of the
network segment, install a 50-ohm terminator at
the open end of the T-connector. Do this
carefully to prevent accidental shorts which may
disrupt network operation.

5.

Power ON the PC.

Hardware installation is now complete.  Switch
ON  the PC.  The Compex LinkPort PCMCIA
Ethernet Card receives its power from the PC.

Warning:   To avoid accidents, do not connect or
disconnect  cables, or perform installation or
maintenance of the card  during an electrical
storm.

Removing the Card:

Procedure:

To remove the Compex LinkPort PCMCIA Ethernet
Card
 from the PC, do as follows:

1.

Power OFF the machine.

2.

Remove from the coupler the UTP cable from the
RJ-45 socket; or if coaxial cable, the T-connector
from the BNC socket.

Содержание LinkPort ENET-B

Страница 1: ...Compex LinkPort PCMCIA Ethernet Card ENET B User s Manual Version 1 7C...

Страница 2: ...i Compex LinkPort PCMCIA Ethernet Card ENET B User s Manual Version 1 7C Manual Number M 0011 V1 7C Manual Release Date October 1999 Printed in the Republic of Singapore...

Страница 3: ...ed herein and will be incorporated into later versions of the guide The information contained is subject to change without prior notice Trademark Information Compex LinkPort and ReadyLINK are register...

Страница 4: ...Emission Standards EN60555PT2 conducted emission EN55022B conducted emission FCC Part 15 Class B Immunity Standards IEC 801 2 IEC 801 3 IEC 801 4 Therefore this product is in conformity with the follo...

Страница 5: ...on the user is encouraged to try to correct the interference by one or more of the following measures p p p p Reorient or relocate the receiving antenna Increase the separation between the computer an...

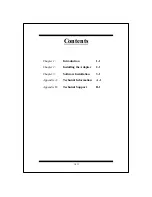
Страница 6: ...v Contents Chapter 1 Introduction 1 1 Chapter 2 Installing the Adapter 2 1 Chapter 3 Software Installation 3 1 Appendix A Technical Information A 1 Appendix B Technical Support B 1...

Страница 7: ...vi NOTES...

Страница 8: ...t card plugs into a Type II PCMCIA slot providing a 16 bit bus interface The card is switchless software configurable and provides full support for the PCMCIA Card Information Structure CIS The card i...

Страница 9: ...5 10Base T UTP connector and BNC 10Base 2 coaxial connector Switchless design hardware settings are software configurable Low power consumption Extensive software driver support which includes drivers...

Страница 10: ...ng signals to and or receiving signals from the network This LED is normally OFF It will flash when the card transmits signals to the network The speed at which the LED flashes increases with the leve...

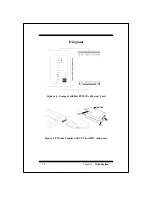
Страница 11: ...1 4 Chapter 1 Introduction Diagrams Figure 1 1 Compex LinkPort PCMCIA Ethernet Card Figure 1 2 Media Coupler with UTP and BNC connectors...

Страница 12: ...he computer s PCMCIA slot Insert the 68 pin connector on the card into the computer s PCMCIA slot The label on the card should face up Slide the card all the way into the slot 3 Plug the media coupler...

Страница 13: ...ts which may disrupt network operation 5 Power ON the PC Hardware installation is now complete Switch ON the PC The Compex LinkPort PCMCIA Ethernet Card receives its power from the PC Warning To avoid...

Страница 14: ...coupler from the Compex LinkPort PCMCIA Ethernet Card To do this squeeze the locking arms on either side of the coupler to card connector Pull to unplug the media coupler 4 Remove the card from the s...

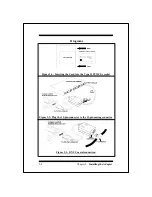
Страница 15: ...Chapter 2 Installing the Adapter Diagrams Figure 2 1 Inserting the Card into the Type II PCMCIA socket Figure 2 2 Plug the 15 pin connector to the 15 pin mating connector Figure 2 3 BNC Coaxial connec...

Страница 16: ...the machine LANENB EXE must run immediately after this Card and Socket Services software is loaded but before loading the network driver LANENB EXE cannot be unloaded The machine must reboot and LANEN...

Страница 17: ...to configure the adapter to a another Interrupt number such as 10 or 11 to avoid any conflicts Before beginning the installation procedure make a backup Copy diskette and use the Copy for installatio...

Страница 18: ...ed in the respective directories of the particular NOS in the Driver Disk Please refer to these documents to install the network driver for the adapter As new and updated Network Operating Systems bec...

Страница 19: ...3 4 Chapter 3 Installing the Drivers NOTES...

Страница 20: ...Type II JEDIA 4 1 Bus Width 16 bit I O Base Address 200H to 3E0H in steps of 20H Default IOP 300H Interrupt 3 4 5 7 9 10 11 12 15 Default IRQ Media Coupler UTP RJ 45 10Base T connector and BNC coaxial...

Страница 21: ...A 2 Appendix A Technical Information NOTES...

Страница 22: ...egistration Card The card qualifies you as being eligible for customer support If there is a diagnostic program run it This helps identify the cause of the problem which may be something you could rep...

Страница 23: ...ersion of network operating system NOS and other applications Network information including the network topology type of cable used size of network number of workstations in the network etc The networ...

Страница 24: ...Networktechnology Gmbh Albert Einstein Stra e 42 63322 R dermark Germany Fax Call Tel Fax BBS 49 0 6074 98017 8 a m 5 p m local time 49 0 6074 90668 49 0 6074 93974 24 hour access Asia Australia New Z...

Страница 25: ...B 4 Appendix B Technical Support NOTES...

Страница 26: ...Appendix B Technical Support B 5 NOTES...

Страница 27: ...051 E La Palma Unit A Anaheim CA 92807 USA 714 630 7302 1997 by Compex Inc All rights reserved Printed in Singapore Compex LinkPort PCMCIA Ethernet Card ENET B Manual Number M 0011 V1 7C Version 1 7C...

Страница 28: ...B 6 Appendix B Technical Support NOTES...

Отзывы: