Comelit 49807 Скачать руководство пользователя страница 14

User’s Manual 


– 

Record Channels

: Select channels o include every recorded event regardless of the event type in 

your search condition. 

– 

Disk Almost Full

Disk Bad

Disk Temperature

 or 

Disk S.M.A.R.T.

: Select to include self-diagnostic 

events in your search condition. 
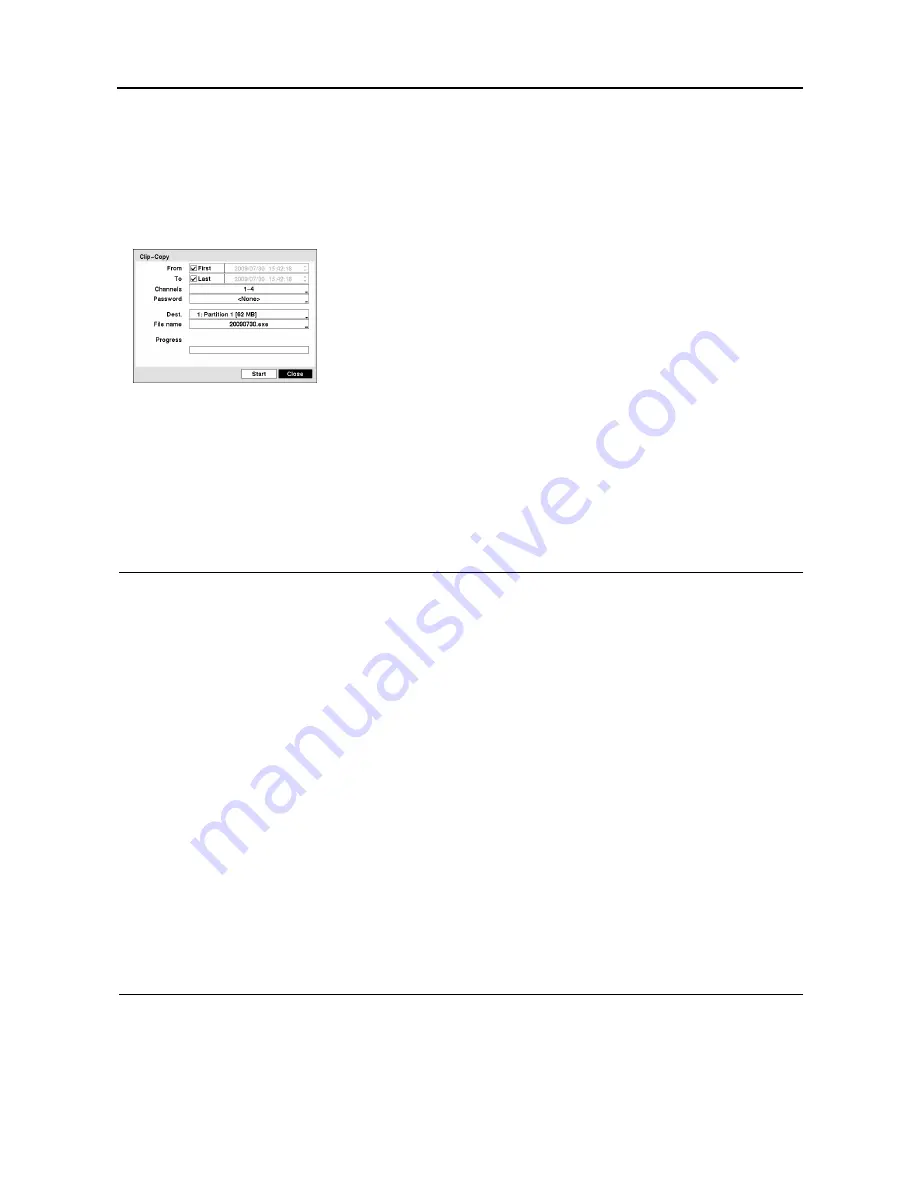


Clip Copy 


It allows you to copy recorded video clips to external storages.  The 
copied video clips can be viewed on computers.  Refer to Appendix – 
Clip Player

– From

/

To

: Set up to define a specific period of video to copy.  You 

can simply sets the period of video to copy by using the PLAYBACK 
button on the front panel in the playback mode.  Pressing and holding 
the PLAYBACK button for two seconds or longer sets the starting 
point.  Pressing and holding the PLAYBACK button for two seconds 
of longer again sets the ending point.  Selecting 

First

 or 

Last

 copies 

video from the first or to the last recorded image. 

– Channels

: Choose to select a camera of the video to copy. 

– Password

: Choose to assign a password to use when playing the 

copied video clips. 

– Dest.

: Choose to select a storage device for clip copy. 

– File Name

: The DVR automatically assigns a file name to the video 

clip, but you can assign a desired file name. 


NOTES: 


The time bar on the calendar during Calendar search is one-hour segments.  If a segment is highlighted, 
it means that some video was recorded during that hour.  However, it does NOT mean video was recorded 
for the entire hour. 


The lower number of the Segment during Calendar search indicates the latest recorded video. 


It is possible that no recorded image displays on the current screen.  Press the DISPLAY button and 
change the screen mode 2x2.  You will be able to easily see the camera have recorded video during 
target time. 


The USB device for clip copy must be FAT16 or FAT32 format. 


When naming a file of video clip to copy, you cannot use the following characters: \, /, :, *, ?, “, <, >, |.  
The DVR will automatically add the date and “.exe” to the file name. 


The file size for clip copy is limited to 2GB. 


During Clip Copy, you cannot shut the system down or clear data on the storage device.  Refer to Chapter 3 – 
Configuration 

 Main MenuSTORAGE for clearing data on the storage device. 


Do NOT disconnect the USB cable or the power from the external drive while copying video clips.  If 
the external drive is shut down or the USB cable is disconnected while copying video clips, THE DVR 
SYSTEM MAY NOT WORK NORMALLY OR THE EXTERNAL DRIVE COULD BE DAMAGED, and 
you will get an error message the next time you try to copy video clips.  You will need to power down 
the DVR and restart it to get rid of the error message.  Once the file system of the USB hard disk drive 
has been corrupted, this error message cannot be dismissed.  Even after restarting the DVR it may 
automatically restart while preparing to clip copy.  You must recover the file system using the recovery 
program, or you must reformat the hard disk drive. 


Содержание 49807

Страница 1: ...DIGITAL VIDEO RECORDER ART 49807 Please read this manual thoroughly before use and keep it for future reference Via Don Arrigoni 5 24020 Rovetta S Lorenzo Bergamo http www comelit eu e mail export dep...

Страница 2: ......

Страница 3: ...ERFERENCE AT THEIR OWN EXPENSE WARNING CHANGES OR MODIFICATIONS NOT EXPRESSLY APPROVED BY THE PARTY RESPONSIBLE FOR COMPLIANCE COULD VOID THE USER S AUTHORITY TO OPERATE THE EQUIPMENT THIS CLASS OF DI...

Страница 4: ...en damaged B If liquid is spilled or objects have fallen into the equipment C If the equipment has been exposed to rain or water D If the equipment does not operate normally by following the operating...

Страница 5: ...ontrols 3 Chapter 2 Operation 4 Turning on the Power 4 Live Monitoring 5 Recording 5 Playback 6 Searching 6 PTZ Control 9 Chapter 3 Configuration 11 Overview 11 Main Menu 12 Appendix 20 WebGuard 20 DV...

Страница 6: ...User s Manual iv...

Страница 7: ...endar Event Alarm Connections Include Input Output and Reset Input Built in Buzzer Live or Recorded Video Access via Ethernet Self diagnostics with automatic notification including hard disk drive S M...

Страница 8: ...30VDC RS 485 Port Connect a PTZ camera Refer to Appendix Connector Pin Outs for details Factory Reset Switch Use this switch on rare occasions that you want to return all the settings to the original...

Страница 9: ...search mode pressing the button plays back images at regular speed or pauses playing video In the Main Setup menu pressing the button selects an item or completes the entry you have made The blue LED...

Страница 10: ...itle PTZ mode Zoom mode Network connected Freeze mode Sequence mode HDD Recycle mode Remaining storage space Schedule recording off Being clip copied Recording mode Time lapse Event Time lapse Event P...

Страница 11: ...gain in sequence screen mode returns to the quad screen mode Freeze screen Pressing the Play Pause button freezes the current screen Pressing the button again releases the freeze screen mode RECORDING...

Страница 12: ...play the most recent image When playing video subsequent times the DVR will start playing video from the last recalled image NOTE While recording video the playback speed of searched data might decrea...

Страница 13: ...ed video If the DVR s time and date have been reset to a time that is earlier than some recorded video it is possible for the DVR to have more than one video stream in the same time range In this case...

Страница 14: ...hour However it does NOT mean video was recorded for the entire hour The lower number of the Segment during Calendar search indicates the latest recorded video It is possible that no recorded image d...

Страница 15: ...When the PTZ device is set up the PTZ icon appears on the screen Pressing the PTZ ZOOM button in the live monitoring mode and selecting a PTZ camera enters PTZ mode The PTZ icon flickers in the PTZ m...

Страница 16: ...and button and then press the OK button Move to Move to Preset in the PTZ menu and select it by pressing the button Pressing the button displays the Move to Preset screen Pressing the PLAYBACK button...

Страница 17: ...tected Enter the password by pressing the camera buttons or virtual keyboard 1 to 9 and a Main Setup screen appears There is no default password How to Select Items Move to the desired item by pressin...

Страница 18: ...ption password and system date time to display the system version and system log to upgrade the software to save the DVR settings or to shut down the system RECORD Select to set up recording quality m...

Страница 19: ...tem Log for the details of system log information Change Password Choose to change the password System Shutdown Choose to shut the system down NOTE Even after changing the DVR settings by importing sa...

Страница 20: ...p the recording speed quality for time lapse recording Event Record ips Quality Choose to set up the recording speed quality for event recording Record Mode Choose to set up the recording mode Time la...

Страница 21: ...up are selected or cleared by using the camera buttons Pressing the Play Pause button displays the menu screen and each item in the menu has the following functions Select Select All Select to activat...

Страница 22: ...aximum bandwidth When limiting the network bandwidth the frame rate might decrease to lower than the frame rate set in the RECORD setup screen Use WebGuard Service Select to use the WebGuard service S...

Страница 23: ...e IP Address of the DNS Server from the internet service provider Do NOT use the same port number for two different programs otherwise the DVR cannot be connected with the PC running remote software p...

Страница 24: ...ion box to enter user ID and password Sender Recipient Choose to enter the sender s recipient s e mail address The e mail address must include the character to be a valid address CAMERA No Select to t...

Страница 25: ...Recorded Data Displays the time information about recorded data of the device Selecting Clear All Data will clear all video data except the system log When the hard disk drive has not been formatted t...

Страница 26: ...IP address in the DVR ADDRESS field when running the WebGuard program by entering http www dvronline net Selecting the Use DVRNS option allows you to enter the DVR name registered on the DVRNS server...

Страница 27: ...to apply the changes If you want to enable the Auto Tuning capability again enter netsh int tcp set global autotuninglevel normal after running the Command Prompt with elevated administrator permissio...

Страница 28: ...he image aspect ratio displayed on each camera screen and to enhance image display quality by eliminating staircase aliasing effects on the enlarged image Web Search Mode The WebSearch is a remote web...

Страница 29: ...the current image on a printer connected to your computer Setup Click to set up the image drawing mode and OSD display You can adjust the display speed by changing the image drawing mode and select OS...

Страница 30: ...an be viewed on computers running Microsoft Windows 2000 XP or Vista Double click the target clip to start the Player program The ClipPlayer Screen displays the clip images Playback and Layout Buttons...

Страница 31: ...sition Full Screen Place the mouse cursor on an image and click it to display the image in full screen NOTES It is suggested that the computer used for the Player program has at least an 800MHz Pentiu...

Страница 32: ...earch recorded video from four to five o clock during the overlapping time range using a search menu such as Event Log Search it is possible for the DVR to have two overlapping start and stop times Yo...

Страница 33: ...ailed 402 Copying upgrade package on the USB device failed 18 Burning is out of time 500 System is busy clip copying TROUBLESHOOTING PROBLEM POSSIBLE SOLUTION No Power Check power cord connections Con...

Страница 34: ...O Connector Output Input AI 1 to 4 Alarm Inputs 1 to 4 G GND Chassis Ground ARI Alarm Reset In NC Alarm Out Normally Closed C Common NO Alarm Out Normally Open RS485 Connector Master Unit Slave Unit T...

Страница 35: ...te 4 BNC Monitor Output Composite 1 BNC VGA 1 DB15 Alarms Terminal block Ethernet Port RJ 45 RS 485 Serial Port Terminal block telemetry control USB Port 1 on front panel 2 0 STORAGE Primary Storage S...

Страница 36: ...User s Manual V1 5 30 Via Don Arrigoni 5 24020 Rovetta S Lorenzo Bergamo http www comelit eu e mail export department comelit it...

Отзывы: