background image


www.combisteel.com 

IMPORTANT: Before connecting your units to the power supply, be sure the machine’s electrical specifications, 
printed in the unit’s nameplate, match those of your local power supply. 
1. For first-time use, remove the mincer head and wash all parts thoroughly. 
2. Before grinding, tighten the thumb screw clockwise until secure. Do not use a tool or over-tighten. 
3. Prepare meat for grinding by remove all skin and bones. Then cut the meat into appropriately sized pieces for 
grinding. 
4. Feed meat  into the grinding chamber with the  special  meat  pusher that  was included with your machine. 
Never use fingers, hands, or any other objects. 
5. After use, disconnect unit from the power supply. Disassemble the head, wash and dry all parts thoroughly. 
6. If the unit is overloaded, it will shut off to prevent internal damage. Turn the grinder off, allow cooling for 
several minutes, press the reset button and turn the mincer on to continue. 
7. If there is a blockage in the mincer head, switch the machine to Reverse and then Forward. 
 
Note: During grinding, meat should be discharged from the mincer smoothly. If the discharge is not smooth, or 
if it is in the form of a paste, the following causes and remedies should be considered: 
 

Possible cause 

Remedy 

1.


Coupling too tight. 

Loose and hand-tighten only until  snug. Don’t over-
tighten. 

2.


Discharge plate is blocked. 

Remove discharge plate and clean, then reinstall. 

3.


Blade edges have dulled. 

May be sharpened, recommend replacing. 


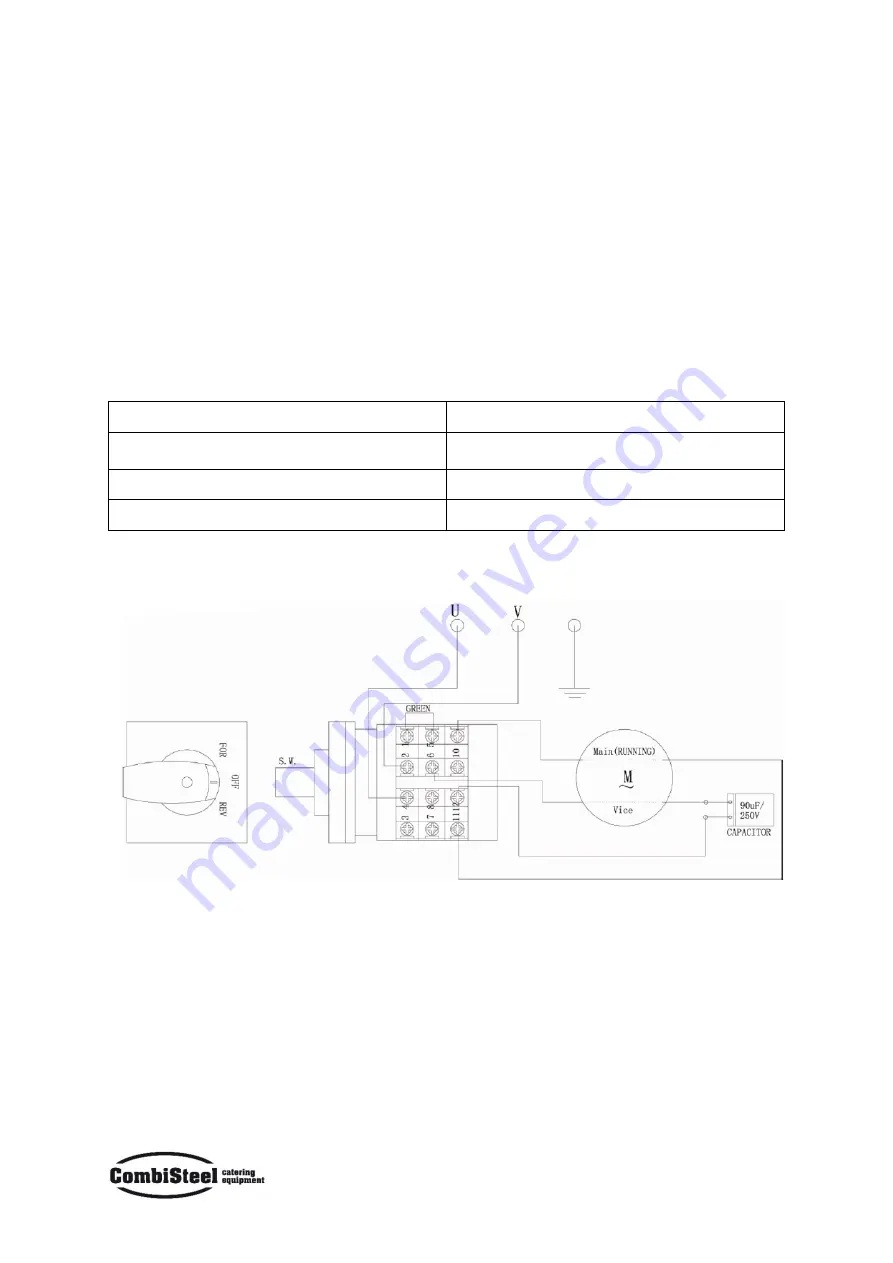
CIRCUIT DIAGRAM 


Содержание 7455.0085

Страница 1: ...Meat Mincer Machine 7455 0085 7455 0090 User Manual Gebruikershandleiding Gebrauchsanweisung Le mode d emploi...

Страница 2: ...VOORNAAMSTE TECHNISCHE PARAMETERS 6 INTRODUCTIE 6 CIRCUIT DIAGRAM 7 UITGETROKKEN ZICHT OVERZICHT RESERVEONDERDELEN 8 DEUTSCH TECHNISCHE HAUPTPARAMETER 9 EINF HRUNG 9 SCHALTPLAN 10 EXPLOSIONSDARSTELLUN...

Страница 3: ...of the safety features installed by the manufacturer will seriously undermine the guaranteed safety conditions 7 To ensure these conditions you must also fully comply with the instructions regarding t...

Страница 4: ...ects 5 After use disconnect unit from the power supply Disassemble the head wash and dry all parts thoroughly 6 If the unit is overloaded it will shut off to prevent internal damage Turn the grinder o...

Страница 5: ...knife 18 Big gear B 32 Rubber pad 5 Holder 19 Elastic washer 33 Machine body 6 Spiral propeller 20 Small gear A 34 Capacitor 7 Mincer head 21 Screw 35 Screw 8 Locking seat 22 Gear box 36 Bottom plate...

Страница 6: ...rwijderen van de veiligheidsvoorzieningen die de fabrikant heeft ge nstalleerd zal het gegarandeerde veilige gebruik danig ondermijnen 7 Om het veilig gebruik te garanderen moet u ook de instructies a...

Страница 7: ...gebruik verbreek de verbinding met de stroomtoevoer Haal het hoofd uit elkaar was en droog alle onderdelen grondig 6 Indien het apparaat werd overvuld zal het zichzelf uitzetten om interne schade te...

Страница 8: ...t Tandwiel B 32 Rubberen bekleding 5 Houder 19 Elastische ring 33 Machine body 6 Spiraalschroef 20 Klein Tandwiel A 34 Condensator 7 Maalhoofd 21 Schroef 35 Schroef 8 Grendelzitting 22 Versnellingsbak...

Страница 9: ...on Sicherheitsfunktionen gef hrdet ernsthaft die garantierten Sicherheitsbedingungen die der Hersteller eingebaut hat 7 Um diese Bedingungen sicherzustellen m ssen Sie die Anleitungen unbedingt einhal...

Страница 10: ...nde 5 Nach der Benutzung trennen Sie das Ger t von der Stromversorgung Montieren Sie den Einf llschacht ab waschen und trocknen alle Teile gr ndlich 6 Falls das Ger t berlastet ist schaltet es sich a...

Страница 11: ...ahnrad B 32 Gummiunterlage 5 Halterung 19 Unterlegscheibe 33 Ger tegeh use 6 F rderschnecke 20 Kleines Zahnrad A 34 Kondensator 7 Einf llschacht 21 Schraube 35 Schraube 8 Sicherungsschraube 22 Getrieb...

Страница 12: ...des dispositifs de s curit install s par le fabricant compromettront gravement les conditions de s curit garantis 7 Pour assurer ces conditions vous devez galement vous conformer aux instructions conc...

Страница 13: ...les mains ou tout autre objet 5 Apr s l utilisation d branchez l unit de l alimentation D monter la t te laver et s cher compl tement toutes les pi ces 6 Si l appareil est surcharg il s teindra pour...

Страница 14: ...s 18 Big gear B 32 Coussin en caoutchouc 5 Porteur 19 Rondelle lastique 33 Corps de la machine 6 H lice spirale 20 Petit quipement A 34 Condensateur 7 T te du hachoir 21 Vis 35 Vis 8 Si ge de verrouil...

Отзывы: