background image


Page 

20

 of 

46


Vulcan Prime 

Layer Mode 

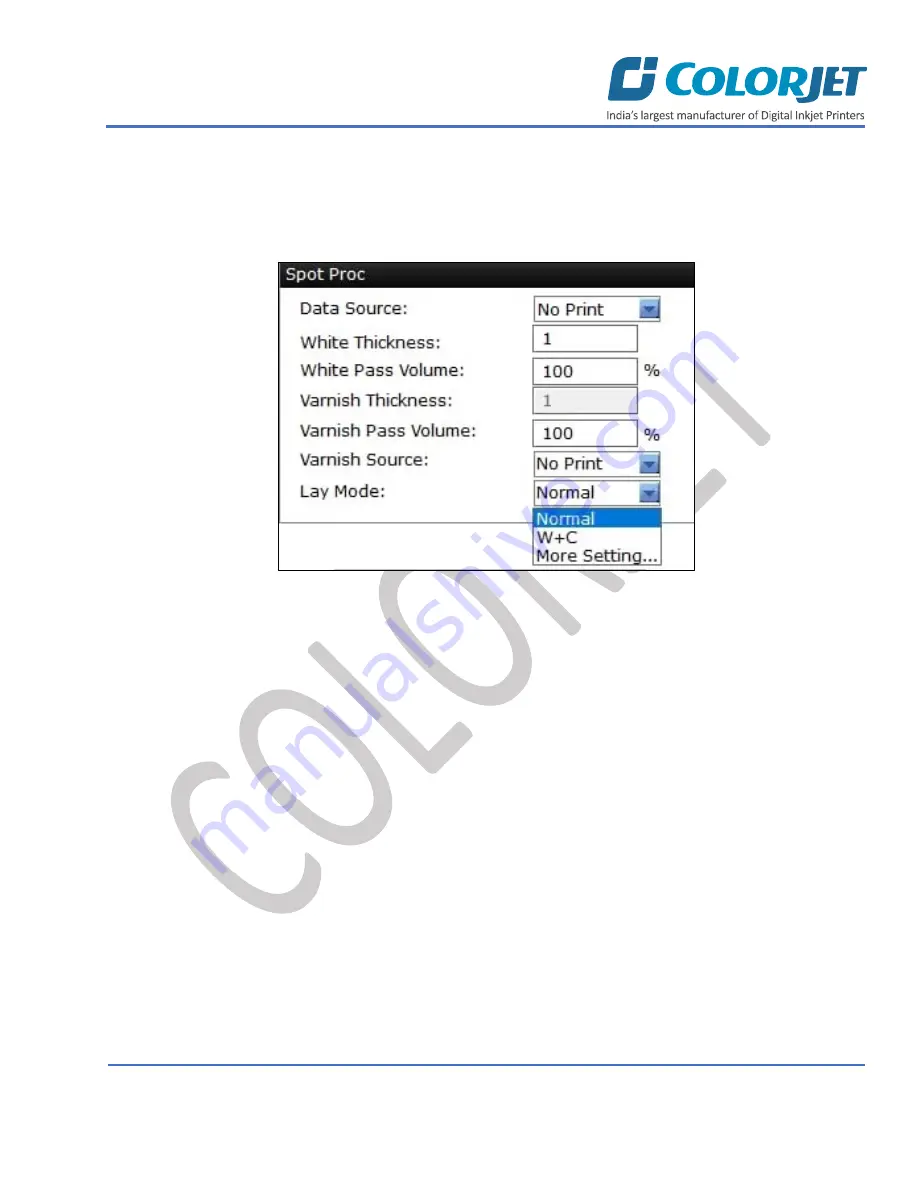
Layer mode defines the sequence and depth of printing with respect to color print heads and white. You can create 
various layer modes as per the requirements. To increase the depth of ink layer, select the desire option from the 
available list. For example, if the layer mode 

W+C 

is selected. This means, the first layer of white is printed and 

then color.  


Fig 16: Layer Mode and Its Related Options 

Note

: The layer mode is used when the white print head is in-line with colors. When we select the Lay Mode, the 

printing speed gets slow. 


Содержание Vulcan Prime

Страница 1: ......

Страница 2: ...chine without anyone else assistance The information provided in this document ensures its uniqueness and language quality For safe and proper use of the product please read this manual carefully and...

Страница 3: ...dy for Printing 10 Switch ON Procedure 10 Loading Media 12 Refilling Ink 14 5 Chiller Operating Instructions 15 Important Instructions 15 Chiller Features 15 Operation Rules 15 Parameter Settings 16 C...

Страница 4: ...nce 40 Maintenance of Machine Motion Parts 40 Equipment Cleaning 40 Power System Maintenance 40 Control System Maintenance 40 Ink Supply System Maintenance 41 Water Chiller Operating Instructions 41 1...

Страница 5: ...Page 4 of 46 Vulcan Prime Machine Errors 44...

Страница 6: ...encountered problems while working with the printer and Print Control Center software with appropriate remedial actions Intended Audience This document is meant for all the users who want to use the P...

Страница 7: ...anel of the Machine Head Power Switch ON OFF print head power Heater Not applicable for this machine Media Take Up A Auto Manual Enable to set the Media Take Up controlling modes viz Auto or Manual B...

Страница 8: ...Page 7 of 46 Vulcan Prime USB Port of the machine is shown in the image below Fig 4 Displaying the USB Port REV FWD Button Manually Switch Supply Roller Direction...

Страница 9: ...Menu Consist of several menu or sub menu options viz Print Option Task Select Operation Maintenance Help and also provide variety of functions in well organize manner Error Messages Displays the syst...

Страница 10: ...right direction C FWD Move the media in the upward direction D REV Move the media in the downward direction Note When user press the arrow key the movement of carriage media starts To stop the moveme...

Страница 11: ...smooth printing operations Step 2 Check Ink Level Step 3 Check Waste Ink Bottle Step 4 Release the Emergency button if pressed Step 5 Turn ON the Main Power switch located on the bottom left side from...

Страница 12: ...amps Step 8 Open the ink valves User needs to maintain the head negative air pressure between 2 5 to 3 0 If the negative pressure is slightly being high or low adjust it using the regulator knob The N...

Страница 13: ...he machine first open the Print Control Center and get it ready for use Now the machine starts initializing automatically Step 11 Press the Purging button Step 12 Perform Nozzle test Now printer is re...

Страница 14: ...nough media so that it reaches to the Take Up roller or let the media down by issuing the Print command Step 8 Paste the front edge of the media on the Core Step 9 Move the media forward so that it ro...

Страница 15: ...ity as well as long life of print and print heads To refill ink open the right door from back of the printer and replace ink bottles if empty To refill ink remove the Main Ink Tank cap and refill ink...

Страница 16: ...ures longer lifespan of the UV LED lamp source Higher luminous efficiency less power consumption long lifespan The UV LED lamp is suitable for many curing base materials like the soft rigid absorbent...

Страница 17: ...range is 5 50 C Water temperature D1 Indoor temperature D2 D values C1 D1 will display upper limit C5 and lower limit C4 value if room temperature is too high or too low to beyond the upper or lower...

Страница 18: ...C1 D values 1 5 0 C The d value between actual and target water temp C2 Condenser Temp 60 0 C C3 Water shortage alarm delay 1s C4 Low Water Temp Limit 20 0 C C5 High Water Temp Limit 31 0 C C6 Heatin...

Страница 19: ...ike Lamp1 Left Work Lamp1 Right Work and similarly for Lamp 2 Colorbar Option Enable users to define the colorbar width distance from image distance between colors and colobar position White Color Set...

Страница 20: ...ons for the White Color printing No Print No white color is printed Full White will be printed completely all over the image Valid Image White color is printed same as the percentage of CMYK color in...

Страница 21: ...requirements To increase the depth of ink layer select the desire option from the available list For example if the layer mode W C is selected This means the first layer of white is printed and then...

Страница 22: ...to the current printing jobs Follow these steps to import file Step 1 Click on the Import button to import a file Refer to Fig 14 The Open dialog box appears on the screen as shown below Fig 17 Displ...

Страница 23: ...save the current printer settings in the cbk file format which can be used in future After clicking on the Export button the following screen appears Fig 18 Exporting the Current Print Settings After...

Страница 24: ...shown in the image below Fig 19 Displaying the Task Select Screen Follow these steps to open and print a file Step 1 After opening the Task Select screen navigate to the location where the printable...

Страница 25: ...same image When user select the Multi Copy check box the Multi mm section gets activated where user has to specify total count of images in X axis and Y axis as well as horizontal and vertical distanc...

Страница 26: ...e 6 720x2400 16 Checking the Image Ink Color Volume Click on the Ink Volume button on the Properties dialog box Refer to Fig 20 to check the requirement of each color ink to print the selected image T...

Страница 27: ...Fig 22 Displaying the Operation Menu List of options related to the Operation menu Open File Open image file for printing Print Position Set print settings like speed print direction X origin and Y o...

Страница 28: ...ration screen Refer to Fig 22 The Open dialog box appears on the screen as shown below Fig 23 Displaying the Open Dialog Box Step 2 Select the file by navigating the file location Step 3 After selecti...

Страница 29: ...Page 28 of 46 Vulcan Prime Step 4 Click the OK button to add the image file in the printing queue job list area as shown in the image below Fig 24 Creating Printing Queue...

Страница 30: ...Page 29 of 46 Vulcan Prime After clicking the OK button the file is shown in the job list area as shown in the image below Fig 25 Displaying the Printing Queue Job List Area...

Страница 31: ...t position option enables users to set the printing speed print direction X origin and Y origin as shown below Fig 26 Setting the Print Position Note This option enables user to define printing direct...

Страница 32: ...rint origin X and Y printing direction and speed To check the status of print head nozzles click on the Status option under the Operation tab Refer to Fig 26 The Test Result is shown in the image belo...

Страница 33: ...Let s see all these menus one by one in the upcoming section The Motion tab is shown as below Fig 29 Displaying the Motion Tab In the above image user has to provide the value of X and Y Move Length w...

Страница 34: ...Page 33 of 46 Vulcan Prime The Voltage tab is shown as below Fig 30 Displaying the Voltage Tab This section is only used by the service engineer...

Страница 35: ...31 Displaying the System Information Tab Feeding Password In Vulcan Prime there is a hardware key associated with the Main Board This hardware key is required to run the printer and valid for certain...

Страница 36: ...igure step and bi direction calibrations are performed simply by providing data in the given fields For bi direction click on the Bi Dir Offset Refer to Fig 33 and select the speed for which you want...

Страница 37: ...ng the head wiper as shown below Fig 34 Displaying the Head Wiper Note Please strictly follow the below mentioned instructions Don t apply force while wiping the residue inks from heads after purging...

Страница 38: ...head purging Step 1 Open ink valves Step 2 Press the Purging button of each color to purge refer to Fig 35 Step 3 Push the sliding tray refer to Fig 35 Step 4 Use head wiper to clean the print head r...

Страница 39: ...ware Step 3 Turn OFF the ink valves Step 4 Switch off the Chiller Unit by pressing the OFF button as shown in the below image Fig 37 Switch OFF the Chiller Unit Step 5 Turn off the Printer Main Power...

Страница 40: ...d refill ink main tank regularly to avoid air lock To avoid air in head pipes always maintain the ink level more than 1 Litre in the main tank and wipe Print Heads immediately after purging Chiller ta...

Страница 41: ...e ON Don t use expiry ink and store the ink at favorable environment Prevent the object or human body with static contact to the print head Print head nozzles should be kept clean dust free and also p...

Страница 42: ...ure that the water chiller is operated in a smoothly ventilated environment and it is barrier free in 0 5 meter on both sides of the air inlet and air outlet Make sure that the water tank is filled wi...

Страница 43: ...Page 42 of 46 Vulcan Prime Fasten the electrical wiring inside the electrical control cabinet with a fixed screw every six month to prevent the screw loosening which results in poor contact...

Страница 44: ...s empty Ink pipe is having cut bend Ink pump is not working connector loose open Print Stops in Between Printing USB cable is loose faulty Image files are heavy in size Ground wire is disconnected Enc...

Страница 45: ...s wrong Contact your equipment provider 155 The Security dog has expired Contact your equipment provider 156 The Security dog has expired Contact your equipment provider 157 The Stage is expired Conta...

Страница 46: ......

Страница 47: ...For Any Query Please Contact Us www colorjetgroup com Call us on 91 120 4548195 Email on info colorjetgroup com For Ink Enquiry sales colorjetgroup com For Support support colorjetgroup com...

Отзывы: