FIGURE 1
7.00"
6.25"
NOTE : All of the information listed in this booklet
must be given to the end user by the installer.
1 ) Cut a hole in the desired mounting location to
the dimensions shown in Figure 1. Make sure
this hole is properly oriented to a structural
member of the vehicle for a secure mounting.
This installation may require the use of spac-
ers or longer mounting screws to bring the
product to the desired orientation with the
exterior surface. In some installations it may
be necessary to fabricate a special adaptor
plate to achieve the desired position on the
vehicle.
2 ) Hold speaker assemblies against the bumper
and inscribe locations for drilling holes for the
mounting screws.
4
3 ) At the inscribed positions, drill holes for the
provided 1/4" x 2-1/2" screws using a 9/32"
drill bit.
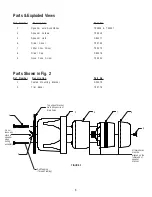
4 ) Attach the speaker assemblies and bezel to
the vehicle using the fasteners shown in
Figure 2. Make sure that the siren wires are
clear of the mounting bracket to avoid dam-
age during installation. In addition, DO NOT
TIGHTEN the mounting screws completely
until the speaker is parallel and evenly
positioned with the holes on the vehicles
exterior.
5 ) Connect the wires from the speaker assem-
bly to the leads coming from the siren control
h e a d .
NOTE: When two or more speakers are to
be operated by the same control head, the
speakers must be connected in phase. In
order to accomplish this, the white wires,
which are connected to the number 1 termi-
nals on the siren drivers, must be connected
together to the same output terminal on the
siren amplifier. Likewise, the blue wires,
which are connected to the number 2 termi-
nals on the drivers, must be connected
together on the other output terminal of the
siren amplifier.
FIGURE 2
Cleaning
Clean with soap and water to remove all salt, dirt or mud. Do not use any abrasive cleaners or harsh chemi-
cals because the protective coating on the aluminum may be damaged allowing the exposed aluminum to dull
in appearance or corrode.
Maintenance
Maintenance of your FM100C and FM100V involves the cleaning of the unit and in some cases the replace-
ment of the siren driver, if required.
2
1
Содержание FM100C
Страница 7: ...NOTES ...


