20
.
3.1 Unboxing and Assembly
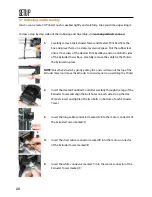
Your Cocoon Create 3D Printer Touch is packed tightly and carefully - take your time unpacking it.
To view a step by step video of the Unboxing and Assembly, visit cocoonproducts.com.au
1.
Carefully remove the Extruder Tower and Heated Print Bed from the
box and place them on a clean, level work space. Slot the rubber feet
onto all 4 corners of the Heated Print Bed Base, and one on both sides
of the Extruder Tower Base. Carefully remove the cable tie that holds
the Extruder in place
NOTE:
Raise the Extruder by gently pulling the z-axis rod towards the top of the
Extruder Tower and move the Extruder to one side prior to assembling the Printer
2.
Insert the Heated Print Bed Controller carefully through the legs of the
Extruder Tower and align the bolt holes on each side. Using the Hex
Wrench, insert and tighten the two bolts on bottom of each Extruder
Tower
3.
Insert the long cable connector marked ‘A’ into the motor connector of
the Extruder Tower marked ‘A’
4.
Insert the short cable connector marked ‘B’ into the motor connector
of the Extruder Tower marked ‘B’
5.
Insert the white connector marked ‘C’ into the motor connector of the
Extruder Tower marked ‘C’
SETUP
.
Содержание HE161192
Страница 1: ... MODELNUMBER HE161192 INSTRUCTIONMANUAL VERSION 1 ISSUED 23 11 17 ...
Страница 2: ... ...
Страница 40: ... ...

