background image

18


 7. SMARTS 


Smart is one of the main features of Cockpit client application. It allows end users to control 
and monitor their home on zone/room level (home, floor, living room, kitchen…).


Smart consists of set of devices of the same type that are available in one zone in user’s smart 
home.


Currently, there are three smart types available within Cockpit application:


1. 

Lighting smart (requires at least one device that supports lighting service)


2. 

Heating smart (requires at least one thermostat)


3. 

Sensory smart (requires at least one sensor)


Smarts are active by default after the end user logs into the Cockpit application.


 7.1 ADD NEW SMART 


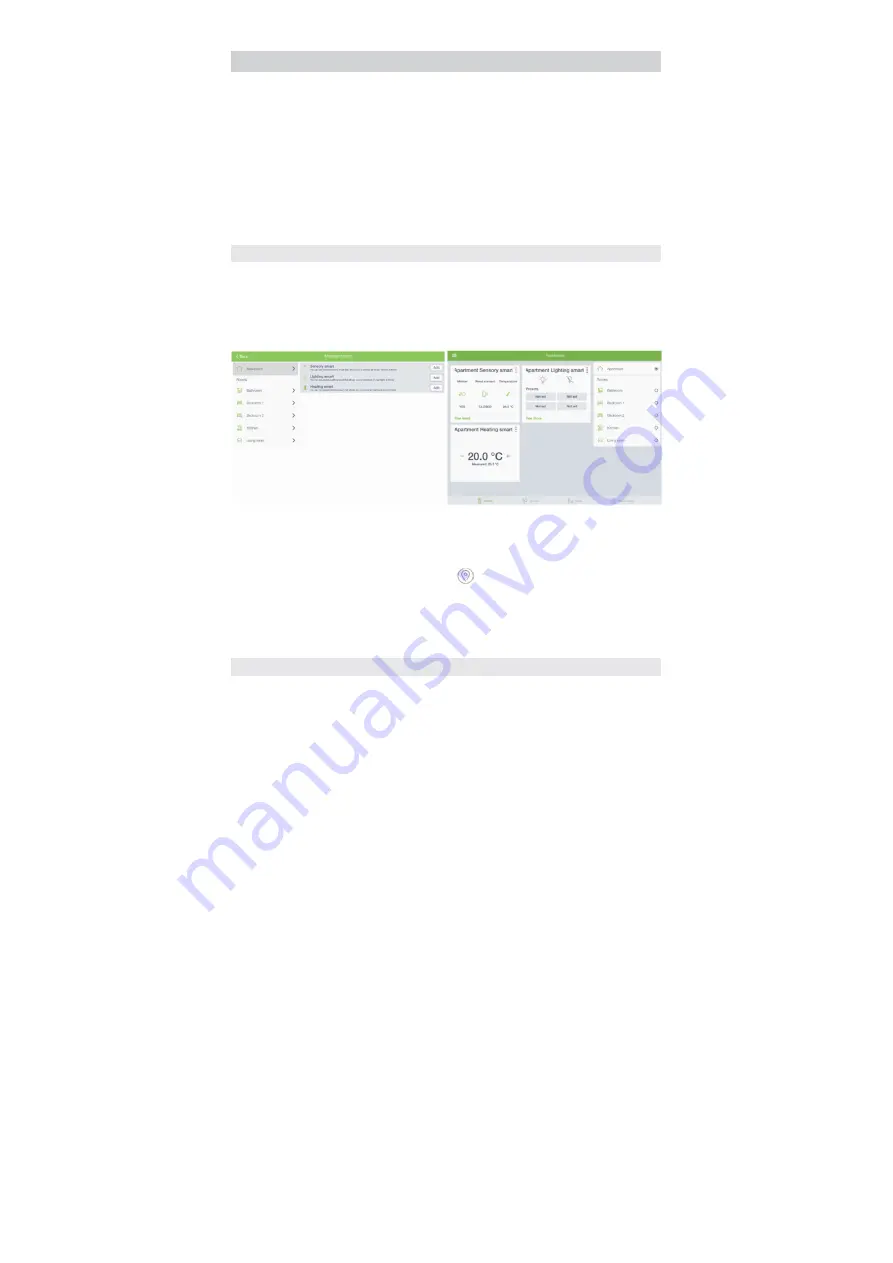
Once a new device is added to the user’s smart home system, the gateway will automatically 
check if the corresponding smart could be added to the selected zone also (Illustration 25). 
For  example,  when  the  new  smoke  sensor  is  added  and  assigned  to  the  kitchen,  gateway 
automatically proposes sensory smart in the kitchen and all parent zones (floor, home).


Illustration 25 

Illustration 26


Smart can be easily added to the selected zone by pressing the button “Add”. Once the smart 
is added to the selected zone, its quick control will be displayed on the screen whenever that 
zone is active (Illustration 26).


To select a specific zone/location, tap the button 

 in the upper right corner.


NOTE: 

Smarts  can  be  added  to  the  user’s  smart  home  system  only  when  corresponding 

devices  are  assigned  to  some  room/zone  in  user’s  home  (in  the  case  when  devices  are 
unsorted, smarts are not available for those devices). 


 7.2 LIGHTING SMART 


Lighting smart allows control of all lighting devices (dimmers, relays, connected bulbs) within the

Содержание CKNOAD1

Страница 1: ...USER MANUAL Home Automation Gateway Cockpit Main Gateway Ordering Code CKNOAD1...

Страница 2: ......

Страница 3: ...UP 13 5 DEVICE MANAGEMENT 14 5 1 MANAGEDEVICESBYUSINGCLIENTAPPLICATION 14 5 1 1 Add a device to the gateway 14 5 1 2 Remove a device 15 5 1 3 Update device name and location 16 5 1 4 Replace failed de...

Страница 4: ...4 Do not use device in gas filled environments 5 Do not place the device near heat sources 6 Do not expose the device to direct sunlight 7 Do not place cables and or power supplies under heavy objects...

Страница 5: ...ay communicates with connected devices and enables users to monitor and control their home FRONT Front button LED indicator Powersupplysocket Back button Ethernet Illustration 1 Cockpit automation gat...

Страница 6: ...eway to the home network router by using Ethernet Illustration 2 or WiFi Connection Illustration 3 Illustration 2 Ethernet connection Illustration 3 WiFi connection In case you have connected your gat...

Страница 7: ...rt phone to the WiFi network created by gateway 3 In web browser of your client device launch default IP address printed on the label on the back side of the gateway typically 192 168 1 1 Device infor...

Страница 8: ...L applications and Cockpit cloud service it provides a turn key platform that covers lighting security safety energy management and other aspects of the fast growing home automation markets Cockpit cl...

Страница 9: ...rder to create new account 1 To create a new user account by using client application make sure that your smart phone or tablet is connected to the Internet and start the application 2 Tap the Create...

Страница 10: ...iz 2 Tap the Create account button on the login dialog 3 Enter your personal and login information on the login dialog see Illustration 11 Illustration 11 4 Agree with Terms of service and Privacy Pol...

Страница 11: ...quired gateway information Illustration 12 a Secure ID is a unique secret identifier for a gateway It consists of 16 characters com bination of letters and numbers and can be found on the back side of...

Страница 12: ...isplayed 4 3 2 Add the gateway by using web application Please follow next steps in order to add the gateway to the user account 1 Visit https cloud yourcockpit biz and log into the user account 2 Onc...

Страница 13: ...his section please follow next steps 1 Login to the account to which the gateway was added 2 Select Home Setup option from the main menu After you have accessed Home setup section you will see followi...

Страница 14: ...of this user manual 5 DEVICE MANAGEMENT To manage devices the user should choose one of the following ways 1 Byusingclientapplication recommendedwaytomanagedevices 2 By using gateway s main button 5...

Страница 15: ...from device to device 5 Once the device is added to network it will be displayed among the list of devices NOTE In order to add a new Z Wave device to the network make sure that the device is removed...

Страница 16: ...eplace device from the menu 3 This will start inclusion procedure on your smart home gateway Illustration 22 4 Start joining procedure on the new device according to manufacturer s instructions 5 Upon...

Страница 17: ...ase follow next steps in order to control or monitor devices 1 Select Devices option in the application s main menu 2 All devices added to your smart home system will be displayed on the screen Illust...

Страница 18: ...ally check if the corresponding smart could be added to the selected zone also Illustration 25 For example when the new smoke sensor is added and assigned to the kitchen gateway automatically proposes...

Страница 19: ...ure lighting smart By using this option the users are able to define their own presets according to their needs This can be done in a few simple steps 3 Tap the button 4 Select the option Play and edi...

Страница 20: ...e sensors in accordance with predefined prioritization To check statuses of all sensors within selected smart tap the option See more The user is able to check all devices included in the sensory smar...

Страница 21: ...button b In the device trigger dialog choose the device you want to add as a trigger you can choose device by its location or by type c In the drop down list choose functionality and its value Illust...

Страница 22: ...e logical operators OR AND upper right corner to combine mul tiple triggers e g we would like to define an action when light intensity is less than 20 AND motion is detected Illustration 36 8 Once you...

Страница 23: ...o definition of an action set you will be able to set delay time between actions sets execution Delay time can be added by pressing Add delay time button in the upper right corner Once you have set de...

Страница 24: ...the application s main menu to open the list of available rules 2 Choose the rule you want to rename and tap the button next to the rule s name 3 From the drop down menu select option Rename 4 In the...

Страница 25: ...k red 2 times per second 11 FACTORY RESET In order to restore your gateway to default factory setting please follow next steps 1 Press back button 9 times 2 Duringthe operation LEDwill blink red once...

Страница 26: ...50 60Hz Power Consumption 10W Dimensions W x H x D 108 x 26 x 108 mm 14 DECLARATIONS OF CONFORMITY Hereby Cockpit Smart Home d o o declares that HA Gateway device is in compliance with the essential...

Страница 27: ...27...

Страница 28: ...hnical support that you are not able to get it from your supplier please contact our technical support team support yourcockpit biz COCKPIT SMART HOME d o o Ulica Klementa Juga 7 5250 Solkan Slovenia...

Отзывы: