background image

28

E x t e r n a l   C o n n e c t i o n   D i a g r a m

Tempo Go

External Connection Diagram

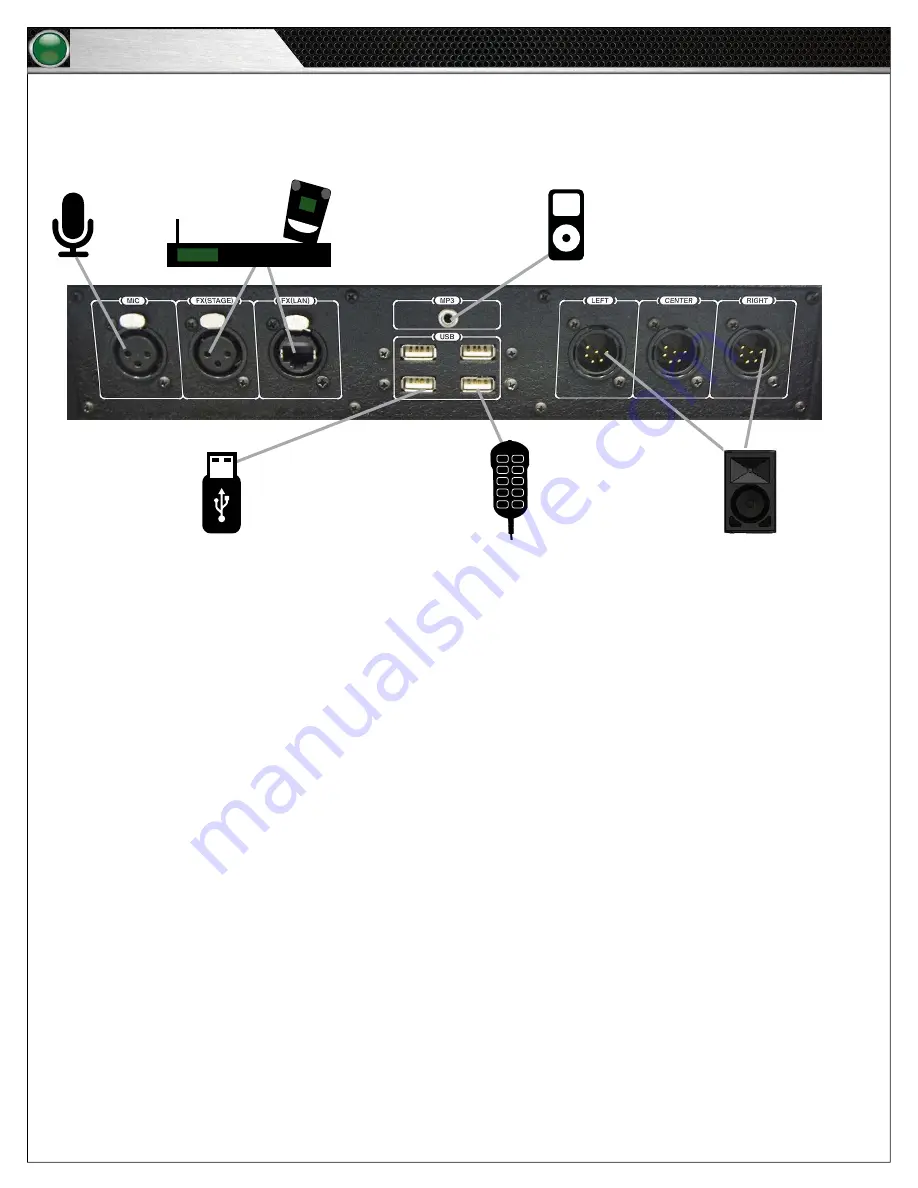
Figure 41 provides specific connection details for the Tempo Go Control Unit.

Mic

Speakers

Tempest

®

 FX 

System

Portable 

Music Player

Control Unit Back Panel

Tempo USB

Remote 

(available USB port)

External USB Drive with 

Tempo Script (available 

USB port)

Figure 41: Control Unit I/O Connection Panel Showing Possible Connected Devices

Содержание Tempo Go

Страница 1: ...O p e r a t i n g M a n u a l ...

Страница 2: ...stem please take a few moments to read this manual completely so that you better understand the operation of this product For questions not addressed in this manual feel free to contact CoachComm s Customer Support Department CoachComm LLC 205 Technology Parkway Auburn Alabama 36830 1 800 749 2761 www coachcomm com 2018 CoachComm LLC All rights reserved Tempo is a registered trademark of CoachComm...

Страница 3: ...ardware Operation 11 Tempo Control Unit 11 Connections and Controls 11 Time Clocks 13 Software Installation and Operation 14 Installation 14 Minimum Software Requirements 14 Operation 14 Organize Your Audio Library 14 Open Tempo Software 15 Build a Script 15 Test a Script 21 Edit a Script 21 Clone a Script 21 Delete a Script 21 Configure the System 22 Export and Play Script 23 Test FX Connectivity...

Страница 4: ...ii T a b l e o f C o n t e n t s Tempo Go This page is intentionally blank ...

Страница 5: ...rt of Tempo Go 3 Do not operate the Tempo Go system in winds exceeding 20 mph System damage or personal injury may occur System damage due to wind is not covered under the product warranty Electrical Safety 1 Do not submerge any part of the Tempo Go system in water 2 Protect the power cords from being walked on or pinched particularly at plugs convenience receptacles and the point they exit from t...

Страница 6: ...ents accessories cables hardware provided by the manufacturer 4 Do not use blocks to increase height of system Noise Level Safety Exposure to extremely high noise levels may cause a permanent hearing loss Individuals vary considerably in susceptibility to noise induced hearing loss but nearly everyone will lose some hearing if exposed to sufficiently intense noise for a sufficient time To ensure a...

Страница 7: ...family of products includes the followoing Tempo Control Unit and Tempo Remote Tempo Software Speaker Units Tripods Control Unit Mounting Bracket Hard Case for Tempo Control Weather Covers for Speakers Wired Microphone Audio Cables Optional components provided by CoachComm include Practice Segment Timer s 25 40 Clock s Tempest FX System Commando T Remote Each hardware component of the Tempo Go sys...

Страница 8: ...n system allow you to jump to the next period adjust volume levels add or subtract times from periods and play selected song and or sound files With Tempest FX users can control the Tempo Software from anywhere on the field communicate with other coaches wearing BeltPacks and use the Voice Announce feature to engage players Valuable product features include the following 1 Control Unit A Practice ...

Страница 9: ...erated with additional solar panel charging AC power options are available in some instances 1 Solar Panel Charges the battery 2 Battery Powers the Clock 3 Tow Hitch Allows transport of the Clock Tempo Software Overview The Tempo Software is engineered to provide simple control over event scripting including the following features Organized audio for practice management Built in coordination with ...

Страница 10: ...entify the images used throughout these steps 1 Fully extend the two tripods Full extension is when the sliding plastic collar contacts the bolt near the bottom of the center tube Then place the tripods side by side aligning the holes in each tripod s Leg 1 Secure with the provided pin as shown in Figure 7 2 Insert the mounting bracket s two posts into the tops of the tripods Use two of the provid...

Страница 11: ...ower strip via extension cord if necessary to a 120 Volt 15 Amp power source Note If you are using an optional Tempest FX system with Tempo Go CoachComm recommends that you power on your FX system before powering on your Tempo Go Control Unit and speakers See page 10 for information about connecting an optional Tempest FX system CAUTION Protect the power cords from foot or vehicle traffic Do not a...

Страница 12: ...on outlines the I O connection panel to utilize your Tempo Go Control Unit 1 Mic Microphone level input female 2 Tempest FX Stage FX audio input from Tempest FX Voice Announce output female Tempest FX LAN FX network Ethernet connection 3 MP3 Player Port Connection for 1 8 in auxiliary cable 4 USB Ports Used to connect the Tempo Remote and USB flash drives to load the Tempo script 5 Output to speak...

Страница 13: ...to utilize your Speaker s 1 Audio Cable Connection 2 Power Cable Connection 3 Power Switch Speaker Settings The Tempo Go speakers have have the following settings applied from the factory The Gain settings should be verified on the rear of each speaker prior to each use Figure 13 Speaker Rear Detail Figure 14 Speaker Settings Locations ...

Страница 14: ...aseStation and Tempo Go Control Unit See the red labels in Figure 15 below 3 Connect a Stage Announce XLR cable between the BaseStation and Tempo Go Control Unit See the yellow labels in Figure 15 below 4 Follow the Tempest FX setup instructions found in the Tempest FX User Manual to connect and mount your Remote Transceiver and to connect power It is recommended that you power on your FX system b...

Страница 15: ...n XLR connector into the Mic input on the I O connection panel Then adjust the volume with the Tempo Remote or Volume switch The Tempo Go system has no phantom power therefore always use a dynamic microphone Tempest FX if applicable The Voice Announce feature broadcasts one s voice through the entire Tempo Go system using your connected Tempest FX system To operate this feature open the Tempo Soft...

Страница 16: ...tions or distortion of audio content it is recommended to only use the highest quality licensed content obtained from reputable licensed download providers USB Ports To connect a USB flash drive or Tempo Remote to the unit use one of the four provided USB ports on the Control Unit s IO connection panel You can use these ports to connect the following USB flash drive containing the exported Tempo p...

Страница 17: ...wered Plug the clock s into the battery on the clock trailer or into an AC power source for operation Once powered they can be controlled wirelessly via the Tempo script For battery powered clocks it is best to charge the clocks overnight or when not in use Figure 22 I O Connection Panel Output to Speaker Connection Figure 23 The 25 40 Clock left displays a countdown as intervals and the Practice ...

Страница 18: ...ganize your MP3 audio files within your computer s directory so they can be easily imported into a Tempo script Do this by placing the files you d like to use in your Tempo audio library To access your Tempo audio library use these steps 1 Click on Start 2 Go to My Computer and open your C folder 3 Open the Tempo Go folder and then open the folder labeled library CoachComm recommends creating orga...

Страница 19: ...d a script from scratch open the Tempo Software and click on New Script The new blank script will display with these tabs General Periods Effects and One Touch The Folder List shown on the left hand side of the screen displays all of the music folders you created in your Tempo audio library Note You can preview an audio file in this list by selecting it and using the Play Pause button at the botto...

Страница 20: ...eriod length This is your most used period length You can customize length by period in the Periods tab D Determine your total scheduled length of practice E Determine whether or not the music stops at the end of the period Note If you make your total practice time longer than your allowed or allotted practice time the timing mechanism will flash red on the bottom center of the screen This control...

Страница 21: ...tting for all periods on the General tab and is shown on the Periods tab C Manual Advance Select if you prefer your period to have no time associated with it With this setting a period will not advance to the next period unless you manually do so from the Tempo Remote Tempest FX BeltPack or Commando T Remote This setting s options are hidden until it is selected Figure 27 Tempo Software Periods Ta...

Страница 22: ...y on your period clock if applicable If you leave the Practice Period field empty the clock will always display the default period number The Shows As field displays what will be seen in the software and on the clocks as you run the script Type two hyphens in this field to remove the period number from the period clock The period time will still be displayed on the clocks A zero can be placed in t...

Страница 23: ...ult duration is set in the general tab to stop sounds or continue sounds at the end of each period in the script In Default Duration box you can override the script setting for an individual period M Additional options for the Periods tab are shown below i Not in Practice Time Check this box to remove the period from the total practice time Typically used for practice beginning or stretching time ...

Страница 24: ...sers choose to have one or the other not both E 25 40 Clock End Effect for the end of the 25 40 clock countdown One Touch Tab 5 Set specific one touch buttons for the Tempo Remote using the One Touch tab by dragging the selected audio file from the Folder List to the applicable field Delete unwanted audio files by selecting Clear Click Save when done A Assign each audio file a Label to correspond ...

Страница 25: ...g a script makes a duplicate copy of the selected script This is useful in situations where you would want nearly identical scripts for each practice day but still need to change a few details Cloning prevents you from having to create each script from scratch 1 Select the script you wish to clone from the Tempo Home screen 2 Click Clone Script Confirm your decision in the pop up prompt Your dupli...

Страница 26: ... or delete the line all together if you don t want anything read before the periods of your script Customize this to whatever your coach likes best You can click on the Default button at any time to return to default settings BeltStation Controls Configure the control functions for all associated Tempest BeltPacks Commando T Controls Configure the settings of a Commando T Remote associated to a Be...

Страница 27: ...o export every time 6 Turn the Control Unit on After approximately 20 seconds the clock will start a USB animation at which time you can plug in your flash drive 7 Start practice after the software displays the script on the screen by pressing the Pause Practice button on either the Tempo Remote or Tempest FX Commando T controls Test FX Connectivity After the script is loaded you should verify you...

Страница 28: ...Subtracts or adds a minute to a period Shift 25 Starts 25 second clock Shift 40 Starts 40 second clock Volume Decreases or increases volume Shift 1 7 Plays sound assigned to the selected one touch number Skip Song Forwards to next song Restart Period Restarts current period Previous Period Returns to beginning of previous period Next Period Starts next period Shift Changes remote functions when pr...

Страница 29: ...ond Clock Call Stage Display Practice Script Time Remaining Call Hold Enter Next Period Call Hold Menu Previous Period Call Hold Menu Restart Period Call Hold Stage Pause Restart Practice Call Turn AB Knob Adjust Period Length Voice Announce is also a feature that will duck the music while the designated coach speaks over the system In this situation the music s volume level is lowered and the voi...

Страница 30: ... previous or next period in the script 6 1 00 1 00 Adds or removes one minute from the period clock 7 One Touch Buttons 1 and 2 Play the sounds associated to the first and second One Touch buttons on the Tempo Play screen Commando T Volume Remote Functions See Figure 40 1 Volume Changes script audio volume level 2 Restart Song Restarts the current song from the beginning 3 Skip Song Skips current ...

Страница 31: ...ate controlled storage space is not available Tempo Go equipment can be stored in temperatures ranging from 5 to 130 F However when going from cold to warm environments electronics can form condensation which can cause damage to the electronic components If storing your system in these type of conditions wait for the equipment to acclimate to the ambient temperature before using Operating Temperat...

Страница 32: ...es specific connection details for the Tempo Go Control Unit Mic Speakers Tempest FX System Portable Music Player Control Unit Back Panel Tempo USB Remote available USB port External USB Drive with Tempo Script available USB port Figure 41 Control Unit I O Connection Panel Showing Possible Connected Devices ...

Страница 33: ... ground Edison plug Only one Tempo Master allowed per circuit Power Cable Length 82 Audio Cable Length 45 each Speakers Power Requirements Universal Power Supply 100 240 VAC 50 60 Hz Audio Coverage Approximately 105 Frequency Response 66 Hz 18 kHz 59 Hz 20 kHz speakers speakers 2 Amp Protection Thermal Limiting Ouput Overcurrent Overtemperature Muting Amp Total Power Output 1000 watts 2000 watts s...

Страница 34: ...30 P r o d u c t S u p p o r t a n d W a r r a n t y Tempo Go ...

Страница 35: ...31 P r o d u c t S u p p o r t a n d W a r r a n t y Tempo Go ...

Страница 36: ...burn Alabama 36830 1 800 749 2761 www coachcomm com 2018 CoachComm LLC All rights reserved Tempo is a registered trademarks of CoachComm LLC The CoachComm logo is a registered trademark of CoachComm LLC Document Reference 2018 07 D0000421_A ...

Отзывы: