background image

XNET User Manual 


14 /

 43 

1

1

.

.

6

6

.

.


S

S

e

e

t

t

t

t

i

i

n

n

g

g


D

D

a

a

t

t

e

e


&

&

T

T

i

i

m

m

e

e


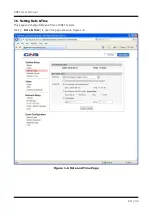
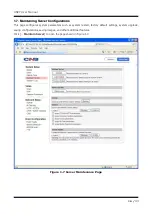
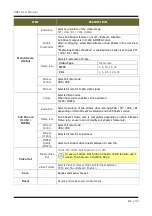
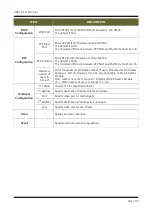
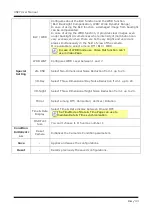
This page will change Date and Time of XNET system.   

Click [


Date & Time

] to open the page shown in Figure 1-6. 


Figure 1-6 Date and Time Page 


Содержание XNET ITE1030

Страница 1: ...Ver 1 0 XNET Network Vandal Dome Camera ITE1030 User Manual...

Страница 2: ...ore or the manufacturer before disassembling the product for alteration or repair XNET is a trademark of CNB Technology Inc This product complies for CE Europe and FCC USA regulations for industrial h...

Страница 3: ...XNET User Manual 3 43 Appendix Warning This symbol provides a caution for handling XNET network cameras Note This symbol provides a useful tip for handling XNET network cameras...

Страница 4: ...s 12 1 6 Setting Date Time 14 1 7 Maintaining Server Configurations 16 1 8 System Log 18 1 9 Configuring Video 20 1 10 Configuring RTP 22 1 11 Camera Conditions 24 1 12 Configuring TCP IP parameters 2...

Страница 5: ...ttp 192 168 123 100 8080 1 1 1 1 2 2 I ID D a an nd d P Pa as ss sw wo or rd d If you are logging in as an administrator the Log In box will appear as shown in figure 1 1 Basic Setup page will appear...

Страница 6: ...is the only way to regain access However since this will retrieve all default settings you need to configure the network settings using IP installer software again For security purpose it is recommen...

Страница 7: ...atures can be accessed from this page Access to each feature is controlled by different user groups Administrator Operator and Viewer Figure 1 2 Basic Setup Page Basic Setup Page can be accessed from...

Страница 8: ...p Page Maintain Server Setup Page System Log Setup Page Video Setup Page RTP Setup Page Camera Condition Setup Page TCP IP Setup Page IP Filtering Setup Page HTTP HTTPS Setup Page UPnP DynDNS BJR Setu...

Страница 9: ...er r I In nd de ex x h ht tm ml l When you access an XNET product Web Viewer page will appear automatically Viewer area displays the video output from the camera and menu bar contains taps that lead t...

Страница 10: ...ill display Video as well as setting up Stream Protocol TCP UDP and Codec when using Dual Stream Stream Protocol A Stream Protocol can be selected when selecting EditBox RTP over TCP RTP over UDP RTP...

Страница 11: ...r Manual 11 43 1 1 4 4 S St ta at tu us s W Wi in nd do ow w Status page displays XNET System s Version and its Ethernet address Click Status button to open the page shown in Figure 1 4 Figure 1 4 Sta...

Страница 12: ...on nf fi ig gu ur ri in ng g U Us se er rs s This can give or limit authority to users for controlling Video and other features of XNET system Click Users button to open the page shown in Figure 1 5...

Страница 13: ...ation for each user Select a user in User Listbox enter new Password User Group and click modify button to save the changes Updated detail can be viewed in User List Box Remove Removes a user Select a...

Страница 14: ...ser Manual 14 43 1 1 6 6 S Se et tt ti in ng g D Da at te e T Ti im me e This page will change Date and Time of XNET system Click Date Time to open the page shown in Figure 1 6 Figure 1 6 Date and Tim...

Страница 15: ...and Time of the Server Synchronize with computer time Synchronizes time and date of Client PC to Server Synchronize with NTP server Synchronizes server s time and date to NTP Server Enter NTP Server a...

Страница 16: ...fi ig gu ur ra at ti io on ns s This page configures system parameters such as system restart factory default settings system upgrade saving configurations saving images and other additional features...

Страница 17: ...onds system reset Restore Restore This loads up settings from a saved Backup file Click restore button after selecting backup files in Client PC Optional check boxes can be used to select settings to...

Страница 18: ...1 1 8 8 S Sy ys st te em m L Lo og g System Log page provides network camera s configuration language and error information to users Click System Log button to open the page shown in Figure 1 8 Figur...

Страница 19: ...e from the list Please select a language file from the list and then select Del button to remove from the list If you delete the currently set language file from the list then web page language is set...

Страница 20: ...ual 20 43 1 1 9 9 C Co on nf fi ig gu ur ri in ng g V Vi id de eo o XNET s Video features can be configured in this page Click Video button to open the page shown in Figure 1 9 Figure 1 9 Video Config...

Страница 21: ...ts Video Codec When dual codec enabled can be selected H 264 MJPEG Resolution Select resolution of sub stream video among QVGA CIF VGA D1 depending on Main Stream s resolution and Sub Stream s codec F...

Страница 22: ...NET User Manual 22 43 1 1 1 10 0 C Co on nf fi ig gu ur ri in ng g R RT TP P RTP RTSP protocol ports can be configured in this page Click RTP to open the page shown in Figure 1 10 Figure 1 10 RTP page...

Страница 23: ...rt should be 100 Maximum number of users to connect Enter the maximum allowable number of users connected to the Stream between 1 and 10 However it can be vary depending on Main Stream s Bit Rate MAX...

Страница 24: ...1 11 1 C Ca am me er ra a C Co on nd di it ti io on ns s This shows how to setup the camera functions of the XNET products Click Camera Condition button to open the page shown in Figure 1 11 Figure 1...

Страница 25: ...enabled when White Balance is configured as Manual mode Blue Gain Select the value of Video s Blue level between 0 and 20 This can only be enabled when White Balance is configured as Manual mode Video...

Страница 26: ...ase of WDR mode use Video Out function can t use in Video Page WDR WGT Configures WDR Level between 1 and 7 2D DNR Select Two Dimensional Noise Reduction from 1 up to 20 3D Day Select Three Dimensiona...

Страница 27: ...1 12 2 C Co on nf fi ig gu ur ri in ng g T TC CP P I IP P p pa ar ra am me et te er rs s This configures XNET s network related parameters Click TCP IP button to open the page shown in Figure 1 12 Fig...

Страница 28: ...rom one PC only Default gateway Enter the address of Default gateway DNS Configuration Primary DNS Server Enter primary DNS address Secondary DNS Server Enter secondary DNS address NTP Configuration N...

Страница 29: ...43 1 1 1 13 3 C Co on nf fi ig gu ur ri in ng g I IP P F Fi il lt te er ri in ng g This configures IP Filters for XNET product Click IP Filtering button to open the page shown in Figure 1 13 Figure 1...

Страница 30: ...ves an IP address from IP Filtering listbox Select the IP address to remove and click Remove button to remove it from the list The updated list can be viewed in IP Address Listbox IP Filter Enable Ena...

Страница 31: ...User Manual 31 43 1 1 1 14 4 C Co on nf fi ig gu ur ri in ng g H HT TT TP P This configures HTTP port to access XNET s webpage Click HTTP button to open the page shown in Figure 1 14 Figure 1 14 HTTP...

Страница 32: ...ered at the end of the IP address when accessing e g When using HTTP Port 8080 enter http 192 168 123 100 8080 HTTPS HTTPS port Enter HTTPS Port to access the webpage Default port is 443 and any other...

Страница 33: ...DN NS S B Bo on nj jo ou ur r UPnP is a protocol for IP installer software You can enable or disable this UPnP and you can also use a Friendly Name DynDNS configures XNET s DDNS server information Cl...

Страница 34: ...ing through authentication at Autoipset com DDNS server If you want to register a hostname with a specific user account at autoipset com please make an account from http www autoipset com Alias host n...

Страница 35: ...XNET s CMS Server information Click CMS to open the page shown in Figure 1 16 Figure 1 16 CMS Page ITEM DESCRIPTION CMS CMS Port Enter CMS port number for communication with CMS between 1 and 65535 Th...

Страница 36: ...al 36 43 1 1 1 17 7 C Co on nf fi ig gu ur ri in ng g E Ev ve en nt t T Ty yp pe e This is related to XNET s DDNS Server information Click Event Types to view page shown in Figure 1 17 Figure 1 17 Eve...

Страница 37: ...Post Alarm When processing an event this establishes saving images after the occurrence of the event It can be saved MAX 8 seconds after the event Event Output Upload image to FTP This allows Alarm im...

Страница 38: ...Mo ot ti io on n D De et te ec ct ti io on n a ar re ea a This defines areas that detect motion and up to three different areas can be defined in each channel Click Motion button in Operator mode to...

Страница 39: ...tivity Sets sensitivity for detecting motions 1 being the least sensitive and 10 being the most sensitive The user needs to configure this according to their applications and circumstances Defining Mo...

Страница 40: ...l 40 43 1 1 1 19 9 S SM MT TP P S Se et tu up p This configures mailing out method of Alarm Images once event occurred in the XNET system Click SMTP button to open the page shown in Figure 1 19 Figure...

Страница 41: ...e SMTP Authorization Turns External SMTP Server on or off When this box is checked user should choose one among LOGIN PLAIN CRAM MD5 DIGEST MD5 SMTP Authentication Method SMTP Server Name Enter the na...

Страница 42: ...2 20 0 C Co on nf fi ig gu ur ri in ng g F FT TP P This configures how the Alarm Images get sent out using FTP once event occurred in the XNET system Click FTP button to open the page shown in Figure...

Страница 43: ...to receive the Alarm Images FTP Port Enter the port number for the FTP server to send Alarm Images to in the event processing Login Information User Name Enter the user name of the FTP server to send...

Отзывы: