CNB IS2765N Скачать руководство пользователя страница 86

bâàwÉÉÜ fÑxxw WÉÅx fxÜ|xá    |Ñ@åÇxà


86 


MEMO 

Содержание IS2765N

Страница 1: ...Outdoor Speed Dome Series IP XNET Ver 1 0 INSTALLATION AND OPERATION MANUAL ISS2000 Series www cnbtec com 3810 0203A...

Страница 2: ...ected While operating if any abnormal condition or malfunction is observed stop using the camera immediately and then contact your local dealer Handling Do not disassemble or tamper with parts inside...

Страница 3: ...SD Menu OSD Display of Main Screen 25 General Rules of key Operation for Menu 26 Main Menu 26 Display Setup 26 Privacy Zone Mask Setup 27 Camera Setup 27x ISS2765N P models 28 Camera Setup 36x ISS2965...

Страница 4: ...i n g C M S 7 3 C o n f i g u r i n g E v e n t T y p e 75 SMTP Setup 77 C o n f i g u r i n g F T P 7 9 Conf i guri ng a nd o pe ra ti n g PT Z 8 1 Configuring Motion Detection Area 83 Configuring Mu...

Страница 5: ...ent Preset Pattern Swing Group Privacy Mask and More Max 127 Presets are assignable and characteristics of each preset can be set up independently such as white Balance Auto Exposure Label Digital Out...

Страница 6: ...the output relay can be matched to some specific preset positions to do counteractions such as turning on the light or sound the alarm Reserved Presets for Special Purpose Most camera characteristics...

Страница 7: ...b w f xxw W x fx x x 7 1 Introduction Product Accessories Basic Components Optional Accessories May vary by region Adaptor Other Components available to be ordered separately Manual CD...

Страница 8: ...g the spring to the drop prevention hook of main body as shown in picture for further tasks Lockup Screw After assembling main body to bracket screw main body to bracket to protect them from separatio...

Страница 9: ...Open type and Normal Close type Normal Open Voltage is let out when the sensor is activated Normal Close Voltage is let out when the sensor is not activated Pin Switch position Sensor type ST1 Pin 4 O...

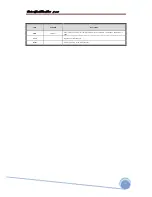
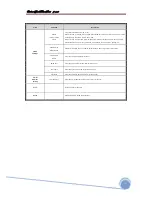
Страница 10: ...b w f xxw W x fx x x 10 General LAN WAN Configuration...

Страница 11: ...b w f xxw W x fx x x 11 2 Installation Installation Using the Wall Mount...

Страница 12: ...b w f xxw W x fx x x 12 2 Installation Installation Using the Pendant Mount...

Страница 13: ...VAC 2A Please check the voltage and current capacity of rated power carefully Video Connection Connect With BNC coaxial cable LAN WAN Configuration For PTZ control connect this line to router To contr...

Страница 14: ...after considering these types Also the sensor type i e Normal Open or Normal Close in DIP switch in main body of camera must be set properly Signal Line Description IN COM Connect cable of electric p...

Страница 15: ...fault value enter the new port as shown below IP Address of the XPEED XNET Port No Ex http 192 168 123 100 8080 ID and Password If you are logging in as an administrator the Log In box will appear as...

Страница 16: ...b w f xxw W x fx x x 16 Figure 3 1 Log in window...

Страница 17: ...b w f xxw W x fx x x 17 Configuring PTZ This configures XPEED XNET s PTZ information Click PTZ Configuration to open the page shown in Figure 3 2 Figure 3 2 PTZ Configuration...

Страница 18: ...on camera go to open the IRIS set Saves the current position to the values in the Preset Edit box del Deletes the current position to the values in the Preset Edit box go Moves the PTZ to the defined...

Страница 19: ...b w f xxw W x fx x x 19 Configuring and operating Network PTZ This controls XPEED XNET s PTZ Click PTZ button in operator mode to open the page shown in the Figure 3 3 Figure 3 3 Web Viewer Page...

Страница 20: ...ms Out Near Far When push Near button camera go Focus In When push Far button camera go Focus Out Iris Iris When push Iris button camera go to close the IRIS When push Iris button camera go to open th...

Страница 21: ...attern and Swing and Group of PTZ general functin or select Alarm I O using OSD menu OSD ON OFF Click Menu On Off button in OSD menu of control group at this page OSD Cursor Using arrow button in OSD...

Страница 22: ...can be set up independently for each preset Label should be blank and Relay Outputs should be set to OFF as default Camera Adjust should be set GLOBAL as default All characteristics can be set up in...

Страница 23: ...emorized in a pattern The rest memory size is displayed in progress bar To save the recording press NEAR key and to cancel press FAR key Method 2 Using OSD Menu See the section how to use OSD Menu Run...

Страница 24: ...n to hide objects such as windows shops or private house With Spherical Coordinates system powerful Privacy Zone Mask function is possible This function is only available with ISS2465N P X ISS2665N P...

Страница 25: ...ion SWGx PRESET xxx When Swing x is in action UNDEFINED When undefined function is called to run Preset Label The Label stored for specific Preset Alarm Information This information shows current stat...

Страница 26: ...t by models Main Menu SYSTEM INFORMATION Displays system information and configuration DISPLAU SETUP Enable Disable of OSD display on Main Screen DOME CAMERA SETUP Configure various functions of this...

Страница 27: ...e UNDEFINED will be displayed under MASK NO DISPLAY ON OFF Sets if camera makes mask shows or not on images CLEAR MASK CANCEL OK Deletes data in the selected mask NO Privacy Zone Area Setup Move camer...

Страница 28: ...ens turn FLICKERLESS setting ON This prevents flickering which happens when the frequency of the power and the frequency of camera are different When FLICKERLESS in ON Day Night mode goes DAY and Digi...

Страница 29: ...MANUAL mode As for setting value refer to the table below Note2 BRIGHTNESS 0 96 It can be set when AE is not in MANUAL mode Note1 Backlight Compensation Value Description Value Description C1 Low weig...

Страница 30: ...ng may appear on the screen When this happens turn Flickerlees setting ON This prevents flickering which happens when the frequency of the power and the frequency of camera are different COLOR ON OFF...

Страница 31: ...s mode is ON AE mode is automatically in SHUTTER SPEED mode IRIS LEVEL CLOSE F1 6 F28 Model S1465N P X S1965N P X CLOSE F1 4 F22 Model S1665N P X It can be set when AE is in IRIS mode or MANUAL mode G...

Страница 32: ...in the screen is moving reversely FRZ IN PRESET ON OFF 30x EXview 27x 36x Models Only If Freeze in preset function mode is ON camera starts freezing the image of start point at start point of preset...

Страница 33: ...ed RELAY OUT Sets the relay output The figure on the right is current Setting value indicates OFF mode If the relay is shown as figures it means relay is ON CAM ADJUST GLOBAL LOCAL WB White Balance an...

Страница 34: ...phabet cursor moves to the next digit Using Left Right Up Down of Direction KEY move to an appropriate character from the Character set To choose that character press the NEAR key If you want to use b...

Страница 35: ...moves from the preset assigned as the 1st point to the preset assigned as the 2nd point in CW Clockwise direction Then camera moves from the preset assigned as the 2nd point to the preset assigned as...

Страница 36: ...ERN By using Direction KEY move to start position with appropriate zoom To start pattern recording press NEAR key To exit this menu press FAR key Move camera with Direction KEY or run preset function...

Страница 37: ...Group setup Note that MAX 20Functions are allowed in a Group Move cursor up down and press NEAR key to set up Set up Action Dwell time and Option Note that selected item is displayed in reverse Move c...

Страница 38: ...inishing setting up a Action press NEAR key to one upper Level Menu Step Move cursor Up Down to select Action Number and repeat Step Step to edit selected Group After Finishing setting up all Action p...

Страница 39: ...TZ Information Action Title Preset Label Alarm I O North Direction Privacy Zone OFF AUTO AUTO AUTO AUTO PAN 0 UNDEFINED Focus mode Digital Zoom Max Zoom Flickerless Color Line Lock White Balance Mode...

Страница 40: ...orer Type the IP Address of the XPEED XNET product in the address bar and press enter Ex http 192 168 123 100 If the HTTP port has been changed from the default value enter the new port as shown below...

Страница 41: ...features can be accessed from this page Access to each feature are controlled by different user groups Administrator Operator and Viewer Figure 5 1 Basic Setup Page Basic Setup Page can be accessed f...

Страница 42: ...tup Page Date Time Setup Page Multi Viewer Setup Page Maintain Server Setup Page System Log Setup Page Audio Setup Page Video Setup Page TCP IP Setup Page IP Filtering Setup Page SMTP Setup Page FTP S...

Страница 43: ...rt Live view Web Viewer When you access in IP XNET product Web Viewer page will appear automatically Viewer area displays the video output from the camera and menu bar taps that lead to each feature s...

Страница 44: ...for detail Live View Opens up Index View page Index View page will display Video as well as setting up Stream Protocol TCP UDP and Codec when using dual Stream Multi View Opens up Multi View page Mult...

Страница 45: ...x x x 45 5 IP network Part Status Window Status page display XPEED XNET system s Version and its Ethernet address Clock Status button to open the page shown in Figure 5 4 Figure 5 4 Status Page Intern...

Страница 46: ...b w f xxw W x fx x x 46 MEMO...

Страница 47: ...network Part Configuring Users This can give or limit authority to users for controlling Video and other features of XPEED XNET system Click Users button to open the page shown in Figure 5 5 Figure 5...

Страница 48: ...ach user Select a user in User Listbox enter new Password User Group and click Modify button to save the changes Updated detail can be viewed in User Listbox Remove Removes a user Select a user in Use...

Страница 49: ...b w f xxw W x fx x x 49 5 IP network Part Setting Date Time This page will change Date and Time of XPEED XNET system Click Date Time to open the page shown in Figure 5 6 Figure 5 6 Date and Time Page...

Страница 50: ...aving Time Time Mode Sets Date and Time of the Server Default None Synchronize with computer time Synchronizes time and date of Client PC to Server Synchronize with NTP server Synchronizes server s ti...

Страница 51: ...Configuring Multi Viewer Up to 3 cameras connected to XPEED XNET s network can be displayed as sub cameras simultaneously in Multi View page Click Multi Viewer to copn the page shown in Figure 5 7 Fi...

Страница 52: ...om IP address entered This can only be enabled when IP address User Name and Password is properly entered Default Disable 2nd IP Address Enter 2nd Sub Channel s IP Address 2nd User name Enter 2nd Sub...

Страница 53: ...f xxw W x fx x x 53 5 IP network Part Configuration PTZ This configures XPEED XNET s PTZ server information Click PTZ Configuration to open the page shown in Figure 5 8 Figure 5 8 PTZ Configuration p...

Страница 54: ...o open the IRIS set Saves the current position to the values in the Preset Edit box del Deletes the current position to the values in the Preset Edit box go Moves the PTZ to the defined Preset positio...

Страница 55: ...ations This page configures system parameters such as system restart factory default settings system upgrade Saving configurations saving images and other additional features Click Maintain Server to...

Страница 56: ...lick upgrade button This will be followed by one minute system restart Note Please do not disconnect power and LAN cable from the XPEED XNET while the upgrade is in process It might cause a system err...

Страница 57: ...x x 57 5 IP network Part Generating Log Report Log report contains detailed information about XPEED XNET s image setup and error Click Log Report button to open the pageshown in Figure 5 10 Figure 5 1...

Страница 58: ...e stored in the XPEED XNET product Log Message file can be sorted with date and index Click Load List button to view messages list in the Listbox Logs View Select a file from the Log List and click Lo...

Страница 59: ...f xxw W x fx x x 59 5 IP network Part Configuring Audio XPEED XNET s Audio features can be configured in this page Click Audio button to open the page shown in Figure 5 11 Figure 5 11 Audio configure...

Страница 60: ...e Default Microphone Microphone input can be used when users send their voice over XPEED XNET system Line input takes the input from an audio device to send over XNET Audio sent to XNET can be played...

Страница 61: ...f xxw W x fx x x 61 5 IP network Part Configuring Video XPEED XNET s video features can be configured in this page Click Video button to open the page shown in Figure 5 12 Figure 5 12 Video configure...

Страница 62: ...ed when Codec is set up as MPEG4 or H 264 Frame Rate Control Frame rate Selects Frame rate of Video output 1 30 Frame MJPEG Appearance Quality Select MJPEG s video quality between 1 and 100 Mpeg4 H 26...

Страница 63: ...w f xxw W x fx x x 63 5 IP network Part Configuring RTP RTSP This is related to XPEED XNET s DDNS server information Click RTP RTSP to open the page shown in Figure 5 13 1 14 Figure 5 13 RTP RTSP pag...

Страница 64: ...am between 1 and 65535 The default is 665 RTP Configuration RTP Start Port Enter RTP Start Port between 1024 and 65534 The default is 2000 RTP End Port Enter RTP End Port between 1124 and 65535 The de...

Страница 65: ...fx x x 65 5 IP network Part Configuring the Network TCP IP parameters This configures XPEED XNET s network related parameters Click TCP IP button to open the page shown in Figure 5 14 Figure 5 14 Netw...

Страница 66: ...cted Subnet mask Enter Subnet mask Use this when you want to access only from the same subnet by masking out upper portion of the IP address Use 255 255 255 255 when you want to connect from one PC on...

Страница 67: ...xxw W x fx x x 67 5 IP network Part Configuring IP Filtering This configures IP Filters for XPEED XNET product Click IP Filtering button to open the page shown in Figure 5 15 Figure 5 15 IP filtering...

Страница 68: ...dress Listbox Up to 20 IP addresses can be added Remove Removes an IP address from IP Filtering listbox Select the IP address to remove and click Remove button to remove it from the list The updated l...

Страница 69: ...b w f xxw W x fx x x 69 5 IP network Part Configuring HTTP This configures HTTP port to access XPEED XNET s webpage Click HTTP button to open the page shown in Figure 5 16 Figure 5 16 HTTP Page...

Страница 70: ...TP Port to access the webpage Default port is 80 and any other port number has to be entered at the end of the ip address when accessing Ex When using HTTP Port 8080 enter http 192 168 123 100 8080 Sa...

Страница 71: ...Bonjour UPnP is a protocol for IP installer software You can enable or disable this UPnP and you can also use a Friendly Name DynDNS configures XPEED XNET s DDNS server information Click UPnP DynDNS t...

Страница 72: ...roduct Enable Anonymous Enables or disables DynDNS Anonymous feature When enabled DDNS service is used without going through authentication at Autoipset com DDNS server Alias Host Name Enter a Host Na...

Страница 73: ...b w f xxw W x fx x x 73 5 IP network Part Configuring CMS This configures XPEED XNET s CMS server infomation Click CMS to open the page shown in Figure 5 18 Figure 5 18 CMS Page...

Страница 74: ...x x x 74 Field Sub Field Description CMS CMS Port Enter CMS port number for communication with CMS between 1 and 65535 The default is 5000 Save Applies and saves changes Reset Recalls previously saved...

Страница 75: ...w f xxw W x fx x x 75 5 IP network Part Configuring Event Type This is related to XPEED XNET s DDNS Server information Click Event Types to view page shown in Figure 5 19 Figure 5 19 Event Types page...

Страница 76: ...During Time is selected while Event Alarm is activated the unit will monitor event Alarm during the time period specified Event Schedules Setting Specifiy schedule for Event Alarm monitoring Event Ala...

Страница 77: ...fx x x 77 5 IP network Part SMTP Setup This configures mailing out method of alarm Images once event occurred in the XPEED XNET system Click SMTP button to open the page shown in Figure 5 20 Figure 5...

Страница 78: ...rt user password mail address etc needs to be configured Enable SMTP Authorization Enables or disables the use of SMTP authorization when using external mail server SMTP Server Name Enter the name of...

Страница 79: ...x 79 5 IP network Part Configuring FTP This configures How the Alarm Images get sent out using FTP once event occurred in the XPEED XNET system Click FTP button to open the page shown in Figure 5 21 F...

Страница 80: ...order to receive the Alarm Images FTP Port Enter the port number for the FTP server to send Alarm Images to in the event processing Login Information User Name Enter the user name of the FTP server t...

Страница 81: ...xw W x fx x x 81 5 IP network Part Configuring and operating Network PTZ This controls XPEED XNET s Speeddome PTZ Click PTZ button in Operator mode to open the page shown in Figure 5 22 Figure 5 22 PT...

Страница 82: ...ms Out Near Far When push Near button camera go Focus In When push Far button camera go Focus Out Iris Iris When push Iris button camera go to close the IRIS When push Iris button camera go to open th...

Страница 83: ...Configuring Motion Detection area This defines area that detect motion and up to three different areas can be defined in each channel Click Motion button in Operator mode to open the page shown in Fig...

Страница 84: ...Sensitivity Sets sensitivity for detecting motions 1 being the least sensitive and 10 being the most sensitive The user needs to configure this according to their applications and circumstances Defin...

Страница 85: ...different camera images simultaneously Click button in Administrator mode to open the page shown in Figure 5 24 The video from the XPEED XNET product gets displayed on top left and the rest display vi...

Страница 86: ...b w f xxw W x fx x x 86 MEMO...

Страница 87: ...ion Speed Preset 360 sec Manual 1 360 sec inter locked with zoom extension Swing 1 180 sec Preset Setting 127 presets label setting individual video setting Swing Setting 8 swings Pattern Setting 4 pa...

Страница 88: ...er locked with zoom extension Swing 1 180 sec Preset Setting 127 presets label setting individual video setting Swing Setting 8 swings Pattern Setting 4 pattern 1200 commands pattern 5 min Group Setti...

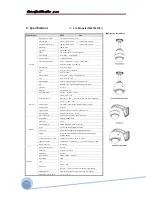
Страница 89: ...b w f xxw W x fx x x 89 6 Specifications Dimensional Drawings unit mm...

Страница 90: ...b w f xxw W x fx x x 90 6 Specifications Dimensional Drawings Unit mm...

Страница 91: ...etc IS2765NW IS2765PW IS2965NXW IS2965PXW IS2765NP IS2765PP IS2965NXP IS2965PXP ISS2765NW ISS2765PW ISS2965NXW ISS2965PXW ISS2765NP ISS2765PP ISS2965NXP ISS2965PXP IS2765N IS2765P IS2965NX IS2965PX IS...

Страница 92: ...b w f xxw W x fx x x 92 MEMO...

Отзывы: