background image

7

AUTO

MENU

UP

DOWN

POWER

UP

DOWN

LEFT

RIGHT

SET

LAN

(POE)

DC 24V

INPUT

HDMI

LAN

(POE)

DC 24V

INPUT

HDMI

LAN

(POE)

DC 24V

INPUT

BNC

OUTPUT

BNC

OUTPUT

BNC

OUTPUT

VIDEO SD MEMORY

DO NOT REMOVE - CIF MEMORY

VIDEO SD MEMORY

DO NOT REMOVE - CIF MEMORY

POWER

AUTO

UP

DOWN

MENU

POWER

AUTO

UP

DOWN

MENU

VIDEO SD MEMORY

DO NOT REMOVE - CIF MEMORY

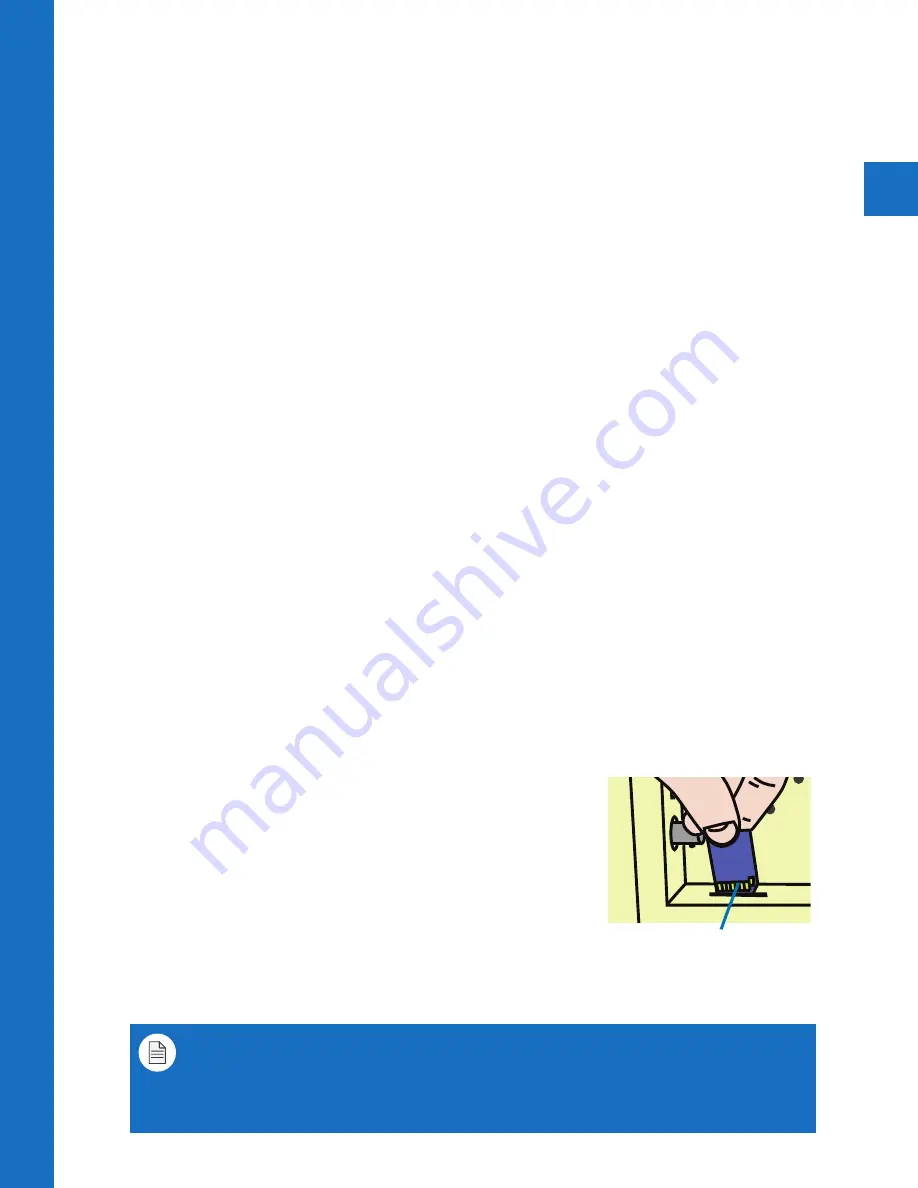
Upload SD Card Content

SD-Car

d

Contacts Facing Out

The PVM is capable of displaying JPEG images or AVI video files from an SD Card. 

Note: A-Series PVMs manufactured prior to May 19th, 2015 do not have SD-Card or BNC 

Output features.

The preferred JPEG image size is 1024 x 768. 

Load files directly onto the card. Do not place 

files into folders

. Skip to step 6 below.

The preferred video format for Video-on-Video (VOV) is AVI with a maximum resolution size 

of 720 x 540. If you already have a supported video, simply load it onto the SD Card. 

To convert an unsupported video to the correct AVI format, follow guidelines below:


1. Download VLC

  Download, install, & open the free program VLC. http://www.videolan.org/vlc/index.html


2. Convert

  From the 

File

 menu select 

Convert/Stream

.


3. Drop Media

  Drag/Drop the desired video into the box that says “

Drop Media Here

”.


4. Choose Profile


A)

 Under 

Choose Profile

, Click the 

Customize

 button. Select 

AVI

 under the


Encapsulation menu.


B)

 Click the 

Video codec

 tab, under the 

Codec

 dropdown, select 

DIVX 3

.


In the 

Resolution

 field, enter 

720

 for width, and 

540

 for height. 


Note: 640x480 will also work. (The Bitrate and Frame Rate should automatically


populate based on the quality of the original video).


C)

 Click 

Apply

.


5. Choose Destination

 Under 

Choose Destination

, click 

Save File As 

Browse

 to select the SD Card in which you

  would like to save the file to. 

(Load files directly onto the card. Do not place files into

 folders)

. Click 

Save

 when the progress bar has completed loading.


6. Insert Card into PVM

  Insert the SD Card into the PVM with the contacts facing  


  outward (see image on right). Push the card down until it

  clicks into place.


7. Power Cycle

  Power cycle the unit by pressing the power button on the

  back of the PVM, or on the remote control, or by   


  unplugging the power cord.


8. Set Viewing Options

  In the PVM’s OSD menu, under Display, make sure Image Mode is set to Camera VOV Switch  

  or SD-Video to display content full-screen.

Note:  If using an Apple Computer, you will not be able to preview an AVI file.

Note: The SD Card player is not High Definition.

Note: If the video is not formatted/sized correctly (too large), the VOV window will display 

a blue “Home” screen.

Содержание A-SERIES

Страница 1: ...6701 Clinton Road Loves Park IL 61111 800 447 3306 Sales 800 549 6393 Support www clintonelectronics com Public View Monitor Manual A SERIES v07 10 15 ...

Страница 2: ...erior Back Panel Connections Remote Button Pad SD Card Display Menu OSD Menu Overview Video Menu Display Menu Audio System Settings Camera Quick Setup Mini CD Method IP Utility Software Download Method IP Utility Camera Access Setting Reset 1 2 3 4 5 6 7 8 9 9 10 10 11 12 13 14 14 15 ...

Страница 3: ...ea is likely to cause harmful interference in which case the user will be required to correct the interference at his own expense WARNING Changes or modifications not expressly approved by the manufacturer could void the user s authority to operate the equipment CAUTION To prevent electric shock and risk of fire hazards Do NOT use power sources other than that specified Do NOT expose this applianc...

Страница 4: ...erate normally by following the operating instructions adjust only those controls that are covered by the operating instructions as an improper adjustment of other controls may result in damage and will often require extensive work by a qualified technician to restore the equipment to its normal operation E If the equipment has been dropped or the cabinet damaged F When the equipment exhibits a di...

Страница 5: ...1 Hardware Overview ...

Страница 6: ...iew Exterior BACK FRONT LED Flasher Remote Receiver IP Camera Lens AUTO MENU UP DOWN POWER Up Button Auto Button Power Button VESA 100 x 100 VESA 100 x 200 27 32 Only VESA 100 x 100 VESA 75 x 75 Menu Button Down Button ...

Страница 7: ...E DC 24V INPUT BNC OUTPUT BNC OUTPUT BNC OUTPUT VIDEO SD MEMORY DO NOT REMOVE CIF MEMORY VIDEO SD MEMORY DO NOT REMOVE CIF MEMORY VIDEO SD MEMORY DO NOT REMOVE CIF MEMORY 27Inch 32Inch DC 24V Input Network POE Capable 48V POE 21Inch AC 120V Input DC 24V Input SD Card Service Port Not User Serviceable Service Port Not User Serviceable WARNING Do not connect DC 24V and AC 110V power simultaneously O...

Страница 8: ...the audio from SD Card content EXIT Closes the OSD Menu or returns to previous menu POWER Turns display On Off Note Swap PIP and Auto buttons are non functioning for this device When the display is turned OFF with the remote control or the back panel button the camera will continue to supply video to a remote computer display or DVR if connected AUTO MENU UP DOWN POWER BUTTONPAD REMOTECONTROL POWE...

Страница 9: ...er the Codec dropdown select DIVX 3 In the Resolution field enter 720 for width and 540 for height Note 640x480 will also work The Bitrate and Frame Rate should automatically populate based on the quality of the original video C Click Apply 5 Choose Destination Under Choose Destination click Save File As Browse to select the SD Card in which you would like to save the file to Load files directly o...

Страница 10: ...2 Display Menu ...

Страница 11: ...eo image resolution and refresh rate will appear This cannot be changed This camera is only capable of displaying images at 720p resolution to the PVM Video Contrast Adjust to set the white level so that the images are at their brightest without losing definition in the white portions of the image Setting the too high will result in an oversaturated image Brightness Adjust to set the black level s...

Страница 12: ...on screen and duration of SD Card content 5 60 sec PIP Size Change the size of the SD Card VOV window Large Middle Small PIP Position Change the corner in which the VOV is displayed Bottom Right Bottom Left Top Left Top Right VOV Switch Open Time Select the duration in which VOV content is displayed on screen 1 10 sec VOV Switch Close Time Select the duration in which VOV content is inactive on sc...

Страница 13: ... panel buttons Remote control will be required for future OSD changes Special Control Message On Off Turn the on screen message on or off Message Select from preset on screen messages Recording in Progress Welcome Grabacion en Progresso Bienvenida There are also two selections that alternate the English and Spanish versions of these messages Flash must be set to ON for these selections Message Pos...

Страница 14: ...3 Camera Quick Setup ...

Страница 15: ...CD into your computer and select the Open folder to view files option Open the software folder Double click the IPUtility exe file and follow the prompts to download and open If you initially choose to run the program close the program and Right click on the CD s Axis icon Click Open software IPUtility exe Determine IP Address Find the axis camera on the network Double click the AXIS M1025 from th...

Страница 16: ...ting the camera Default Username root Default Password pass Tip When the camera s IP address has been located you can simply type in the camera s IP address into an Internet Browser Internet Explorer Chrome Firefox etc to view and setup the PVM s camera Note The computer must be connected to the same network as the camera For computers without Mini CD drive capable you can download the software di...

Страница 17: ...ure and the default password shown on the previous pages You will be asked to enter and confirm a new password and set your power line frequency 50Hz or 60Hz Reset will invert the camera image To correct video orientation go to Setup Video Video Stream and set Rotate Image to 180 degrees Click Save to apply the change If using DHCP server the IP address will not change If no DHCP server is availab...

Страница 18: ...6701 Clinton Road Loves Park IL 61111 800 447 3306 Sales 800 549 6393 Support www clintonelectronics com ...

Отзывы: