background image

Section 3 — Commissioning

Master Panel 8

3-4

Part No. 750-375

C. I/P ADDRESSING (MASTER PANEL)

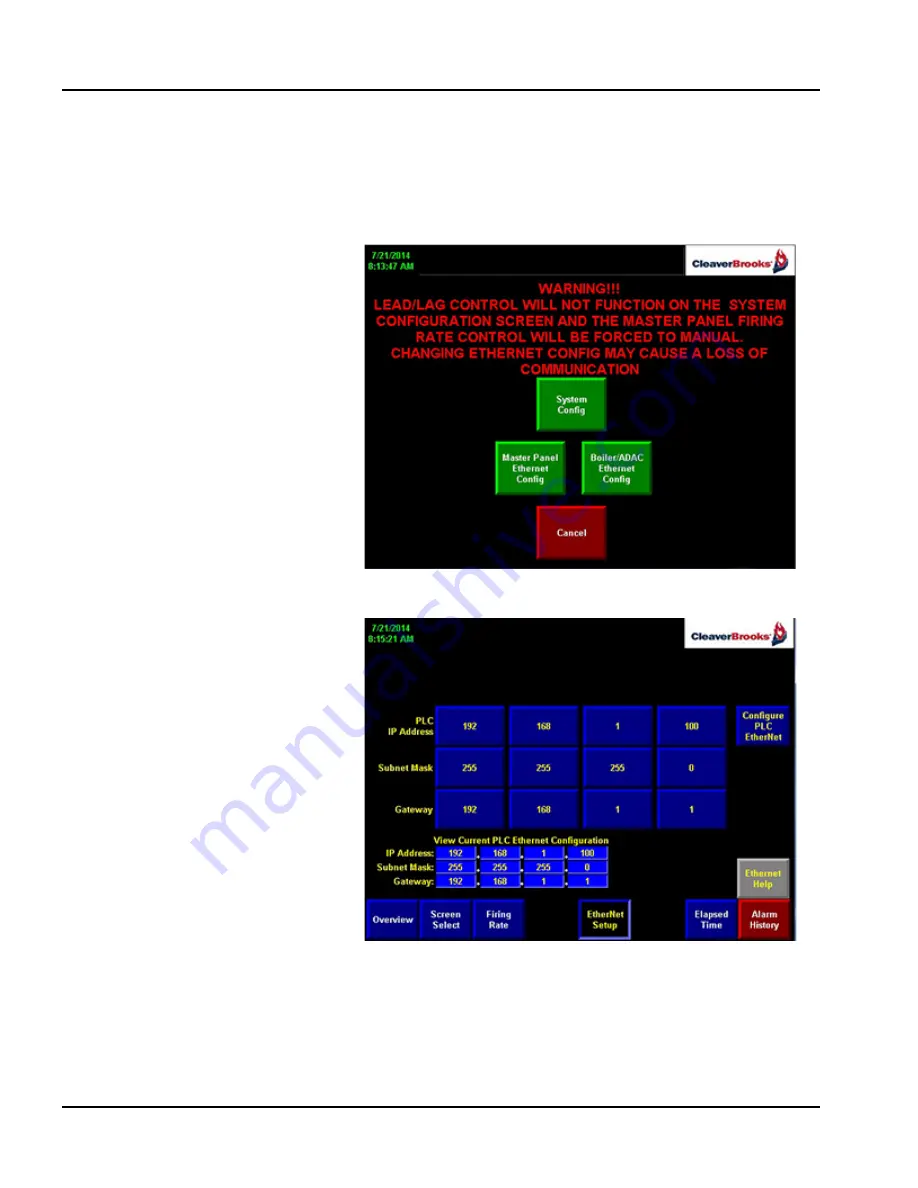
To set the Master Panel Ethernet configuration, first go to System
Configuration. Observe the screen warning: Lead/Lag control will not
function while in system configuration and the master panel firing
rate control will be forced to manual. Changing Ethernet settings may
cause a loss of communication.

Press <Master Panel Ethernet Config> for the following screen:

On this screen the IP Address, Subnet Mask, and Gateway are set for
the Master Panel PLC. A help screen is available. When settings are
complete, press <Configure PLC Ethernet> to confirm. This will
bring up the following window:

Содержание Master Panel 8

Страница 1: ...750 375 10 16 Master Panel 8 Eight Boiler Lead Lag Control Operation Manual...

Страница 2: ...m of certain repetitive chores and give him more time to devote to the proper upkeep of equipment It is solely the operator s responsibility to properly operate and maintain the equipment No amount of...

Страница 3: ...leaver Brooks Master Panel 8 Operation Manual Manual Part No 750 375 10 16 Please direct purchase orders for replacement manuals to your local Cleaver Brooks authorized representative Printed in U S A...

Страница 4: ......

Страница 5: ...Screen 2 9 5 Set Up 2 Screen 2 10 6 Firing Rate 2 11 7 Elapsed Time Screen 2 12 8 Alarm History Screen 2 13 9 Configuration Config Screen 2 13 10 PanelView Configuration 2 15 11 Individual Boiler Over...

Страница 6: ......

Страница 7: ...www cleaverbrooks com Section 1 Overview A Features 1 2 B Components 1 2 C Specifications 1 4...

Страница 8: ...re available from the master panel to customer BMS Individual boiler indicating screens Web server for remote monitoring through a web browser B COMPONENTS 1 Control panel which houses the following c...

Страница 9: ...D 4 Slot 2 Digital Outputs Boiler A H Start 5 Slot 3 Analog Input Header Pressure Temperature 6 Slot 4 Analog Outputs Control Signal Boiler A B 7 Slot 5 Analog Outputs Control Signal Boiler C D 8 Slot...

Страница 10: ...Table 1 1 Operational and Environmental Specifications Description Specification Maximum connecting units 8 boilers Power Supply Voltage 120 VAC 10 15 Power Supply Frequency 50 or 60 Hz Fusing Touch S...

Страница 11: ...Display Screens and Parameters Settings 2 5 1 Screen Select 2 5 2 Boiler Overview Screen 2 6 3 Set Points and Sequence Screen 2 7 4 Set Up 1 Screen 2 9 5 Set Up 2 Screen 2 10 6 Firing Rate 2 11 7 Elap...

Страница 12: ...of the lead boiler off point 2 Warm Up Sequence hot water units only If the boiler was off fuel valve deenergized for the duration of the setting for Warm Up Boiler Off timer the boiler will start and...

Страница 13: ...t not applicable to lead boiler Example CVMAIN 35 ModShift 100 for all boilers Number of boilers available N 4 Control output to the lead boiler For Lead boiler n 1 Using above equation CV1 35x4 1 1 x...

Страница 14: ...80 480 580 20 160 60 40 140 240 340 440 540 25 200 100 0 100 200 300 400 500 30 240 140 40 60 160 260 360 460 35 280 180 80 20 120 220 320 420 40 320 220 120 20 80 180 280 380 45 360 260 160 60 40 140...

Страница 15: ...PLAY SCREENS AND PARAMETER SETTINGS The following appear on all screens Day and time Current alarm Cleaver Brooks logo Screen selection buttons 1 Screen Select This is a navigational screen from which...

Страница 16: ...ich boilers are brought on line 1 Lead Boiler 2 Lag Boiler 1 3 Lag Boiler 2 etc Entered indicates the sequence of firing selected by the operator Working and entered numbers will be identical if all b...

Страница 17: ...value at which controller will try to maintain water temperature steam pressure at the header Valid entries for hot water system are from 170 F 76 7 C to the Off point setting Valid entries for steam...

Страница 18: ...ion for each boiler duplicate numbers are not allowed When finished press the Enter New Order button If the order is valid the numbers in the existing column will change If the order is invalid an Inv...

Страница 19: ...election is available only on a steam system when lead lag modulation is selected This is the firing rate for the previous boiler at which this boiler will start modulation Modulation On steam systems...

Страница 20: ...Up 2 Screen steam Shut Down Delay Time delay for boiler shut down after the stop command is received Valid entry is from 0 to 1200 seconds Boiler In Sequence Valid selections are Yes or No Yes indica...

Страница 21: ...essure is displayed digitally to the left of the bar graph Set point temperature pressure bar graph with display Displays water temperature steam pressure set point Set point is displayed on the right...

Страница 22: ...formational only The following parameters are displayed Order column displays current firing order Run Time column displays the individual boiler run time since the last rotation Status column shows c...

Страница 23: ...n is password protected Entering a valid password will cause the following warning to appear Press the desired configuration screen button to continue Master Panel and Boiler ADAC Ethernet configurati...

Страница 24: ...is a Hawk 2000 then both Hawk ICS and Hawk 2000 must be selected as Yes to communicate to the Master Panel Note Some Master Panel options are unavailable for units without HAWK controls Number of Boi...

Страница 25: ...al Press Terminal Settings to see the Terminal Settings menu These are settings specific to the PanelView device and are independent of the currently loaded application Select Time Date Regional Setti...

Страница 26: ...view Screen This is an information only screen It displays parameters pertaining to an individual boiler To select a boiler press the appropriate button Boiler A etc from the Screen Select menu Overvi...

Страница 27: ...www cleaverbrooks com Section 3 Commissioning I P Addressing individual boilers 3 2 Boiler Configuration 3 3 I P Addressing Master Panel 3 4 Setpoints And Set up Parameters 3 6 System Wiring 3 18...

Страница 28: ...figured according to the following table Boiler A Boiler B Boiler C Boiler D IP Address 192 168 1 101 192 168 1 102 192 168 1 103 192 168 1 104 Subnet Mask 255 255 255 0 255 255 255 0 255 255 255 0 25...

Страница 29: ...wk controls manual for configuration help In order for the boiler to be in lead lag sequence the boiler has to be in Rem LLag mode This selection has to be made on the firing rate screen of the boiler...

Страница 30: ...le in system configuration and the master panel firing rate control will be forced to manual Changing Ethernet settings may cause a loss of communication Press Master Panel Ethernet Config for the fol...

Страница 31: ...ings menu choose Networks and Communications then select RSLinx Enterprise Communications and press the Enter arrow 3 Highlight the Ethernet IP address for the PLC and press Edit Device 4 Press Device...

Страница 32: ...not change the IP address of the associated boiler or ADAC they only specify the path used by the Master Panel to communicate with each unit D SETPOINTS AND SET UP PARAMETERS Make appropriate selecti...

Страница 33: ...r o C 170 o F 76 7 o C Lead Boiler Off Point 200 o F SP Limit Low Minimum limit for Operating Set Point o F or o C 170 o F 76 7 o C SP Limit High 170 o F SP Limit High Maximum limit for Operat ing Set...

Страница 34: ...for boiler F 1 8 6 Boiler Seq Exist G Order of firing for boiler G 1 8 7 Boiler Seq Exist H Order of firing for boiler H 1 8 8 Auto Rotation Days Timer for automatic order of firing selection Days 1 6...

Страница 35: ...SP Limit Low Minimum limit for Operating Set Point PSI or Bar 5 PSI 0 3 Bar SP Limit High 5 PSI SP Limit High Maximum limit for Operating Set Point PSI or Bar SP Limit Low 90 of the Max Pressure 135 P...

Страница 36: ...Seq Exist G Order of firing for boiler G 1 8 7 Boiler Seq Exist H Order of firing for boiler H 1 8 8 Auto Rotation Days Timer for automatic order of fir ing selection Days 1 60 1 Auto Rotation On Off...

Страница 37: ...ler 2 Boiler Start Point Control signal to Lag Boiler 1 at which Lag Boiler 2 will start Lag Boiler 2 Stop Point 100 85 Lag Boiler 2 Boiler Start Delay Time delay before lag boiler 2 will start second...

Страница 38: ...ag Boiler 5 at which Lag Boiler 5 will be shut down 0 Lag Boiler 5 Boiler Start Point 20 Lag Boiler 6 Boiler Start Point Control signal to Lag Boiler 4 at which Lag Boiler 5 will start Lag Boiler 6 St...

Страница 39: ...t Control signal to Lag Boiler 2 at which Lag Boiler 3 starts modula tion 0 100 100 Lag Boiler 4 Mod Start Control signal to Lag Boiler 3 at which Lag Boiler 4 starts modula tion 0 100 100 Lag Boiler...

Страница 40: ...er Stop Delay expires Seconds 0 1200 180 Boiler E Shutdown Delay Time delay for Boiler E start output to be deenergized after Boiler Stop Delay expires Seconds 0 1200 180 Boiler F Shutdown Delay Time...

Страница 41: ...selections applicable to hot water units only Boiler A Warm Up Blr Off Time delay set to initiate warm up cycle Delay is activated by the main fuel valve minutes 60 1440 240 Boiler A Warm Up Blr On Ti...

Страница 42: ...o initiate warm up cycle Delay is activated by the main fuel valve minutes 60 1440 240 Boiler F Warm Up Blr On Time delay set to stop warm up cycle Delay is activated by the main fuel valve minutes 5...

Страница 43: ...le warm up routine OFF Boiler E Warm Up Enable Enable or disable warm up routine OFF Boiler F Warm Up Enable Enable or disable warm up routine OFF Boiler G Warm Up Enable Enable or disable warm up rou...

Страница 44: ...Section 3 Commissioning Master Panel 8 3 18 Part No 750 375 E SYSTEM WIRING NOTE Refer to wiring diagram supplied with unit for job specific information and terminal designations...

Страница 45: ...www cleaverbrooks com Section 4 Troubleshooting A General 4 2 B Ethernet Troubleshooting 4 2 C Loading PLC Program 4 6 D Web Server 4 10...

Страница 46: ...boiler and master panel Boiler ready output is off Put burner switch on Make sure no alarms are present at the boiler Burner does not go to the correct firing rate Boiler is in Warm Up or Hot Standby...

Страница 47: ...Master Panel 8 Section 4 Troubleshooting Part No 750 375 4 3 3 Select Local Area Connection 4 Select Internet Protocol TCP IP...

Страница 48: ...Master Panel processor is 192 168 1 100 I P address for Master Panel PanelView is 192 168 1 120 9 Using Ethernet cable connect Ethernet port of the computer to the Ethernet port of processor 10 Go to...

Страница 49: ...roubleshooting Part No 750 375 4 5 11 Type ping IP address then press Enter Example To ping Boiler 1 type ping 192 168 1 101 The computer screen should resemble the following If computer display is as...

Страница 50: ...10 and 11 If there is no reply from the processor the problem is with the Ethernet cable connection from the master panel to the boiler C LOADING PLC PROGRAM To load a program to the processor requir...

Страница 51: ...ng Part No 750 375 4 7 3 Double click on Extract 4 Choose the drive where the SD card is located and click on Extract button Close WinZip window 5 Browse to the drive where SD card is located and make...

Страница 52: ...ng Master Panel 8 4 8 Part No 750 375 6 Using Unplug and Eject Hardware on your computer select the USB device A screen prompt will indicate that the device can be removed 7 Remove card reader and rem...

Страница 53: ...selection switch in RUN mode 10 Cycle power to the controller 11 MS and OK lights will be red and CF light will be flashing When I O light stops flashing and OK and RUN lights are green it is safe to...

Страница 54: ...remotely from a PC for diagnostic informational purposes From a computer on the same network as the Master Panel enter the IP address of the PanelView Plus HMI in the computer s web browser The Master...

Страница 55: ...www cleaverbrooks com Section 5 Parts Master Panel 8 Parts List 5 3...

Страница 56: ...Section 5 Parts Master Panel 8 5 2 Part No 750 375...

Страница 57: ...5 x3 0 with Cover 4Ft Length 832 02047 Grounding Bar Kit 884 00131 Terminal Screw Lug 884 00078 Enclosure Nema 12 848 00523 Processor L30ER 833 05524 Power Supply PA2 833 02834 Discrete Input Module...

Страница 58: ...Section 5 Parts Master Panel 8 5 4 Part No 750 375...

Страница 59: ...put Boiler E O8 0 Control Output Boiler G I1 1 Boiler B Ready O2 1 Boiler B Start I3 1 O4 1 Control Output Boiler B O5 1 Control Output Boiler D I6 1 Boiler F Ready O7 1 Control Output Boiler F O8 1 C...

Страница 60: ...e mail info cleaverbrooks com Web Address http www cleaverbrooks com...

Отзывы: