Cleaver Scientific PowerPro300 Скачать руководство пользователя страница 20


20

Section 5


Trouble shooting and Maintenance


Many operating problems may be solved by carefully reading and following the 

instructions in this manual accordingly. Some suggestions for troubleshooting are given 
below. Should these suggestions not resolve the problem, contact our SERVICE 

DEPARTMENT or a distributor in your region for assistance. If troubleshooting service is 
required, please include a full description of the problem. 
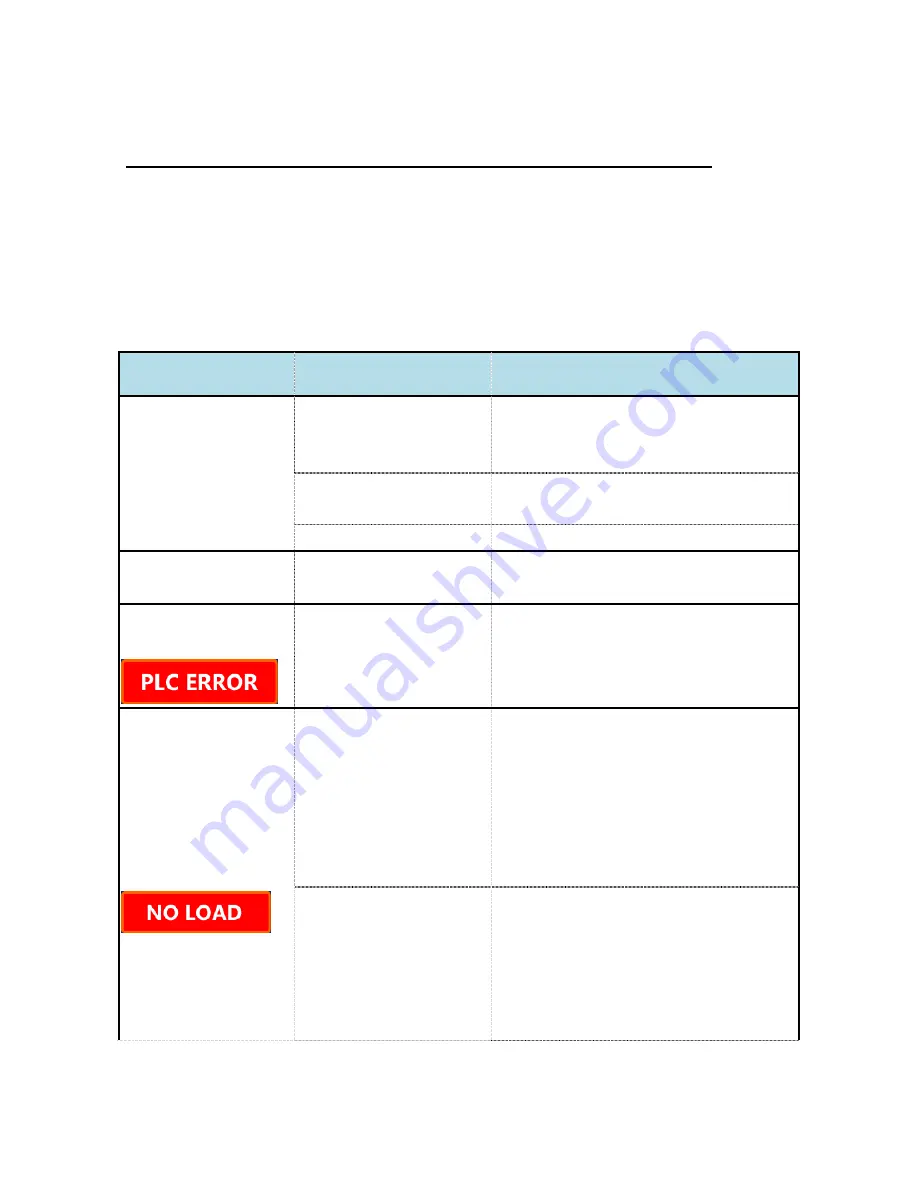
 

Problem 

Possible Causes 

Solution 

No Display / lights 

No AC power 

Ø


Check if PowerPro power supply is 
plugged, or AC power source has 
problem. 

AC power cord is not 
connected 

Ø


Check AC power cord connections at 
both ends. Use the correct cords. 

The fuse has blown 

Ø


Replace the fuse. 

Repeated fuse broken 

Hardware failure 

Ø


Contact Cleaver Scientific service 

department 

Operation stops and the 

screen displays 


Communication wires on 

circuit board have loosen or 

broken.   

Ø


It is recommended to send the 

machine back to local distributor or 
our Service Department for 

maintenance.   

Operation stops with 
alarm: The screen 

displays 


Electrophoresis leads are 

not connected to the 
power supply or to the 

electrophoresis unit(s), or 
there is a broken circuit in 
the electrophoresis cell 

Ø


Check the connections to the power 

supply and on your electrophoresis cell 
to make sure the connection is intact; 

check condition of wires in 

electrophoresis unit. Close the circuit 

by reconnecting the cables. Press 

START/STOP to restart the run. 

High resistance due to tape 
left on a pre-cast gel, 

incorrect buffer 

concentration, or incorrect 

buffer volumes in the 

electrophoresis cell 

Ø


Make sure the tape is removed from 
the pre-cast gel, buffers are prepared 

correctly, and the recommended 

volume of buffer is added to the 
electrophoresis unit. 

Содержание PowerPro300

Страница 1: ...Version 1 Revised on 2017 7 19 PowerPro Power Supplies Instruction manual Catalog No PowerPro300 PowerPro3AMP PowerPro500 www cleaverscientific com...

Страница 2: ...TION 10 SECTION 3 INSTALLATION INSTRUCTIONS 11 SECTION 4 OPERATION INSTRUCTIONS 11 4 1 CONTROL INTERFACE 11 4 2 START THE OPERATION 12 4 3 CONSTANT MODE 13 4 4 PROGRAM MODE 16 4 5 TYPICAL RUNNING COND...

Страница 3: ...1x Power Cord 1x Instruction Manual Packing list checked by ________________________ Date ____________ Cleaver Scientific is liable for all missing or damaged parts accessories within 7 days after cu...

Страница 4: ...ts carefully before operating this equipment 1 Read and follow the manual instructions carefully 2 Do not alter the equipment Failure to follow these directions could result in personal and or laborat...

Страница 5: ...ollution degree 2 7 Mains supply voltage fluctuations up to 10 of the normal voltage Avoiding Electrical Shock Follow the guidelines below to ensure safe operation of the unit The PowerPro Power Suppl...

Страница 6: ...turer s recommendation users should check with the manufacturer s instruction to see if the proposed method will damage the equipment Equipment Operation Follow the guidelines below to ensure safe ope...

Страница 7: ...re 1 Risk assessment table Potential Risk Frequency Frequent Likely Possible Rare Unlikely Bruise Slash Electrical shock Power cord plug wrong 2 Preventative measures of risk Potential Risk Preventive...

Страница 8: ...majority of electrophoresis applications on the market Sufficient and accurate output voltages five terminal pairs and its compacted size can deliver accurate and reliable experimental results from o...

Страница 9: ...multi electrophoresis units simultaneously Cleaver Scientific PowerPro Series Power Supply provides Constant Voltage or Constant Current or Constant Power to instruments used in electrophoresis 5 ter...

Страница 10: ...age 30 programmed files Program Multi Step Up to 6 steps Editable Program Function 1 Have typical running conditions program 2 Manual editable program Display 2 4 TFT Control Microprocessor controller...

Страница 11: ...ady for operation Section 4 Operation Instructions 4 1 Control interface Button Functions No Icon Function 1 Press to activate or stop the unit 2 Press to temporarily interrupt power to an operation i...

Страница 12: ...ker near the AC cord on the back of the unit and plug the other end into the main power socket 3 Connect the DC output jacks from the electrophoresis unit insert the red lead into the red output jack...

Страница 13: ...current limit and power limit continuously during the entire operation of electrophoresis Note When target constant mode is set system automatically adjusts the other two parameters to maximum to all...

Страница 14: ...W or time min Press Key to set the specified parameter Use or to set the appropriate value and then press Key and move to the next parameter until all the parameters are set in the same operation met...

Страница 15: ...setting screen Adjust the values and then press Key to resume your operation If you want to change values of parameters and start a new operation run during current running press Key instead of After...

Страница 16: ...s convenience After starting the operation see the above 4 2 instruction set the Program Mode as follow Use Key and Key to select Program Mode and then press either or to enter the next page Press or...

Страница 17: ...Press Key to terminate a timed run and turn the AC power OFF by the switch on the back Note It would take a little time about 5 seconds for the unit to power off Press to switch pages between real ti...

Страница 18: ...rs during current running but do not want to terminate the time run you may pause electrophoresis by pressing the Key Press Key to enter the setting screen Adjust the values and then press Key to resu...

Страница 19: ...are 4 categories that can be selected Choose the model according to your experiment need After selecting model the preset value will display User could adjust the value or simply just press to start o...

Страница 20: ...fic service department Operation stops and the screen displays Communication wires on circuit board have loosen or broken It is recommended to send the machine back to local distributor or our Service...

Страница 21: ...again restart application If you cannot restart the instrument turn off the power disconnect the power cord from the outlet and contact Technical Service Operation stops with alarm Display shows Circu...

Страница 22: ...en cut and now recover User does not need to take extra action The warning sign and beep sound would only last for 5 second after that the machine will continue running the unfinished project The sign...

Страница 23: ...fuses are burned or there is a break in the fuses element replace the fuses with identical type of fuses 4 Place the fuses holder back into the compartment 5 Snap the cover closed For additional fuse...

Страница 24: ...iability under the warranty is limited to the receipt of reasonable proof by the customer that the defect is embraced within the terms of the warranty All claims made under this warranty must be prese...

Отзывы: