background image


17 


Figure 5- 2 Web login


If it is your first time to log in, system pops up warning information to ask you whether install web plug-

in or not after you logged in for one minute. For detailed plug-in installation, please refer to the Web 

Operation Manual included in the resource CD.  

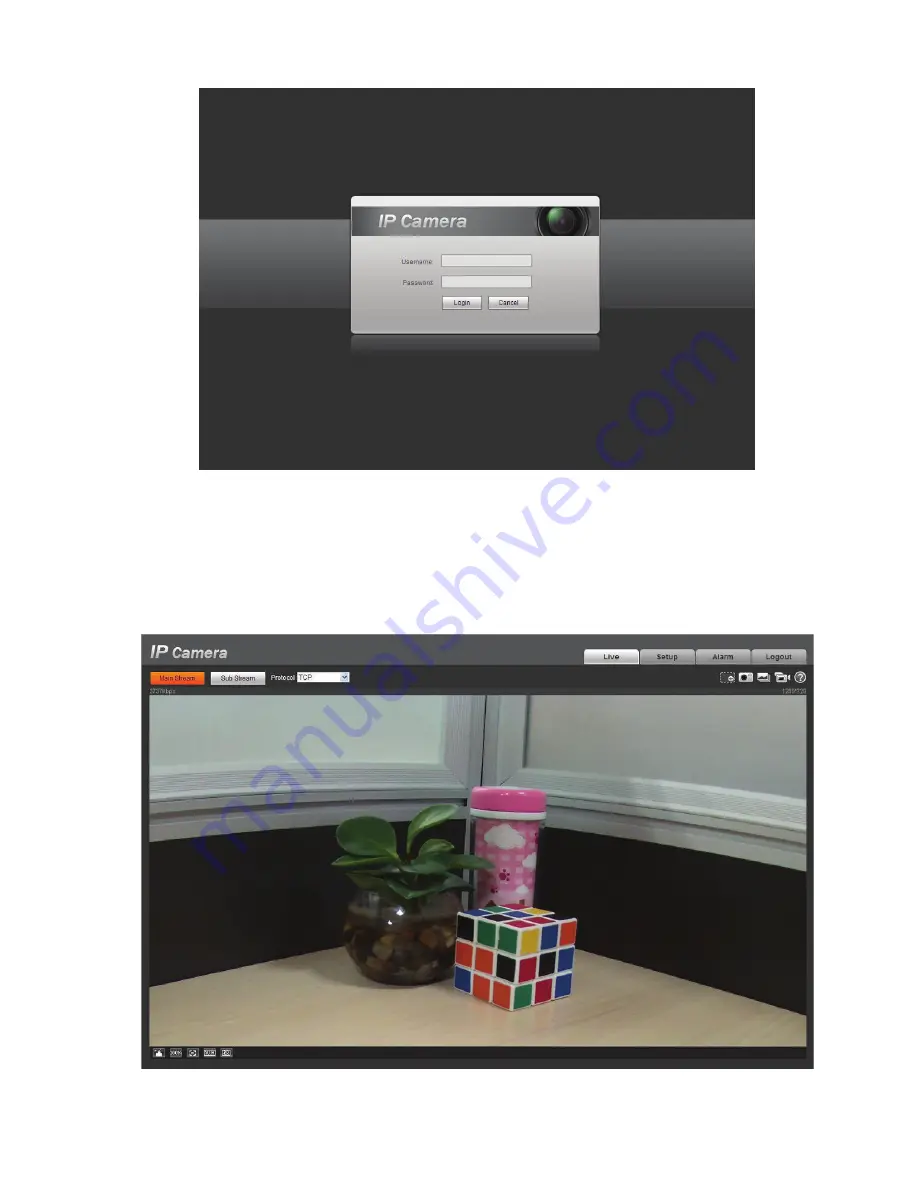
After you logged in, you can see the main window. See Figure 5- 3. 


Figure 5- 3 Web monitoring window 

Содержание Network Video Recorder

Страница 1: ...Network Video Recorder Quick Start Guide Version 3 1 0 ...

Страница 2: ... 2SHUDWLRQ 6 RJLQ 6 6 VWHP 6HWWLQJ 6FKHGXOH 7 6 VWHP 6HWWLQJ 1HWZRUN 6HWXS 8 6 VWHP 6HWWLQJ ODUP 10 6 VWHP 6HWWLQJ 37 12 2 5 1 PTZ Setup 12 2 5 2 PTZ Operation 13 5HPRWH HYLFH 14 2 6 1 UPNP 14 2 6 2 Built in Switch Setup 15 2 6 3 Remote Device Connection 15 2 6 4 Short cut Menu 17 2 6 5 Remote Device Info 18 GYDQFHG 0DQDJHPHQW 18 HE 2SHUDWLRQ 20 1HWZRUN RQQHFWLRQ 20 RJLQ 21 ...

Страница 3: ...ii 0DLQ LQGRZ 22 3 3 1 LAN Login 22 3 3 2 WAN Login 22 SSHQGL 7R LF RU D DUGRXV 0DWHULDOV RU OHPHQWV 23 ...

Страница 4: ... recorder This quick start guide is designed to be a reference tool for your system Please open the accessory bag to check the items one by one in accordance with the list below Contact your local retailer ASAP if something is missing or damaged in the bag ...

Страница 5: ...ould be installed in a cool dry place away from direct sunlight inflammable explosive substances and etc This series product shall be transported storage and used in the specified environments 6 Accessories Be sure to use all the accessories recommended by manufacturer Before installation please open the package and check all the components are included Contact your local retailer ASAP if somethin...

Страница 6: ...v z Please refer to the packing list in the box ...

Страница 7: ...unction keys in the front panel and the ports in the rear panel please refer to the User s Manual included in the resource CD The model label in the front panel is very important please check according to your purchase order The label in the rear panel is very important too Usually we need you to represent the serial number when we provide the service after sales IWHU 5HPRYH WKH KDVVLV Please chec...

Страница 8: ...econds to boot up or shut down NVR Assistant Fn z One window monitor mode click this button to display assistant function PTZ control and image color z Backspace function in numeral control or text control press it for 1 5 seconds to delete the ĹPull the HDD knob up when you put the HDD into the box in case the knob buckle may strike the front panel ĺPut the knob back after you insert the HDD to t...

Страница 9: ...on light Power indication light HDD abnormal indication light HDD error occurs or HDD capacity is below specified threshold value the light becomes red to alert you Network abnormal indication light Network error occurs or there is no network connection the light becomes red to alert you Alarm indicator light The light becomes on when an alarm occurred 5HDU 3DQHO The rear panel is shown as below S...

Страница 10: ...ports Group 1 port NO1 C1 Group 2 port NO2 C2 Group 3 port NO3 C3 Output alarm signal to the alarm device Please make sure there is power to the external alarm device z NO Normal open alarm output port z C Alarm output public end A RS485_A port It is the cable A You can connect to the control devices such as speed dome PTZ B RS485 RS 485 communication port I O port RS485_B It is the cable B You ca...

Страница 11: ...g audio signal to the devices such as the sound box z Bidirectional talk output z Audio output on 1 window video monitor z Audio output on 1 window video playback eSATA eSATA port External SATA port It can connect to the device of the SATA port Please jump the HDD when there is peripheral connected HDD ...

Страница 12: ...ce only You can overlay the corresponding date time and channel name on each screen You can refer to the following sheet for channel record or alarm status information Figure 2 1 Right click mouse you can see the login interface Please input user name and password See Figure 2 2 System consists of four accounts z Username admin Password admin z Username 888888 Password 888888 z Username 666666 Pas...

Страница 13: ...u backup recorded file in two disks You can highlight Redundancy button to activate this function Please note before enable this function please set at least one HDD as redundant Main menu Advanced HDD Management Please note this function is null if there is only one HDD z Snapshoot You can enable this function to snapshoot image when alarm occurs z Record types There are four types regular motion...

Страница 14: ...face the copy function succeeded Please note if you select ALL in Figure 2 4 the record setup of all channels are the same and the Copy button becomes hidden Figure 2 4 6 VWHP 6HWWLQJ 1HWZRUN 6HWXS Here is for you to input network information See Figure 2 5 z IP Version There are two options IPv4 and IPv6 Right now system supports these two IP address format and you can access via them z MAC addre...

Страница 15: ... and network becomes off That is to say MTU modification can affect current network service System may pop up dialog box for you to confirm setup when you want to change MTU setup Click OK button to confirm current reboot or you can click Cancel button to terminate current modification Before the modification you can check the MTU of the gateway the MTU of the NVR shall be the same as or is lower ...

Страница 16: ...he on off alarm signal from the front end device and can activate the local NVR IPC offline alarm Once you select this item system can generate an alarm when the front end IPC disconnects with the local NVR The alarm can activate record PTZ snap and etc The alarm can last until the IPC and the NVR connection resumes z Type Normal open or normal close z Enable Please you need to highlight this butt...

Страница 17: ...11 Figure 2 6 For the 32 channel series product the alarm interface and PTZ setup is shown as below See Figure 2 7 and Figure 2 8 Figure 2 7 ...

Страница 18: ... PTZ Setup The pan tilt zoom setup includes the following items Please select channel first See Figure 2 9 z Channel Please select the connected IPC z PTZ type Please select from the dropdown list There are two options local remote z Protocol Select corresponding PTZ protocol such as PELCOD z Address Input corresponding PTZ address z Baud rate Select baud rate Default value is 9600 z Data bit Sele...

Страница 19: ...ick save button system goes back to the previous menu 2 5 2 PTZ Operation In one window display mode right click mouse click Fn Button in the front panel or click Fn key in the remote control Click Pan Tilt Zoom the interface is shown as below See Figure 2 11 Here you can set the following items z Step value ranges from 1 to 8 z Zoom z Focus z Iris ...

Страница 20: ...You can click the software keyboard or the front panel to input The speed 8 is faster than speed 1 Figure 2 12 Here is a sheet for you reference Name Function key function Shortcut key Function key function Shortcut Key Zoom Near Ź Far Focus Near _ Far Ź Iris close W Open f You can click set button in Figure 2 11 or click REC button in the front panel to set preset tour and pattern You can click p...

Страница 21: ...o noise Check Auto system automatically sets video gain Check Manual you can set gain threshold brightness and etc Gain threshold Here is for you to set gain value The different series product has different default values The lower the value is the lower the noise is But the video brightness may become too dark under the low illumination If the value is high it can enhance the video brightness und...

Страница 22: ...the noise is b Manual It is to display manual exposure value z Delete Please select one device in the Added device list and then click it to remove z Manual add Click it to add the IPC manually The port number is 37777 The default user name is admin and password is admin Figure 2 15 Figure 2 16 Click the Manual Add button you can go to the following interface See Figure 2 17 ...

Страница 23: ...rces 400 480fps D1 200 240fps 720P 100 120 1080P 32 ch series Max support 32 channel standard definition video Support 8 channel 1080p 5mbps extra stream D1 1mbps 16 channel 720p 2mbps extra CIF 640kbps 32 channel D1 1mbps This series product supports the IPC from many popular manufactures such as Sony Hitachi dynacolor Axis Samsung arecont Dahua onvif and custom type You can just input URL addres...

Страница 24: ...k load and etc Please refer to the user s manual for detailed information GYDQFHG 0DQDJHPHQW Here is for you to view and implement hard disk management main menu Advanced HDD management See Figure 2 20 You can see current HDD type status capacity and record time The operation includes format HDD resume from error or change HDD property Read write HDD read only HDD It can also set the HDD alarm and...

Страница 25: ...19 Figure 2 20 ...

Страница 26: ...rowser Device only support 1 channel monitor on the Apple PC About PoE address setup operation and allocation 1 Insert PoE After you insert PoE device may try to set a corresponding IP address of the Switch network adapter First system tries to set via arp ping It then uses DHCP if it finds the DHCP is enabled After successfully set IP address system may use Switch to send out broadcast system thi...

Страница 27: ...em follow the steps listed above to find the channel available 4 When you insert PoE all channels are in use now System can pop up a dialogue box for you to select a channel to overwrite The title of the pop up interface is the name of the current operation PoE port In this interface All PoE channel become grey and can not select RJLQ Open IE and input NVR address in the address column For example...

Страница 28: ... Figure 3 2 Click the channel name on the left side you can view the real time video Figure 3 2 3 3 2 WAN Login In WAN mode after you logged in the interface is shown as below See Figure 3 3 Figure 3 3 For detailed operation information please refer to the User s Manual included in the resources CD ...

Страница 29: ...period the toxic or hazardous substance or elements contained in products will not leak or mutate so that the use of these substances or elements will not result in any severe environmental pollution any bodily injury or damage to any assets The consumer is not authorized to process such kind of substances or elements please return to the corresponding local authorities to process according to you...

Страница 30: ...Network Video Recorder User s Manual V 3 1 0 ...

Страница 31: ...RQ 7 LGLUHFWLRQDO WDON 7 2 4 1 Device end to PC end 7 2 4 2 PC end to the device end 8 0RXVH 2SHUDWLRQ 8 QVWDOODWLRQ 10 8 2SHUDWLRQ 11 RJLQ 11 5LJKW OLFN 0HQX 13 0DLQ 0HQX 14 6HDUFK 3OD EDFN 14 QIRUPDWLRQ 18 4 5 1 HDD Information 18 4 5 2 BPS 19 4 5 3 Log 20 4 5 4 Version 21 4 5 5 Online Users 21 4 5 6 Remote Device Information 22 4 5 7 Network Info 23 ...

Страница 32: ...11 Alarm center 44 4 6 5 12 SNMP 44 4 6 5 13 Auto register 45 4 6 6 Alarm 46 4 6 7 Detect 49 4 6 7 1 Motion Detect 49 4 6 7 2 Video Loss 51 4 6 7 3 Camera Masking 52 4 6 8 PTZ 53 4 6 9 Display 55 4 6 10 Default 56 4 6 11 Remote Device 56 4 6 11 1 UPNP 56 4 6 11 2 Built in Switch Setup 57 4 6 11 3 Remote Device 57 4 6 11 4 Short cut Menu 60 GYDQFHG 61 4 7 1 HDD Management 61 4 7 2 Abnormality 64 4 ...

Страница 33: ...tion 75 6 1 2 Log in 76 1 0RGH 77 6 2 1 Monitor Channel Menu Tree 78 6 2 2 System Menu 81 6 2 3 Monitor Window Switch 81 6 2 4 PTZ Control 81 6 2 5 Color and More Setup 83 1 RJLQ 84 RQILJXUDWLRQ 86 6 4 1 System Information 86 6 4 1 1 Version Information 86 6 4 1 2 HDD information 87 6 4 1 3 Log 87 6 4 2 System Configuration 88 6 4 2 1 General Setup 88 6 4 2 2 Encode 90 6 4 2 3 Schedule 91 6 4 2 4 ...

Страница 34: ... 8 Remote device 114 6 4 3 9 Preview Control 115 6 4 4 Additional Function 116 6 4 4 1 IPC Config 116 6 4 4 2 Auto register 118 6 4 4 3 Mobile Config 118 6 4 4 4 WIFI Config 119 6HDUFK 120 ODUP 123 ERXW 125 RJ RXW 125 4 126 SSHQGL DSDFLW DOFXODWLRQ 131 SSHQGL RPSDWLEOH 6 7 132 SSHQGL RPSDWLEOH 86 LVW 137 SSHQGL RPSDWLEOH LVSOD HU LVW 139 SSHQGL 7R LF RU D DUGRXV 0DWHULDOV RU OHPHQWV 140 ...

Страница 35: ...o recorder This user s manual is designed to be a reference tool for your system Please open the accessory bag to check the items one by one in accordance with the list below Contact your local retailer ASAP if something is missing or damaged in the bag ...

Страница 36: ...Environment The NVR should be installed in a cool dry place away from direct sunlight inflammable explosive substances and etc This series product shall be transported storage and used in the specified environments 6 Accessories Be sure to use all the accessories recommended by manufacturer Before installation please open the package and check all the components are included Contact your local ret...

Страница 37: ...vii Check the following accessories after opening the box z Please refer to the packing list in the box ...

Страница 38: ...nding setup such as alarm setup and schedule setup you can backup related audio video data in the network video recorder x Support Web record and record local video and storage the file in the client end Alarm x Respond to external alarm simultaneously within 200MS based on user s pre defined relay setup system can process the alarm input correctly and prompt user by screen and voice support pre r...

Страница 39: ...e video preview and control 6SHFLILFDWLRQV Specifications Parameter Phoenix Series System Resources Max support 16 ch standard definition with the transmission rate of 2Mbps for each channel 8 channel 720P with the transmission rate of 4Mbps for each channel 4 channel 1080P with the transmission rate of 8Mbps for each channel Support 20 online users at the same time The image delay time of each ch...

Страница 40: ... USB2 0 Port 3 peripheral USB2 0 ports Network Connection One RJ45 10 100M 1000Mbps self adaptive Ethernet port Power Port Two power ports power adapter Input DC 12V or DC 48V Power Button One power button in the rear panel Power Button One power button in the front panel IR Remote Control Receiver Support IR remote control Clock Built in clock Power Consumption 12W Exclude HDD Working Temperature...

Страница 41: ...r mode click this button to display assistant function PTZ control and image color z Backspace function in numeral control or text control press it for 1 5 seconds to delete the previous character before the cursor z In motion detection setup working with Fn and direction keys to realize setup z In text mode click it to switch between numeral English character small capitalized and etc z In HDD ma...

Страница 42: ...t you Network abnormal indication light Network error occurs or there is no network connection the light becomes red to alert you Alarm indicator light The light becomes on when an alarm occurred 5HDU 3DQHO The rear panel is shown as below See Figure 2 2 Figure 2 2 Please refer to the following sheet for detailed information Port Name Connection Function USB2 0 USB2 0 port Connect to USB2 0 mouse ...

Страница 43: ...ports Group 1 port NO1 C1 Group 2 port NO2 C2 Group 3 port NO3 C3 Output alarm signal to the alarm device Please make sure there is power to the external alarm device z NO Normal open alarm output port z C Alarm output public end A RS485_A port It is the cable A You can connect to the control devices such as speed dome PTZ B RS485 RS 485 communication port I O port RS485_B It is the cable B You ca...

Страница 44: ...he NC alarm device please connect to the NC C ports Please note the NO C ports are for NO alarm device only z Open Web and go to the Alarm setup interface to set the alarm input and output The alarm 01 is corresponding to the first channel of the device I O port and so on Please set the NO NC type according to the high low level the alarm input device generated when an alarm occurred z Set the ala...

Страница 45: ...r panel Login the Web and then enable the corresponding channel real time monitor Please refer to the above interface Figure 2 3 to enable bidirectional talk Listening Operation At the PC end speak via the speaker or the pickup and then you can get the audio from the earphone or sound box at the device end See Figure 2 5 Figure 2 5 0RXVH 2SHUDWLRQ Please refer to the following sheet for mouse oper...

Страница 46: ...rol operation such as double click one item in the file list to playback the video Double left click mouse In multiple window mode double left click one channel to view in full window Double left click current video again to go back to previous multiple window mode In real time monitor mode pops up shortcut menu Right click mouse Exit current menu without saving the modification In numeral input b...

Страница 47: ...fer to the Appendix for recommended HDD brand Please use HDD of 7200rpm or higher Usually we do not recommend the PC HDD Please follow the instructions below to install hard disk ķUse 4 screws to secure the HDD ĸPut the HDD to the HDD box at the front ĹPull the HDD knob up when you put the HDD into the box in case the knob buckle may strike the front panel ĺPut the knob back after you insert the H...

Страница 48: ...tor local and network z Username 888888 Password 888888 administrator local only z Username 666666 Password 666666 Lower authority user who can only monitor playback backup and etc z Username default Password default hidden user You can use USB2 0 mouse to input Click to switch between numeral English character small capitalized and denotation Note For security reason please modify password after ...

Страница 49: ...m pops up the preview control interface See Figure 4 3 If your mouse stays in this area for more than 6 seconds and has no operation the control bar automatically hides Figure 4 3 You can refer to the following sheet for detailed information SN Name Function 1 Realtime playback It is to playback the previous 5 60 minutes record of current channel Please go to the Main Menu General to set real time...

Страница 50: ...nel It will display the channel title and the record status once you exit the preview playback z During the preview playback you can not switch the displayed channel or change current window display mode z Please note the tour function has the higher priority than the preview playback System automatically exits the preview playback function and its corresponding interface when the tour function st...

Страница 51: ...icons search Information setting remote device backup advanced and shutdown Move the cursor to highlight the icon then double click mouse to enter the sub menu Figure 4 5 6HDUFK 3OD EDFN Click search button in the main menu search interface is shown as below See Figure 4 6 Figure 4 6 1 2 3 4 5 6 7 8 12 9 10 11 ...

Страница 52: ...back mode and channel selection pane z Playback mode 1 4 9 16 It may vary due to different series In 1 window playback mode you can select 1 16 channels In 4 window playback mode you can select 4 channels according to your requirement In 9 window playback mode you can switch between 1 8 and 9 16 channels In 16 window playback mode you can switch between1 16 and 17 32 channels z The time bar will c...

Страница 53: ... watching the files from the same channel In normal play mode when you pause current play you can click WŇ and ŇX to begin frame by frame playback In frame by frame playback mode click Ź to restore normal playback Ź Slow play In playback mode click it to realize various slow play modes such as slow play 1 slow play 2 and etc Fast forward In playback mode click to realize various fast play modes su...

Страница 54: ...he corresponding slide bar in the time bar of the corresponding channel You can adjust the slide bar or input the accurate time to set the file end time Click this button again and then save current contents in a new file 12 Record type In any play mode the time bar will change once you modify the search type 13 Smart search z When system is playing you can select a zone in the window to begin mot...

Страница 55: ...ion BPS data stream statistics log Version online user remote device information and network info See Figure 4 7 Figure 4 7 4 5 1 HDD Information Here is to list hard disk type total space free space and status See Figure 4 8 ż means current HDD is normal means there is no HDD If disk is damaged system shows as Please remove the broken hard disk before you add a new one Figure 4 8 In Figure 4 8 cl...

Страница 56: ...The HDD total capacity Free space The HDD free capacity Status HDD can work properly or not Bad track Display there is bad track or not Page up Click it to view previous page Page down Click it to view the next page View recording time Click it to view HDD record information file start time and end time View HDD type and capability Click it to view HDD property status and etc 4 5 2 BPS Here is for...

Страница 57: ...up down button on the interface or the front panel to view more z Backup Please select a folder you want to save you can click the backup button to save the log files After the backup you can see there is a folder named Log_time on the backup path Double click the folder you can see the log file z Details Click the Details button or double click the log item you can view the detailed information S...

Страница 58: ...gure 4 13 z Channel z Alarm in z Alarm out z System version z Build Date z Web z Serial number Figure 4 13 4 5 5 Online Users Here is for you manage online users connected to the local device See Figure 4 14 You can disconnect one user or block one user if you have proper system right ...

Страница 59: ...etc Channel status Here you can view the IPC status of the corresponding channel such as motion detect video loss camera masking alarm and etc See Figure 4 15 Figure 4 15 Connection log In this interface you can search the IPC log information of the corresponding channel It includes IPC online offline and etc See Figure 4 16 ...

Страница 60: ...e dropdown list to select peripheral device Click Browse button to select the snap path The steps here are same as preview backup operation You can view all connected network adapter names including Ethernet PPPoE WIFI and 3G you can click the button on the right panel to begin Sniffer Click the grey stop button to stop Please note system can not Sniffer several network adapters at the same time A...

Страница 61: ...information of all connected network adapters The connection status is shown as offline if connection is disconnected Click one network adapter you can view the flow statistics such as send rate and receive rate at the top panel Figure 4 18 6HWWLQJ In main menu highlight setting icon and double click mouse System setting interface is shown as below See Figure 4 19 ...

Страница 62: ...tem supports various languages Chinese simplified Chinese Traditional English Italian Japanese French Spanish All languages listed here are optional Slight difference maybe found in various series z HDD full Here is for you to select working mode when hard disk is full There are two options stop recording or rewrite If current working HDD is overwritten or the current HDD is full while the next HD...

Страница 63: ... 2012 z Mouse property Click mouse setup button you can go to mouse setup interface See Figure 4 24 You can set double click speed via dragging the slide bard You can Click Default button to restore default setup z Startup wizard Once you check the box here system will go to the startup wizard directly when the system restarts the next time Otherwise it will go to the login interface z Auto logout...

Страница 64: ...re 4 25 Please note some series do not support extra stream z Channel Select the channel you want z Type Please select from the dropdown list There are three options regular motion detect alarm You can set the various encode parameters for different record types z Compression System supports H 264 MPEG4 MJPEG and etc ...

Страница 65: ...status Monitor means the privacy mask zone can not be view by the user when system is in monitor status Time display You can select system displays time or not when you playback Please click set button and then drag the title to the corresponding position in the screen Channel display You can select system displays channel number or not when you playback Please click set button and then drag the t...

Страница 66: ...There are eight options ranges from Saturday to Sunday and all z Pre record System can pre record the video before the event occurs into the file The value ranges from 1 to 30 seconds depending on the bit stream z Redundancy System supports redundancy backup function It allows you backup recorded file in two disks You can highlight Redundancy button to activate this function Please note before ena...

Страница 67: ... and red color stands for alarm recording The white means the MD and alarm record is valid Once you have set to record when the MD and alarm occurs system will not record neither motion detect occurs nor the alarm occurs Figure 4 29 4 6 3 1 Quick Setup Copy function allows you to copy one channel setup to another After setting in channel 1 click Copy button you can go to interface Figure 4 30 You ...

Страница 68: ...n Network keyboard is for you to use the special keyboard to control the device PTZ matrix is to connect to the peripheral matrix control z Baud rate You can select proper baud rate z Data bit You can select proper data bit The value ranges from 5 to 8 z Stop bit There are three values 1 1 5 2 z Parity there are five choices none odd even space mark System default setup is z Function Console z Bau...

Страница 69: ... any setup of the above four ports Please make sure the port values here do not conflict z Max connection system support maximal 20 users 0 means there is no connection limit z MTU It is to set MTU value of the network adapter The value ranges from 1280 7200 bytes The default setup is 1500 bytes Please note MTU modification may result in network adapter reboot and network becomes off That is to sa...

Страница 70: ...d IP in the following list The list supports max 64 IP addresses System supports valid address of IPv4 and IPv6 Please note system needs to check the validity of all IPv6 addresses After you enabled trusted sites function only the IP listed below can access current NVR If you enable blocked sites function the following listed IP addresses can not access current NVR z Enable Highlight the box here ...

Страница 71: ...tion and the end address shall be larger than the start address f System may check newly added IP address exists or not System does not add if input IP address does not exist z Delete Click it to remove specified item z Edit Click it to edit start address and end address System can check the IP address validity after the edit operation and implement IPv6 optimization Figure 4 34 4 6 5 3 NTP Setup ...

Страница 72: ...ka GMT 9 Pacific Time P T GMT 8 American Mountain Time M T GMT 7 American Central Time C T GMT 6 American Eastern Time E T GMT 5 Atlantic Time GMT 4 Brazil GMT 3 Middle Atlantic Time GMT 2 Figure 4 35 4 6 5 4 Multicast Multiple cast setup interface is shown as in Figure 4 36 Figure 4 36 Here you can set a multiple cast group Please refer to the following sheet for detailed information z IP multipl...

Страница 73: ...ed addresses of special meaning you can use other addresses For example Multiple cast IP 235 8 8 36 Multiple cast PORT 3666 After you logged in the Web the Web can automatically get multiple cast address and add it to the multiple cast groups You can enable real time monitor function to view the view Please note multiple cast function applies to special series only 4 6 5 5 PPPoE PPPoE interface is...

Страница 74: ...ntroduction 1 Background Introduction Device IP is not fixed if you use ADSL to login the network The DDNS function allows you to access the NVR via the registered domain name Besides the general DDNS the quick DDNS works with the device from the manufacturer so that it can add the extension function 2 Function Introduction The quick DDNS client has the same function as other DDNS client end It re...

Страница 75: ... UPNP on off Turn on or off the UPNP function of the device z Status When the UPNP is offline it shows as Unknown When the UPNP works it shows Success z Router LAN IP It is the router IP in the LAN z WAN IP It is the router IP in the WAN z Port Mapping list The port mapping list here is the one to one relationship with the router s port mapping setting z Enable Switch It shows that the function of...

Страница 76: ... Setting You can view the WIFI connection status in the Network Setting interface See Figure 4 41 You can view current connection status and IP address if there is a connection Figure 4 41 The WIFI interface is shown as below See Figure 4 42 ...

Страница 77: ...d if you have set it before z Disconnect Here you can click it to turn off the connection z Connect Here you can click it to connect to the hotspot System needs to turn off current connection and then connect to a new hotspot if there is connection of you selected one See Figure 4 43 Figure 4 42 Figure 4 43 After successfully connection you can see the following interface You can see it is connect...

Страница 78: ...PA2 The display may become abnormal for the verification type and encryption type After device successfully connected to the WIFI you can view the hotspot name IP address subnet mask default gateway and etc See Figure 4 45 Figure 4 45 4 6 5 9 Email The email interface is shown as below See Figure 4 46 z SMTP server Please input your email SMTP server IP here z Port Please input corresponding port ...

Страница 79: ... here Click the Test button you can see the corresponding dialogue box to see the email connection is OK or not See Figure 4 47 Please note system will not send out the email immediately when the alarm occurs When the alarm motion detection or the abnormity event activates the email system sends out the email according to the interval you specified here This function is very useful when there are ...

Страница 80: ...FTP server address port and remote directory When remote directory is null system automatically create folders according to the IP time and channel User name and password is the account information for you to login the FTP File length is upload file length When setup is larger than the actual file length system will upload the whole file When setup here is smaller than the actual file length syste...

Страница 81: ... 6 5 12 SNMP SNMP is an abbreviation of Simple Network Management Protocol It provides the basic network management frame of the network management system The SNMP widely used in many environments It is used in many network device software and system You can set in the following interface See Figure 4 52 Figure 4 52 ...

Страница 82: ...ideo channels audio channels application version and etc 4 6 5 13 Auto register This function allows the device to auto register to the proxy you specified In this way you can use the client end to access the NVR and etc via the proxy Here the proxy has a switch function In the network service device supports the server address of IPv4 or domain Please follow the steps listed below to use this fun...

Страница 83: ... you set the period 7 10 18 00 for Monday So the arm period of the Monday ranges from 7 10 to 18 00 Please highlight the corresponding button to enable this function z PTZ activation When an alarm occurred system can activate the PTZ operation The PTZ activation lasts an anti dither period In the Pan Tilt Zoom interface Main menu Setting Pan Tilt Zoom please set video channel speed dome protocol a...

Страница 84: ...ote the manual record has the highest priority System record all the time no matter there is an alarm or not if you select Manual mode Now you can go to the Schedule interface Main Menu Setting Schedule to set the record type corresponding channel number week and date You can select the record type Regular MD Alarm MD Alarm Please note you can not select the MD Alarm and MD or Alarm at the same ti...

Страница 85: ...48 Figure 4 54 Figure 4 55 Figure 4 56 ...

Страница 86: ... disarm mode In arm mode you can click the direction buttons to move the green rectangle to set the motion detection zone After you completed the setup please click ENTER button to exit current setup Do remember click save button to save current setup If you click ESC button to exit the region setup interface system will not save your zone setup z Sensitivity System supports 6 levels The sixth lev...

Страница 87: ...arm occurs System one window tour Please go to chapter 5 3 9 Display for tour interval setup z Snapshot You can enable this function to snapshoot image when motion detect alarm occurs Please highlight icon to select the corresponding function After all the setups please click save button system goes back to the previous menu Note In motion detection mode you can not use copy paste to set channel s...

Страница 88: ...51 Figure 4 59 Figure 4 60 Figure 4 61 Figure 4 62 4 6 7 2 Video Loss In Figure 4 58 select video loss from the type list You can see the interface is shown as in ...

Страница 89: ...s the lens or the output video is in one color due to the environments light change the system can alert you to guarantee video continuity Camera masking interface is shown as in Figure 4 64 You can enable alarm output channel and then enable show message function You can refer to chapter 4 6 7 1Motion detect for detailed information Tips You can enable preset tour pattern activation operation whe...

Страница 90: ...er A B line connects with NVR A B line Boot up the NVR input user name and password In the main menu click setting and then click Pan Tilt Control button The interface is shown as in Figure 4 65 Here you can set the following items z Channel Select the current camera channel z PTZ type There are two types local remote z Protocol Select corresponding PTZ protocol such as PELCOD z Address Default ad...

Страница 91: ...s below See Figure 4 67 Here you can set the following items z Step value ranges fro 1 to 8 z Zoom z Focus z Iris Please click icon and to adjust zoom focus and iris Figure 4 67 In Figure 4 67 please click direction arrows to adjust PTZ position There are total 8 direction arrows Figure 4 68 Here is a sheet for you reference Name Function key function Shortcut key Function key function Shortcut Ke...

Страница 92: ...tem needs to reboot to activate current setup z Enable tour Activate tour function z Interval System supports 1 4 8 9 16 window tour Input proper interval value here The value ranges from 5 120 seconds In tour process you can use mouse or click Shift to turn on window switch function Stands for opening switch function stands for closing switch function z Monitor tour type System support 1 8 window...

Страница 93: ...l the setups please click OK button system goes back to the previous menu Warning System menu color language time display mode video format IP address user account will not maintain previous setup after default operation 4 6 11 Remote Device Important Do not connect the switch to the PoE port otherwise the connection may fail 4 6 11 1 UPNP Please connect the IPC to the PoE port of the device rear ...

Страница 94: ... 72 4 6 11 3 Remote Device In the main menu click the Remote Device icon to go to the corresponding interface See Figure 4 73 Figure 4 73 The remote device interface is shown as in Figure 4 74 z IP search Click it to search IP address z Add Click it to connect to the selected device and add it to the Added device list Support Batch add z Show filter You can use it to display the specified devices ...

Страница 95: ...automatically expose according to environment so that you can view the darkest section of the video Day Night mode Here is to set video color or black and white mode a Color Camera only outputs color video b Auto Camera auto selects color or black and white video according to device feature Video whole brightness or there is any IR light or not c Black and white Camera only outputs black and white...

Страница 96: ...el video Total resources 400 480fps D1 200 240fps 720P 100 120 1080P 8 ch series Max support 8 channel video Total resources 400 480fps D1 200 240fps 720P 100 120 1080P This series product supports the IPC from many popular manufactures such as Sony Hitachi dynacolor Axis Samsung arecont Dahua onvif and custom type You can just input URL address user name and password to login the front end device...

Страница 97: ... 4 Short cut Menu In the preview interface for the channel of no IPC connection you can click the icon in the centre of the interface to quickly go to the Remote Device interface See Figure 4 77 and Figure 4 78 Figure 4 77 ...

Страница 98: ...rix Figure 4 79 4 7 1 HDD Management Here is for you to view and implement hard disk management See Figure 4 80 You can see current HDD type status capacity and record time When HDD is working properly system is shown as O When HDD error occurred system is shown as X z Alarm set Click alarm set button the interface is shown as below See Figure 4 81 This interface is just like the abnormality setup...

Страница 99: ...corresponding to several hard disks while one hard disk is only included in one HDD Group z Each channel is only corresponding with one HDD Group while one HDD Group can store records from several channels z HDD Group is only available for read write HDD and self defined disks other types of hard disks cannot be set as HDD Group Important z eSATA also supports this function you can manage e SATA h...

Страница 100: ... Group settings system will pack the records and snapshots and then reboot Figure 4 82 Channels Setting Click the button named with Channels Settings at the top right corner of the Figure 4 80 system will pop up an interface shown as in Figure 4 83 You can set HDDs for main stream extra stream and snap pictures respectively The main stream and extra stream of one channel can be saved to different ...

Страница 101: ...Here you can set corresponding delaying time The value ranges from 10s 300s System automatically delays specified seconds in turning off alarm and activated output after external alarm cancelled z Show message system can pop up the message in the local screen to alert you when an alarm occurs z Alarm upload System can upload the alarm signal to the network including alarm centre if you enabled cur...

Страница 102: ... in the main menu Advanced Manual Record Manual record menu is shown as in Figure 4 86 4 7 4 2 Basic operation There are three statuses schedule manual stop Please highlight iconĀƻā to select corresponding channel z Manual The highest priority After manual setup all selected channels will begin ordinary recording z Schedule Channel records as you have set in recording setup Main Menu Setting Sched...

Страница 103: ... Figure 4 88 When system is in schedule recording all channels will record as you have previously set Main menu Setting Schedule The corresponding indication light in front panel will turn on Figure 4 88 z All channel manual record Please highlight ALL after Manual See Figure 4 89 When system is in manual recording all scheduled set up you have set in will be null Main menu Setting Schedule You ca...

Страница 104: ...z Modify user z Add group z Modify group z Modify password For account management please note z For the user account name and the user group the string max length is 6 byte The backspace in front of or at the back of the string is invalid There can be backspace in the middle The string includes the valid character letter number underline subtraction sign and dot z System account adopts two level m...

Страница 105: ...iew without login z One user should belong to one group User right can not exceed group right z About reusable function this function allows multiple users use the same account to login After all the setups please click save button system goes back to the previous menu Figure 4 91 4 7 5 1 Modify Password Click password button the interface is shown as in Figure 4 92 Here you can modify account pas...

Страница 106: ...etup system setup log view clear log upgrade system control device and etc The modify group interface is similar to the Figure 4 93 Figure 4 93 4 7 5 3 Add Modify User Click add user button the interface is shown as in Figure 4 94 Please input the user name password select the group it belongs to from the dropdown list Then you can check the corresponding rights for current user For convenient use...

Страница 107: ...e is shown as below See Figure 4 96 This function allows you to copy current system configuration to other devices It also supports import create new folder delete folder and etc function Figure 4 96 6KXWGRZQ Double click shutdown button system pops up a dialogue box for you to select See Figure 4 97 z Logout menu user log out menu You need to input password when you login the next time z Restart ...

Страница 108: ...own the device there is a process bar for your reference system waits for 3 seconds and then shut down You can not cancel Please note sometimes you need to input the proper password to shut down the device Figure 4 97 ...

Страница 109: ... applies to the IP addresses in the same segment 2SHUDWLRQ Double click the ConfigTools exe icon you can see an interface is shown as in Figure 5 1 In the device list interface you can view device IP address port number subnet mask default gateway MAC address and etc Figure 5 1 Select one IP address and then right click mouse you can see an interface is shown as in Figure 5 2 Figure 5 2 ...

Страница 110: ...he Login button to go to the login interface See Figure 5 4 In Figure 5 4 you can view device IP address user name password and port Please modify the corresponding information to login Please note the port information here shall be identical with the port value you set in TCP port in Web Network interface Otherwise you can not login the device If you are using device background upgrade port 3800 ...

Страница 111: ...74 Figure 5 5 For detailed information and operation instruction of the quick configuration tool please refer to the Quick Configuration Tool User s Manual included in the resources CD ...

Страница 112: ...uses DHCP if it finds the DHCP is enabled After successfully set IP address system may use Switch to send out broadcast system thinks the connection is OK when there is any response Now system is trying to login the newly found IPC Now please check the interface you can see the corresponding digital channel is active now You can see a small PoE icon at the top left corner You can see the PoE chann...

Страница 113: ...le 4 When you insert PoE all channels are in use now System can pop up a dialogue box for you to select a channel to overwrite The title of the pop up interface is the name of the current operation PoE port In this interface All PoE channel become grey and can not select 6 1 2 Log in Open the IE and then input the NVR IP address in the address column For example if your NVR IP address is 192 168 1...

Страница 114: ... the interface is shown as below See Figure 6 3 Figure 6 3 Login interface Please input your user name and password Default factory name is admin and password is admin Note For security reasons please modify your password after you first login 1 0RGH ...

Страница 115: ... There are six sections z Section 1 Monitor channel menu tree z Section 2 System menu z Section 3 PTZ control z Section 4 Video setup and other setup z Section 5 Preview window z Section 6 Monitor window switch 6 2 1 Monitor Channel Menu Tree The monitor channel menu tree is shown as in Figure 6 5 ķ ĸ Ĺ ĺ ļ Ļ ...

Страница 116: ... Once all video channels are open it becomes close all button Start Dialogue You can click this button to enable audio talk Click Ǐ ǐ to select bidirectional talk mode There are four options DEFAULTˈ G711aˈG711u and PCM Please note the audio input port from the device to the client end is using the first channel audio input port During the bidirectional talk process system will not encode the audi...

Страница 117: ...l time video the monitor window is shown as in Figure 6 7 Figure 6 7 Real time Monitor Please refer to the following sheet for monitor window parameter information Parameter Function Display device information z 1 NVR IP address z 2 Channel number z 3 Bit stream z 4 Bit stream decode type S1 Overlay S2 Off stream S3 GD1 H1 Overlay H2 off stream decoding from the display card Digital zoom Click thi...

Страница 118: ...monitor window switch interface is shown as in Figure 6 9 Figure 6 9 Monitor Window Switch System supports 1 4 6 8 9 13 16 20 25 36 window real time preview It is video quality adjustment button It has relationship with decode via software Fluency button You can use this function to adjust the priority between real time and fluency 6 2 4 PTZ Control Before PTZ operation please make sure you have p...

Страница 119: ...82 Figure 6 10 PTZ Interface Click PTZ set button the interface is shown as in Figure 6 11 Figure 6 11 PTZ Setup You can click this icon to display or hide the PTZ control platform ...

Страница 120: ...ck start record button to begin PTZ movement Please go back to Figure 7 10 to implement camera operation Then you can click stop record button in Figure 7 11 Now you have set one pattern Assistant The assistant items include BLC Digital zoom night vision camera brightness flip You can select one option and then click start or stop button Matrix Please select matrix x and then input corresponding m...

Страница 121: ...wing sheet for detailed information Parameter Function Picture Path Click picture path button system pops up an interface for you to modify path Record Path Click record path button system pops up an interface for you to modify path More Reboot Click this button to reboot device If there is local use logged in the system menu or the Web logged in user has no right to reboot the device system pops ...

Страница 122: ... mode at the bottom of the interface See Figure 6 15 Figure 6 15 Important The window display mode and the channel number are by default For example for the 16 channel the max window split mode is 16 3 Multiple channel monitor system adopts extra stream to monitor by default Double click one channel system switches to single channel and system uses main stream to monitor You can view there are two...

Страница 123: ...the configuration interface Please note system will not open the playback interface again after you close the configuration interface Figure 6 16 5 If you login via the WAN mode system does not support alarm activation to open the video function in the Alarm setup interface Important z For multiple channel monitor mode system adopts extra stream to monitor by default You can not modify manually Al...

Страница 124: ...ion Information 6 4 1 2 HDD information Here you can view local storage status such as free capacity and total capacity See Figure 6 18 Figure 6 18 HDD Information 6 4 1 3 Log Here you can view system log See Figure 6 19 ...

Страница 125: ... search Search You can select log type from the drop down list and then click search button to view the list Clear You can click this button to delete all displayed log files Please note system does not support clear by type Backup You can click this button to backup log files to current PC 6 4 2 System Configuration Please click save button to save your current setup Please click refresh button t...

Страница 126: ...or detailed information Parameter Function System Time Here is for you to modify system time Please click Save button after your completed modification Sync PC You can click this button to save the system time as your PC current time Data Format Here you can select data format from the dropdown list ...

Страница 127: ...alue ranges from 1 to 120 minute Default setup is 60 minutes Device No When you are using one remote control to manage multiple devices you can give a serial numbers to the device Please note current series product does not support this function Video Standard Here you can view video format such as PAL 6 4 2 2 Encode The encode interface is shown as in Figure 6 23 Figure 6 23 Encode Please refer t...

Страница 128: ...the better the image quality Reference bit is an ideal range for you to set bit rate Overlay Cover area Here you can privacy mask the specified video in the monitor video One channel max supports 4 privacy mask zones The privacy mask includes two options Never monitor Never It means do not enable privacy mask function Monitor the privacy mask zone can not be viewed in monitor mode Time display You...

Страница 129: ...92 Figure 6 25 Schedule Time Figure 6 26 Copy Figure 6 27 Please refer to the following sheet for detailed information Parameter Function Channel Please select a channel first ...

Страница 130: ...ult You can draw a circle before the week to apply the setup to the whole week After complete setup please go back to Figure 6 24 and then click save to save current time period setup Holiday Click Set button system pops up a dialogue box shown as in Figure 6 27 Here you can set holiday date Check the box it means current chann shall record as your holiday setup Please go to the Period interface s...

Страница 131: ...x PTZ matrix protocol You can use the device to control the PTZ matrix Data Bit The value ranges from 5 to 8 Stop Bit There are three options 1 2 Baud Bit You can select corresponding baud bit here Parity There are five options none odd even mark space 6 4 2 5 Network Network interface is shown as in Figure 6 29 Figure 6 29 Network Please refer to the following sheet for detailed information Param...

Страница 132: ...an change if necessary HTTP Port Default value is 80 RTSP port Default value is 554 UDP Port Default value is 37778 You can change if necessary Max Connection Network user max amount The value ranges from 0 to 20 O means there is no user can access current device Please note system needs to check the validity of all IPv6 addresses The IP address and the default gateway shall be in the same IP sect...

Страница 133: ...nd visit this IP address via WEB Email The email interface is shown as in Figure 6 31 Figure 6 31 Email Please refer to the following sheet for detailed information Parameter Function SMTP Server Input server address and then enable this function You can also input the corresponding server domain name here but you need to go to DNS interface chapter 7 3 4 1 to set the server IP that can parse the ...

Страница 134: ...en enable DDNS function Server IP DDNS server IP address Server Port DDNS server port Domain Name Your self defined domain name User The user name you input to log in the server Password The password you input to log in the server Interval Device sends out alive signal to the server regularly You can set interval value between the device and DDNS server here Private DDNS and Client end Introductio...

Страница 135: ...this service and set proper server address port value and domain name z Server address www quickddns com z Port number 80 z Domain name There are two modes Default domain name and customized domain name Except default domain name registration you can also use customized domain name You can input your self defined domain name After successful registration you can use domain name to login installed ...

Страница 136: ...Remote storage file path Channel Select a monitor channel Period info Setup z In NAS interface click set button you can go to the corresponding setup interface See Figure 6 34 z Please set schedule period and then select corresponding record type schedule alarm Please note device does not support motion detect record function now z Please select date Current setup applies to current day by default...

Страница 137: ... Function Enable Enable NTP function or not Server IP Server IP address Port Server port System supports TCP only and default port value is 123 Time Zone Device current time zone Update Interval Time update interval value Alarm Centre Alarm centre interface is shown as below See Figure 6 36 Please input alarm centre server IP port number Once there is an alarm occurred system can notify the alarm ...

Страница 138: ...and the public network Here you can also add modify or remove UPNP item Figure 6 37 UNPN SNMP The SNMP interface is shown as in Figure 6 38 SNMP is an abbreviation of Simple Network Management Protocol It provides the basic network management frame of the network management system The SNMP widely used in many environments It is used in many network device software and system ...

Страница 139: ...102 Please refer to chapter 4 6 5 12 SNMP for detailed information Figure 6 38 SNMP 6 4 2 6 Alarm Alarm setup interface is shown as in Figure 6 39 Figure 6 39 Alarm Setup ...

Страница 140: ...stem detects from the alarm input port Network input alarm It is the alarm signal from the network IPC external alarm It is the on off alarm signal from the front end device and can activate the local NVR IPC offline alarm Once you select this item system can generate an alarm when the front end IPC disconnects with the local NVR Alarm in Select corresponding alarm channel Enable You need to draw ...

Страница 141: ...alarm occurs working with alarm activation function Please note current device shall be in auto record mode Record Latch System can delay the record for specified time after an alarm ended The value ranges from 10s to 300s Email Please draw a circle to enable email function System can send o email to alert you when an alarm occurs and ends Screen display After enabled alarm info will be prompted o...

Страница 142: ...105 signal which meets the senility standard that is previously set See Figure 6 42 ...

Страница 143: ... exit to save the setup Period Here you can set for business day and non business day Anti dither Range 0 600 Alarm output s when an alarm occurred system enables peripheral alarm device Record channel Select the recording channel Multiple choices This channel will be activated to record when an alarm occurs Send email System can send out email to alert you when an alarm occurs Tour Here you can e...

Страница 144: ...e address otherwise you can not control the speed dome Baud Rate Select the dome baud rate Default setup is 115200 Data Bit Default setup is 8 Please set according to the speed dome dial switch setup Stop bit Default setup is 1 Please set according to the speed dome dial switch setup Parity Default setup is none Please set according to the speed dome dial switch setup 6 4 2 3 Default Backup Defaul...

Страница 145: ... setup Export Configuration Export system configuration to local PC Import Configuration Import configuration from PC to the system 6 4 3 Advanced 6 4 3 1 HDD Management Please select the storage device first and then you can see the items on your right become valid You can check the corresponding item here See Figure 6 45 Figure 6 45 HDD Management ...

Страница 146: ...ite Read only Set current HDD as read Redundant Set current HDD as redundant HHD Recover Fix the HDD error Right now the device does not support this function 6 4 3 2 Abnormity The interface is shown as in below See Figure 6 46 and Figure 6 47 Figure 6 46 Abnormity 1 Figure 6 47 Abnormity 2 Please refer to the following sheet for detailed information ...

Страница 147: ...tem can delay the record for specified time after alarm ended The value ranges from 10s to 300s SMS If you check the box here system can send out a message to the specified mobile phone when an alarm occurred Send email If you enable this function system can send out email to alarm the specified user Show message Once you check the box to enable this function system can display the alarm icon on t...

Страница 148: ...e alarm can not be cancelled Refresh Search alarm output status 6 4 3 4 Record Record control interface is shown as in Figure 6 49 The bit stream type includes main stream and extra stream Figure 6 49 Record Please refer to the following sheet for detailed information Parameter Function Schedule System enables auto record function as you set in schedule setup chapter 7 3 2 2 Manual Enable correspo...

Страница 149: ...ser Please refer to the following sheet for detailed information Parameter Function User Input the user name of the new established account Reusable The reusable account means that this account can be used in more than one PC at the same time ...

Страница 150: ...account Authority All User can select all to entitle this account to all authorities or set authority of each item respectively 6 4 3 6 Snapshot Snapshot interface is shown as in Figure 6 52 Here you can set snap mode frequency resolution and quality of each channel Figure 6 52 6 4 3 7 Auto Maintenance Here you can select auto reboot and auto delete old files interval from the dropdown list See Fi...

Страница 151: ...114 Figure 6 53 Auto Maintenance 6 4 3 8 Remote device Remote device interface is shown as in Figure 6 54 Figure 6 54 Remote device ...

Страница 152: ...earch the devices in the same segment and the device shall disable the firewall Type Select remote device type here Manufacturer It includes private Panasonic Sonyˈdynacolor AXIS arecont Samsung Onvif custom and etc For the custom mode you can just input URL user name password to view the video There are two modes TCP default UDP IP address port remote channel Please input remote device IP address...

Страница 153: ... 6 4 4 1 IPC Config IPC configuration interface is shown as in Figure 6 57 Here you can set gain iris brightness contrastness hue saturation BLC and etc of the network camera Figure 6 57 IPC Config Please refer to the following sheet for detailed information ...

Страница 154: ...he value is too high For the grey part of the video the distortion may occur if the white balance is not accurate Please note the video may not be attractive if the value is too low The recommended value ranges from 40 to 60 Day Night Mode It is to set device color and the B W mode switch The default setup is on z Color Device outputs the color video z Auto Device auto select to output the color o...

Страница 155: ...mpered with or not 6 4 4 2 Auto register The auto register interface is shown as in Figure 6 58 You can set the server IP and port if you want to use the auto register function After the device registered to the server you can access the device after the client end connected to the server Figure 6 58 Auto register 6 4 4 3 Mobile Config The mobile setup interface is shown as in Figure 6 59 Here you...

Страница 156: ...e WIFI interface is shown as in Figure 6 60 Here you can view WIFI connection status System displays as no connection if there is no connection You can view connection status and IP address if there is a connection See Figure 6 61 Figure 6 60 WIFI Setup ...

Страница 157: ...nt connection status You can view connection status and IP address if there is a connection Otherwise system shown as there is no hotspot connection 6HDUFK Click search button you can see an interface is shown as in X479H479H479HFigure 7 60 Please set record type record date window display mode and channel name You can click the date on the right pane to select the date The green highlighted date ...

Страница 158: ...sponding files in the list See Figure 7 61 Figure 6 63 Select the file s you want to download and then click download button system pops up a dialogue box shown as in X480H480H480HFigure 7 62 then you can specify file name and path to download the file s to your local pc ...

Страница 159: ...gure 6 65 there is a remote back pane at the left bottom of the pane It allows you to backup the record or picture to your local USB2 0 storage media via the Web remotely Click the search button you can view the available storage device See Figure 6 65 Please select from the dropdown list and then begin the backup Please refer to chapter 6 2 5 to set device download path ...

Страница 160: ...or your reference ODUP Click alarm function you can see an interface is shown as in Figure 6 67 Here you can set device alarm type and alarm sound setup When an alarm occurs system can display the alarm information in the corresponding interface For motion detect video loss camera masking you need to set the event in the motion detection interface Current series product does not support this funct...

Страница 161: ... local end offline alarm IPC external alarm It refers to the on off alarm signal from the front end device and can activate NVR local operation Alarm Type IPC offline alarm System can generate an alarm when the front end IPC disconnects with the local NVR Listening alarm System notifies web when an alarm occurs you select from the above event type and then web can notify user Video When an alarm o...

Страница 162: ...an alarm occurs You can specify as you wish Path Here you can specify alarm sound file ERXW Click about button you can view the web information See Figure 6 68 Figure 6 68 About RJ RXW Click log out button you can go back to log in interface See Figure 6 69 Figure 6 69 Logout ...

Страница 163: ...nvironment is too harsh too much dust z Hardware malfunction 3 System can not detect hard disk There are following possibilities z HDD is broken z HDD ribbon is damaged z HDD cable connection is loose z Main board SATA port is broken 4 There is no video output whether it is one channel multiple channel or all channel output There are following possibilities z Program is not compatible Please upgra...

Страница 164: ...here are following possibilities z It is not a power picker z It is not a power acoustics z Audio cable is damaged z Device hardware malfunctions 9 There is audio when monitor but there is no audio when system playback There are following possibilities z Setup is not correct Please enable audio function z Corresponding channel has no video input Playback is not continuous when the screen is blue 1...

Страница 165: ...s VISTA control z ActiveX control has been disabled z No dx8 1 or higher Please upgrade display card driver z Network connection error z Network setup error z Password or user name is invalid z Client end is not compatible with device program 14 There is only mosaic no video when preview or playback video file remotely There are following possibilities z Network fluency is not good z Client end re...

Страница 166: ...em Please upgrade your system 19 Alarm function is null There are following possibilities z Alarm setup is not correct z Alarm cable connection is not correct z Alarm input signal is not correct z There are two loops connect to one alarm device 20 Remote control does not work There are following possibilities z Remote control address is not correct z Distance is too far or control angle is too sma...

Страница 167: ...nel mode from the client end There are following possibilities z The network bandwidth is not sufficient The multiple channel monitor operation needs at least 100M or higher z Your PC resources are not sufficient For 16 ch remote monitor operation the PC shall have the following environment Quad Core 2G or higher memory independent displayer display card memory 256M or higher Daily Maintenance z P...

Страница 168: ...acity i m which is storage of each channel needed unit Mbyte i m i q i h i D 2 In the formula i h means the recording time for each day hour i D means number of days for which the video shall be kept Step 3 According to Formula 3 to calculate total capacity accumulation T q that is needed for all channels in the device during scheduled video recording c i i T m q 1 3 In the formula c means total n...

Страница 169: ...10SV 320G SATA Seagate Seagate SV35 4 ST3250311SV 250G SATA Seagate Seagate SV35 5 ST3500410SV 500G SATA Seagate Seagate SV35 5 ST3500411SV 500G SATA Seagate Seagate SV35 5 ST31000525SV 1T SATA Seagate Seagate SV35 5 ST31000526SV 1T SATA Seagate Seagate SV35 5 ST1000VX000 1T SATA Seagate Seagate SV35 5 ST2000VX003 2T SATA Seagate Seagate SV35 5 ST2000VX002 2T SATA Seagate Seagate SV35 5 ST2000VX00...

Страница 170: ...3 2T SATA Seagate Seagate Constellation ES ST3500514NS 500G SATA Seagate Seagate Constellation ES ST31000524NS 1T SATA Seagate Seagate Constellation ES ST32000644NS 2T SATA Seagate Seagate Constellation ES ST2000NM0011 2T SATA Seagate Seagate Constellation ES ST1000NM0011 1T SATA Seagate Seagate Constellation ES ST500NM0011 500G SATA Seagate Seagate Constellation ES ST2000NM0031 2T SATA Seagate Se...

Страница 171: ...T32000647NS 2T SATA Westem Digital Cariar SE WD3200JD 320G SATA Westem Digital Cariar SE WD3000JD 300G SATA Westem Digital Cariar SE WD2500JS 250G SATA Westem Digital Cariar SE16 WD7500KS 750G SATA Westem Digital Cariar SE16 WD5000KS 500G SATA Westem Digital Cariar SE16 WD4000KD 400G SATA Westem Digital Cariar SE16 WD3200KS 320G SATA Westem Digital Cariar SE16 WD2500KS 250G SATA Westem Digital WD ...

Страница 172: ...AV GP EVCS WD20EVCS 63ZLB0 2T SATA Westem Digital WDAV GP AVVS WD3200AVVS 63L2B0 320G SATA Westem Digital WDAV GP AVVS WD5000AVVS 63ZWB0 500G SATA Westem Digital WDAV GP AVVS WD7500AVVS 63E1B1 750G SATA Westem Digital WDAV GP AVVS WD7500AVVS 63E1B1 750G SATA Westem Digital WDAV GP EVVS WD10EVVS 63E1B1 1T SATA Westem Digital WDAV GP EVDS WD10EVDS 63N5B1 1T SATA Westem Digital WDAV GP EVDS WD15EVDS ...

Страница 173: ...ng Samsung HA HA500LJ CE 500G SATA Samsung Samsung HA HA751LJ 750G SATA Samsung Samsung HA HA101UJ CE 1T SATA Samsung Samsung HD HD502HI CEC 500G SATA Samsung Samsung HD HD103SI CEC 1T SATA Samsung Samsung HD HD154UI CE 1 5T SATA Hitachi Hitachi CinemaStar 5K500 HCP725050GLA380 500G SATA Hitachi Hitachi CinemaStar 7K1000 B HCT721050SLA360 500G SATA Hitachi Hitach CinemaStar 7K1000 B HCT721075SLA36...

Страница 174: ... Kingston Data Traveler II 2G Kingston Data Traveler 1G Kingston Data Traveler 2G Maxell USB2 0 Flash Stick 128M Maxell USB2 0 Flash Stick 256M Maxell USB2 0 Flash Stick 512M Maxell USB2 0 Flash Stick 1G Maxell USB2 0 Flash Stick 2G Kingax Super Stick 128M Kingax Super Stick 256M Kingax Super Stick 512M Kingax Super Stick 1G Kingax Super Stick 2G Netac U210 128M Netac U210 256M Netac U210 512M Net...

Страница 175: ...138 Teclast Ti Cool 512M Teclast Ti Cool 1G Teclast Ti Cool 2G ...

Страница 176: ...FD17069HB 17 inch LENOVO CRT LXB HF769A 17 inch LENOVO CRT LX GJ556D 17 inch Samsung LCD 2494HS 24 inch Samsung LCD P2350 23 inch Samsung LCD P2250 22 inch Samsung LCD P2370G 23 inch Samsung LCD 2043 20 inch Samsung LCD 2243EW 22 inch LG LCD W1942SP 19 inch LG LCD W2243S 22 inch LG LCD W2343T 23 inch BENQ LCD G900HD 18 5 inch BENQ LCD G2220HD 22 inch PHILIPS LCD 230E 23 inch PHILIPS LCD 220CW9 23 ...

Страница 177: ...ental friendly use period EFUP period the toxic or hazardous substance or elements contained in products will not leak or mutate so that the use of these substances or elements will not result in any severe environmental pollution any bodily injury or damage to any assets The consumer is not authorized to process such kind of substances or elements please return to the corresponding local authorit...

Страница 178: ...S oftware ...

Страница 179: ...Cost effective HD IR Waterproof Fixed IP Camera Quick Start Guide Version 1 0 1 ...

Страница 180: ...tion security Heavy stress violent vibration or water splash are not allowed during transportation storage and installation 3 Installation Do not apply power to the camera before completing installation Please install the proper power cut off device during the installation connection Always follow the instruction guide the manufacturer recommended 4 Qualified engineers needed All the examination a...

Страница 181: ...evice If there is too much dust please use the water to dilute the mild detergent first and then use it to clean the device Finally use the dry cloth to clean the device Please put the dustproof cap to protect the CCD CMOS component when you do not use the camera 7 Accessories Be sure to use all the accessories recommended by manufacturer Before installation please open the package and check all t...

Страница 182: ...ble of Contents UDPHZRUN 1 0XOWLSOH IXQFWLRQ RPELQDWLRQ DEOH 1 UDPHZRUN DQG LPHQVLRQ 1 HYLFH QVWDOODWLRQ 3 4XLFN RQILJXUDWLRQ 7RRO 5 2YHUYLHZ 5 2SHUDWLRQ 5 4 8 SSHQGL 7R LF RU D DUGRXV 0DWHULDOV RU OHPHQWV 9 ...

Страница 183: ...1 Please refer to the following sheet for detailed information Port Name Function Connection Note 1 LAN Network port Ethernet port Connect to standard Ethernet cable 2 DC12V Power input port Power input port Input DC 12V UDPHZRUN DQG LPHQVLRQ Please refer to the following figure for dimension information The unit is mm See Figure 1 2 and Figure 1 3 Figure 1 2 ...

Страница 184: ...2 Figure 1 3 ...

Страница 185: ...es bag and then take the expansion bolt out Insert the expansion bolt into the installation holes z Take the screws from the accessories bag and then use them to secure the device on the installation surface of the wall or the ceiling z Connect the corresponding cables Figure 2 1 z Use the cross head screwdriver to loosen the adjust screw z Turn the device in different directions to make it suitab...

Страница 186: ...4 Figure 2 2 ...

Страница 187: ...ddress and etc Figure 3 1 Select one IP address and then right click mouse you can see an interface is shown as in Figure 3 2 Note You can set the IP address subnet mask and gateway for the IPC and PC Please note IPC IP address and PC IP address shall be in the same network segment if there is no router IPC default IP address is 192 168 1 108 If there is a router please set the corresponding gatew...

Страница 188: ... IP address and then double click it to open the login interface Or you can select an IP address and then click the Login button to go to the login interface See Figure 3 4 In Figure 3 4 you can view device IP address user name password and port Please modify the corresponding information to login Please note the port information here shall be identical with the port value you set in TCP port in W...

Страница 189: ...guration tool main interface is shown as below See Figure 3 5 Figure 3 5 For detailed information and operation instruction of the quick configuration tool please refer to the Quick Configuration Tool User s Manual included in the resources CD ...

Страница 190: ...t install the client end or can not view after the installation We recommend the win2000sp4 OS or install the client end of the low version The Active X control is blocked The display card version shall be dx8 1 or higher Network connection error occurred Invalid network setup Invalid user name or password I can not play the download file There is no player There is no DX8 1 or higher For the MEDI...

Страница 191: ...uring the environmental friendly use period EFUP period the toxic or hazardous substance or elements contained in products will not leak or mutate so that the use of these substances or elements will not result in any severe environmental pollution any bodily injury or damage to any assets The consumer is not authorized to process such kind of substances or elements please return to the correspond...

Страница 192: ...Cost effective HD IR Waterproof Fixed IP Camera User s Manual Version 1 0 2 ...

Страница 193: ... our IP camera This user s manual is designed to be a reference tool for your system Please read the following safeguard and warnings carefully before you use this series product Please keep this user s manual well for future reference ...

Страница 194: ...ower cut off device during the installation connection Always follow the instruction guide the manufacturer recommended 4 Qualified engineers needed All the examination and repair work should be done by the qualified service engineers We are not liable for any problems caused by unauthorized modifications or attempted repair 5 Environment This series IP camera should be installed in a cool dry pla...

Страница 195: ...device Finally use the dry cloth to clean the device Please put the dustproof cap to protect the CCD CMOS component when you do not use the camera 7 Accessories Be sure to use all the accessories recommended by manufacturer Before installation please open the package and check all the components are included Contact your local retailer ASAP if something is broken in your package Accessory Name Amo...

Страница 196: ...LRQ 1 2YHUYLHZ 1 HDWXUHV 1 6SHFLILFDWLRQV 2 6WUXFWXUH 4 0XOWLSOH IXQFWLRQ RPELQDWLRQ DEOH 4 UDPHZRUN DQG LPHQVLRQ 4 HYLFH QVWDOODWLRQ 6 4XLFN RQILJXUDWLRQ 7RRO 8 2YHUYLHZ 8 2SHUDWLRQ 8 4 11 SSHQGL 7R LF RU D DUGRXV 0DWHULDOV RU OHPHQWV 12 ...

Страница 197: ...ckup function in accordance with your configuration and setup in alarm or schedule setting z Support record via Web and the recorded file are storage in the client end PC z Support network storage function such as FTP Network Monitor z IPC supports one channel video data transmit to network terminal and then decode Delaying time is within 270ms network bandwidth support needed z Max supports 20 co...

Страница 198: ...5fps Video Frame Rate NTSC Main stream 1280 960 15fps ˈ extra stream 352 240 15fps Main stream 1280 720 30fps ˈ extra stream 352 240 30fps Video Bit Rate H 264 56Kbps 8192Kbps MJPEG is adjustable and bit rate is adjustable Support customized setup Video Flip Support mirror Support flip function Snapshot Max 1f s snapshot File extension name is JPEG Privacy Mask Supports max 4 privacy mask zones Vi...

Страница 199: ... Remote Operation Monitor system setup file download log information maintenance upgrade and etc Restore Default Setup Reset button Network IR light 30 LED IR light 20 30M Power DC12V power and PoE Power Consumption 6W MAX Working Temperature 10ć 60ć Working Humidify 10 90 Dimensions mm 62 9 64 3 146 8 Weight 370G Excluding box General Parameter Installation Support bracket installation ...

Страница 200: ... 2 1 Please refer to the following sheet for detailed information Port Name Function Connection Note 1 LAN Network port Ethernet port Connect to standard Ethernet cable 2 DC12V Power input port Power input port Input DC 12V UDPHZRUN DQG LPHQVLRQ Please refer to the following two figures for dimension information The unit is mm See Figure 2 2 and Figure 2 3 ...

Страница 201: ...5 Figure 2 2 Figure 2 3 ...

Страница 202: ...es bag and then take the expansion bolt out Insert the expansion bolt into the installation holes z Take the screws from the accessories bag and then use them to secure the device on the installation surface of the wall or the ceiling z Connect the corresponding cables Figure 3 1 z Use the cross head screwdriver to loosen the adjust screw z Turn the device in different directions to make it suitab...

Страница 203: ...7 Figure 3 2 ...

Страница 204: ...ddress and etc Figure 4 1 Select one IP address and then right click mouse you can see an interface is shown as in Figure 4 2 Note You can set the IP address subnet mask and gateway for the IPC and PC Please note IPC IP address and PC IP address shall be in the same network segment if there is no router IPC default IP address is 192 168 1 108 If there is a router please set the corresponding gatew...

Страница 205: ... IP address and then double click it to open the login interface Or you can select an IP address and then click the Login button to go to the login interface See Figure 4 4 In Figure 4 4 you can view device IP address user name password and port Please modify the corresponding information to login Please note the port information here shall be identical with the port value you set in TCP port in W...

Страница 206: ...iguration tool main interface is shown as below See Figure 4 5 Figure 4 5 For detailed information and operation instruction of the quick configuration tool please refer to the Quick Configuration Tool User s Manual included in the resources CD ...

Страница 207: ...t install the client end or can not view after the installation We recommend the win2000sp4 OS or install the client end of the low version The Active X control is blocked The display card version shall be dx8 1 or higher Network connection error occurred Invalid network setup Invalid user name or password I can not play the download file There is no player There is no DX8 1 or higher For the MEDI...

Страница 208: ...T11363 2006 standard During the environmental friendly use period EFUP period the toxic or hazardous substance or elements contained in products will not leak or mutate so that the use of these substances or elements will not result in any severe environmental pollution any bodily injury or damage to any assets The consumer is not authorized to process such kind of substances or elements please re...

Страница 209: ...IPC Web Operation Manual Version 3 0 0 ...

Страница 210: ...HQX 5 9LGHR LQGRZ XQFWLRQ 2SWLRQ 5 9LGHR LQGRZ 6HWXS 6 37 RQWURO 8 6HWXS 11 DPHUD 11 4 1 1 Conditions 11 4 1 2 Video 14 4 1 3 Audio 18 1HWZRUN 19 4 2 1 TCP IP 19 4 2 2 Connection 21 4 2 3 PPPoE 23 4 2 4 DDNS 23 4 2 5 IP filter 24 4 2 6 SMTP e mail 25 4 2 7 UPnP 26 4 2 8 SNMP 27 4 2 9 Bonjour 29 4 2 10 Multicast 29 ...

Страница 211: ...ation 43 4 4 3 Record control 45 6 VWHP 46 4 5 1 General 46 4 5 2 Account 49 4 5 3 PTZ 53 4 5 4 Default 53 4 5 5 Import Export 54 4 5 6 Auto maintenance 54 4 5 7 Firmware update 55 QIRUPDWLRQ 55 4 6 1 Version 55 4 6 2 Log 56 ODUP 58 RJ RXW 59 Important The following functions are for reference only Some series products may not support all the functions listed below ...

Страница 212: ...system configuration alarm and etc Please follow the steps listed below for network connection z Make sure the IPC has connected to the network properly z IPC IP address and PC IP address shall be in the same network segment If there is router please set the corresponding gateway and subnet mask z Use order ping IP camera address to check connection is OK or not ...

Страница 213: ...08 then please input http 192 168 1 108 in IE address bar See Figure 2 1 Figure 2 1 IE The login interface is shown as below See Figure 2 2 Please input your user name and password Default factory name is admin and password is admin Note For security reasons please modify your password after you first login Input your IP address here ...

Страница 214: ...ab or not Please click OK button system can automatically install the control When system is upgrading it can overwrite the previous Web too If you can t download the ActiveX file please check whether you have installed the plug in to disable the control download Or you can lower the IE security level See Figure 2 3 Figure 2 3 Security Settings ...

Страница 215: ...window See Figure 2 4 Figure 2 4 Live Interface There are four sections z Section 1 Encode setup bar z Section 2 System menu z Section 3 Window function option bar z Section 4 Window adjust bar QFRGH 6HWXS The encode setup interface is shown as in Figure 2 5 ķ ĺ ĸ Ĺ ...

Страница 216: ...e dropdown list There are three options TCP UDP Multicast 6 VWHP 0HQX System menu is shown as in Figure 2 6 Please refer to chapter 2 2 Live chapter 3 PTZ chapter 4 Setup chapter 5 Alarm chapter 6 Log out for detailed information Figure 2 6 System Menu 9LGHR LQGRZ XQFWLRQ 2SWLRQ The interface is shown as below See Figure 2 7 Figure 2 7 Video Window Function Please refer to the following sheet for ...

Страница 217: ...ou can go to Setup Camera Audio to set bidirectional talk mode 9LGHR LQGRZ 6HWXS The interface is shown as in Figure 2 8 Figure 2 8 Video Window Setup Please refer to the following sheet for detailed information SN Parameter Function 1 Image control Click it to open picture setup interface See Figure 2 9 This interface is on the top right pane 2 Original size Click this button to go to original si...

Страница 218: ... It is to adjust monitor video contrast ness It is to adjust monitor video saturation It is to adjust monitor video hue Video setup Reset Restore brightness contrastness saturation and hue to system default setup Note z All the operations here apply to WEB end only z Please go to Setup Camera Conditions to adjust corresponding items ...

Страница 219: ...t tour pan scan pattern aux close and PTZ setup button See Figure 3 1 z PTZ direction PTZ supports eight directions left right up down upper left upper right bottom left bottom right z Speed The step 8 speed is faster than step 1 Figure 3 1 PTZ Interface Click PTZ set button the interface is shown as in Figure 3 2 You can click this icon to display or hide the PTZ control platform ...

Страница 220: ... move the camera to your desired location and then input preset value Click add button you have set one preset The preset value ranges from 1 to 80 It may vary due to different protocols Tour z Input auto tour value and preset value Click add button you have added one preset in the tour z Repeat the above procedures you can add more presets in one tour z Or you can click delete button to remove on...

Страница 221: ...2 Now you have set one pattern Assistant The assistant items include BLC Digital zoom night vision camera brightness flip You can select one option and then click start or stop button Matrix Please select the matrix X and then input the corresponding monitor output number video input channel number and then you can click video switch button to complete the operation Light and wiper You can enable ...

Страница 222: ...ormation Parameter Function Brightness It is to adjust monitor window bright The value ranges from 0 to 100 The default value is 50 The larger the number the bright the video is When you input the value here the bright section and the dark section of the video will be adjusted accordingly You can use this function when the whole video is too dark or too bright Please note the video may become hazy...

Страница 223: ...r is This value has no effect on the general brightness of the whole video The video color may become too strong if the value is too high For the grey part of the video the distortion may occur if the white balance is not accurate Please note the video may not be attractive if the value is too low The recommended value ranges from 40 to 60 Gain Mode Gain Adjust There are two options manual auto Th...

Страница 224: ...ld of the white balance is in the sunny mode z Night The threshold of the white balance is in the night mode z Customized You can set the gain of the red blue channel The value reneges from 0 to 100 Day Night Mode It is to set device color and the B W mode switch The default setup is on z Color Device outputs the color video z Auto Device auto select to output the color or the B W video according ...

Страница 225: ...ncludes general stream motion stream and alarm stream You can select different encode frame rates form different recorded events System supports active control frame function ACF It allows you to record in different frame rates For example you can use high frame rate to record important events record scheduled event in lower frame rate and it allows you to set different frame rates for motion dete...

Страница 226: ...o options VBR and CBR Please note you can set video quality in VBR mode Recommended Bit Recommended bit rate value according to the resolution and frame rate you have set Bit Rate z In CBR the bit rate here is the max value In dynamic video system needs to low frame rate or video quality to guarantee the value z The value is null in VBR mode z Please refer to recommend bit rate for the detailed in...

Страница 227: ...ere are multiple resolutions You can select from the dropdown list For each resolution the recommended bit stream value is different Frame Rate PAL 1 25f sˈNTSC 1 30f s The frame rate may vary due to different resolutions Bit Rate Type There are two options VBR and CBR Please note you can set video quality in VBR mode Recommended Bit Recommended bit rate value according to the resolution and frame...

Страница 228: ... activation Image size It is the same with the resolution of the main stream Quality It is to set the image quality There are six levels Interval It is to set snapshot frequency The value ranges from 1s to 7s 4 1 2 3 Video Overlay The video overlay interface is shown as in Figure 4 4 Figure 4 4 Please refer to the following sheet for detailed information ...

Страница 229: ...nel Title z You can enable this function so that system overlays channel information in video window z You can use the mouse to drag the channel tile position 4 1 2 4 Path The storage path interface is shown as in Figure 4 5 Here you can set snap image saved path in the preview interface and the record storage path in the preview interface The default setup is C PictureDownload Please click the Sa...

Страница 230: ... here to enable audio function Sub Extra stream Recorded file only contains video by default You need to check the audio box here to enable audio function Encode mode The encode mode of the main stream and extra stream include PCM G 711A and G 711Mu The setup here is for audio encode mode and the bidirectional talk encode both 1HWZRUN 4 2 1 TCP IP The TCP IP interface is shown as in Figure 4 7 ...

Страница 231: ...evice needs to reboot to activate the new setup once you modify the default setup Mode There are two modes static mode and the DHCP mode z The IP submask gateway are null when you select the DHCP mode to auto search the IP z If you select the static mode you need to set the IP submask gateway manually z If you select the DHCP mode you can view the IP submask gateway from the DHCP z If you switch f...

Страница 232: ... LAN This function is on by default You can refer to the steps listed below Step 1 Get an IP address Set the IPC and the PC in the same LAN Step 2 Get the physical address from the label of the IPC Step 3 Go to the Run interface and then input the following commands arp s IP Address MAC ping l 480 t IP Address Such as arp Ͳs 192 168 0 125 11Ͳ40Ͳ8cͲ18Ͳ10Ͳ11 ping Ͳl 480 Ͳt 192 168 0 125 Step 4 Reboo...

Страница 233: ...alue is 80 You can input the actual port number if necessary RTSP port The default value is 554 Rtsp streay query format is Main stream rtsp username password ip port cam realmonitor channel 1 subtype 0 Sub stream rtsp username password ip port cam realmonitor channel 1 subtype 1 You need to input the following four items manually Username password IP and port The IP is device IP and the port defa...

Страница 234: ...et the IP address in the WAN from the IP address column Please note you need to go to the IP address item to via the device current device information You can access the client end via this address Figure 4 9 4 2 4 DDNS The DDNS interface is shown as in Figure 4 10 The DDNS is to set to connect the various servers so that you can access the system via the server Please go to the corresponding serv...

Страница 235: ...rt Domain Name Your self defined domain name User The user name you input to log in the server Password The password you input to log in the server Update period z Device sends out alive signal to the server regularly z You can set interval value between the device and DDNS server here 4 2 5 IP filter The IP filter interface is shown as in Figure 4 11 You can enable IP filter function so that some...

Страница 236: ...25 Figure 4 11 4 2 6 SMTP e mail The SMTP interface is shown as in Figure 4 12 Figure 4 12 ...

Страница 237: ...econds 0 means there is no interval Please note system will not send out the email immediately when the alarm occurs When the alarm motion detection or the abnormity event activates the email system sends out the email according to the interval you specified here This function is very useful when there are too many emails activated by the abnormity events which may result in heavy load for the ema...

Страница 238: ...UPnP User Interface Please click OK to begin installation Enable UPnP from the Web If your UPnP is enabled in the Windows OS the IPC can auto detect it via the My Network Places Figure 4 13 4 2 8 SNMP The SNMP interface is shown as in Figure 4 14 The SNMP allows the communication between the network management work station software and the proxy of the managed device Please install the software su...

Страница 239: ...ship between one proxy and one group of the managers Please make sure the device and the proxy are the same The read community will read all the objects the SNMP supported in the specified name The default setup is public Write Community It is a string It is a command between the manage process and the proxy process It defined the authentication access control and the management relationship betwe...

Страница 240: ... service information and listen to the service information from other device You can use the browse of the Bonjour service in the same LAN to search the IPC device and then access if you do not know the IPC information such as IP address You can view the server name when the IPC is detected by the Bonjour Please note the safari browse support this function Click the Display All Bookmarks and open ...

Страница 241: ...p of the group member and group of the outer Here you can set multicast address and port You also need to go to Live interface to set the protocol as Multicast Figure 4 16 4 2 11 WIFI Please note this function is for the device of WIFI module The WIFI interface is shown as in Figure 4 17 ...

Страница 242: ...17 Please check the box to enable WIFI function and then click the Search SSID button Now you can view all the wireless network information in the following list Double click a name to connect to it See Figure 4 18 ...

Страница 243: ...c We can guarantee the transmission bandwidth lower the delay reduce the loss of the data packet and anti dither to enhance the quality We can set the DSCP Differentiated Services Code Point of the IP to distinguish the data packet so that the router or the hub can provide different services for various data packets It can select the different queues according to the priority of the packets and se...

Страница 244: ... ranges from 0 to 63 The router or the switcher can provide different service for various data packets Command The value ranges from 0 to 63 The router or the switcher can provide different service for various data packets YHQW 4 3 1 Video detect 4 3 1 1 Motion Detect The motion detect interface is shown as in Figure 4 20 ...

Страница 245: ...34 Figure 4 20 Figure 4 21 ...

Страница 246: ... interface is shown as in Figure 4 22 There are PAL 22X18 NTSC 22X15 zones Right click mouse you can go to full screen display mode Do remember clicking OK button to save your motion detection zone setup Working Period z Motion detection function becomes activated in the specified periods See Figure 4 21 z There are six periods in one day Please draw a circle to enable corresponding period z Selec...

Страница 247: ...curs working with motion detection function Please note you need to go to Storage Schedule to set current channel as general record Record Delay System can delay the record for specified time after alarm ended The value ranges from 10s to 300s Send Email If you enabled this function System can send out email to alert you when alarm occurs and ends PTZ z Here you can set PTZ movement when alarm occ...

Страница 248: ...zones Right click mouse you can go to full screen display mode Do remember clicking OK button to save your Video masking zone setup Working Period z Video masking function becomes activated in the specified periods z There are six periods in one day Please draw a circle to enable corresponding period z Select date If you do not select current setup applies to today only You can select all week col...

Страница 249: ...need to go to Storage Schedule to set current channel as general record Record Delay System can delay the record for specified time after alarm ended The value ranges from 10s to 300s Email If you enabled this function System can send out email to alert you when alarm occurs PTZ z Here you can set PTZ movement when alarm occurs Such as go to preset x when there is an alarm z The event type include...

Страница 250: ...unction You need to select alarm output port so that system can activate corresponding alarm device when alarm occurs Alarm Delay System can delay the alarm output for specified time after alarm ended The value ranges from 10s to 300s Record Channel System auto activates motion detection channel to record once alarm occurs working with motion detection function Please note you need to go to Storag...

Страница 251: ...ton 1 If you want to enable the alarm activation output function please press the corresponding button and then trigger Refresh Search alarm output status 4 3 3 Abnormity It includes five statuses No SD card capacity warning SD card error and disconnection and IP conflict There are two interfaces for you reference See Figure 4 27 through Figure 4 31 Figure 4 27 ...

Страница 252: ...41 Figure 4 28 Figure 4 29 Figure 4 30 ...

Страница 253: ...x to enable this function Record Delay System can delay the record for specified time after alarm ended The value ranges from 10s to 300s Relay Out The corresponding alarm output channel when alarm occurs You need to check the box to enable this function Relay out Delay The alarm output can delay for the specified time after alarm stops The value ranges from 10s to 300s Send email If you enable th...

Страница 254: ...etect record snapshot z Red color stands for the alarm record snapshot Figure 4 32 4 4 2 Destination The destination interface is shown as in Figure 4 33 It is to set the storage mode of the IPC record file or snapshot pictures There are three options local FTP network You can only select one mode System can save according to the event types It is corresponding to the three modes general motion al...

Страница 255: ...ocal interface is shown as in Figure 4 34 Here you can view local SD card or disk information You can also operate the read only write only hot swap and format operation Figure 4 34 The FTP interface is shown as in Figure 4 35 You need to check the box to enable the FTP function When network disconnect occurred or there is malfunction Emergency storage can save the record snapshot picture to the l...

Страница 256: ...You need to check the box to enable the network Please select the mode from the dropdown list It includes NFS ISCSI and etc You can select according to your actual requirements Figure 4 36 4 4 3 Record control The record control interface is shown as in Figure 4 37 ...

Страница 257: ...from the fifth second Disk Full There are two options stop recording or overwrite the previous files when HDD is full z Stop Current working HDD is overwriting or current HDD is full it will stop record z Overwrite Current working HDD is full it will overwrite the previous file Record mode There are three modes Auto manual close 6 VWHP 4 5 1 General The general interface includes the local host se...

Страница 258: ...ce No It is to set device name Video Standard This is to display video standard such as PAL Language You can select the language from the dropdown list Please note the device needs to reboot to get the modification activated 4 5 1 2 Date and time The date and time interface is shown as in Figure 4 39 ...

Страница 259: ...tem time It becomes valid after you set Sync PC You can click this button to save the system time as your PC current time DST Here you can set day night save time begin time and end time You can set according to the date format or according to the week format NTP You can check the box to enable NTP function NTP server You can set the time server address Port It is to set the time server port Updat...

Страница 260: ...name In this interface you can add remove user and modify user name See Figure 4 40 Figure 4 40 Add user It is to add a name to group and set the user rights See Figure 4 41 There are four default users admin 888888 666666 and hidden user default Except user 6666 other users have administrator right The user 666666 can only have the monitor rights Hidden user default is for system interior use onl...

Страница 261: ...t is to modify the user password You need to input the old password and then input the new password twice to confirm the new setup Please click the OK button to save Please note the password ranges from 1 digit to 6 digit It shall include the number only For the user of the account rights he can modify the password of other users ...

Страница 262: ... 2 Group The group management interface can add remove group modify group password and etc The interface is shown as in Figure 4 43 Figure 4 43 Add group It is to add group and set its corresponding rights See Figure 4 45 ...

Страница 263: ...onding rights It includes shutdown reboot device live view record control PTZ control and etc Figure 4 44 Modify group Click the modify group button you can see an interface is shown as in Figure 4 45 Here you can modify group information such as remarks and rights Figure 4 45 ...

Страница 264: ...address otherwise you can not control the speed dome Baud Rate Select the dome baud rate Default setup is 9600 Data Bit Default setup is 8 Please set according to the speed dome dial switch setup Stop bit Default setup is 1 Please set according to the speed dome dial switch setup Parity Default setup is none Please set according to the speed dome dial switch setup 4 5 4 Default The default setup i...

Страница 265: ...t is to import the local setup files to the system Export It is to export the corresponding system setup to your local PC 4 5 6 Auto maintenance The auto maintenance interface is shown as in Figure 4 49 Here you can select auto reboot and auto delete old files interval from the dropdown list If you want to use the auto delete old files function you need to set the file period ...

Страница 266: ...he update button to begin firmware update Important Update improper program may result in device malfunction Figure 4 50 QIRUPDWLRQ 4 6 1 Version The version interface is shown as in Figure 4 51 Here you can view system hardware features software version release date and etc Please note the following information is for reference only ...

Страница 267: ...4 52 Please refer to the following sheet for log parameter information Parameter Function Type Log types include system operation configuration operation data operation event operation record operation user management log clear Start time Set the start time of the requested log ...

Страница 268: ...tton to view the list You can click the stop button to terminate current search operation Detailed information You can select one item to view the detailed information Clear You can click this button to delete all displayed log files Please note system does not support clear by type Backup You can click this button to backup log files to current PC ...

Страница 269: ... motion detection alarm occurs Disk full System alarms when disk is full HDD malfunction System generates an alarm when HDD is malfunction Camera masking System alarms when camera is viciously masking Alarm type External alarm Alarm input device sends out alarm Operation Prompt System automatically pops up alarm dialogue box Alarm audio Audio When alarm occurs system auto generates alarm audio The...

Страница 270: ...ure 6 1 Note z Slight difference may be found in user interface z All the designs and software here are subject to change without prior written notice z If there is any uncertainty or controversy please refer to the final explanation of us z Please visit our website for more information ...

Страница 271: ...software NOT FOR SALE ...

Страница 272: ...Clearview HD IR Waterproof Network Dome Camera Quick Start Guide Version 1 2 0 ...

Страница 273: ... installation We are not liable for any problems caused by unauthorized modification or attempted repair 2 Transportation security Heavy stress violent vibration or water splash are not allowed during transportation storage and installation 3 Installation Do not apply power to the camera before completing installation Please install the proper power cut off device during the installation connectio...

Страница 274: ... the dry cloth to clean the device Please put the dustproof cap to protect the CCD CMOS component when you do not use the camera Dome enclosure is the optical component do not touch the enclosure when you are installing the device or clean the enclosure when you are doing maintenance work Please use professional optical clean method to clean the enclosure Improper enclosure clean method such as us...

Страница 275: ...Q 1 HYLFH QVWDOODWLRQ 3 QVWDOODWLRQ 6WHSV 3 5HVWRUH DFWRU HIDXOW 6HWXS QWURGXFWLRQ 5 3 Quick Configuration Tool 6 3 1 Overview 6 3 2 Operation 6 4 Web Operation 8 4 1 Network Connection 8 4 2 Login and Main Interface 8 SSHQGL 7R LF RU D DUGRXV 0DWHULDOV RU OHPHQWV 11 ...

Страница 276: ...function combination cable Please refer to the following sheet for detailed information No Port Name Connector Note 4 LAN Network port Ethernet To connect to standard Ethernet 5 DC12V DC 12V power To connect to DC12V power supply UDPHZRUN DQG LPHQVLRQ Component Component Name Component 1 Device lens Component 2 Dome body Component 3 Dome enclosure ...

Страница 277: ...2 Please refer to the following two figures for dimension information The unit is mm See Figure 1 2 and Figure 1 3 Figure 1 2 Dimension illustration 1 Figure 1 3 Dimension illustration 2 ...

Страница 278: ... 3 Adjust the device installation pedestal to the proper position and then line up the three screw holes in the device pedestal to the three plastic expansion bolt holes in the installation position Put the three self tapping screws in the three plastic expansion bolts firmly Loosen the M3X8 cross recessed pan head slot screw of the pedestal to unfasten the preforming Do not remove loosen a little...

Страница 279: ...the other is from the side Please refer to the following figure for cable exit from the side information Figure 2 3 Device installation illustration 3 Please earth the GND port of the device to enhance the device reliability The GND port is near the cable exit port on the rear of the dome The GND screw uses the M2X5 pan screw ...

Страница 280: ...body from the gland cover Step2 Take the dome body out and then turn the top cover hard to remove Step3 Slightly press the RESET button to complete the reset function See Figure 2 5 Step4 Turn the top cover back to the original position Please make sure it reaches the original position otherwise it may result in water leakage Step5 Put the dome back to the gland cover Please refer to step4 in chap...

Страница 281: ...wn as in Figure 3 1 In the device list interface you can view device IP address port number subnet mask default gateway MAC address and etc Figure 3 1 Search interface Select one IP address and then right click mouse you can see an interface is shown as in Figure 3 2 Select the Open Device Web item you can go to the corresponding web login interface Figure 3 2 Search interface 2 If you want to mod...

Страница 282: ...o login Please note the port information here shall be identical with the port value you set in TCP port in Web Network interface Otherwise you cannot login the device If you are using device background upgrade port 3800 to login other setups are all invalid Figure 3 3 Login prompt After you logged in the configuration tool main interface is shown as below See Figure 3 4 Figure 3 4 Main interface ...

Страница 283: ... the PC and the network camera respectively Network camera default IP address is 192 168 1 108 Subnet mask is 255 255 255 0 Gateway is 192 168 1 1 z Use order ping network camera address to check connection is OK or not 4 2 Login and Main Interface Open IE and input network camera address in the address bar See Figure 4 1 Figure 4 1 IP address The login interface is shown as below See Figure 4 2 P...

Страница 284: ...rmation to ask you whether install web plug in or not after you logged in for one minute For detailed plug in installation please refer to the Web Operation Manual included in the resource CD After you logged in you can see the main window See Figure 4 3 Figure 4 3 Web monitoring window ...

Страница 285: ...10 Please refer to the Web Operation Manual included in the resource CD for detailed operation instruction ...

Страница 286: ... or elements contained in products will not leak or mutate so that the use of these substances or elements will not result in any severe environmental pollution any bodily injury or damage to any assets The consumer is not authorized to process such kind of substances or elements please return to the corresponding local authorities to process according to your local government statutes Note z This...

Страница 287: ...Clearview HD IR Waterproof Network Dome Camera User s Manual Version 4 0 1 ...

Страница 288: ...ur Network camera This user s manual is designed to be a reference tool for your system Please read the following safeguard and warnings carefully before you use this series product Please keep this user s manual well for future reference ...

Страница 289: ... cut off device during the installation connection Always follow the instruction guide the manufacturer recommended 4 Qualified engineers needed All the examination and repair work should be done by the qualified service engineers We are not liable for any problems caused by unauthorized modifications or attempted repair 5 Environment This series network camera should be installed in a cool dry pl...

Страница 290: ...cal component do not touch the enclosure when you are installing the device or clean the enclosure when you are doing maintenance work Please use professional optical clean method to clean the enclosure Improper enclosure clean method such as use cloth may result in poor IR effect of camera with IR function 7 Accessories Be sure to use all the accessories recommended by manufacturer Before install...

Страница 291: ... RPSRQHQWV 9 UDPHZRUN DQG LPHQVLRQ 9 HYLFH QVWDOODWLRQ 11 QVWDOODWLRQ 6WHSV 11 5HVWRUH DFWRU HIDXOW 6HWXS QWURGXFWLRQ 13 4 Quick Configuration Tool 14 4 1 Overview 14 4 2 Operation 14 5 Web Operation 16 5 1 Network Connection 16 5 2 Login and Main Interface 16 4 19 SSHQGL 7R LF RU D DUGRXV 0DWHULDOV RU OHPHQWV 20 ...

Страница 292: ... backup function in accordance with your configuration and setup in alarm or schedule setting z Support record via Web and the recorded file are storage in the client end PC z Support network storage function such as FTP Network Monitor z Network camera supports one channel video data transmit to network terminal and then decode Delaying time is within 270ms network bandwidth support needed z Max ...

Страница 293: ...ual Auto PAL It ranges from 1 3 to 1 10000 NTSC It ranges from 1 4 to 1 10000 Video Compression Standard H 264 H 264H H 264B MJPEG Video Frame Rate PAL Main stream 1280 960 15fps extra stream 704 576 15fps Main stream 1280 720 25fps extra stream 704 576 25fps NTSC Main stream 1280 960 15fps extra stream 704 480 15fps Main stream 1280 720 30fps extra stream 704 480 30fps Video Bit Rate H 264 56Kbps...

Страница 294: ... Restore Default Setup Built in Reset button IR light IR light 15M General Parameter Power DC12V power and PoE Warningʽ ʽ Do not connect these two power supplying sources to the device at the same time it may result in device damage Power Consumption 4 5W MAX Working Temperature 10ć 60ć Working Humidify 10 90 Dimensions mm Φ 113h86 Weight 280g Excluding box Installation Fixed on the wall ceiling a...

Страница 295: ...terval 50 Watermark Enable Watermark character DigitalCCTV Sub Stream Enable Enable Bit stream type General Encode mode H 264B Resolution CIF 352 288 Frame Rate FPS PAL 25 NTSC 30 Bit Rate Type CBR Recommend ed Bit 192 1024Kb S Bit Rate 512 I Frame interval 50 Snapshot Snapshot Type General Image Size 720P 1280 720 Quality Better Bit Rate Main stream Interval 1s Video Overlay Privacy Mask Disable ...

Страница 296: ... Default Gateway 192 168 1 1 Preferred DNS 8 8 8 8 Alternate DNS 8 8 8 8 Enable ARP Ping set device IP address service Enable Connection Max Connection 10 TCP Port 37777 UDP Port 37778 HTTP Port 80 RTSP Port 554 Enable HTTPs Disable HTTPs Port 443 PPPoE Enable Disable Username none Password N A DDNS Server Type DisableˈCN99 DDNS Server Address www 3322 org Domain Name none Username none Password I...

Страница 297: ...ble UPnP Disable SNMP SNMP Port 161 Read Community public Write Community private Trap Address N A Trap Port 162 SNMP v1 Disable SNMP v2 Disable SNMP v3 Disable Bonjour Enable Enable Server Name Device factory SN Multicast Main Stream Enable Enable Multicast Address 239 255 42 42 Port 36666 Extra Stream Enable Disable Multicast Address 239 255 42 42 Port 36667 IEEE802 Enable Disable Authenticatio ...

Страница 298: ...sable Record Enable Record Delay 10 seconds IP Conflict Enable Disable Record Enable Record Delay 10 seconds Storage Schedule Holiday Schedule Record Disable Snapshot Disable Storage FTP Enable FTP Disable Server IP N A Port 21 Username anonymity Password N A Remote path Share Record Control Pack Duration 8 minutes Pre record 5 seconds Disk Full Overwrite Record Mode Auto Bit Stream Main Stream Sy...

Страница 299: ...c DST Disable DST Type Date Start Time 00 00 00 of Jan 1st End Time 00 00 00 of Jan 2nd NTP Disable NTP Server clock isc org Port 123 Update Period 10 minutes Account Anonymous Login Disable Auto Maintenance Auto Reboot Enable Tuesday 02 00 Auto Delete Old Files Disable ...

Страница 300: ...function combination cable Please refer to the following sheet for detailed information No Port Name Connector Note 4 LAN Network port Ethernet To connect to standard Ethernet 5 DC12V DC 12V power To connect to DC12V power supply UDPHZRUN DQG LPHQVLRQ Component Component Name Component 1 Device lens Component 2 Dome body Component 3 Dome enclosure ...

Страница 301: ...10 Please refer to the following two figures for dimension information The unit is mm See Figure 2 2 and Figure 2 3 Figure 2 2 Dimension illustration 1 Figure 2 3 Dimension illustration 2 ...

Страница 302: ... 3 Adjust the device installation pedestal to the proper position and then line up the three screw holes in the device pedestal to the three plastic expansion bolt holes in the installation position Put the three self tapping screws in the three plastic expansion bolts firmly Loosen the M3X8 cross recessed pan head slot screw of the pedestal to unfasten the preforming Do not remove loosen a little...

Страница 303: ...the other is from the side Please refer to the following figure for cable exit from the side information Figure 3 3 Device installation illustration 3 Please earth the GND port of the device to enhance the device reliability The GND port is near the cable exit port on the rear of the dome The GND screw uses the M2X5 pan screw ...

Страница 304: ... body from the gland cover Step2 Take the dome body out and then turn the top cover hard to remove Step3 Slightly press the RESET button to complete the reset function See Figure 3 5 Step4 Turn the top cover back to the original position Please make sure it reaches the original position otherwise it may result in water leakage Step5 Put the dome back to the gland cover Please refer to step4 in cha...

Страница 305: ...wn as in Figure 4 1 In the device list interface you can view device IP address port number subnet mask default gateway MAC address and etc Figure 4 1 Search interface Select one IP address and then right click mouse you can see an interface is shown as in Figure 4 2 Select the Open Device Web item you can go to the corresponding web login interface Figure 4 2 Search interface 2 If you want to mod...

Страница 306: ...to login Please note the port information here shall be identical with the port value you set in TCP port in Web Network interface Otherwise you cannot login the device If you are using device background upgrade port 3800 to login other setups are all invalid Figure 4 3 Login prompt After you logged in the configuration tool main interface is shown as below See Figure 4 4 Figure 4 4 Main interface...

Страница 307: ...f the PC and the network camera respectively Network camera default IP address is 192 168 1 108 Subnet mask is 255 255 255 0 Gateway is 192 168 1 1 z Use order ping network camera address to check connection is OK or not 5 2 Login and Main Interface Open IE and input network camera address in the address bar See Figure 5 1 Figure 5 1 IP address The login interface is shown as below See Figure 5 2 ...

Страница 308: ...rmation to ask you whether install web plug in or not after you logged in for one minute For detailed plug in installation please refer to the Web Operation Manual included in the resource CD After you logged in you can see the main window See Figure 5 3 Figure 5 3 Web monitoring window ...

Страница 309: ...18 Please refer to the Web Operation Manual included in the resource CD for detailed operation instruction ...

Страница 310: ...f you can not install the client end or can not view after the installation We recommend the win2000sp4 OS or install the client end of the low version The Active X control is blocked The display card version shall be dx8 1 or higher Network connection error occurred Invalid network setup Invalid user name or password I can not play the download file There is no player There is no DX8 1 or higher ...

Страница 311: ...or hazardous substance or elements contained in products will not leak or mutate so that the use of these substances or elements will not result in any severe environmental pollution any bodily injury or damage to any assets The consumer is not authorized to process such kind of substances or elements please return to the corresponding local authorities to process according to your local governmen...

Страница 312: ...software NOT FOR SALE ...

Страница 313: ... so your NVR will stay connected Ensures product warranty REGISTRATION IS REQUIRED for product repairs New Software updates and feature notification Knowledge base and video tutorials Go to http register ClearViewcctv com and enter your information under the PRODUCT REGISTRATION column Filling in the form will create a MyClearView login and you will be asked to register your NVR You will need the ...

Страница 314: ...ery backup UPS is recommended If you are attaching a monitor using the HDMI output locate the unit so that is within reach of the HDMI input on your TV or AV receiver At the NVR attach the USB mouse and your VGA monitor power supply to AC power There are two power supplies in the accessory box One will power the NVR and the other will power the NVR s internal Power Over Ethernet or POE switch whic...

Страница 315: ...Once you log in the system will begin the Startup Wizard and guide you through the unit s initial set up During camera setup the NVR assigned each camera to the correct channel as you plugged them in Once finished you will see your cameras in live view on screen automatically your video will be automatically be recorded to the hard drive and all video channels will be ready to review from this scr...

Страница 316: ...SAVE at the bottom of the window Write down your NVR s IP address 2nd line on the screen above and then back out through the SETTINGS and MAIN MENU Once you hit SAVE give the changes a few minutes to work through your ISP s system Check if your NVR is online by entering it in Internet Explorer as http enter your IP address ClearView gives you a FREE DDNS service when you register your new NVR onli...

Страница 317: ...6 In no event will ClearView CCTV Inc be liable for any special incidental or consequential damages including loss of use loss of profit and claims of third parties however caused whether by the negligence of ClearView CCTV Inc or otherwise 7 For warranty repaired or replaced products ClearView CCTV Inc will warrant all replacement parts and repairs for the remainder of the original warranty or 90...

Отзывы: