A
SSEMBLING THE
R
OUND
S
TYLE
M
INI
G
ARAGE
(O
VERVIEW
)
This section is an overview of the process for
assembling your Round Style Mini Garage. For details,
please see the next section,
Assembling the Round
Style Mini Garage Components
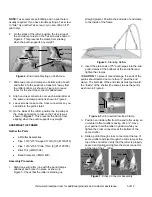
. See Figure 1 to identify
main parts of shelter, as necessary.
1. Locate the required parts for each assembly
procedure.
2. Assemble the rafters and frame, and square frame.
3. Connect end conduits and anchor the shelter.
4. Prepare and attach end panels.
5. Prepare and attach main cover to the shelter.
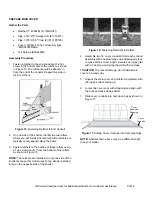
Figure 1.
Round Style Mini Garage Parts Diagram
NOTE:
Figure 1 may show a frame of a different length
than what you are assembling.
A
SSEMBLING THE
R
OUND
S
TYLE
M
INI
G
ARAGE
C
OMPONENTS
NOTE:
You may need assistance assembling your
mini garage.
ASSEMBLE THE RAFTERS
Gather the Parts
•
Pipe 1.315" 10' Round Raft Position #1
(#10R1301)
•
Pipe 1.315" 10' Round Raft Position #2
(#10R1302)
•
Pipe 1.315" 10' Round Raft Position #3
(#10R1303)
•
Band Clamps (#QH1400)
•
Purlin End Clamps (#102855)
•
Cross Connectors (#102479)
•
Tek Screws (#FA4482B)
•
Nut Setter 3/8" x 2-9/16 Magnetic (1) (#100441)
Assembly Procedure
NOTE:
To prevent twisting, assemble rafters on a level
surface.
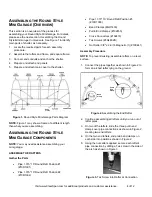
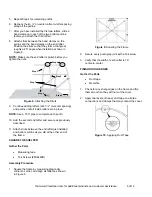
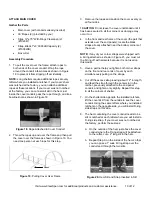
1. Connect the pipes together as shown in Figure 2 to
form an arched rafter lying on the ground.
Figure 2.
Assembling the End Rafter
2. Continue assembling all rafters until you run out of
rafter pipes.
3. On two of the rafters, slide the three purlin end
clamps over pipe connections as shown in Figure 2
creating two end rafters.
4. On the two end rafters, slide two band clamps on
each side into positions shown in Figure 2.
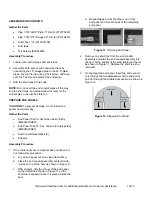
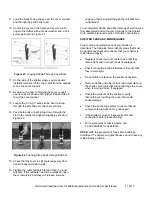
5. Using the nut setter supplied, secure each rafter's
pipe connection by drilling a Tek screw in the side of
the arch as shown in Figure 3.
Figure 3.
Tek Screw into Rafter at Connection
BAND
CLAMP
CONNECTOR
PURLIN
SHORT TEE
5 o'clock
Purlin
End
Clamp
Band
Clamp
SLID
E
Visit www.ClearSpan.com for additional products and customer assistance.
4 of 12


