CLEARSPAN
™
CEDAR GREENHOUSES
10
Revision date: 06.18.09
6
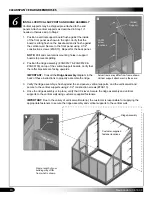
INSTALL VERTICAL SUPPORTS AND RIDGE ASSEMBLY
Vertical supports may be shipped pre-attached to the end
panels. Attach vertical supports as described in Step 1 if
needed, otherwise skip to Step 2.
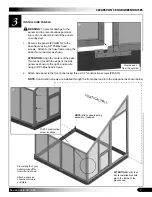
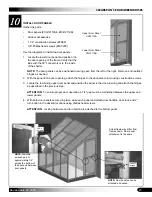
Position a vertical support board flush against the inside
1.
of the front panel as shown to the right. Verify that the
board is sitting flush on the baseboard and is flush against
the vertical wall. Secure to the front panel using 2-1/2"
construction screws (#FAS13). Repeat for the back panel.
NOTE:
Drill and countersink mounting holes in support
boards to prevent splitting.
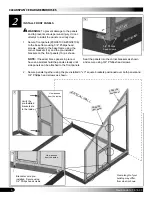
Position the ridge assembly (#CG08127 & #CG08129 &
2.
#CG08130) on top of the vertical support boards. Verify that
the rafter brackets are facing upwards.
IMPORTANT:
Consult the
Ridge Assembly
diagram in the
back of these instructions to properly assemble the ridge.
Verify the ridge assembly is flush against the end panels, vertical supports, and the vertical wall and
3.
secure to the vertical supports using 2-1/2" construction screws (#FAS13).
Once the ridge assembly is in place, verify that it is level. Secure the ridge assembly and vertical
4.
supports to the vertical wall using
customer-supplied fasteners.
IMPORTANT:
Due to the variety of vertical wall material, the customer is responsible for supplying the
appropriate fasteners to secure the ridge assembly and vertical supports to the vertical wall.
1
FAS13
screw
locations
Vertical
Support
Actual frame may differ from frame shown.
Vertical support attachment is the same.
Customer-supplied
fastener locations
Frame length of your
building may differ
from what is shown.
FAS13
screw
2
Ridge Assembly
Ridge Assembly


