KEEP
THIS GUIDE!
Simple Steps
To Get Your
Up and Growing
Quick Start
Guide
Model #s: 100610-BLK; 100610-WHT; 100610-SLR
Input Voltage: 120V, 60Hz, 1.5A
Date Code:
English
Страница 1: ...KEEP THIS GUIDE Simple Steps To Get Your Up and Growing Quick Start Guide Model s 100610 BLK 100610 WHT 100610 SLR Input Voltage 120V 60Hz 1 5A Date Code English...
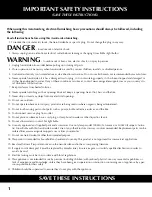
Страница 2: ...se outdoors 11 Do not operate where aerosol spray products are being used or where oxygen is being administered 12 Do not touch moving parts or hot parts such as pumps bulbs reflective surfaces and th...
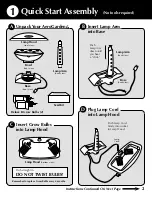
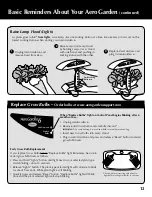
Страница 3: ...bottom view DO NOT TWIST BULBS Remember to replace Grow Bulbs every 6 months Push Lamp Cord firmly into socket in Lamp Hood Push Lamp Arm down until you hear a click Lamp Arm back view Base back view...
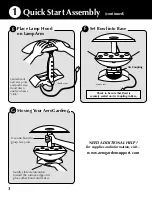
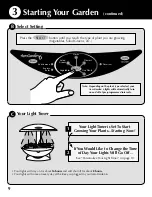
Страница 4: ...Quick Start Assembly continued Check to be sure that Bowl is securely seated on Air Coupling in Base Need Additional HELP For supplies and information visit www aerogardensupport com Place Lamp Hood o...
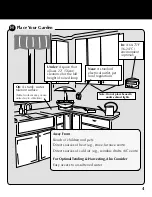
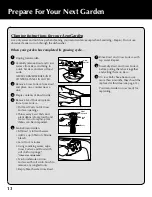
Страница 5: ...Consider Easy access to un softened water Note Do not place beneath under cabinet lights Near A standard electrical outlet per local regulations Under A space that allows 22 56cm clearance for the ful...
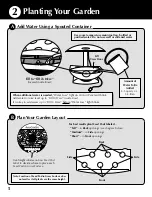
Страница 6: ...er up to Fill To Here before Water Low light blinks Use room temperature municipal tap bottled or purified water Do not use well or softened water Amount of Water To Be Added 3 5 quarts or 3 2 liters...
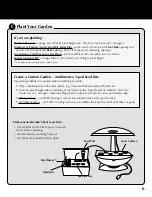
Страница 7: ...een Beans Salad Greens or Live Plants place Seed Plant Pods anywhere in Grow Surface Master Gardener Kit arrange Pods in Grow Surface according to plant height Re arranging may be required as plants g...
Страница 8: ...ches Grow Surface Place Bio Domes on Seed Pods D Bio Dome Add 2 Starting Nutrients directly into Bowl See Add Nutrients Feed Garden Basic Feeding on page 11 of this guide for additional feeding instru...
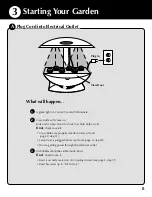
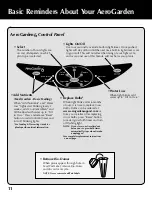
Страница 9: ...Bulbs are properly inserted in Lamp Hood page 2 step 1C Lamp Cord is plugged into Lamp Hood page 2 step 1D You are getting power through the electrical outlet Air bubbles should be visible inside Bow...
Страница 10: ...me you plugged in your AeroGarden 6 Select Setting B Your Light Timer is Set To Start Growing Your Plants Starting Now If You Would Like to Change the Time of Day Your Lights Will Go Off See Personali...
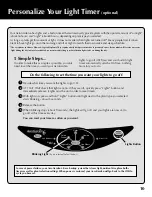
Страница 11: ...possible you only need to set the time you want your AeroGarden lights to go off Off Time and your built in light timer automatically sets the On Time nothing more for you to do Decide what time you w...
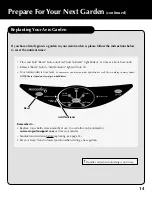
Страница 12: ...ler After replacing Grow Bulbs press Reset button to restart grow bulb timer and turn off flashing light NOTE If you store your AeroGarden 6 between uses grow bulb timer automatically stops when Garde...
Страница 13: ...s are cool before handling Insert new Grow Bulbs into Lamp Hood Plug in AeroGarden 6 and press and release Reset button to restart grow bulb timer Early Grow Bulb Replacement If you replace Grow Bulbs...
Страница 14: ...ve Bowl and Grow Surface from Base and bring to a sink Set Base and Lamp Hood aside NEVER SUBMERSE BASE AND CONTROL PANEL IN WATER Remove Grow Surface from Bowl and place on a counter near a sink Empt...
Страница 15: ...nd hold Reset button until red Add Nutrients light blinks 3 or 4 times about 9 seconds Release Reset button Add Nutrients light will turn off Your AeroGarden is now reset In some cases you may see oth...
Страница 16: ...g the equipment off and on the user is encouraged to try to correct the interference by one or more of the following measures Reorient or relocate the receiving antenna Increase the separation between...