Clarke Log Buster 3 Скачать руководство пользователя страница 6

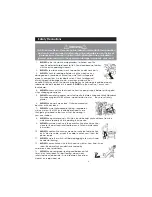
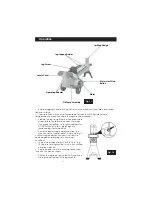
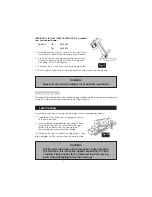
If the log moves away from the blade, retract the ram and rotate the

log through 90

 as shown in


Fig. 3.

Do not attempt to load the log in the machine whilst the log pusher is in
motion, you could get trapped and injured.

Keep your hands well away from any splits and cracks which open in

the log; these may close suddenly and crush your fingers.

Never attempt to split a log for longer than 5 seconds.  After this time interval, the oil
under pressure is overheated and the machine could be damaged. It is therefore
better to stop and rotate the log by 90

O,

 as shown above, to see whether it can be

split in a different position.

Not being able to split the log within this time, indicates that its hardness exceeds the

capacity of the machine and it should therefore be

discarded so as not to cause damage/injury.
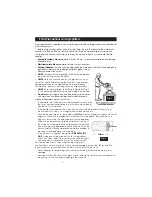
Do not force the blade by pushing the log on the
upper part (Fig. 4), as this can cause the blade to
break or damage the body of the machine. Always
set the log on the guides.

Never leave the machine unattended while it is

running. If you leave the machine, even for a short
time, disconnect from the power supply.

NEVER use the machine whilst under the influence
of alcohol, drugs, medicines, or when you are tired.
A clear mind is essential for safety.

Never request the assistance of another person to help you remove a jammed log.

NEVER use the machine in a dangerous environment i.e. damp or wet conditions, or

expose it to rain. DO NOT use in a potentially explosive atmosphere (around paint,

flammable liquids etc.)

ALWAYS comply with the requirements for electrical installation .

Make sure that the machine and the cable never come in contact with water.

Treat the power cable with care, do not attempt to move the machine by pulling the
cable. Do not yank the cable to unplug it; keep the cable away from excessive heat,
oil and sharp objects.

ALWAYS disconnect the power cable when not in use, when carrying out maintenance
work or when moving the machine.

Never use the Logbuster if it is not in perfect order or if it needs servicing.

Before starting work, check correct functioning of all the safety devices and check for
soundness of welded joints, securing nuts & bolts.

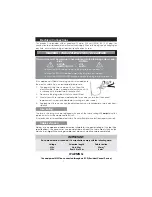
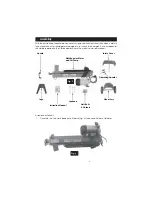
Figure 2 shows the maximum log size that can be split. Please note that the diameter of the
log is indicative: i.e. A small log can be difficult to split if it has knots or a particularly tough fibre.
On the other hand, if the wood has regular fibres, it is not difficult to split logs with diameters
greater than that shown in Figure 2. It is important 

NOT 

to persist if the log does not split on the

first attempt, as the pump may be damaged by the oil overheating. This could occur when
the machine is made to work under maximum stress in an attempt to split excessively fibrous,
knotty wood or wet, green wood. Do not attempt to split a log for longer than 5 seconds.

Fig. 3

Fig. 4

Size of logs to be split

-6-

Содержание Log Buster 3

Страница 1: ...OPERATION MAINTENANCE INSTRUCTIONS 0205 MODEL NO Log Buster 3 PART No 3402020 LOG SPLITTER 4 Tonne Force LOG SPLITTER 4 Tonne Force...

Страница 2: ...50mm Minimum Diameter 50mm Please note that the details and specifications contained herein are correct at the time of going to print However CLARKE International reserve the right to change specifica...

Страница 3: ...sed as soon as possible Double Ended Spanners 2 off 10mm x 12mm 1 off 13mm x 16mm 1 Off Operating and Maintenance Instructions 1 Off Log splitter main body including motor and oil pump 1 Off Safety Co...

Страница 4: ...ies 5 ALWAYS wear safety goggles manufactured to the latest European Safety Standards Everyday eyeglasses do not have impact resistant lenses they are not safety glasses 6 ALWAYS keep work area clean...

Страница 5: ...ps can create a hazardous work environment The operator must take all necessary precautions to minimize the risk of accidental damage or injury due to wood being ejected from the machine The operator...

Страница 6: ...ER use the machine in a dangerous environment i e damp or wet conditions or expose it to rain DO NOT use in a potentially explosive atmosphere around paint flammable liquids etc ALWAYS comply with the...

Страница 7: ...self Cable Extension Always use an approved cable extension suitable for the power rating of this tool see specifications the conductor size should also be at least the same size as that on the machin...

Страница 8: ...k list on page 2 Any discrepancies should be reported to the Clarke dealer where the machine was purchased Main Body inc Motor and Oil Pump Handle Safety Cover Operating Handles Wheel Assy Nuts Bolts...

Страница 9: ...ten bolts 3 Attach the handle to the front legs using screws nuts and washers supplied Fig 8 NOTE insert screw with washer through the handle and secure to the legs with locknut DO NOT Overtighten Fig...

Страница 10: ...cover removed this is a safety cover making it necessary to use both hands to operate Fig 12 5 Carefully turn the machine over onto its feet Stand the log splitter on a firm level surface attach the...

Страница 11: ...le to the splitter only stack those logs that are ok for splitting i e length and diameter DO NOT attempt to split green logs dry seasoned logs split more easily Route the power supply cord safely fro...

Страница 12: ...bient temperature After several hours of continuous use the pump may become very hot This is not detrimental to the machine however it is very important to not cause overheating of the oil by attempti...

Страница 13: ...operation the splitting wedge will become blunt and require sharpening To do this simply remove burrs and flat spots using a fine file Fig 17 Jam Clearing Use extreme care when clearing jammed logs t...

Страница 14: ...Check oil level Top up if necessary If problem persists consult your nearest Clarke dealer Oil leaks Leaking from the tank Check the bleed screw has been unscrewed before operating the machine Washer...

Страница 15: ...Parts Diagram 15...

Страница 16: ...Cover 1 16 SD30016 Double Ended Threaded Stud 4 18 SD30018 Cross Head Screw M6 x 20 2 19 SD30019 Handle 1 20 SD30020 Foot Pad left 1 21 SD30021 Foot Pad right 1 22 SD30022 Leg Assy 1 23 SD300023 Lock...

Страница 17: ...T3 5 x 14 6 52 SD30052 Power Cable Plug 1 53 SD30053 Cable Clamp 1 54 SD30054 Terminal Box 1 55 SD30055 Oil Cylinder Rear Cover 1 56 SD30056 Grub Screw M8 x 10 2 57 SD30057 Handle Housing left 1 57a S...

Страница 18: ...18...

Отзывы: