background image

CONTROL PANEL

1.

If the unit has been stored or moved laying down leave it to stand in an upright
position for two hours before operating.

2.

Insert the mains plug into a power socket, the ‘OFF’ light 

(5)

 illuminates.

3.

Press the ‘SELECT’ key 

(10)

 to select the operating mode 

(6)

 - 

(9)

 in sequence.

4.

To turn the dehumidifier OFF press the ‘SELECT’ key 

(10)

 until OFF 

(5)

 is illuminated.

Unplug the unit from the power socket if it isn’t going to be used for a long period
of time.

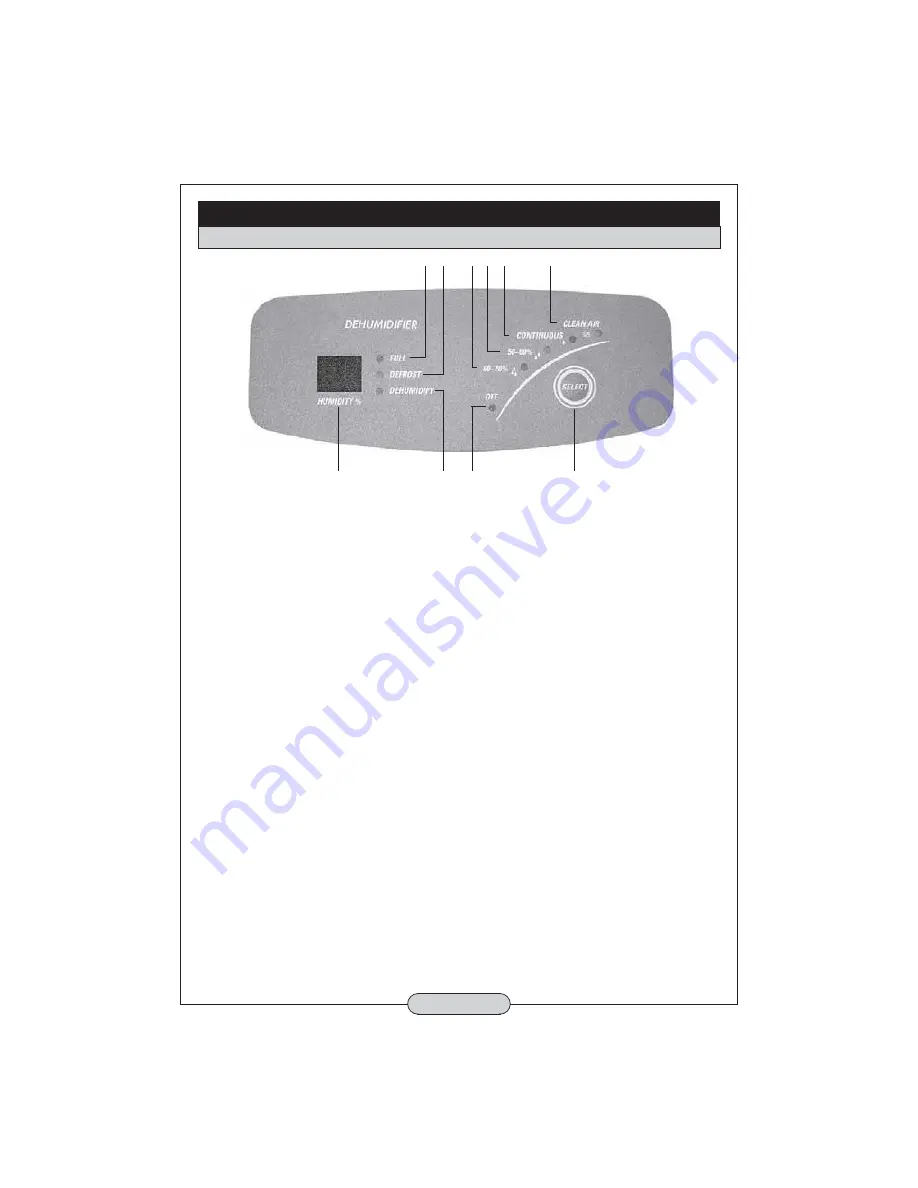
INDICATOR LIGHTS:

(1)

FULL

Blinks when the bucket is full or incorrectly fitted.

(2)

DEFROST

Blinks when defrosting. The unit will auto-return to
dehumidification mode once the defrost cycle is complete.

(3)

DEHUMIDIFY

Illuminates when the compressor (dehumidifying function) is ON
to indicate the unit is running in the normal dehumidification mode.

(4)

HUMIDITY %

Displays the relative humidity.

MODES:

(5)

OFF

Stops the machine.

(6)

60 - 70%

Automatically maintains humidity between 60% and 70%.

(7)

50 - 60%

Automatically maintains humidity between 50% and 60%.

(8)

CONTINUOUS Continuous dehumidification.

(9)

CLEAN AIR

No dehumidification, fan runs to clean air through the filters.

NOTE:

Whenever the compressor stops there will be at least a 3 minute wait
before it will restart, even if you select a different mode. This ensures a
smooth start and also helps to extend the life of the unit.

NOTE:

This unit operates within an ambient temperature of 5°C to 35°C.

8

SETUP AND OPERATION CONTINUED

6 7

9

10

5

3

1 2

4

- 7 -

Содержание CD1250

Страница 1: ...USER INSTRUCTIONS 0306 DEHUMIDIFIER MODEL NO CD1250 Part No 6470622 DEHUMIDIFIER ...

Страница 2: ...Copyright CLARKE International All rights Reserved 03 2006 Waste electrical products should not be disposed of with household waste Please dispose of at your local recycling facility Guarantee 1 Safety Precautions 2 Electrical Connections 3 Technical Specification 4 Parts Description 5 Setup Operation 6 Maintenance 10 Troubleshooting 11 Parts List 12 CLARKE GUARANTEE This CLARKE product is guarant...

Страница 3: ... before unplugging from the mains supply failure to do so could cause damage to the electronics in the unit ALWAYS empty the water tank before storing the unit away ALWAYS unplug the unit from the supply when not in use when emptying the water tank and when moving to a new location NEVER pull the cord to disconnect the unit from the power supply always grip the power plug and pull from the socket ...

Страница 4: ...le There is a danger of electric shock if it is subsequently inserted into a socket outlet NEVER use the plug without the fuse cover fitted Should you wish to replace a detached fuse carrier ensure that the correct replacement is used as indicated by marker or colour code The fuse in the plug MUST be replaced with one of the same rating 13amps and this must be approved to BS1362 IMPORTANT If in an...

Страница 5: ... Domestic Small office Product Specification Operating Voltage 230V Motor Wattage 420W Operating Temperature 5 C 35 C Max Extraction Rate 16 Litres Day Tank Capacity 5 Litres Dimensions Weights Product length x width x height 300 x 348 x 586mm Weight 20Kg gross 18Kg nett 4 ...

Страница 6: ...ARTS DESCRIPTION REAR VIEW Adjustable air outlet Control panel Handle Bucket Finger grip to pull out bucket both sides Casters Nylon filter and activated carbon filter Drain connector Air inlet Power cord storage 5 ...

Страница 7: ...AIR OUTLET Open and adjust the multidirectional air flap BEFORE operating the unit Not doing this will cause the machine to malfunction The air flap can be adjusted to direct the air flow upwards or forwards 1 ACTIVATED CARBON FILTER To use an activated carbon filter pull the filter frame out from the back of the machine Unpack the carbon filter fit into the frame and refit Pull up here to lift th...

Страница 8: ...ode once the defrost cycle is complete 3 DEHUMIDIFY Illuminates when the compressor dehumidifying function is ON to indicate the unit is running in the normal dehumidification mode 4 HUMIDITY Displays the relative humidity MODES 5 OFF Stops the machine 6 60 70 Automatically maintains humidity between 60 and 70 7 50 60 Automatically maintains humidity between 50 and 60 8 CONTINUOUS Continuous dehum...

Страница 9: ... To remove the bucket grip each side and lever out carefully lift and pour the water away then replace back into the correct position CONTINUOUS WATER DRAIN For continuous water drainage use a hose with an inner diameter of 12 7mm inch 1 Use a screw driver to carefully remove the knock out at the back of the unit 2 Attach the hose to the connector through the hole 3 The hose should be lead to the ...

Страница 10: ... obstruction minimum 0 5m RELOCATING THE UNIT 1 Casters are fitted to the unit to allow it to be easily moved 2 ALWAYS turn OFF and unplug from the mains supply before moving 3 Empty the water bucket to avoid spillages 4 Once the unit has been moved before switching ON ensure that the dehumidifier is located on a flat stable surface and that the bucket is correctly installed 9 ...

Страница 11: ...the nylon filter is completely dry before refitting NOTE Never operate the dehumidifier without the nylon filter fitted 3 If you have used the activated carbon filter replace it after 3 to 6 months when the nylon filter side has changed from white to a dark colour 4 Never leave a dirty carbon filter in the unit or a malfunction may occur 5 Clean the air inlet and outlet with a soft cloth or vacuum...

Страница 12: ... 5 C This could cause an accumulation of ice on the unit If this occurs unplug the unit and move to a place where water can be drained away Whenever the compressor stops there will be at least a three minute wait before it will restart this ensures a smooth start and also helps to extends the life of the unit The humidity display will differ from the true value for a period when the unit starts op...

Страница 13: ... than those supplied by CLARKE international or one of its recognised dealers may be hazardous and could invalidate the guarantee PARTS LIST ITEM DESCRIPTION PART NO 1 Nylon Filter Frame EH125001 2 Inner Frame EH125002 3 Carbon Filter EH125003 1 2 3 12 ...

Отзывы: