O
1.
IMPORTANT: You should not operate this
machine unless you are thoroughly familiar
with wood turning lathes and wood turning
techniques. If there is any doubt
whatsoever, you should consult a qualified
person.
2.
Do not operate the machine until it is
completely assembled, and this entire
manual, has been read and understood.
3.
Ensure the proper electrical regulations are
followed. The machine must be properly
earthed.
4.
Before switching the machine ON,
ALWAYS
:-
a.
Clear the lathe bed of ALL objects
(tools, scraps of wood etc.).
b.
Examine the setup carefully, ensuring
nothing could possibly interfere with
the rotating workpiece. eg. The tool
rest is secure and not liable to swing
into the workpiece. Rotate workpiece
by hand to check.
c.
Ensure the tool rest is adjusted to the
correct height, and is as close to the
workpiece as possible.
d.
Ensure all clamps are properly secured.
e.
Ensure your clothing is properly
adjusted.
f.
Ensure the workpiece is centralised.
5.
Make all adjustments with the power OFF.
6.
ALWAYS use the slowest speed when
starting a new workpiece, and cut at
correct speed for material and shape.
7.
ALWAYS remove the tool rest when sanding
or polishing.
8.
When turning between centres, always
ensure that the tailstock centre is snug
against the workpiece, with the spindle
locked, AND the Tailstock securely locked
to the bed. NEVER loosen the tailstock
spindle OR the tailstock with the workpiece
turning.
NOTE: The centre should be lubricated
(unless it is a ball bearing type).
9.
DO NOT drive the workpiece into the
centre when the centre is installed in the
headstock. Always set the workpiece into
the centre with a soft mallet first, and then
mount the Centre with workpiece attached
into headstock spindle.
10. When using the Faceplate, ensure the
workpiece is securely fastened to it and
the appropriate size faceplate is used to
correctly support the workpiece. Ensure
the securing screws cannot interfere with
the turning tool at the finished dimension.
11. ALWAYS rough cut the workpiece as close
as possible to the finished shape before
mounting on to a faceplate.
12. ALWAYS examine the workpiece for flaws.
Do not use wood which is split or has knots.
Test glued joints before mounting on to
lathe to ensure they have completely set.
13. When roughing off, DO NOT jam tool into
workpiece or take too big a cut.
14. NEVER attempt to remount a faceplate
turning to the faceplate for any reason.
Never attempt to remount a between-
centres turning if the original centres in the
turning have been altered or removed.
15. ALWAYS clean the machine at the end of a
working session. Remove centres from the
headstock AND tailstock and store them.
Ensure the work area is cleaned before
leaving the machine.
16. Should any part of the lathe be missing,
damaged, or fail in any way, or any
electrical component fail to perform
properly, shut OFF the machine and
disconnect from the power supply. Replace
missing, damaged or failed parts before
resuming operation. If in doubt, consult
your local dealer. Always disconnect from
power supply when carrying our repairs.
17. Be particularly careful with your clothing
when operating a lathe. Always wear
safety glasses. Long hair should be
contained. See General Safety Instructions
- Apparel.
18. Do not exceed recommended speeds.
Refer to chart on page 12.
ADDITIONAL SAFETY RULES FOR WOOD LATHES
5
glued or tacked in place, do satisfactory work.
These have the advantage that special sizes,
tapers etc., can be made.
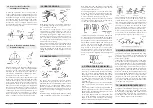
The drum is used mainly for sanding the edges
of curved work. The squareness of the edge of
the work can be best retained by using a simple
form of vertical fence as shown. The standard
sanding drums are commonly made with a
threaded hole to fit the Lathe Drive Spindle. To
guard against loosening of the taper shank while
the drum is in operation, it is advisable to support
the free end, using either a ball bearing or plain
60° centre in the tailstock.
4. USE OF WOOD CHUCKS FOR
SANDING
Quick acting chucks can be very useful for
sanding operations on duplicate production
parts. The chuck is made slightly oversized, and
a piece of rubber hose (for small parts) is inserted
in the recess to grip the workpieces. Workpieces
can be changed without stopping the lathe.
MAINTENANCE
WARNING :
For your own safety, turn the switch ‘off’ and remove the plug from the electrical socket
before maintaining or lubricating your lathe.
Frequently blow out any dust that may accumulate inside the motor.
If the mains lead is worn, cut or damaged in any way, have it replaced immediately.
LUBRICATION
All the BALL BEARINGS are packed with grease at the factory and require no further lubrication.
Periodically lubricate the the tailstock screw threads with either SAE20 or SAE30 engine oil.
28
Fig.60
Fig. 59


