background image

3.1.7 Entering coordinates 

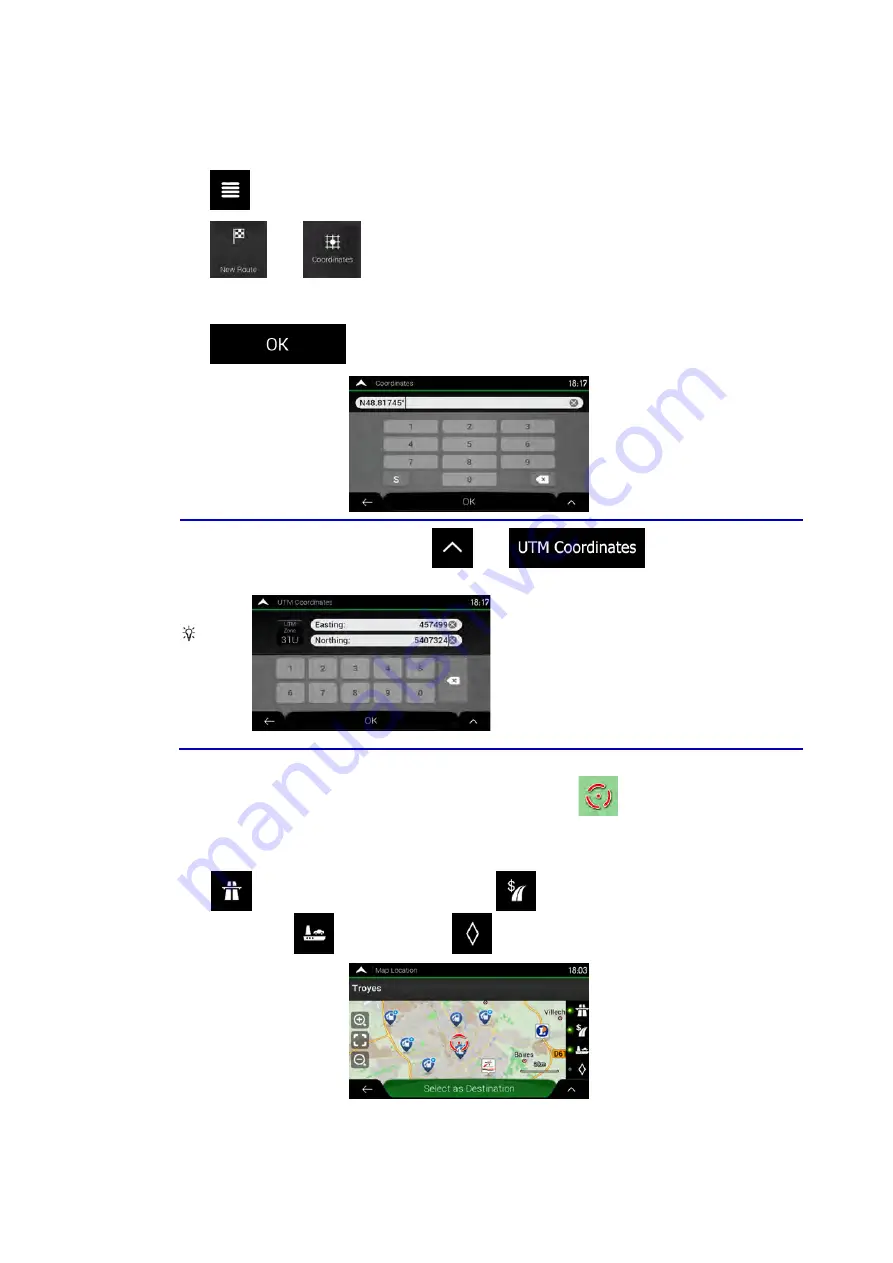
To select a destination by entering its coordinates, perform the following steps: 

1.  Tap 

 on the Navigation view to access the Navigation menu. 

2.  Tap 

  and 

 . 

3.  You can enter the latitude and longitude values in any of the following formats: decimal 

degrees, degrees and decimal minutes, or degrees, minutes and decimal seconds. 

Tap 


Tip! 

(optional) If necessary, tap 

 then 

 and enter the 

coordinate in UTM format. 


4.  A full screen map appears with the selected point in the middle. If necessary, tap the 

map somewhere else to modify the destination. The cursor (

) appears at the new 

location.  

5.   Check the settings for road types and change them if necessary. 

Tap 

  to enable or avoid motorways, tap 

  for roads with Period Charge or 

Per-use Toll, tap 

 for ferries, or tap 

 for carpool lanes. 


44 NX405E English 
 

Содержание NX405E

Страница 1: ...NX405E Owner s manual DVD MULTIMEDIA STATION WITH BUILT IN NAVIGATION 6 0 TOUCH PANEL CONTROL ...

Страница 2: ...a Laite sisältää laserdiodin joka lähettää näkymätöntä silmille vaarallista lasersäteilyä USE OF CONTROLS OR ADJUSTMENTS OR PERFORMANCE OF PROCEDURES OTHER THAN THOSE SPECIFIED IN THE OWNER S MANUAL MAY RESULT IN HAZARDOUS RADIATION EXPOSURE Denne mærking er anbragt udvendigt på apparatet og indikerer at apparatet arbejder med laserstråler af klasse 1 hvilket betyder at der anvendes laserstråler a...

Страница 3: ...u 22 Listening to Compressed Audio 23 Tag Display Function 23 Playback MP3 WMA AAC menu 24 9 USB AUDIO OPERATIONS 25 Notes on Using USB Memories 25 Select USB Audio Mode 25 Playing Audio Files in USB Memory 26 10 USB VIDEO OPERATIONS 27 Notes on Using USB Memories 27 Select USB Video Mode 27 Playing Video Files in USB Memory 27 Playable Video Format 27 11 iPod OPERATIONS 29 Notes on Using iPod iPh...

Страница 4: ...ection of HDMI Mode Wire Connection of HDMI Mode 44 Select HDMI Source 45 18 AUX 46 19 CAMERA INPUT OPERATIONS 46 20 REAR SOURCE OPERATIONS 47 DVD Video in Rear 47 DVD Video Rear Source Control Info Mode 47 DVD Video Rear Source Control Direct Mode 47 iPod Video in Rear 48 iPod Video Rear Source Control Play Mode 48 iPod Video Rear Source ID3 Mode 48 21 SETTING OPERATIONS 49 General Setup Menu 49 ...

Страница 5: ...nding Systems NOTE The items listed outside of the frames are the commercial products generally sold CCA 750 CCA 771 CCA 802 Sold separately iPod Expanding Visual Features Rear Monitor Rear Vision Camera Expanding Audio Features External Power Amplifier iPhone USB Memory Bluetooth Telephone Connect via CCA 750 Connect via CCA 750 Connect via CCA 771 CCA 802 iPhone Smartphone via HDMI Expanding tun...

Страница 6: ... regarded as a suggestion only There may be times when the navigation system displays the vehicle s location incorrectly fails to suggest the shortest route or fails to direct you to your desired destination In such instances rely on your own driving judgment taking into account the driving conditions at the time Do not use the navigation system to locate emergency services The database does not c...

Страница 7: ...6 NX405E English Owner s Manual ...

Страница 8: ... disc DVD CD wipe it off with a soft cloth If moisture forms on the optical parts of the player do not use the player for about one hour The condensation will disappear naturally allowing normal operation 2 Driving on extremely bumpy roads which cause severe vibration may cause the sound to skip 3 This unit uses a precision mechanism Even in the event that trouble arises never open the case disass...

Страница 9: ...els may not operate correctly When the memorized data is lost or damaged by any chance Clarion shall not be liable for any damage When using an USB memory stick we recommend that you backup your data stored on it before by using a personal computer etc Data files may be broken when using USB memory sticks in the following situation When disconnecting the USB memory stick or turning the power off d...

Страница 10: ...rom its storage case press down on the center of the case and lift the disc out holding it carefully by the edges Do not use commercially available disc protection sheets or discs equipped with stabilizers etc These may damage the disc or cause breakdown of the internal mechanism Storage Do not expose discs to direct sunlight or any heat source Do not expose discs to excess humidity or dust Do not...

Страница 11: ...accessory has been designed to connect specifically to iPod or iPhone respectively and has been certified by the developer to meet Apple performance standards Apple is not responsible for the operation of this device or its compliance with safety and regulatory standards Please note that the use of this accessory with iPod or iPhone may affect wireless performance iPhone and iPod are trademarks of...

Страница 12: ...ress to eject disc from the unit MENU Button Press this button to display main menu press again to return current source Press and hold this button for 2 seconds to turn off the monitor Press any place of the screen to turn on the monitor again RESET Button Press this button to hardware reset the unit Note When the RESET button is pressed frequencies of radio stations titles etc stored in memory a...

Страница 13: ...ensure the tray is inserted in the correct direction CAUTION Keep the battery out of the reach of children Should the battery be swallowed consult a doctor immediately Batteries battery pack or batteries installed must not be exposed to excessive heat such as sunshine fire or the like Signal transmitter Operating range 30 in all directions 0 9 SRCH BACK TITLE ZOOM MUTE AUDIO POWER SRC VOLUME SET P...

Страница 14: ...f the screen indicates that speaker is muted POWER SRC Button Press this button to move the focus to next available source item on main menu Press this button to power on when the unit is power off Press this button more than 1 second to power off when the unit is power on 0 9 Buttons Use in the Key Pad screen to select the radio Use to select the track in the track list screen Press to enter DVD ...

Страница 15: ...ode Press for movement of background source in Navigation mode Buttons Press to manually select the next lower or higher station in Tuner modes Press to perform fast backward or fast forward searching Press again to change the speed to 2x 4x 8x or 16x Press for movement of background source in Navigation mode ZOOM Button Press to turn on and zoom in while playing DVD You can zoom in up to 3x No al...

Страница 16: ...e 12 TV Touch the button to display the TV mode 13 BT Audio Touch the button to display the Bluetooth Audio mode 14 AUX1 Touch the button to display the AUX1 mode 15 AUX2 Touch the button to display the AUX2 mode 16 Camera Touch the button to display the Camera mode 17 Setting button Touch the button to display the Setting menu 18 Monitor off Touch the button to turn off the monitor 19 Day Night T...

Страница 17: ...d on a CD R unit and CD RW unit Cause disc characteristics cracks dust dirt dust dirt on player s lens etc If a CD R or CD RW disc that has not been finalized is played it will take a long time to start playing Also it may not be possible to play depending on its recording conditions You cannot play SuperAudio CD The CD player is not supported even if it is a hybrid disc About MP3 WMA AAC playback...

Страница 18: ...parental level Kid Safe Kid Safe G General Audiences PG Parental Guidance Suggested PG 13 Parents Strongly Cautioned PG R Parental Guidance Restricted R Restricted NC 17 No One 17 And Under Admitted Adult Only Adult The contents that the parental level restricts vary with the country code Note The rating can be selected only under the password unlocked status and the limits can be set only under t...

Страница 19: ...arch a Chapter 1 Touch or button during playback Chapters are skipped down or up from current locations as many times as the button is touched and playback starts Skip use seek bar Touch the triangle on seek bar and drag it to any position where you want to start playback Fast Forward Fast Backward 1 Touch or button and hold 2 seconds to start fast backward or fast forward during playback The play...

Страница 20: ...corded For details see the mark of the disc Indicates that 8 audios have been recorded When the power is turned on and when the disc is changed to a new one the language set as the factory default is selected If that language has not been recorded on disc the language is specified on the disc Depending on the disc switching may be completely impossible or impossible on some scenes Switching Subtit...

Страница 21: ...nd fast backward operation The fast forward and fast backward speed may differ depending on the disc Repeat Playback This operation plays back video files recorded on the disc repeatedly The repeat set as the factory default is Repeat all 1 Showing the video files player menu touch button 2 Touch button once for Repeat Track again for Repeat Folder 3 Touch button again for Repeat All Switching Aud...

Страница 22: ...rmat MPEG4 Visual Simple L1 Picture size 720 x 480 Audio format MP3 Audio sampling frequency 32 44 1 48 KHz mp4 files format MPEG4 Visual Simple L1 Picture size 720 x 405 Audio format AAC Audio sampling frequency 32 44 1 48 KHz mpg files format MPEG2 Picture size 720 x 480 Audio format MP3 Audio sampling frequency 32 44 1 48 KHz ...

Страница 23: ...e or track Touch or button during playback to play previous next file Touching button starts playback from the beginning of the next track Touching button starts playback from the beginning of the current track When this button is touched again within 5 seconds playback starts from the beginning of previous track Fast Forward Fast Backward 1 Touch or button and hold more than 2 seconds to start fa...

Страница 24: ...p3 to an MP3 file and WMA or wma to a WMA and m4a to a AAC file by using single byte letters If you add a file extension other than specified or forget to add these file extension the file cannot be played In addition if you use upper case and lower case letters capital and small letters mixed for file extensions normal play may not be possible 2 Files other than MP3 WMA AAC data cannot be played ...

Страница 25: ...en Repeat Folder Repeat All and Repeat Track Repeat Folder and Repeat All 2 Current Folder Showing title of current folder The number on the folder symbol is the number of files and folders number in current folder Touch the title of current folder playlist will show files and folders in upper folder Other operations about playing MP3 WMA AAC are almost same as CD Player mode Stop Playback 1 Touch...

Страница 26: ...The folder hierarchy must be within 8 hierarchical levels Otherwise playback may be impossible The maximum allowable number of folders is 65 535 including root directory and folders with no MP3 WMA AAC FLAC file The maximum allowable number of files in a folder is 65 535 You can store the MP3 WMA AAC FLAC files together in a folder The system may become slow if the files or folders exceed the limi...

Страница 27: ... MP3 audio file contains album art image in ID3 the picture will be displayed in this area ID3 Information Area This area display ID3 information of playing file Skip Using Seek Bar Touch on seek bar and drag it to any position where you want to start playback Select a Folder on Display List Touch the folder title on the display list the display list will display files and folders in selected fold...

Страница 28: ...s position or from the beginning Note This system has two USB connectors and can connect two USB You can select the desired USB by touching the list of USB root menu This system indicate the USB as My USB1 My USB2 on the list Playing Video Files in USB Memory If the video is playing touch the screen of the playing video to display Operation buttons The display will return to the playback screen if...

Страница 29: ...Pause Playback On USB Video menu screen playback status is pause Touch button to resume playback The screen will go to video screen automatically Switch to Previous Next file Touch or button during playback to play previous next file Touch button to starts playback from the beginning of the next track Touch button to starts playback from the beginning of the current track when this button is touch...

Страница 30: ...nnecting your iPod iPhone Some characters of the other languages may not be displayed correctly in this system Precautions on battery consumption If the iPod iPhone is connected to this unit when the internal battery of iPod iPhone has run down this function may not operate correctly You must connect the iPod iPhone after charging the battery if it has run down iPod Audio Menu Operations Connect y...

Страница 31: ... playback 2 Touch this button again to turn off the feature Album Art work If current audio file contains album art image in ID3 the picture will be displayed in this area ID3 Information Area This area display ID3 information of playing file song title artist information album information Genre playlist and release time Category List Select different category songs to play The category is same as...

Страница 32: ...stem will automatically detect the connected device When an iPod iPhone is already connected Touch the button on the Main Menu screen The system changes to the iPod Video mode and starts playback from the previous position Touch MENU button on Operational Panel to return to the Main Menu Viewing video data in the iPod iPhone only for the iPod iPhone with video features When you connect an iPod iPh...

Страница 33: ... Menu List button 6 Repeat button 7 System time 8 Bluetooth status indicator 9 Playback information Play Pause Playback 1 Touch button to pause during playback 2 Touch button again to resume playback Switch to Previous Next Track Touch or button during playback to play previous next track Touch button to starts playback from the beginning of the next track Touch button to starts playback from the ...

Страница 34: ...ed when the automobile is moving Image data may not be played back according to the status of the iPod iPhone The volume setting of video data is relatively lower than audio data Be sure to lower the volume setting before switching to the other mode Do not select the categories with no track registered from the iPod menu screen The iPod iPhone may be frozen If the iPod iPhone is frozen reset the i...

Страница 35: ...ess MENU button on Operational Panel to return to the Main Menu When the connection with blue icon a Bluetooth audio player has been established the icon is displayed at the top of the screen Bluetooth Audio Player Settings You can confirm various information concerning about the Bluetooth Interface features 1 Touch the button to display the information on the screen 2 When you finish confirming t...

Страница 36: ... button then touch the button to disconnect the active device 3 Touch the desired Device button you wish to use Touch button to select it as your active device The corresponding cellular phone is set as current telephone 4 Touch the button to return to the previous screen Controlling the Bluetooth Audio Player Note Occasionally depending on the environment playback sounds may be fragmented or swit...

Страница 37: ...the top of the screen Bluetooth Telephone Settings You can confirm various information concerning about the Bluetooth Interface features 1 Touch the button to display the information on the screen 2 Perform setting for the desired item See the following sections for detail 3 When you finish confirming the Bluetooth information touch the button to return to the previous screen Setting Automatic Con...

Страница 38: ...ular phone registration 1 Touch the button to delete the device A confirmation screen is displayed 2 Touch the button to confirm delete Select the Cellular Phone To change the current cellular phone to the other device which is already registered perform the following operation 1 Touch the device button to display the Device Select screen 2 Touch the currently connected device then touch button to...

Страница 39: ...nction the Phone Book data must be sent from the cellular phone Only the Phone Book items with at least one telephone number registered in the captured Phone Book data are displayed on the Phone Book screen 1 Touch the button to display the Phone Book screen 2 Touch the desired name button you wish to dial Flick the list up and down to scroll the list 3 Touch the button to call the specified numbe...

Страница 40: ...d button to select the band you wish to store 2 Tune to a station you want to store using the seek tuning step tuning or preset tuning 3 Touch and hold the desired Preset button you want to store for about 2 seconds RDS Function Setting Press the Option to set the RDS operation Note The RDS operation does not work during AM radio reception 1 TA Traffic Announcement Function When a traffic announce...

Страница 41: ...r auto store the previous stored stations will be overwritten 2 The unit has 4 bands but FM3 and AM can store by Auto Store function Preset Scan The Preset Scan receives the stations stored in the preset memory in order This function is useful when searching for the desired station in memory 1 Touch the FM1 2 3 AM button to select the desired band FM or AM 2 Touch the button to start the Preset Sc...

Страница 42: ...r button to tune to previous or next ensemble station manually step by step 2 Long touch the or button to seek and tune to previous or next available ensemble station 3 Touch or button to select and tune to previous or next Service in current Ensemble Notes Total number and the current service number of the current Ensemble is displayed just below the Ensemble frequency display as in the way 1 16 ...

Страница 43: ... DAB band button the band will change as below DAB1 DAB2 DAB3 DAB1 Preset Scan Preset Scan tunes to the Services stored in the preset list in order 1 Touch the DAB1 2 3 button to select the desired band 2 Touch the button to start the Preset Scan The unit starts scanning each service for playing 10 seconds sequentially 3 When the desired service is tuned in touch the button again to stay in that s...

Страница 44: ...ol the following DVB T Black Box DTX502E DTX502E is sold separately Note For your safety the unit has a safety function which turns off the picture when car is moving so only the audio can be heard The picture can be only watched when the car is stopped and parking brake is applied Switching to DVB T mode Touch TV key on Main Menu to select desired mode when unit is reading The LCD will display th...

Страница 45: ... that the audio noise and video noise is generated NX405E NX405E NX405E NX405E 1 Connection with the iPhone 4 and iPhone 4s 2 Connection with the iPhone 5 iPhone 5s iPhone 5c iPhone 6 and iPhone 6 Plus 3 Connection with the Android Phone 4 Connection with the equipment with HDMI output HDMI cable sold in the market or CCA 802 iPhone 4 and iPhone 4s HDMI cable sold in the market or CCA 802 iPhone 5...

Страница 46: ...ton then appear the screen of the connected device This HDMI mode is only indicate the screen of the iPhone Android Can t operate by the touch screen of NX405E Note Depending on the application and model of the mobile phone there is the case that black frame appears around the screen ...

Страница 47: ...nit will broadcast audio of external device Press Menu button on Operational Panel to return to the Main Menu You cannot directly control external devices connected to AUX input 19 CAMERA INPUT OPERATIONS Switching to Camera mode Touch Camera button on Main Menu The LCD will display the external camera video The screen will display No Video Signal message if a valid camera is not connect to this h...

Страница 48: ...Touch the 2 Zone off button to close the Rear Source Note 1 If the source is selected as the front the source in rear can t be selected 2 If the source is selected as the rear the source in front can t be selected 3 Touch the Front button to access the main menu but not close the Rear Source DVD Video in Rear 8 7 2 3 4 5 6 1 1 Option button 2 Show Cursor keys 3 Previous Chapter Fast Backward butto...

Страница 49: ...e mode screen 6 Repeat button Same as iPod function of front source 7 Front Rear button If the screen displays Rear Source touch to switch to Front Source If the screen displays Front Source touch to switch to Rear Source iPod Video Rear Source ID3 Mode Note If the source is selected as the front the source in rear can t be selected If the source is selected as the rear the source in front can t b...

Страница 50: ... images which you can import from USB Select Imported 1 2 3 and touch Import The format should be jpeg of less than 5M bytes Illumination Color Set the illumination color on the panel Input Aux Sense AUX input switch including Low Middle High Tel Speaker There are two options Left and Right For example if current setting is Right when BT phone is coming in only right speaker can hear the phone Ver...

Страница 51: ...sold separately is necessary when you use Audio line out Navigation Setup Menu GPS Time Set the system time to be synchronized with GPS local time or not Navi Interrupt There are three choices On Popup Off On The navigation screen will cover to AV screen when reaching some key point Popup When small turn info window will pop up in the top of the AV screen to indicate the key point Off Turn off thi...

Страница 52: ...en the Anti Theft setting mode will display Users can change anti theft code Touch YES button the numerical keypad is displayed Enter the new password twice then anti theft code is set and your unit is secured When the Anti theft is On you need enter correct Anti theft code to turn the unit on If you enter wrong code three times the unit is locked and must be unlocked by the professionals 2 If you...

Страница 53: ...l unit it may not work The battery of the remote control unit is dead or there is no battery in the remote control unit Check the battery of the remote control unit DVD Player Problem Cause Measure Disc cannot be loaded A disc is already loaded Eject the disc before loading the new one There is foreign matter already in the disc slot Remove the foreign matter or consult a service station Sound ski...

Страница 54: ...USB device Sound skips or is noisy MP3 WMA files are not encoded properly Use MP3 WMA files encoded properly The video image of iPod iPhone is disturbed The TV Signal setting of the iPod iPhone is not set correctly Set the TV Signal setting NTSC PAL of the iPod iPhone correctly Bluetooth Problem Cause Measure Cannot pair the Bluetooth enable device with the car audio system The device does not sup...

Страница 55: ... appropriate temperature 25 C or so and check it again The headlight of the vehicle is lit The display is made dark at night to prevent the glare When the headlight of the vehicle is lit in the daytime the display gets dark There are red green and blue points in display This is not a failure but a phenomenon peculiar to a liquid crystal panel The liquid crystal panel is produced according to techn...

Страница 56: ...ay Cause Measure BAD DISC A disc cannot be played due to scratches etc Replace with a non scratched non warped disc Invalid Disc A disc is loaded upside down inside the DVD deck and does not play Eject the disc then reload it properly PARENTAL VIOLATION Parental level error Set the correct Parental level Region code error Region code error Eject the disc and replace correct region code disc ...

Страница 57: ...udio Video output Video output voltage 1 0 Vp p 75Ω Screen Size 6 0 wide type Pixels 1 152 000 Resolution 800 x 480 x 3 RGB Bluetooth Specification Bluetooth Ver 2 1 EDR Profile HFP1 5 Hands Free Profile HSP1 0 Headset Profile A2DP Advanced Audio Distribution Profile AVRCP1 2 1 3 AV Remote Control Profile PBAP Phone Book Access Profile SPP Serial Port Profile Power Class 2 USB Specification USB 1 ...

Страница 58: ...57 NX405E English English Owner s Manual NX405E dimensions NX405E weight 2 3 kg m m 0 0 1 m m 8 7 1 165mm 172mm ...

Страница 59: ...items When connect the HDMI and USB cable be sure to fix with the clamp Refer to next page DTX502E or DAB404E GPS Antenna Radio Antenna YELLOW WHITE RED RED RED RED WHITE WHITE WHITE 4 Channel Amlifier YELLOW YELLOW RED WHITE CAMERA VIDEO OUT REAR_RCH REAR_LCH MIC AUX2 VIDEO IN AUX2 AUDIO IN LCH AUX2 AUDIO IN RCH SUBWOOFER 1 SUBWOOFER 2 SWI HDMI CABLE CCA 750 sold separately Video Out Rear Vision ...

Страница 60: ...Yellow Black Ground 12V main power Orange white Illumination Blue Red Brown Blue white Grass green Purple white Purple black Purple Gray black Gray White White black Green Green black Auto antenna 12V accessory Phone interrupt Amplifier turn on cord Parking brake cord Reverse gear cord Rear right Rear right Rear left Rear left Front right Front right Front left Front left 15A ...

Страница 61: ...Clarion Co Ltd All Rights Reserved Copyright 2015 Clarion Co Ltd ...

Страница 62: ...NX405E English Owner s manual ...

Страница 63: ...3D object types 19 2 3 11 Traffic events 19 2 4 Navigation menu 20 3 Using the navigation 22 3 1 Selecting a destination 22 3 1 1 Using combined search 22 3 1 2 Selecting an address 25 3 1 2 1 Entering an address with states 25 3 1 2 2 Entering an address starting with the street name 28 3 1 2 3 Selecting a town centre 30 3 1 2 4 Selecting the midpoint of a street 31 3 1 2 5 Selecting an intersect...

Страница 64: ... 6 Adding an Alert Point 58 3 7 Running a Simulation 59 3 8 Off road navigation 60 3 8 1 Switching to off road navigation 60 3 8 2 Selecting the destination in off road mode 60 3 8 3 Navigating in off road mode 60 4 Reference guide 62 4 1 Concepts 62 4 1 1 2D 3D GPS reception 62 4 1 2 Natural and TTS voices 62 4 1 3 Road safety cameras and other proximity Alert Points 62 4 1 4 Route calculation an...

Страница 65: ...ay settings 79 4 3 7 Traffic settings 79 4 3 8 Trip Monitor settings 80 4 3 9 Usage Reports settings 80 5 Troubleshooting 81 5 1 GPS signal cannot be received 81 5 2 Address cannot be found 81 5 3 The calculated route is not optimal 81 5 4 Disabling the speed limit warning 82 5 5 Keyboard buttons are greyed out 82 5 6 The map is hidden behind an image of a junction 83 6 End user licence agreement ...

Страница 66: ...no one is able to track any personal information If you change your mind later you can enable or disable the log collection in Settings page 80 It is important to look at the display only when it is safe to do so If you are the driver of the vehicle we recommend that you plan and review your route before you start your journey Plan the route before your departure and stop if you need to change the...

Страница 67: ...lly 1 Select your preferred language then tap to confirm your selection Later you can change it in Regional settings page 78 2 Read the end user licence agreement and tap if you agree with the terms of use 3 You are now asked whether you allow the software to collect usage information and GPS logs that may be used for improving the application and the quality of maps Tap to allow the anonymous sta...

Страница 68: ...n change them in Regional settings page 78 Tap to continue 7 If needed modify the default route planning options Later you can change them in Route Preferences page 71 Tap to continue 8 The initial set up is now complete tap to enter the Navigation view 2 2 Screen controls The following sections describe the functionality and use of buttons sliders and other screen controls in NX405E NX405E Englis...

Страница 69: ...e cursor appears at the selected point on the map The location of the cursor can be used as the destination of the route or a new Alert Point You can also search for Places around it or add this location to your saved locations You can also select some of the objects on the map If you tap the map at the icon of a Place or traffic event the object is selected and you can get information about this ...

Страница 70: ... centre of the screen Entering upper and lower case letters By default when entering a text the first character appears in upper case while the rest of the text is in lower case Tap to enter an upper case letter or tap it twice to turn on Caps Lock Tap again to use lower case letters Entering numbers and symbols Tap to switch to a keyboard offering numbers and symbols Finalising the keyboard entry...

Страница 71: ...ap continuously Tap and hold the following button on keyboard screens to quickly delete several characters Tap and hold the following buttons in long lists to scroll pages continuously Dragging Drag the screen in the following cases To move the handle on a slider To scroll a list grab the list anywhere and slide your finger up or down Depending on the speed of the sliding the list scrolls faster o...

Страница 72: ...eet names and other text with the same font size never upside down and you only see the streets and objects that you need Map scaling has a limit in 3D map view mode If you zoom out further the map switches to 2D view mode Tap once to modify the view in a large step or tap and hold the button to modify it continuously and smoothly Tilting up and down Change the vertical view angle of the map in 3D...

Страница 73: ...sor location as a new destination The route is automatically calculated 2 3 Navigation view The navigation view is the main screen of NX405E that shows the planned route on a map NX405E works with digital maps which are not simply the computerised versions of traditional paper maps Similarly to paper road maps the 2D mode of digital maps shows you streets and roads Elevation is also illustrated in...

Страница 74: ...e of the second next manoeuvre if it is near the first one See page 15 7 Next street It displays the name of the next street See page 15 If you have not selected a route destination you can see nearby house numbers 8 Parking around destination It appears near the destination By tapping it you can check the available parking facilities around your destination See page 66 9 Destination menu It appea...

Страница 75: ... entering a tunnel the map is replaced with a generic tunnel image See page 18 2 3 1 Streets and roads NX405E shows the streets similarly to paper road maps Their width and colours correspond to their importance you can easily tell a motorway from a small street 2 3 2 GPS position markers When your GPS position is available NX405E marks your current position By default this marker is a blue arrow ...

Страница 76: ... It is the final destination of the route Route colour The route always stands out with its colour on the map both in daytime and night colour modes Streets and roads that are excluded from the navigation You can choose whether you want to use or avoid certain road types page 71 However when NX405E cannot avoid such roads the route includes them and shows them in a colour that is different from th...

Страница 77: ...corner Most of the manoeuvre icons are intuitive The following table lists some of the frequently shown route events Icon Function Turn left Turn right Turn back Bear right Turn sharp left Keep left Continue straight in the intersection Enter the roundabout and take the first exit next manoeuvre Enter the roundabout second next manoeuvre Enter the motorway Exit the motorway Board the ferry Leave t...

Страница 78: ...mbers All signposts look similar when cruising when there is no planned route During navigation only the signpost that points to the lane s to be taken is highlighted all the others are darker If you want to hide the currently displayed signposts tap any of them and the normal Navigation view returns until new signpost information is received You can modify the signpost settings in page 76 2 3 7 J...

Страница 79: ...urns Tunnel view can be turned off in See page 76 2 3 9 Motorway services When you are driving on a motorway the button appears at the top right corner of the Navigation view Tap it to open a panel with the details of the next few service stations petrol stations restaurants Tap any of them to display the exit area on the map You can now easily add this service station as a waypoint to your route ...

Страница 80: ...ock representations of full town building data containing actual building sizes and positions on the map 2 3 11 Traffic events Road segments affected by traffic events are displayed in a different colour on the map The following icons may appear at the top right corner of the screen Button Description It is displayed when traffic events are not received It is displayed when traffic events are rece...

Страница 81: ...oute points You can also plan a route independently of your current GPS position by setting a new starting point Check the traffic events affecting your route or view historical traffic data Access additional options and check navigation related information Customise the way the navigation software works See information about the navigation software With a planned route the following menu options ...

Страница 82: ... profiles menu where you can create new profiles or edit the existing ones If several drivers are using the navigation system they can create their own profiles with their own settings The following options are also available on many of the menu screens Button Function The Menu button appears when the Navigation view is displayed Tap it to open the Navigation menu The More button appears on the sc...

Страница 83: ...choose your destination by selecting one of the following options Using combined search to search among different destination types at once see page 22 Entering a full address or a part of an address for example a street name without a house number see page 25 Selecting a Place as your destination see page 34 Selecting a previously saved location as your destination see page 40 Selecting a locatio...

Страница 84: ...e new search area is in a different country start entering the country and the town It is usually enough to type the first few letters of the country or town and conventional abbreviations can also be used b Tap to see the whole list of the matching results 5 With the proper search area displayed start entering the name address or category of the destination you are looking for 6 Tap to switch to ...

Страница 85: ...em to see Places from that provider Tip To search for an intersection in the combined search enter the names of the streets connected by the sign You do not need to use spaces before and after the separator character For example you can find the intersection of Collins Street and Douglas Avenue by entering strings like Collins St Douglas Ave Collins Douglas Col Doug etc The more precise the input ...

Страница 86: ...g the house number see page 25 The address starting with the street name see page 28 The centre of a town see page 30 The midpoint of a street see page 31 An intersection see page 32 Any of the above starting the search with the postal code see page 33 3 1 2 1 Entering an address with states To enter an address as the destination follow these steps 1 Tap on the Navigation view to access the Naviga...

Страница 87: ... the City or ZIP code field b optional In the Select City or ZIP code screen you can immediately select a city from the list of suggestions c Otherwise start entering the first few letters of the city on the keyboard The names that match the string appear in a list d To open this list tap and select the city 5 Enter the street name a Tap the Street field b optional On the Select Street screen you ...

Страница 88: ...A full screen map appears with the selected point in the middle If necessary tap the map somewhere else to modify the destination The cursor appears at the new location 8 Check the settings for road types and change them if necessary Tap to enable or avoid motorways tap for roads with Period Charge or Per use Toll tap for ferries or tap for carpool lanes 9 Tap to confirm the destination You can al...

Страница 89: ...ion view to access the Navigation menu 2 Tap and 3 By default NX405E proposes the country and state where you are If needed change the country Tap a In the Select Country screen you can immediately select a country from the list below the input field or tap the button and start entering the first few letters of the country on the keyboard b Tap to open the list of results and select one country fr...

Страница 90: ...e start entering the street name on the keyboard the names that match the string appear in a list d Tap to open the list of results Select the street from the list 6 Enter the house number by performing the following steps a Tap the House number or crossing street field b Enter the house number on the keyboard To enter letters tap c Tap the selected address to finish the address search NX405E Engl...

Страница 91: ...nation 10 The route is calculated and the map appears showing the entire route where you can check route information and route alternatives Tap to modify the route parameters or tap to start your journey 3 1 2 3 Selecting a town centre The town centre is not the geometric centre of the town but an arbitrary point the map creators have chosen In towns and villages it is usually the most important i...

Страница 92: ...ecting the midpoint of a street To navigate to the midpoint of a street without entering the house number perform the following steps 1 Go to and select the country and town as described earlier The Select Street screen appears 2 Enter the street name by performing the following steps a Tap the Street name field b optional On the Select Street screen you can immediately select a street from the li...

Страница 93: ...ollowing steps 1 Go to and select the country and city as described earlier 2 Enter the street name by performing the following steps a Tap the Street name field b optional On the Select Street screen you can immediately select a street from the list of suggestions c Otherwise start entering the street name on the keyboard The names that match the string appear in a list d Tap to open the list of ...

Страница 94: ...ng the postal code instead of the city name To select the postal code perform the following steps 1 Go to and modify the country and state as described earlier page 25 if necessary 2 Tap the Town or Postcode field 3 Enter the postcode by performing the following steps a Tap to open the numeric keypad b Start entering the postal code c Tap to open the list of results d Find the place you need 4 Con...

Страница 95: ...he most frequently selected types of Places Perform the following steps 1 Tap on the Navigation view to access the Navigation menu 2 Tap and The following Quick search categories appear If a planned route exists petrol stations are searched along the route If a planned route exists accommodation is searched around the destination If a planned route exists restaurants are searched along the route I...

Страница 96: ... one of the list items A full screen map appears with the selected point in the middle The name and address of the Place is displayed at the top of the screen 7 Tap to see the details of the selected Place or to save the location 8 If necessary tap the map somewhere else to modify the destination The cursor appears at the new location 9 Check the settings for road types and change them if necessar...

Страница 97: ...nt position or if it is not available around the last known position In this case the following result list is ordered by the distance from this position Tap to search along the planned route and not around a given point This is useful when you search for a later stopover that results in a minimal detour only such as searching for upcoming petrol stations or restaurants The result list is ordered ...

Страница 98: ... can be ordered by the following criteria Name Their distance from the current or last known position Their distance from the selected town Their distance from the destination The length of the necessary detour Tap to reorder the list To filter the list of results by providers tap and then the provider logo on the right side of the screen 9 Browse the list and tap one of the list items A full scre...

Страница 99: ...ct one of the following search areas Tap to search for a place within a selected town The result list is ordered by the distance from the centre of the selected town Tap to search for a place around the destination of the planned route The result list is ordered by the distance from the destination Tap to search along the planned route and not around a given position This is useful when you search...

Страница 100: ...int in the middle The process continues the same way as in case of any other Places search See page 34 3 1 3 4 Finding help nearby To quickly search for nearby assistance perform the following steps 1 Tap on the Navigation view to access the Navigation menu 2 Tap and Places in the following pre set search categories can be searched for around the current position or around the last known position ...

Страница 101: ...rocess continues the same way as in case of any other Places search See page 34 3 1 4 Selecting a Saved Location To select a location that you have already saved page 56 perform the following steps 1 Tap on the Navigation view to access the Navigation menu 2 Tap and 3 The list of saved locations is displayed It contains two pre set categories Home and Work 4 Tap the location that you want to set a...

Страница 102: ...to select a different destination 10 The route is calculated and the map appears showing the entire route where you can check route information and route alternatives Tap to modify the route parameters or tap to start your journey 3 1 5 Selecting a History item The destinations that you have used earlier appear in the History list Smart History offers these locations from your previous destination...

Страница 103: ...st selected If necessary scroll the list to see earlier destinations 4 Select a destination from the list 5 A full screen map appears with the selected point in the middle If necessary tap the map somewhere else to modify the destination The cursor appears at the new location 6 Check the settings for road types and change them if necessary Tap to enable or avoid motorways tap for roads with Period...

Страница 104: ...ute perform the following steps 1 Tap on the Navigation view to access the Navigation menu 2 Tap and 3 The list of saved routes appears If necessary scroll the list to see earlier routes 4 Select a route and the Multipoint Route screen appears If necessary modify the saved route Otherwise tap 5 The route is calculated and the map appears showing the entire route where you can check route informati...

Страница 105: ...utes or degrees minutes and decimal seconds Tap Tip optional If necessary tap then and enter the coordinate in UTM format 4 A full screen map appears with the selected point in the middle If necessary tap the map somewhere else to modify the destination The cursor appears at the new location 5 Check the settings for road types and change them if necessary Tap to enable or avoid motorways tap for r...

Страница 106: ... journey 3 1 8 Selecting a location on the map To select a map location perform the following steps 1 Locate your destination on the map Move and scale the map as necessary 2 Tap the location that you want to select as your destination The cursor appears there 3 optional If needed tap to list the Places near the selected point or to save this location Tip If you already have a planned route tap an...

Страница 107: ...our route destination by destination perform the following steps 1 Tap on the Navigation view to access the Navigation menu 2 Tap 3 There is only one line in the list of route points the starting point of the route which is normally the current GPS position 4 Tap to select the destination 5 The New Route to screen appears where you can select the destination of the route the same way as described ...

Страница 108: ...r of waypoints You can also delete all the destinations 9 When you have added all the route points tap and the planned route is automatically calculated 3 2 Checking Route Information and Alternatives To get a map overview of the planned route and check different parameters of the planned route perform the following steps 1 Tap on the Navigation view to access the Navigation menu 2 In the Navigati...

Страница 109: ...tical traffic information historical speed information or traffic patterns can be taken into account in the route calculation based on the time of day and the day of week if suitable data can be found on the device In addition real time traffic information can help you avoid current traffic events like temporary road closures or traffic jams caused by an accident Both functions are subject to data...

Страница 110: ...ents 3 Tap any of the list items to see its details and to display the affected road segment in its full length on the map To display real time traffic information on the map perform the following steps 1 On the Navigation view tap the traffic icon for example to open the Traffic summary screen and tap 2 Tap to display real time traffic information on the map A 2D map is displayed with road segmen...

Страница 111: ...rnative for an existing route see page 55 Pausing guidance see page 56 3 4 1 Setting a new starting point For normal navigation all routes are calculated from the current position You can pause navigation to check future routes simulate them or see their length in time and distance Then you can set the starting point of the route to a location other than the current GPS position 1 Tap on the Navig...

Страница 112: ... To return to normal navigation tap 3 4 2 Adding an additional destination If you already have a planned route and you select a new destination as described in the above sections the route to the previous destination is deleted and a new route is calculated To add a new intermediate destination to the planned route perform one of the following actions Tap the map anywhere to browse it After select...

Страница 113: ...aypoints or the route Tap the name of the intermediate destination to move it up or down in the list to save the location or to delete it from the list If you have a route with at least one intermediate destination you can delete the waypoint from the list right from the Main menu Tap then confirm the deletion 3 4 4 Saving the planned route To save the planned route perform the following steps 1 S...

Страница 114: ...options to delete the navigated route If you already have a planned route and you select a new destination as described in the above sections the route to the previous destination is automatically deleted and a new route is calculated In the Navigation menu tap or If there are no waypoints the planned route is deleted after a confirmation If you have waypoints you can choose to delete the whole ro...

Страница 115: ...r and go to the route confirmation screen 2 Tap 3 You can see the basic details of route alternatives Tap any of them to see it on the map 4 To view more suggestions tap and scroll down for other alternative routes with different route planning methods 5 Select one of the route alternatives and tap to return to the previous screen NX405E recalculates the route Tap to start your journey The orange ...

Страница 116: ...asic details of a few route alternatives Tap any of them to see it on the map If there are suitable alternatives calculated with the route planning method that is selected in Route preferences page 71 they are shown on top of the list Routes with other route planning methods are shown at the bottom of the list 4 If there are more than a few suggestions you can tap and scroll down for routes 5 Sele...

Страница 117: ...ons the list of frequently used destinations perform the following steps 1 Select a destination as described before It can be an address a Place any location on the map a previously used destination from History and so on 2 When the map appears with the selected location in the middle tap 3 Tap 4 optional Using the keyboard you can change the name offered for the Saved Location 5 Tap to save the l...

Страница 118: ...dy added as a Saved Location perform the following steps 1 On the Navigation view tap and 2 The list of Saved locations is displayed 3 Tap and 4 Tap the location you want to edit tap and enter the name of the location on the keyboard then tap Note In Saved Locations Home and Work cannot be renamed To change your home or work location tap or and confirm the address change 5 Tap Adding a location to...

Страница 119: ...sabled when you are in a country where road safety camera warning is prohibited However you must make sure that using this feature is legal in the country where you intend to use it 1 Return to the Navigation view and select the Alert Point The red cursor appears there 2 Tap 3 Scroll down the list and tap 4 Select the type of the Alert Point the direction from which you expect the alert and if app...

Страница 120: ...f the route and leads you through the whole planned route using a realistic speed optional You have the following controls during the simulation the control buttons disappear after a few seconds but you can open them again if you tap the map Jump to the next route event manoeuvre Pause the simulation Jump to the previous route event manoeuvre Tap to increase the speed of the simulation to 4 8 or 1...

Страница 121: ... route planning method Vehicle settings are disabled 3 8 2 Selecting the destination in off road mode Selecting a destination waypoint or final destination is the same as described in the previous sections The only difference is that route points are linked to form a route with straight lines regardless of the road network and traffic regulations 3 8 3 Navigating in off road mode The real differen...

Страница 122: ...Note If you do not want to use off road navigation switch back to on road navigation by tapping and NX405E English 61 ...

Страница 123: ...ntage of pre recorded voice is that it sounds really natural but the range of instructions that can be given this way is limited Location specific information such as street names cannot be announced TTS technology provides a machine generated way to give voice instructions The advantage of TTS is that it can announce street names traffic events route summary and traffic rules 4 1 3 Road safety ca...

Страница 124: ...ting point is the current or last known position by default If you need to see a future route the starting point can be replaced with any other given point See page 50 Once the destination has been selected NX405E calculates the route based on your preferences These preferences are the route planning method and the road types used or avoided when calculating the route For detailed information on a...

Страница 125: ...a sources are available Traffic Message Channel TMC TMC is a specific application of the FM Radio Data System RDS used for broadcasting real time traffic and weather information If public Traffic data is broadcast at your location NX405E automatically searches the FM radio stations for TMC data and the decoded information is immediately used in route planning Note TMC is not a global service It ma...

Страница 126: ...w appears and shows the length and duration of the detour You can ignore this message and keep the original route by tapping or you can check the suggested route by tapping By tapping the plus minus signs you can increase or decrease the distance to avoid on the highway You can accept the recommended detour by tapping 4 1 8 2 Real time alternative routes NX405E may offer an alternative route on no...

Страница 127: ...on By tapping the arrows on the sides you can switch between the recommended parking facilities By tapping and the selected parking place becomes your destination 4 1 8 4 Hints upon detour If you leave the planned route by exiting a motorway NX405E tries to guess the reason for making a detour The Reason for detour window appears and shows available petrol stations restaurants or other Places arou...

Страница 128: ... if GPS reception is not available See page 68 Offers assistance near your current position See page 39 Offers a list of countries with useful driving information about the selected country for example speed limits maximum blood alcohol level Shows statistical data of your trips like the start time end time and average speed see page 69 Track logs the sequence of the positions given by the GPS rec...

Страница 129: ...s shown on the Where Am I screen Address details when available of the current position Latitude and Longitude coordinate of the current position in WGS84 format The nearest town Next crossing road street Previous crossing road street You can also perform some actions on this screen Tap and to add the current position to the saved locations and to check the country information You can also search ...

Страница 130: ... the recorded route You can export all logs into the sdmmc folder You can access the Trip Monitor Settings where you can enable saving the trip logs automatically or you can save the trip logs manually See page 80 By tapping your recorded trip on the Trip Monitor screen you can check information such as time speed altitude and distance By tapping on the Trip Data Details screen you can view the tr...

Страница 131: ...iew or adjust how the software helps you navigate with different kinds of route related information on the Navigation view Change the voice guidance language set the time zone the measurement units the time and date and formats and customise the application for your local language Enable or disable menu animations Enable or disable traffic information and modify detour settings Turn the automatic ...

Страница 132: ...different situations and vehicle types by changing the planning method See page 72 Select on road or off road navigation See page 60 Select your preferred road types for the route See page 73 4 3 1 1 Vehicle profile You can select the following vehicle types Button Description Manoeuvre restrictions and directional constraints are taken into account when planning a route Roads are used only if acc...

Страница 133: ... the following route planning method types Button Description Gives a quick route if you can travel at or near the speed limit on all roads Usually the best selection for fast and normal cars Results in a route with fewer turns and no difficult manoeuvres With this option you can make NX405E take for example the motorway instead of a series of smaller roads or streets Gives a short route to minimi...

Страница 134: ...roads where you can purchase a pass or vignette to use the road for a longer period of time They can be enabled or disabled separately from toll roads Per use toll roads are pay roads where there is a per use charge in the routes by default If you disable toll roads NX405E plans the best toll free route NX405E includes ferries in a planned route by default However a map does not necessarily contai...

Страница 135: ...lider becomes inactive Tap again to re enable it Button Function Disable verbal instructions This function is enabled by default Choose from the following options Announce the street names in the native language area of the selected voice guidance language Announce the road numbers only Announce the manoeuvres only Street names sound correct only if you use a native voice profile for the country C...

Страница 136: ...X405E is able to warn you if you exceed the current speed limit This information may not be available in your region or may not be fully correct for all roads on the map The maximum speed set in the vehicle profile is also used for this warning NX405E alerts you if you exceed the pre set value even if the legal speed limit is higher This setting lets you decide whether you wish to receive visible ...

Страница 137: ...d limit Only when speeding The audio warning is only played when you exceed the given speed limit When approaching The audio warning is always played when approaching one of these Alert Points In order to draw your attention the audio alert is different when you exceed the speed limit Maps may contain driver alert information that can be shown on the Navigation view in a similar way as real life r...

Страница 138: ...e map as possible Tap the name of the Place category to show hide it or to open the list of its subcategories You can modify the following additional settings on the Navigation View screen If you are navigating with a planned route you can set three data fields to be displayed on the Navigation view You can choose from the time of arrival at destination distance to destination time to destination ...

Страница 139: ...d the remaining distance are also displayed In certain situations NX405E offers a detour when there is a traffic jam on a highway See page 65 In certain situations NX405E offers an alternative route when there is a traffic jam on the road See page 65 In certain situations NX405E offers parking Places when you approach your destination See page 66 In certain situations NX405E offers different route...

Страница 140: ...bove mentioned profiles it can also be used for voice recognition You can set the measurement units and time date format to be used NX405E may not support all the listed units in some voice guidance languages By default the time zone is taken from the map information and adjusted by your current location Here you can manually set the time zone and the daylight saving time 4 3 6 Display settings Yo...

Страница 141: ...of all trip and track logs saved 4 3 9 Usage Reports settings If you enable it when first using the application it collects usage information and GPS track logs that may be used for improving the application and the quality and coverage of maps Data are processed anonymously no one is able to track any personal information You can enable or disable collecting the following logs Button Description ...

Страница 142: ...m your current position Solution 2 Wait a few minutes for the GPS signal 5 2 Address cannot be found Issue NX405E cannot find the address you entered Cause The digital map data may not include every single address Solution 1 If the house number is not known or NX405E cannot find it select only the street name This way NX405E will navigate you to the midpoint of the street where you can find the ex...

Страница 143: ...n Disable the speed warning by performing the following steps 1 Tap and 2 Tap and 5 5 Keyboard buttons are greyed out Issue Some keyboard buttons are greyed out and cannot be used Cause NX405E has a smart keyboard for address search which means that only those buttons are active that can be used to type a name that is available on the map Solution Check if you entered the name correctly If the nam...

Страница 144: ...intersection and the needed information exists the map is replaced with a 3D view of the junction The lanes you need to take are displayed with arrows Solution If you want to hide the currently displayed junction and return to the Navigation view tap the picture To turn off this feature perform the following steps 1 Tap and 2 Tap Now the tunnel view will not appear again NX405E English 83 ...

Страница 145: ...en You as the end user hereinafter User and the business entity distributing selling the Device together with the Navigation Product under its own name and or branding hereinafter Licensor This Agreement sets out the conditions and limitations of use of the Navigation Product The User and the Licensor are referred together as Parties 1 2 User represents and warrants that i he she is not located in...

Страница 146: ...oding or any medium thereof shall be deemed parts of the Navigation Product 4 3 Error corrections updates or upgrades or any other modifications to the Navigation Product used by the User following the conclusion of this Agreement shall also be used in accordance with this Agreement 4 4 Your rights under this Agreement will terminate immediately without notice from Licensor if you materially breac...

Страница 147: ...s only 6 2 In the event that the Navigation Product comes preinstalled on or otherwise licensed together with the Device or acquired from Licensor by the User for a specific Device the Navigation Product shall be tied to the Device and may not be separated transferred to or used with another Device or sold to another User without selling the Device itself 6 3 The Databases and Services provided to...

Страница 148: ... to the Navigation Product not being applicable for any defined purpose or due to the error or incompatibility of the Navigation Product with any other system device or product 8 5 NEITHER LICENSOR NOR ITS SUPPLIERS SHALL BE LIABLE TO USER FOR ANY INCIDENTAL CONSEQUENTIAL SPECIAL INDIRECT OR EXEMPLARY DAMAGES ARISING OUT OF THIS AGREEMENT INCLUDING LOST PROFITS OR COSTS OF COVER LOSS OF USE OR BUS...

Страница 149: ...y use these services when the User has read and understood the relevant terms at the website and the User is obliged to use the services in line with those terms In the event of conflict between this Agreement and such additional terms the additional terms shall prevail 8 11 Purchase and acquisition of activation licence for the use of certain functions Databases or Services may require Internet c...

Страница 150: ...territorial coverage of the information and content furthermore no warranty is offered regarding the availability e g uptime of online information and content servers User acknowledges that in any territory or time slow or non connectivity may be experienced due to capacity limitations of the Internet connection or the content servers The Navigation Product may allow the User to access and communi...

Страница 151: ...t those terms together with this Agreement 12 2 Potential third party suppliers and their Supplier Terms may have their Database or Service distributed as part of the Navigation Product are listed in the About section of the Navigation Product or at a website address indicated in the About section 12 3 Service specific terms 12 3 1 Online Search By using the built in online search functionality th...

Страница 152: ...y four hour period 13 Third party attribution Attribution of third parties e g copyright notices supplying software modules Databases Services or other material to the Navigation Product are listed in the About section of the Navigation Product or at a website address indicated in the About section NX405E English 91 ...

Страница 153: ... not in whole or in part be reproduced or transmitted in any form either electronically or mechanically including photocopying and recording without the express written consent of Clarion 2015 Clarion Map data 1987 2015 HERE All rights reserved See http corporate navteq com supplier_terms html All rights reserved 92 NX405E English ...

Отзывы: