background image

— 6 —

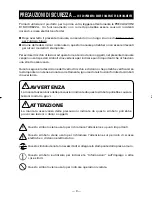
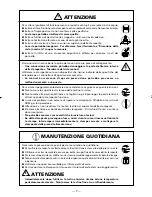
Sistemare la stampante su una superficie piana, stabile e senza vibrazioni.

•  In caso contrario essa potrebbe cadere e causare danni.

Non utilizzare la stampante nelle condizioni seguenti.

Evitare che un muro nelle vicinanze o qualsiasi oggetto blocchino i fori di
ventilazione della stampante.

Non utilizzare la stampante con oggetti depositati su di essa.

Non utilizzare la stampante coperta o avvolta da un tessuto o un lenzuolo.

• Fare attenzione alla formazione interna di calore che potrebbe provocare incendi

e deformare la struttura esterna della stampante.

Evitare di usare la stampante vicino ad una radio o ad un televisore e non
alimentarla dalla stessa presa utilizzata per questi apparecchi.

Evitare di utilizzare la stampante collegata ad un cavo che non presenta alcuna
protezione contro i disturbi.  (Per le interconnessioni, utilizzare una coppia di cavi
schermati o attorcigliati e nuclei in ferrite o altri dispositivi antidisturbo.)

Evitare di usare la stampante con un dispositivo che rappresenti una forte fonte di
rumore.

• La stampante potrebbe avere un effetto negativo sulle trasmissioni radio o TV.

In alcuni casi gli apparecchi elettrici potrebbero influenzare in modo negativo la
stampante, causando errori di dati o malfunzionamento.

Usare la stampante con il morsetto di messa a terra collegato ad un adeguato
impianto di messa a terra.

• Se si verificano dispersioni potrebbe sussistere il pericolo di scosse elettriche.

Non collegare il morsetto di messa a terra della stampante a nessuno di questi
impianti:

Tubature del gas

Potrebbe verificarsi un’esplosione di gas

Linea telefonica

Aste parafulmine

In caso di fulmine, un forte picco di corrente potrebbe provocare incendi o scosse
elettriche

Tubazioni idrauliche

Tubazioni idrauliche in plastica non dovrebbero essere utilizzate per la messa a
terra. (Possono essere utilizzate solo quelle approvate dall’Acquedotto).

Prima di collegare o scollegare il cavo di messa a terra alla o dalla stampante,
scollegarlo sempre dalla presa di alimentazione.

L'etichetta di avvertenza è posizionata così come mostrato in figura.  Leggete
accuratamente le precauzioni per la manipolazione prima di utilizzare la stampante.

QUESTA ETICHETTA INDICA UN
RISCHIO DI DANNO DOVUTO ALLA
"TEMPERATURA ELEVATA" DELLA
TESTINA TERMICA.

ATTENZIONE

Содержание CT-S300

Страница 1: ...LINE THERMAL PRINTER MODEL CT S300 User s Manual Mode d emploi Benutzerhandbuch Manuale dell utente Manual de Usuario...

Страница 2: ...n mode EN61000 4 6 1996 3 V 0 15 MHz 80 MHz AM 1 KHz 80 EN61000 4 8 1993 50 Hz 3 A m Out of scope EN61000 4 11 1994 10ms 95 500ms 30 5000ms 100 Supplementary Information The product complies with the...

Страница 3: ...ser at his own expense will be required to take whatever measures may be necessary to correct the interference CAUTION Use shielded cable for this equipment Sicherheitshinweis Die Steckdose zum Anschl...

Страница 4: ...ENGLISH...

Страница 5: ...3 3 4 Installing the Printer 14 3 5 Partition for 58 mm Wide Paper Roll 14 3 6 Setting DIP Switch 15 3 7 Adjusting the Paper Near end Sensor 16 4 MAINTENANCE AND TROUBLESHOOTING 17 4 1 Setting Replaci...

Страница 6: ...Except explained elsewhere in this manual do not attempt to service disassemble or repair this product Note that CBM is not responsible for any damage attributable to incorrect operation handling or i...

Страница 7: ...important items to be strictly observed The following describes the degree of hazard and damage that could occur if the printer is improperly operated by ignoring the instructions indicated by the war...

Страница 8: ...printer A metallic foreign object if accidentally dropped into the printer may cause printer failure fire or electric shock Should it occur immediately turn the printer off unplug it from the supply o...

Страница 9: ...ker to trip Do not allow anything to rest on the power cord Do not place the printer where the power cord will be trampled on Do not use or carry the printer with its power cord bent twisted or pulled...

Страница 10: ...printer may have an adverse effect on nearby radio or TV transmissions There may also be cases when nearby electrical appliances adversely influence the printer causing data errors or malfunction CAU...

Страница 11: ...rts e g paper cutter gears active electrical parts while the printer is working In case of trouble do not attempt to repair the printer Ask CBM service for repair Be careful that the paper cover does...

Страница 12: ...r s manual This manual 1 Printer AC adapter type Sample paper roll Partition for 58 mm wide paper roll User s manual This manual AC adapter AC adapter type AC power cord Printer Built in power supply...

Страница 13: ...m Paper thickness 65 75 m Interfacing Serial RS 232C compliant Parallel IEEE 1284 compliant USB Cash drawer interface 2 cash drawers are supported Input buffer 4K bytes 45 bytes Supply voltage DC 24 V...

Страница 14: ...ew AC Adapter Type Built in Power Supply Type Front view Rear view AC inlet POWER LED ERROR LED FEED switch Interface connector Serial parallel etc Cash drawer interface connector Power connector Rear...

Страница 15: ...ype Power connector AC adapter Flat side CAUTION Use only the specified AC adapter with the printer When disconnecting a cable do not pull out by the cable Always hold the plug Always keep the AC powe...

Страница 16: ...cable terminal correctly and insert it into the interface connector In case of a built in power supply type remove the power box unit before connection CAUTION When disconnecting the cable always hold...

Страница 17: ...ctrical characteristics 1 Driving voltage 24 VDC 2 Driving current Approx 1A max shall not exceed 510 ms 3 DRSW signal Signal levels L 0 to 0 5 V H 3 to 5 V 3 DRSW signal DRSW signal status can be tes...

Страница 18: ...installing the printer with built in power supply vertically Horizontal position Vertical position 3 5 Partition for 58 mm Wide Paper Roll 1 Turn off the printer power 2 Open the paper cover 3 Attach...

Страница 19: ...N 7 ON 8 INIT Reset Invalid OFF Selecting baud rate Switch No 6 7 2400 OFF OFF 4800 ON OFF 9600 OFF ON 19200 ON ON 38400 bps can also be selected by a command etc 3 6 Setting DIP Switch The DIP switch...

Страница 20: ...orizontal or vertical or the diameter of the paper roll as shown in the following figure Sensor Position Installation Method Paper Roll External Diameter mm 1 22 2 Horizontal 24 3 27 4 27 5 Vertical W...

Страница 21: ...er part of the cover to close it firmly WARNING When opening the paper cover take care not to touch the print head or cutter blade Otherwise burning or injury of hand may result 4 2 Removing Jammed Pa...

Страница 22: ...4 When the Paper Cover Cannot Be Opened If the cutter blade remains protruded due to paper jam or for any abnormality opening the paper cover may be disabled In this case do not open the paper cover f...

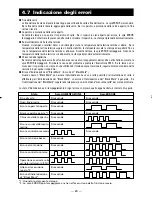
Страница 23: ...on allows checking whether or not the printer is receiving data correctly Set paper to the printer and keep the paper cover open With the FEED switch pressed and held turn the printer power on and the...

Страница 24: ...e of the trouble and press the FEED switch If the blade does not move and the cover does not open yet even in the above procedure follow the procedure in section 4 4 to open the paper cover Black Mark...

Страница 25: ...21 5 OTHER 5 1 External Views and Dimensions Unit millimeter Built in Power Supply Type AC Adapter Type 195 121 84 145 159 86 145 195...

Страница 26: ...d Valid Memory SW2 3 Spool print Invalid Valid Memory SW2 4 Full col printing CBM EPSON Memory SW2 5 Resume aft PE Next Top Memory SW2 6 Paper width 80 mm 58 mm Memory SW2 7 Reserved Fixed Memory SW2...

Страница 27: ...W1 Memory SW2 Memory SW3 Memory SW4 Write Factory Setting Memory SW1 repeatedly When the memory switch you want to change is reached press and hold the FEED switch for more than 2 seconds 3 Selecting...

Страница 28: ...to Write Factory Setting in the above procedure Here open the paper cover and press and hold the FEED switch till buzzer sounds This allows the printer to return to the initial state All the memory s...

Страница 29: ...25...

Страница 30: ...FRAN AIS...

Страница 31: ...4 Installation de l imprimante 14 3 5 Adaptateur pour le rouleau de papier de 58 mm de largeur 14 3 6 R glage du contact DIP 15 3 7 R glage du capteur de fin du papier proche 16 4 ENTRETIEN ET D PANN...

Страница 32: ...n est pas responsable d aucun dommage attribuable une op ration manipulation incorrecte ou un environnement inexact d op ration qui ne sont pas indiqu s dedans ce manuel Les donn es sont pr vues fond...

Страница 33: ...les op rateurs ou des tiers ou d endommager les biens mat riels Ce qui suit indique le degr de danger et de dommage encouru si l imprimante n est pas utilis e correctement sans tenir compte des instru...

Страница 34: ...e liquide sur l imprimante Un objet m tallique tomb accidentellement dans l imprimante risque de provoquer une panne un incendie ou une lectrocution Dans ce cas mettez imm diatement l imprimante hors...

Страница 35: ...s d objet sur le cordon d alimentation Ne placez pas l imprimante dans un endroit o le cordon risque d tre pi tin N utilisez pas et ne transportez pas l imprimante avec le cordon d alimentation pli to...

Страница 36: ...e L imprimante peut avoir un effet n gatif sur les transmissions radio ou t l vis es Dans certains cas galement les appareils lectriques proches peuvent influencer l imprimante et causer des erreurs d...

Страница 37: ...la t te thermique Ne touchez pas aux pi ces mobiles par ex le massicot les engrenages les pi ces lectriques actives lorsque l imprimante fonctionne En cas de probl me ne tentez pas de r parer l impri...

Страница 38: ...r 1 Mode d emploi ce manuel 1 Imprimante Type d adapteur c a Rouleau de papier chantillon Adaptateur pour le rouleau de papier de 58 mm de largeur Mode d emploi ce manuel Adaptateur secteur Type d ada...

Страница 39: ...83 mm paisseur papier 65 75 m Interfaces S rielle conforme RS 232C Parall le conforme IEEE 1284 USB Interface du tiroir caisse 2 tiroirs caisse sont support s Tampon d entr e 4K octets 45 octets Tensi...

Страница 40: ...ecteur c a Type alimentation int gr e Vue de face Vue arri re Entr e c a DEL ALIMENTATION DEL ERREUR Interrputeur ALIMENTATION FEED Connecteur d interface s riel parall le etc Connecteur d interface d...

Страница 41: ...alimentation Adaptateur secteur C t plat ATTENTION Utilisez uniquement l adapteur c a indiqu avec l imprimante En d branchant un c ble ne tirez pas par le c ble Tenez toujours par la fiche Maintenez...

Страница 42: ...introduisez la dans le connecteur d interface Dans le cas du type d alimentation incorpor e enlevez l unit de la bo te d alimentation avant la connexion ATTENTION En d branchant le c ble tenez toujour...

Страница 43: ...istiques lectriques 1 Tension de commande 24 VCC 2 Courant de commande Approx 1 A max ne doit pas exc der 510 ms 3 Signal DRSW Niveaux de signal L 0 0 5 V H 3 5 V 3 Signal DRSW Le statut du signal DRS...

Страница 44: ...alimentation int gr e Position horizontale Position verticale 3 5 Adaptateur pour le rouleau de papier de 58 mm de largeur 1 Mettez l imprimante hors tension 2 Ouvrez le capot de papier 3 Attachez l A...

Страница 45: ...enclenchement Invalide OFF S lection du taux de baud No de contact 6 7 2400 OFF OFF 4800 ON OFF 9600 OFF ON 19200 ON ON 38400 bps peuvent galement tre choisis par une commande etc 3 6 R glage du conta...

Страница 46: ...u le diam tre du rouleau de papier comme indiqu dans figure suivante Position du capteur M thode d installation Diam tre interne de rouleau de papier mm 1 22 2 Horizontal 24 3 27 4 27 5 Vertical Fix a...

Страница 47: ...ce centrale du capot pour le fermer fermement AVERTISSEMENT En ouvrant le capot faites bien attention ne pas toucher la t te d impression ou la lame du massicot Autrement une br lure ou une blessure d...

Страница 48: ...uvert Si la lame du massicot reste en saillie cause d un bourrage papier ou de n importe quelle anomalie l ouverture du capot de papier peut tre annul e Dans ce cas n ouvrez pas le capot de papier en...

Страница 49: ...r l imprimante et maintenez le capot de papier ouvert Avec l interrupteur d avance FEED press mettez l imprimante sous tension puis fermez le capot de papier Celle ci imprime tout d abord HEX Dump pri...

Страница 50: ...et appuyez sur l interrupteur d avance FEED Si la lame ne se d place pas et le capot ne s ouvre pas m me avec le proc d ci dessus suivez la m thode indiqu e dans la section 4 4 pour ouvrir le capot d...

Страница 51: ...21 5 DIVERS 5 1 Vues et dimensions externes Unit mm Type alimentation int gr e Type adaptateur secteur c a 195 121 84 145 159 86 145 195...

Страница 52: ...Impression Spool Invalide Valide M moire SW2 4 Impression toutes couleurs CBM EPSON M moire SW2 5 Reprendre apr s PE Prochain Haut M moire SW2 6 Largeur de papier 80 mm 58 mm M moire SW2 7 R serv Fix...

Страница 53: ...e l usine SW1 M moire plusieurs reprises Quand le commutateur de m moire que vous voulez changer est indiqu maintenez press l interrupteur d avance FEED pendant plus de 2 secondes 3 S lection de chaqu...

Страница 54: ...n e ci dessus Dans ce cas ouvrez le capot du papier et maintenez press l interrupteur d avance FEED jusqu ce que le buzzer sonne Ceci permettra l imprimante de retourner l tat initial Toutes les posit...

Страница 55: ...25...

Страница 56: ...DEUTSCH...

Страница 57: ...des Druckers 14 3 5 Trennvorrichtung f r 58 mm Papierrollen 14 3 6 Einstellen der DIP Schalter 15 3 7 Einstellen des Papiermengensensors 16 4 WARTUNG UND FEHLERBEHEBUNG 17 4 1 Einsetzen Auswechseln v...

Страница 58: ...e der in diesem Handbuch genannten F lle darf das Ger t nicht selbst gewartet zerlegt oder repariert werden Beachten Sie dass CBM keine Haftung f r jegliche St rungen bernimmt die infolge von unsachge...

Страница 59: ...chstehend wird der Grad der Gefahren und Sch den beschrieben die bei unsachgem em Betrieb des Druckers oder Nichtbeachtung der durch die Warnsymbole gekennzeichneten Hinweise entstehen k nnen Dieses S...

Страница 60: ...aus Metall in den Drucker geraten kann es zum Ausfall des Druckers Br nden oder elektrischen Sch den kommen In derartigen F llen ist der Drucker sofort abzuschalten und vom Netz zu trennen Wenden Sie...

Страница 61: ...en Sie keine Gegenst nde auf das Netzkabel Stellen Sie den Drucker so auf dass nicht auf das Netzkabel getreten wird Achten Sie darauf dass das Netzkabel beim Benutzen und Transportieren des Druckers...

Страница 62: ...ten die starke St rstrahlung abgeben Der Drucker kann den Radio oder Fernsehempfang in der Umgebung beeintr chtigen Es besteht auch die M glichkeit dass benachbarte elektrische Ger te den Drucker bee...

Страница 63: ...h uses ein weiches trockenes Tuch verwenden Hartn ckige Verschmutzungen mit einem weichen Tuch entfernen das leicht mit Wasser befeuchtet wurde Verwenden Sie keine fl chtigen organischen L sungsmittel...

Страница 64: ...utzerhandbuch das vorliegende Handbuch 1 Drucker externes Netzteil Probe Papierrolle Trennvorrichtung f r 58 mm Papierrollen Benutzerhandbuch das vorliegende Handbuch Netzteil externes Netzteil Netzka...

Страница 65: ...Seriell RS 232C kompatibel Parallel IEEE 1284 kompatibel USB Geldlade Kickout Buchse 2 F cher werden unterst tzt Eingangspufferspeicher 4K Bytes 45 Bytes Versorgungsspannung 24 V Gleichstrom 7 Leistu...

Страница 66: ...m Netzteil Ausf hrung mit integriertem Netzteil Vorderansicht R ckansicht Netzeingang BETRIEBS LED FEHLER LED Vorschubtaste FEED Schnittstellenanschluss seriell parallel usw Geldlade Kickout Buchse Ne...

Страница 67: ...VORSICHT Verwenden Sie f r den Drucker ausschlie lich das angegebene externe Netzteil Ziehen Sie beim Abziehen von Kabeln nicht am Kabel selbst sondern stets am Stecker Das Netzteil darf sich nicht i...

Страница 68: ...dnungsgem aus und verbinden Sie es mit dem Schnittstellenanschluss Bei der Ausf hrung mit integrierter Stromversorgung ist die Stromeinheit vor dem Anschlie en zu entfernen VORSICHT Beim Abziehen des...

Страница 69: ...trische Eigenschaften 1 Treiberspannung 24 V Gleichstrom 2 Treiberstrom Ca 1 A max darf 510 ms nicht berschreiten 3 DRSW Signal Signalpegel L 0 bis 0 5 V H 3 bis 5 V 3 DRSW Signal Der DRSW Signalstatu...

Страница 70: ...tem Netzteil Horizontale Position Vertikale Position 3 5 Trennvorrichtung f r 58 mm Papierrollen 1 Schalten Sie den Drucker aus 2 ffnen Sie die Papierabdeckung 3 Setzen Sie die mitgelieferte Trennvorr...

Страница 71: ...IT Reset Ung ltig AUS Ausw hlen der Baudrate Schalterposition 6 7 2400 OFF OFF 4800 ON OFF 9600 OFF ON 19200 ON ON Der Wert von 38 400 Bit s Sekunde kann auch ber Befehle oder sonstig aktiviert werden...

Страница 72: ...er der Papierrolle ab siehe nachstehende Abbildung Sensorposition Aufstellung Papierrollen Innendurchmesser mm 1 22 2 Horizontal 24 3 27 4 27 5 Vertikal Wandmontage 24 6 f22 VORSICHT Die angegebene Re...

Страница 73: ...ei ge ffneter Papierabdeckung nicht den Druckkopf oder das Papiermesser zu ber hren Andernfalls k nnten Sie sich die H nde verbrennen oder sonstig verletzen 4 2 Beseitigen von Papierstaus 1 Schalten S...

Страница 74: ...enst nden 4 4 Vorgehensweise wenn sich die Papierabdeckung nicht ffnen l sst Wenn das Papiermesser aufgrund einer St rung blockiert ist kann die Papierabdeckung nicht angehoben werden In diesem Fall d...

Страница 75: ...empf ngt F hren Sie Papier in den Drucker ein und lassen Sie die Papierabdeckung ge ffnet Schalten Sie den Drucker bei gedr ckter Vorschubtaste FEED ein und schlie en Sie die Papierabdeckung Der Druc...

Страница 76: ...beginnt die Fehler LED zu blinken Beseitigen Sie die Fehlerursache und bet tigen Sie anschlie end die Vorschubtaste FEED Wenn das Messer blockiert bleibt und die Abdeckung sich nicht wie oben beschri...

Страница 77: ...21 5 SONSTIGES 5 1 u ere Ansicht und Abmessungen Einheit Millimeter Ausf hrung mit integriertem Netzteil Ausf hrung mit externem Netzteil 195 121 84 145 159 86 145 195...

Страница 78: ...tischer Papierschneider Ung ltig G ltig Speicher SW2 3 Spool Druck Ung ltig G ltig Speicher SW2 4 Vollfarbdruck CBM EPSON Speicher SW2 5 Nach PE forts N chste Oben Speicher SW2 6 Papierbreite 80 mm 58...

Страница 79: ...icher SW2 Speicher SW3 Speicher SW4 Schreiben Werkseinstellung Speicher SW1 ausgedruckt Wenn der gew nschte Speicher Switch erreicht ist bet tigen Sie die Vorschubtaste FEED und halten Sie sie f r meh...

Страница 80: ...en Sie wie zuvor beschrieben zum Eintrag Schreiben Werkseinstellung ffnen Sie anschlie end die Papierabdeckung bet tigen Sie die Vorschubtaste FEED und halten Sie sie gedr ckt Daraufhin wird der Druck...

Страница 81: ...25...

Страница 82: ...ITALIANO...

Страница 83: ...ante 14 3 5 Divisorio per il rotolo di carta da 58 mm 14 3 6 Regolazione del contatto DIP 15 3 7 Regolazione del sensore di quasi fine carta 16 4 MANUTENZIONE E ASSISTENZA 17 4 1 Sistemazione sostituz...

Страница 84: ...taggio o riparazione del prodotto CBM non sar responsabile per qualsiasi tipo di danno riconducibile al funzionamento trattamento non corretto o all utilizzo in ambienti inadeguati non specificati in...

Страница 85: ...dono una stretta osservanza Quanto segue la descrizione del livello di rischio e di danno che potrebbe verificarsi se la stampante non viene azionata correttamente ignorando le istruzioni fornite dai...

Страница 86: ...metallico se lasciato accidentalmente cadere nella stampante pu provocare il malfunzionamento della stessa incendio o scosse elettriche Nel caso in cui si verificasse questa evenienza spegnere immedi...

Страница 87: ...ione Non sistemare la stampante in un luogo dove il cavo di alimentazione potrebbe essere calpestato Non usare o trasportare la stampante con il cavo di alimentazione piegato attorcigliato o tirato No...

Страница 88: ...ampante potrebbe avere un effetto negativo sulle trasmissioni radio o TV In alcuni casi gli apparecchi elettrici potrebbero influenzare in modo negativo la stampante causando errori di dati o malfunzi...

Страница 89: ...a della testina termica Non toccate alle parti mobili ad es la taglierina gli ingranaggi le parti elettriche attive quando la stampante funziona In caso di problemi non cercare di riparare la stampant...

Страница 90: ...uale dell Utente questo manuale 1 Stampante Tipo di adattatore c a Rotolo di carta campione Divisorio per il rotolo di carta da 58 mm di larghezza Manuale dell Utente questo manuale Adattatore c a Tip...

Страница 91: ...75 m Interfaccia Seriale conforme a RS 232C Parallela conforme a IEEE 1284 USB Interfaccia cassetto 2 cassetti cassa sono sopportati Buffer di input 4K bytes 45 bytes Tensione di alimentazione 24 V c...

Страница 92: ...imentazione integrata Vista frontale Vista posteriore Presa d ingresso c a LED ALIMENTAZIONE LED ERRORE Interruttore AVANZAMENTO FEED Connettore di interfaccia seriale parallela ecc Connettore di inte...

Страница 93: ...Connettore di alimentazione Adattatore c a Lato piatto ATTENZIONE Utilizzare solo l adattatore c a indicato con la stampante Per scollegare il cavo di alimentazione tirare lo stesso sempre tramite la...

Страница 94: ...ia ed introdurlo nel connettore di interfaccia Nel caso del tipo con alimentazione integrata rimuovere l unit della scatola di alimentazione prima del collegamento ATTENZIONE Quando si scollega il cav...

Страница 95: ...che 1 Tensione di comando 24 VCC 2 Corrente di comando Mass circa 1 A non dovr superare I 510 ms 3 Segnale DRSW Livelli segnale L 0 a 0 5 V H 3 a 5 V 3 Segnale DRSW Lo stato del segnale DRSW pu essere...

Страница 96: ...ampante verticalmente con l alimentazione integrata Posizione orizzontale Posizione verticale 3 5 Divisorio per il rotolo di carta da 58 mm 1 Spegnere la stampante 2 Aprire il coperchio di carta 3 Att...

Страница 97: ...ON 8 INIT Ripristino Invalido OFF Selezione del baud rate No contatto 6 7 2400 OFF OFF 4800 ON OFF 9600 OFF ON 19200 ON ON 38400 bps possono anche essere selezionati da un comando software 3 6 Regolaz...

Страница 98: ...otolo di carta cos indicato nella figura seguente Posizione del sensore Metodo di sistemazione Diametro interno di rotolo di carta mm 1 22 2 Orizzontale 24 3 27 4 27 5 24 6 22 ATTENZIONE Il livello di...

Страница 99: ...rte centrale del coperchio per chiuderlo fermamente AVVERTENZA Quando si apre il coperchio fare bene attenzione a non toccare la testina termica o la lama della taglierina Altrimenti un ustione o una...

Страница 100: ...sere aperto Se la lama della taglierina resta sporgentea causa di un inceppamento della carta o qualunque anomalia l apertura del coperchio a protezione della carta pu non essere attuabile In questo c...

Страница 101: ...a carta nella stampante e mantenere il coperchio aperto Con l interruttore di avanzamento FEED premuto accendere la stampante poi chiudere il coperchio La stampante prima stampa HEX Dump print mode Me...

Страница 102: ...liminare la causa del problema e premere l interruttore FEED Se la lama non si muove ed il coperchio non si apre anche utilizzando il metodo sopra menzionato seguire il metodo indicato nella sezione 4...

Страница 103: ...21 5 ALTRI 5 1 Viste e dimensioni esterne Unit mm Tipo con alimentazione integrata Tipo con adattatore c a 195 121 84 145 159 86 145 195...

Страница 104: ...valido Valido SW2 3 Memoria Stampa Spool Invalido Valido SW2 4 Memoria Stampa tutti colori CBM EPSON SW2 5 Memoria Riprendere dopo PE Prossimo Alto SW2 6 Memoria Larghezza carta 80 mm 58 mm SW2 7 Memo...

Страница 105: ...a SW1 Memoria varie volte Quando il microinterruttore di memoria che volete cambiare viene indicato mantenere premuto l interruttore di avanzamento FEED per pi di 2 secondi 3 Selezione di ogni voce de...

Страница 106: ...crittura Regolazione in fabbrica del metodo citato sopra In questo caso aprite il coperchio della carta e mantenete premuto l interruttore di avanzamento FEED sino a che venga attivato il cicalino Que...

Страница 107: ...25...

Страница 108: ...ESPA OL...

Страница 109: ...ora 14 3 5 Instalaci n del Separador para Rollo de Papel de 58 mm de Anchura 14 3 6 Ajuste de los DIP Switches 15 3 7 Ajuste del Sensor de Proximidad de Fin de Papel 16 4 MANTENIMIENTO Y LOCALIZACION...

Страница 110: ...e desmontar o reparar este producto CBM no es responsable por ning n da o atribuible a una operaci n manejo incorrecto o condiciones ambientales inadecuadas que no se especifiquen en este manual Los d...

Страница 111: ...s que deben observarse estrictamente A continuaci n se describe el grado de peligro y los da os que podr an producirse si la impresora no es utilizada de la forma correcta o si se ignoran las instrucc...

Страница 112: ...esora Un objeto met lico que caiga por accidente en el interior de la impresora puede causar aver as un incendio o una descarga el ctrica Si ocurriese apague inmediatamente la impresora desench fela d...

Страница 113: ...ma del cable de alimentaci n No coloque la impresora donde el cable de alimentaci n pueda ser pisado No utilice ni traslade la impresora con su cable de alimentaci n doblado retorcido o estirado No in...

Страница 114: ...intenso La impresora puede causar un efecto adverso en las emisiones de radio y TV cercadas Tambi n pueden haber casos en que los aparatos el ctricos cercanos afecten adversamente a la impresora caus...

Страница 115: ...jemplo el cortador de papel los engranajes o las piezas el ctricas con corriente mientras la impresora est funcionando En el caso de problemas no intente reparar la impresora Solicite la reparaci n al...

Страница 116: ...esora Modelo con adaptador de CA Rollo de papel de muestra Separador para rollo de papel de 58 mm de anchura Manual de usuario Este manual Adaptador de CA Modelo con adaptador de CA Cable de alimentac...

Страница 117: ...mm 83 mm Espesor de papel 65 75 m Interfaz Serie cumple con RS 232C Paralelo cumple con IEEE 1284 USB Interfaz de caj n portamonedas Se soporta 2 cajones portamonedas Memoria buffer 4K bytes 45 bytes...

Страница 118: ...o con Fuente de Alimentaci n Incorporada Vista frontal Vista trasera Entrada de CA POWER LED ERROR LED Pulsador FEED Conector de interfaz Serie paralelo etc Conector de interfaz del caj n portamonedas...

Страница 119: ...corporada Conector de alimentaci n Adaptador de CA Lado plano PRECAUCION Use solamente el adaptador de CA especificado con la impresora Cuando desconecte un cable no tire de l tire siempre del enchufe...

Страница 120: ...terminal del cable de interfaz e inserte en el conector de interfaz En caso del modelo con fuente de alimentaci n incorporada retire la caja de alimentaci n antes de la conexi n PRECAUCION Cuando des...

Страница 121: ...cter sticas el ctricas 1 Tensi n de activaci n 24 V CC 2 Corriente de activaci n Aproximadamente 1A m ximo no deber exceder de 510 ms 3 Se al DRSW Niveles de se ales L 0 a 0 5 V H 3 a 5 V 3 Se al DRSW...

Страница 122: ...fuente de alimentaci n incorporada Posici n horizontal Posici n vertical 3 5 Instalaci n del Separador para Rollo de Papel de 58 mm de Anchura 1 Desconecte la alimentaci n de la impresora 2 Abra la cu...

Страница 123: ...set Inv lido OFF Selecci n de velocidad de transmisi n en baudios No de Conmutador 6 7 2400 OFF OFF 4800 ON OFF 9600 OFF ON 19200 ON ON Tambi n se puede seleccionar 38400 bps v a comando etc 3 6 Ajust...

Страница 124: ...o vertical o el di metro del rollo de papel como se muestra en la siguiente figura Posici n del Sensor M todo de Instalaci n Di metro Externo del Rollo de Papel mm 1 22 2 Horizontal 24 3 27 4 27 5 Ver...

Страница 125: ...ta para cerrarla firmemente ADVERTENCIA Cuando abra la cubierta de papel tenga cuidado de no tocar el cabezal de impresi n o la cuchilla del cortador De lo contrario podr a quemarse o sufrir una lesi...

Страница 126: ...co 4 4 Cuando no se Puede Abrir la Cubierta de Papel Si la cuchilla del cortador permanece extendida debido a un atasco de papel o a otra incidencia puede que sea imposible abrir la cubierta de papel...

Страница 127: ...s correctamente Coloque papel en la impresora y mantenga la cubierta de papel abierta Con el pulsador FEED mantenido pulsado conecte la alimentaci n de la impresora y luego cierre la cubierta de papel...

Страница 128: ...ador FEED Si la cuchilla no se mueve y la cubierta no se abre incluso despu s del procedimiento anterior siga el procedimiento de la secci n 4 4 para abrir la cubierta de papel Error de detecci n de M...

Страница 129: ...21 5 OTROS 5 1 Vistas Externas y Dimensiones Unidad mil metro Modelo con Adaptador de CA Modelo con Fuente de Alimentaci n Incorporada 195 121 84 145 159 86 145 195...

Страница 130: ...modo spool Inv lido V lido SW2 4 de memoria Impresi n de toda la columna CBM EPSON SW2 5 de memoria Reanudaci n despu s de PE Siguiente Top SW2 6 de memoria Ancho del papel 80 mm 58 mm SW2 7 de memori...

Страница 131: ...W4 Write Factory Setting Memory SW1 repetidamente Al llegar al memory switch que desea cambiar mantenga pulsado el pulsador FEED por m s de 2 segundos 3 Selecci n de las opciones de cada memory switch...

Страница 132: ...tory Setting Grabar Ajustes F brica del procedimiento anterior Aqu abra la cubierta de papel y mantenga pulsado el pulsador FEED hasta que suene el zumbador Esto permite que la impresora retorne al es...

Страница 133: ...Information Systems Division CBM Bldg 5 68 10 Nakano Nakano ku Tokyo 164 0001 Japan Tel 81 3 5345 7540 Fax 81 3 5345 7541 01EU 0309 Printed in Japan...

Отзывы: