background image

148

3.10  Einstellungen für die Funktion „Long Life 

Printing“ (LLP)

Diese Funktion kann die Lebensdauer des Druckkopfs verlängern, indem der Druck, 
der vom Druckkopf auf das Papier aufgebracht wird, reduziert wird und damit der 
Abrieb des Hitzeschutzes. 
Die Funktion „Long Life Printing“ (LLP) wird durch Ändern der Hebelschalterposition 
unter der Papierabdeckung aktiviert.

1.  Schalten Sie das Gerät aus.
2.  Klappen Sie den Abdeckung-Öffnen-Hebel nach oben, um die Papierabdeckung zu 

öffnen.

3.  Drücken Sie die Hebelschalter an beiden Seiten mit der Spitze eines Schraubendrehers 

in die Pfeilrichtung.

Drücken Sie den linken und rechten Hebelschalter nacheinander von der Standardposition in 
die LLP-Position.

4.  Schließen Sie die Papierabdeckung, bis sie mit einem Klick fest einrastet.

Standard

(Hebelschalter Frontansicht)

LLP

 VORSICHT

 Achten Sie beim Öffnen der Papierabdeckung darauf, nicht den Zugang zur Klinge des auto-

matischen Papierschneiders zu berühren.

 Unmittelbar nach dem Drucken ist der Druckkopf noch sehr heiß. Achten Sie darauf, ihn nicht 

mit Ihren Händen zu berühren.

 Vermeiden Sie es, den Druckkopf mit bloßen Händen oder Metallgegenständen zu berühren.

 Sowohl der rechte als auch der linke Hebelschalter müssen in dieselbe Position gebracht 

werden.

 Der Ausdruck erscheint möglicherweise schwacher, wenn diese Einstellung aktiviert wurde. 

Erhöhen Sie im Bedarfsfall die Druckdichte oder verwenden Sie ein Papier mit guten Farben-

twicklungseigenschaften.

 Diese Funktion reduziert die physikalische Reibung durch Verringerung des Drucks des 

Druckkopfs, garantiert aber keinen Reibungswiderstand für alle minderwertigen Papiersorten.


  Siehe VORSICHTSMASSNAHMEN BEI DER HANDHABUNG DES DRUCKERS 

Содержание CT-E651

Страница 1: ...LINE THERMAL PRINTER MODEL CT E651 User s Manual Mode d emploi Benutzerhandbuch Manuale dell utente Manual de Usuario...

Страница 2: ...02 96 CE sobre residuos de aparatos el ctricos y electr nicos RAEE vigente nicamente en la Uni n Europea Ge Fr Sp It Se desiderate gettare via questo prodotto non mescolatelo ai rifiuti generici di ca...

Страница 3: ...area is likely to cause interference in which case the user at his ownexpense will be required to take whatever measures may be necessary to correct theinterference CAUTION Use shielded cable for thi...

Страница 4: ...4 ENGLISH...

Страница 5: ...attributable to incorrect operation handling or improper operating environments that are not specified in this manual Data is basically for temporary use and not stored for an extended period of time...

Страница 6: ...e is a registered trademark of DENSO WAVE INCORPORATED Ethernet is a registered trademark of Fuji Xerox Corporation Bluetooth is a registered trademark of Bluetooth SIG Inc CITIZEN is a registered tra...

Страница 7: ...of hazard and damage that could occur if the printer is improperly operated by ignoring the instructions indicated by the warning symbols Be sure to read this information carefully WARNING Neglecting...

Страница 8: ...the printer Dropping a metallic foreign object into the printer may cause printer fail ure fire or electric shock Should it occur immediately turn the printer off unplug it from the supply outlet and...

Страница 9: ...te cores or other anti noise devices Avoid using the printer with a device that is a strong source of noise The printer may have an adverse effect on nearby radio or TV transmis sions There may also b...

Страница 10: ...power cord to overheat catch fire or the circuit breaker to trip Do not allow anything to rest on the power cord Do not place the printer where the power cord may be stepped on Do not subject the powe...

Страница 11: ...during printing Avoid operating the printer without paper properly loaded Avoid the use of paper not complying with specifications May result in poor print quality Avoid using torn pieces of paper or...

Страница 12: ...smoke an odd smell or unusual noise while printing immediately abort the current print session and unplug the printer from the electric outlet DAILY MAINTENANCE Observe the following precautions for...

Страница 13: ...inter 35 3 7 Adjusting the Paper Near end Sensor 36 3 8 Loading Paper 37 3 9 58 mm Width Roll Paper Partition 39 3 10 Setting the Long Life Printing LLP Function 40 3 11 Mounting the Cable Cover 41 3...

Страница 14: ...face included as standard Interchangeable interface board Printer status and errors indicated by five LEDs Built in drawer kick interface USB linked power OFF function available 16 level greyscale and...

Страница 15: ...owing items are included with your printer NAME QUAN TITY ILLUSTRATION Printer 1 AC Adapter 37AD5 1 AC power cord 1 Partition 1 Cable clamp 1 Cable cover 1 Sample paper roll 1 roll Quick Start Guide 2...

Страница 16: ...dots 52 5 mm 420 dots 48 75 m 390 dots 48 mm 384 dots 45 mm 360 dots factory default 72 mm Dot density 8 8 dots mm 203 dpi Print Speed 300 mm sec maximum speed print density level 100 2400 dot lines s...

Страница 17: ...2 W or less USB linked power OFF state AC Adapter 37AD5 Rated input AC 100 to 240 V 50 60 Hz 150 VA Rated output DC 24 V 2 1 A Weight Approximately 1 3 kg Outside dimensions 125 W 165 D 108 H mm Opera...

Страница 18: ...r open lever Use to open the paper cover 3 POWER button Hold down two or three seconds to switch power on or off 4 FEED button Press this button to feed paper In case of a cutter error press the FEED...

Страница 19: ...ght or flash when other abnormalities are detected COVER LED Green Lights or flashes when an open paper cover is detected May also light or flash when other abnormalities are detected SERVICE LED Oran...

Страница 20: ...the end of the paper is near 3 Button to change paper near end sensor Change the position of the paper near end sensor to match the paper being used Refer to 3 7 Adjusting the Paper Near end Sensor 4...

Страница 21: ...on on how to save data refer to the Command Reference Memory switch Setting of various kinds of functions can be stored in memory Settings remain stored in the memory even if the printer is turned off...

Страница 22: ...be specified CAUTION Remove the partially cut paper before performing back feed for starting printing The cut paper may be torn off in the next printing process which may cause a problem Auto side shi...

Страница 23: ...t Use an AC power source that does not also supply power to equipment that generates elec tromagnetic noise Pulling on the AC power cord may damage it cause a fire electric shock or break a wire If a...

Страница 24: ...ecting the cable always hold the connector Be careful not to insert the USB cable into the cash drawer kick out connector To connect more than one printer to a single computer by USB you must change t...

Страница 25: ...tion layout shown below 9 pin female 9 pin female cable Printer PC Signal Pin Pin Signal RXD 2 2 RXD TXD 3 3 TXD DTR 4 4 DTR SG 5 5 SG DSR 6 6 DSR RTS 7 7 RTS CTS 8 8 CTS CAUTION Place the interface c...

Страница 26: ...e Status Description LED Status Detection standby Discoverable Standing by for detection and connection Connection standby Connectable Standing by for connection iOS connection Data session un opened...

Страница 27: ...ttings depends on whether SSP secure simple pairing is enabled on the host PC If SSP is enabled on the host PC pairing can be achieved without additional opera tions If SSP is disabled on the host PC...

Страница 28: ...hen you want Bluetooth communication to cut off after printing is complete When there are multiple iOS devices printing on the same printer Under such conditions disable auto reconnection Enabling and...

Страница 29: ...ring setting mode Hold down the panel button A buzzer will sound once to indicate that setting mode has been entered You can use setting mode to read factory settings If you do not perform any operati...

Страница 30: ...etwork con nection Lit Unlit Board is connected with a printer Connected by wired LAN Lit Flashing 1 second cycle Getting an IP address from the DHCP server over wired LAN Wired LAN operation Lit Lit...

Страница 31: ...rd with a web browser and change board settings Starting up Web Manager 1 Start up a web browser 2 In the address field input the board s IP address and then press Enter HOME Screen This is the Web ma...

Страница 32: ...settings User Name Input a board administrator user name Initial setting admin Password Input the administrator user password Initial setting admin Login button After inputting an administrator user...

Страница 33: ...r kick out cable to this connector Do not connect a telephone line Signals cannot be output from the cash drawer kick out connector while printing Hold the connector of the drawer kick cable perpendic...

Страница 34: ...l Status can be tested by commands 4 Drive circuit Cash drawer kick out connector Cash drawer open close switch Shielded Printer Cash drawer CAUTION Cash drawers 1 and 2 cannot be operated at the same...

Страница 35: ...position CAUTION Do not use the printer under the following conditions Avoid locations subject to vibration or instability Locations that are very dirty or dusty Avoid locations where the printer is n...

Страница 36: ...s diameters of the paper roll used Unit mm Sensor position Paper roll outer diameter when near end is detected Exterior interior diameter of core of paper roll used 1 Approximately 22 0 18 12 2 Approx...

Страница 37: ...at you do not pinch your fingers in the gap above the top of the lever 3 Load the paper roll so that the printable side of the paper is facing up as shown by arrow A 4 Pull a few centimeters of paper...

Страница 38: ...ts Always use the specified types of paper rolls Confirm that the paper roll is set correctly If the paper is skewed and not coming straight out of the paper cover open it and straighten the paper Alw...

Страница 39: ...al Setting of Memory Switches CAUTION When opening the paper cover be careful not to touch the entrance of the blade of the auto cutter The print head is very hot immediately after printing Be careful...

Страница 40: ...y one 4 Close the paper cover firmly until it clicks Standard Projection switch front view LLP CAUTION When opening the paper cover be careful not to touch the entrance of the blade of the auto cutter...

Страница 41: ...41 3 11 Mounting the Cable Cover 1 Remove the screw for the ground wire 2 Screw the screw for the ground wire into the cable cover and the body of the printer 1 2 1 Screw for ground wire 2 Cable cover...

Страница 42: ...appear in the printouts when you are printing graphics or gradated text which require large amounts of data USB interfaces may be susceptible to the effects of electromagnetic interference from the h...

Страница 43: ...3 Wait a few minutes until the print head cools 4 Use a cotton swab dampened with ethyl alcohol to wipe off any dirt and dust that is on the print head and platen 1 2 1 Print head 2 Platen CAUTION Whe...

Страница 44: ...e cover open lever to open the paper cover 3 Remove any jammed paper including any scraps of paper Remove the paper roll that is loaded in the holder also 4 Reload the paper roll and close the paper c...

Страница 45: ...ld the FEED button and turn on the power 2 Hold the FEED button down for about one second until the buzzer sounds Release the button to start self test The printer will print its model name version me...

Страница 46: ...ver 3 The printer will print HEX dump print mode followed by the received data printed in hexadecimal numbers and some characters How to stop hexadecimal dump printing Do one of the following to stop...

Страница 47: ...couple of centimeters and then close the cover Printing restarts A command must be sent to restart printing depending on the memory switch setting Cutter error If the auto cutter cannot move because o...

Страница 48: ...4 Unlit Unlit Unlit Yes 2 Cutter locked Unlit Unlit Unlit Yes Low voltage error Unlit No High voltage error Unlit Unlit Unlit No System error Unlit Unlit Unlit No Memory error Unlit Unlit Unlit No Pri...

Страница 49: ...ng for Which Printing Speed Changes When printing for which the printing speed changes is performed white lines may be printed or paper may not be fed depending on the printing conditions To prevent t...

Страница 50: ...50 5 OTHER 5 1 External Views and Dimensions Unit mm 125 165 108...

Страница 51: ...lls HP220AB 1 F230AA P220AB Koehler KT48 FA Unit mm Max printing width 72 Paper width 80 Unit mm 0 1 Paper width 58 0 1 Printing surface Printing width 83 or less 65 85 m 48 384 dot 5 5 5 D d 3 Paper...

Страница 52: ...etting memory switches individually The printer prints Memory SW 1 and the current setting 0 off or 1 on The current settings for memory switches 7 to 13 are not printed Current memory switch Current...

Страница 53: ...witch settings are printed 10 Repeat steps 4 to 9 to change functions for a different memory switch number 11 Press the FEED button until Save To Memory is printed 12 Press the FEED button for at leas...

Страница 54: ...Invalid Valid MSW2 3 Spool Print Invalid Valid MSW2 4 Full Col Print LineFeed WaitData MSW2 5 Resume aft PE Next Top MSW2 6 Reserved Fixed MSW2 7 Reserved Fixed MSW2 8 PNE Sensor Valid Invalid MSW3 1...

Страница 55: ...00 bps 4800 bps 9600 bps 19200 bps 38400 bps 57600 bps 115200 bps MSW7 2 Data Length 8bits 7bits 8bits MSW7 3 Stop Bit 1bit 1bit 2bits MSW7 4 Parity NONE NONE ODD EVEN MSW7 5 Flow Control DTR DSR DTR...

Страница 56: ...2 Japan SJIS X0213 Japan GB18030 China KS Hangul South Korea EUC Hangul South Korea BIG5 Taiwan MSW10 1 Print Density 100 70 75 80 85 90 95 100 105 110 115 120 125 130 135 140 MSW10 2 Print Speed Leve...

Страница 57: ...57 FRAN AIS...

Страница 58: ...ble une op ration manipulation incorrecte ou un environnement d exploitation inappropri qui ne sont pas indiqu s dans ce mode d emploi Les donn es sont pr vues fondamentalement pour un usage provisoir...

Страница 59: ...st une marque d pos e de DENSO WAVE INCORPORATED Ethernet est une marque d pos e de Fuji Xerox Corporation Bluetooth est une marque commerciale d pos e de Bluetooth SIG Inc CITIZEN est une marque enre...

Страница 60: ...ndique le degr de danger et de dommage encouru si l imprimante n est pas utilis e correctement sans tenir compte des instructions indiqu es par les sym boles d avertissement Veillez lire attentivement...

Страница 61: ...trombones des pingles ou des vis dans l imprimante Ne placez pas de vase de pot de fleurs ou d objets contenant de l eau sur l imprimante Ne renversez pas de caf de boissons gazeuses ou tout autre li...

Страница 62: ...lessures La qualit de l impression peut se d t riorer N obstruez pas les orifices d a ration de l imprimante Ne placez rien sur l imprimante Ne couvrez pas et n enroulez pas l imprimante dans des v te...

Страница 63: ...e t l phonique Paratonnerre En cas de foudre une surtension de courant importante peut provoquer un incendie ou un choc lectrique Conduites d eau Les conduites d eau en plastique ne doivent pas tre ut...

Страница 64: ...ou le disjoncteur risque de se d clencher en raison d une surchauffe Ne posez aucun objet sur le cordon d alimentation Ne placez pas l imprimante un emplacement o le cordon d alimentation risque d tr...

Страница 65: ...ression vitez de faire fonctionner l imprimante sans rouleau de papier correctement charg vitez d utiliser du papier non conforme aux sp cifications Cela risque d entra ner une qualit d impression m d...

Страница 66: ...ne odeur trange ou un bruit anormal lors de l impression quittez imm diatement la session d impression en cours et d branchez l imprimante de la prise lectrique ENTRETIEN JOURNALIER Observez les pr ca...

Страница 67: ...89 3 7 R glage du capteur de fin de papier proche 90 3 8 Chargement du papier 91 3 9 S parateur pour rouleau de papier de 58 mm de large 93 3 10 R glage de la fonction Long Life Print LLP 94 3 11 Mont...

Страница 68: ...face USB incluse de s rie Carte d interface interchangeable tat de l imprimante et erreurs indiqu es par cinq DEL Interface du tiroir caisse int gr e Fonction de mise hors tension par connexion USB di...

Страница 69: ...s avec l imprimante NOM QUANTI T ILLUSTRATION Imprimante 1 Adaptateur secteur 37AD5 1 Cordon d alimentation secteur 1 S parateur 1 Serre c ble 1 Couvercle de c bles 1 Rouleau de papier chantillon 1 ro...

Страница 70: ...ions de base Rubrique Sp cifications Mod le CT E651 M thode d impression M thode d impression matricielle thermique par ligne Largeurs d impression 72 mm 576 points 68 25 mm 546 points 64 mm 512 point...

Страница 71: ...d en charge 2 tiroirs caisses Tampon d entr e 4 K octets 45 octets Tension d alimentation 24 V CC 5 Consommation Environ 50 W moyenne 2 W ou moins en veille 0 2 W ou moins tat de mise hors tension par...

Страница 72: ...ilisez ce levier pour ouvrir le capot papier 3 Touche POWER Appuyez sur cette touche pendant deux ou trois secondes pour mettre l appareil sous ou hors tension 4 Touche FEED Appuyez sur cette touche p...

Страница 73: ...ut galement s allumer ou clignoter lorsque d autres anomalies sont d tect es COVER LED Vert S allume ou clignote lorsque un capot papier ouvert est d tect Peut galement s allumer ou clignoter lorsque...

Страница 74: ...proche 3 Touche pour changer le capteur de fin de papier proche Changez la position du capteur de fin de papier proche en fonction du papier utilis Reportez vous 3 7 R glage du capteur de fin de papi...

Страница 75: ...garder des donn es reportez vous la R f rence des commandes Commutateur de m moire Le r glage de divers types de fonctions peut tre m moris Les r glages restent stock s dans la m moire m me si l impri...

Страница 76: ...sp cifi ATTENTION Retirez le papier partiellement d coup avant de faire reculer le papier pour d marrer l impres sion Le papier coup pourrait tre d chir lors de la prochaine impression et entra ner u...

Страница 77: ...Utilisez une source d alimentation secteur qui n est pas non plus utilis e pour alimenter un appareil qui g n re du bruit lectromagn tique Tirer directement sur le cordon d alimentation secteur peut...

Страница 78: ...t du c ble tenez toujours le connecteur Faites attention de ne pas ins rer le c ble USB dans le connecteur d arr t du tiroir caisse Pour connecter plus d une imprimante un seul ordinateur via USB vous...

Страница 79: ...ci dessous C ble 9 broches femelles 9 broches femelles Imprimante Ordinateur Signal Broche Broche Signal RXD 2 2 RXD TXD 3 3 TXD DTR 4 4 DTR SG 5 5 SG DSR 6 6 DSR RTS 7 7 RTS CTS 8 8 CTS ATTENTION Pla...

Страница 80: ...oritaire tat Description tat de DEL Mise en veille de d tection visible Mise en veille de la d tection et la connexion Mise en veille de connexion Connectable Mise en veille pour la connexion Connexio...

Страница 81: ...l ordinateur h te ou non l op ration requise pour configurer les r glages de couplage est diff rente Si le SSP est activ sur le PC h te le couplage peut tre termin sans op rations suppl mentaires Si...

Страница 82: ...oth se coupe une fois l impression termin e Lorsque plusieurs appareils iOS impriment sur la m me imprimante Sous de telles conditions d sactivez la reconnexion automatique Activation et d sactivation...

Страница 83: ...age Enfoncez la touche du panneau de commande Un signal sonore retentira une fois pour indiquer que le mode de r glage a t saisi Vous pouvez utiliser le mode r glages pour lire les r glages en usine S...

Страница 84: ...Allum e Clignotement cycle de 1 seconde Obtention d une adresse IP depuis le serveur DHCP sur le r seau LAN c bl Fonctionnement du r seau LAN c bl Allum e Allum e Fonctionnement du r seau en cours de...

Страница 85: ...et la modification des r glages de la carte D marrage du Gestionnaire Web 1 D marrez un navigateur Web 2 Dans le champ adresse saisissez l adresse IP de la carte puis appuyez sur Enter cran HOME Il s...

Страница 86: ...aisissez un nom d utilisateur d administrateur de la carte R glage initial admin Password Saisissez le mot de passe d utilisateur administrateur R glage initial admin Touche Login Apr s avoir saisi un...

Страница 87: ...une ligne t l phonique Les signaux ne peuvent pas tre mis par le connecteur d arr t du tiroir caisse pendant une impression Maintenez le connecteur du c ble d arr t du tiroir caisse perpendiculaire et...

Страница 88: ...avec les commandes 4 Circuit de commande Connecteur d arr t du tiroir caisse Commutateur d ouverture fermeture du tiroir caisse Blind Imprimante Tiroir caisse ATTENTION Les tiroirs caisses 1 et 2 ne p...

Страница 89: ...imprimante dans les conditions suivantes vitez les emplacements soumis des vibrations ou une certaine instabilit Dans des emplacements tr s sales ou poussi reux vitez les emplacements o l imprimante...

Страница 90: ...ur les divers diam tres des rouleaux de papier utilis s Unit mm Position du capteur Le diam tre externe du rouleau de papier lorsqu il arrive la fin est d tect Diam tre ext rieur int rieur du noyau du...

Страница 91: ...au dessus du haut du levier lorsque vous relevez le levier 3 Chargez le rouleau de papier avec la face imprimable du papier orient e vers le haut comme indiqu par la fl che A 4 Tirez quelques centim t...

Страница 92: ...les types de rouleaux de papier sp cifi s V rifiez que le rouleau de papier est install correctement Si le papier est de biais et ne sort pas droit du capot papier ouvrez ce dernier et remettez le pap...

Страница 93: ...de m moire ATTENTION Veillez ne pas toucher l orifice de la lame du syst me de d coupe automatique lorsque vous ouvrez le capot papier La t te d impression est tr s chaude imm diatement apr s l impres...

Страница 94: ...que vous entendiez un clic Standard Vue de face des commutateurs levier LLP ATTENTION Veillez ne pas toucher l orifice de la lame du syst me de d coupe automatique lorsque vous ouvrez le capot papier...

Страница 95: ...5 3 11 Montage du cache du c ble 1 Retirez la vis pour le fil de terre 2 Vissez la vis du fil de terre dans le cache du c ble et le corps de l imprimante 1 2 1 Vis pour le fil de terre 2 Cache du c bl...

Страница 96: ...ressions lors de l impression de gra phiques ou de texte avec un d grad qui n cessite de grandes quantit s de donn es Les interfaces USB peuvent tre sensibles aux effets des interf rences lectromagn t...

Страница 97: ...quelques minutes que la t te d impression refroidisse 4 Utilisez un coton tige impr gn d alcool thylique pour retirer les salet s et la pous si re de la t te d impression et du cylindre 1 2 1 T te d...

Страница 98: ...apot papier 3 Retirez le papier coinc y compris tous les morceaux de papier Retirez galement le rouleau de papier qui est charg dans le support 4 Chargez nouveau le rouleau de papier et fermez le capo...

Страница 99: ...tension 2 Maintenez enfonc e la touche FEED pendant une seconde jusqu ce que le signal sonore retentisse Rel chez la touche pour d marrer l auto test L imprimante imprime son nom de mod le la version...

Страница 100: ...3 L imprimante imprime HEX dump print mode suivi des donn es re ues sous forme de nombres hexad cimaux et de certains caract res Comment arr ter l impression d un vidage hexad cimal Proc dez de l une...

Страница 101: ...refermez le capot L impression reprend Une commande doit tre envoy e pour reprendre l impression selon le r glage du commutateur de m moire Erreur de d coupe Si le syst me de d coupe automatique ne fo...

Страница 102: ...e verrouill teinte teinte teinte Oui Erreur de basse tension teinte Non Erreur de haute tension teinte teinte teinte Non Erreur syst me teinte teinte teinte Non Erreur m moire teinte teinte teinte Non...

Страница 103: ...mpression avec des changements de vitesse d impression des lignes blanches peuvent tre imprim es ou le papier peut ne pas tre aliment en fonction des conditions d impression Pour viter de tels probl m...

Страница 104: ...104 5 DIVERS 5 1 Vues et dimensions externes Unit mm 125 165 108...

Страница 105: ...subishi Paper Mills KT48 FA de Koehler Unit mm Largeur d impression maximale 72 Largeur de papier 80 0 1 Surface d impression 83 ou moins Largeur de papier 58 0 1 Surface d impression 48 384 points pa...

Страница 106: ...r L imprimante entre en mode de r glage individuel des commutateurs de m moire L imprimante imprime Memory SW 1 et le r glage actuel 0 OFF ou 1 ON Les r glages actuels des commutateurs de m moire de 7...

Страница 107: ...nt imprim s 10 R p tez les tapes de 4 9 pour changer les fonctions pour un num ro de commuta teur de m moire diff rent 11 Appuyez sur la touche FEED jusqu ce que Save To Memory soit imprim 12 Appuyez...

Страница 108: ...ed MSW2 2 Auto Cutter Invalid Valid MSW2 3 Spool Print Invalid Valid MSW2 4 Full Col Print LineFeed WaitData MSW2 5 Resume aft PE Next Top MSW2 6 Reserved Fixed MSW2 7 Reserved Fixed MSW2 8 PNE Sensor...

Страница 109: ...0 bps 2400 bps 4800 bps 9600 bps 19200 bps 38400 bps 57600 bps 115200 bps MSW7 2 Data Length 8bits 7bits 8bits MSW7 3 Stop Bit 1bit 1bit 2bits MSW7 4 Parity NONE NONE ODD EVEN MSW7 5 Flow Control DTR...

Страница 110: ...IS CP932 Japan SJIS X0213 Japan GB18030 China KS Hangul South Korea EUC Hangul South Korea BIG5 Taiwan MSW10 1 Print Density 100 70 75 80 85 90 95 100 105 110 115 120 125 130 135 140 MSW10 2 Print Spe...

Страница 111: ...111 DEUTSCH...

Страница 112: ...unsachgem er Verwendung oder nicht geeigneter Betriebsumgebungen auftreten auch wenn in diesem Handbuch nicht darauf hingewiesen wird Daten sind im Allgemeinen f r einen tempor ren Gebrauch vorgesehe...

Страница 113: ...st eine eingetragene Marke der DENSO WAVE INCORPORATED Ethernet ist eine eingetragene Marke der Fuji Xerox Corporation Bluetooth ist eine eingetragene Marke der Bluetooth SIG Inc CITIZEN ist eine eing...

Страница 114: ...trieb des Druckers oder Nichtbeachtung der durch die Warnsymbole gekennzeichneten Hinweise entstehen k nnen Lesen Sie diese Informationen unbe dingt sorgf ltig WARNUNG Bei Nichtbeachtung derartig geke...

Страница 115: ...mern Heftklammern oder Schrauben in den Drucker fallen Stellen Sie keine Blumenvasen T pfe oder sonstige Beh lter mit Fl ssig keiten auf dem Drucker ab Achten Sie darauf dass keine Getr nke oder sonst...

Страница 116: ...ursachen Die Druckqualit t kann sich verschlechtern Die Bel ftungs ffnungen des Druckers nicht abdecken Keine Gegenst nde auf den Drucker stellen oder legen Den Drucker nicht mit T chern oder Decken a...

Страница 117: ...hr von Gasexplosionen Gasleitungen Erdungen von Telefonleitungen Blitzableiter Andernfalls besteht bei Blitzeinschl gen durch Spannungsspitzen Brand oder Stromschlaggefahr Wasserleitungen Wasserleitun...

Страница 118: ...en und in Brand geraten oder der Schutzschalter ausgel st werden Stellen Sie keine Gegenst nde auf das Netzkabel Stellen Sie den Drucker so auf dass nicht auf das Netzkabel getreten wird Das Netzkabel...

Страница 119: ...ns nicht ge ffnet werden Den Drucker nicht mit nicht ordnungsgem eingesetzter Papierrolle verwenden Kein Papier verwenden dass nicht den Spezifikationen entspricht M gliche Beeintr chtigung der Druckq...

Страница 120: ...Drucken Rauch ungew hnliche Ger che oder Ger usche entstehen brechen Sie den Druckvorgang sofort ab und ziehen Sie den Netzstecker aus der Steckdose T GLICHE WARTUNG Beachten Sie bei der t glichen Wa...

Страница 121: ...7 Einstellen des Papiermengen Sensors 144 3 8 Einlegen von Papier 145 3 9 Trennvorrichtung f r 58 mm breite Papierrollen 147 3 10 Einstellungen f r die Funktion Long Life Printing LLP 148 3 11 Anbring...

Страница 122: ...fang enthalten Austauschbare Schnittstellenkarte F nf LEDs zur Druckerstatus und Fehleranzeige Eingebaute Geldlade Kickout Schnittstelle USB verkn pfte Ausschaltfunktion verf gbar 16 stufige Graustufe...

Страница 123: ...rs dass alle nachstehend aufge f hrten Komponenten vorhanden sind NAME MENGE ABBILDUNG Drucker 1 Netzteil 37AD5 1 Netzkabel 1 Trennvorrichtung 1 Kabelklemme 1 Kabelabdeckung 1 Probe Papierrolle 1 Roll...

Страница 124: ...en Merkmal Technische Daten Modell CT E651 Druckverfahren Thermo Zeilenpunktdruck Druckbreite 72 mm 576 Punkte 68 25 mm 546 Punkte 64 mm 512 Punkte 52 5 mm 420 Punkte 48 75 m 390 Punkte 48 mm 384 Punk...

Страница 125: ...wa 50 W Durchschnitt max 2 W Standby max 0 2 W ausgeschaltete USB ver kn pfter Stromversorgung Netzteil 37AD5 Nenneingangsspannung 100 bis 240 V Wechselstrom 50 60 Hz 150 VA Nennausgangsspannung 24 V...

Страница 126: ...ebel Damit wird die Papierabdeckung ge ffnet 3 POWER Taste F r zwei oder drei Sekunden gedr ckt halten um das Ger t ein oder auszuschalten 4 FEED Taste Dr cken Sie diese Taste um den Papiervorschub zu...

Страница 127: ...n Schneidefehler Leuchtet oder blinkt ebenfalls wenn andere St rungen erkannt werden COVER LED Gr n Leuchtet oder blinkt wenn die Papierabdeckung ge ffnet ist Leuchtet oder blinkt ebenfalls wenn ander...

Страница 128: ...rmengen Sensor Passen Sie die Einstellung des Papiermengen Sensors an die St rke der verwendeten Papiersorte an Siehe 3 7 Einstellen des Papiermengen Sensors 4 Papierende Sensor PE Erkennt es wenn sic...

Страница 129: ...en Sie in der Befehlsreferenz Speicherschalter Die Einstellungen f r verschiedene Arten von Funktionen k nnen im Speicher gespeichert werden Die Einstellungen bleiben im Speicher erhalten auch wenn de...

Страница 130: ...en Sie das teilweise geschnittene Papier bevor Sie das Papier vor dem Drucken erneut einziehen Das geschnittene Papier k nnte w hrend des n chsten Vorgangs abrei en und eventuell ein Problem verursach...

Страница 131: ...lie en stets direkt am Stecker an Verwenden Sie keinen Versorgungsstromkreis der gleichzeitig Ger te speist die elektromag netische St rungen erzeugen Ziehen am Netzkabel kann eine Besch digung des Ka...

Страница 132: ...el beim Abziehen stets direkt am Stecker an Achten Sie darauf dass das USB Kabel nicht an die Geldlade Kickout Buchse angeschlossen wird Wenn Sie mehrere Drucker per USB an einen einzelnen Computer an...

Страница 133: ...n gezeigten Pinbelegung 9 Pin Buchse auf 9 Pin Buchse Kabel Drucker PC Signal Pin Pin Signal RXD 2 2 RXD TXD 3 3 TXD DTR 4 4 DTR SG 5 5 SG DSR 6 6 DSR RTS 7 7 RTS CTS 8 8 CTS VORSICHT Verlegen Sie das...

Страница 134: ...eibung LED Status Erkennungs Standby sichtbar Erkennungs und Verbindungsbereit schaft Verbindungs Standby verbindbar Verbindungsbereit schaft iOSVerbindung Keine Daten ber tragung Kommunika tion l uft...

Страница 135: ...nicht direkt zu den Kopplungseinstellungen nachdem der Drucker w hrend der Ger teerkennung ausgew hlt wurde Je nachdem ob SSP Secure Simple Pairing auf dem Host PC aktiviert ist sind unterschiedliche...

Страница 136: ...S Ger t handelt Selbst wenn es sich beim zu koppelnden Ger t um ein iOS Ger t handelt k nnen die nachfolgenden Bedingungen die Funktion automatische Verbindungswiederherstellung beeintr chtigen Wenn d...

Страница 137: ...edr ckt Es wird ein Signalton ausgegeben der darauf verweist dass in den Einstellungsmodus gewechselt wurde Im Einstellungsmodus k nnen die Werkseinstellungen angezeigt werden Wenn Sie im Einstellungs...

Страница 138: ...t Die Schnittstellenkarte ist mit dem Drucker verbunden ber verdrahtetes LAN verbunden Leuchtet Blinkt 1 Sekunden Intervall Es wird eine IP Adresse vom DHCPServer ber ein verdrahtetes LAN bezogen Verd...

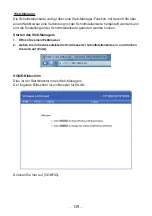
Страница 139: ...n kann und die Einstellungen der Schnittstellenkarte ge ndert werden k nnen Starten des Web Managers 1 ffnen Sie einen Webbrowser 2 Geben Sie in die Adressleiste die IP Adresse der Schnittstellenkarte...

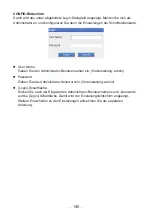
Страница 140: ...Name Geben Sie den Administrator Benutzernamen ein Voreinstellung admin Password Geben Sie das Administrator Kennwort ein Voreinstellung admin Login Schaltfl che Klicken Sie nach der Eingabe des Admin...

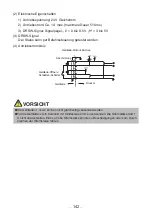
Страница 141: ...lade Kickout Kabel an die Geldlade Kickout Buchse an Schlie en Sie kein Telefonkabel an W hrend des Druckvorgangs k nnen keine Signale ber die Geldlade Kickout Buchse ausge geben werden Halten Sie den...

Страница 142: ...teuerung getestet werden 4 Antriebsstromkreis Geldlade Kickout Buchse Geldlade ffnen Schlie en Schalter Abschirmung Drucker Geldlade VORSICHT Die Geldladen 1 und 2 k nnen nicht gleichzeitig verwendet...

Страница 143: ...ingungen darf der Drucker nicht verwendet werden Standorte die Vibrationen ausgesetzt oder instabil sind Stark verschmutzte oder sehr staubhaltige Standorte Standorte an denen keine ebene Aufstellung...

Страница 144: ...ls geeigneten Sensorpositionen f r die verschiedenen Papierrollendurchmesser aufgef hrt Einheit mm Sensorposition Au endurchmesser der Papierrolle wenn der Papiervorrat zur Neige geht Au en Innenkernd...

Страница 145: ...darauf dass Sie Ihre Finger nicht in der L cke ber dem Hebel einklemmen 3 Legen Sie die Papierrolle so ein dass die zu bedruckende Papierseite nach oben zeigt Pfeil A 4 Ziehen Sie das Papier einige Ze...

Страница 146: ...enen Papierrollentypen Stellen Sie sicher dass die Einstellung dem Papierrollentyp entspricht Wenn das Papier schr g l uft und nicht gerade aus der Papierabdeckung geschoben wird ffnen Sie diese und r...

Страница 147: ...VORSICHT Achten Sie beim ffnen der Papierabdeckung darauf nicht den Zugang zur Klinge des auto matischen Papierschneiders zu ber hren Unmittelbar nach dem Drucken ist der Druckkopf noch sehr hei Achte...

Страница 148: ...einem Klick fest einrastet Standard Hebelschalter Frontansicht LLP VORSICHT Achten Sie beim ffnen der Papierabdeckung darauf nicht den Zugang zur Klinge des auto matischen Papierschneiders zu ber hre...

Страница 149: ...er Kabelabdeckung 1 Entfernen Sie die Schraube f r die Erdungsleitung 2 Schrauben Sie die Schraube f r die Erdungsleitung in die Kabelabdeckung und in das Druckergeh use 1 2 1 Schraube f r Erdungsleit...

Страница 150: ...t k nnen beim Drucken von Grafiken oder abgestuftem Text die gro e Datenmengen erfordern auf dem Ausdruck eventuell Streifen erscheinen USB Schnittstellen sind eventuell anf llig f r elektromagnetisch...

Страница 151: ...sen Sie den Druckkopf einige Minuten abk hlen 4 Befeuchten Sie ein Wattest bchen mit Ethylalkohol und wischen Sie alle Schmutz und Staubablagerungen vom Druckkopf und von der F rderwalze ab 1 2 1 Druc...

Страница 152: ...3 Entfernen Sie das gestaute Papier sowie etwaige Papierfetzen Entnehmen Sie auch die in den Halter eingesetzte Papierrolle 4 Setzen Sie die Papierrolle wieder ein und schlie en Sie die Papierabdecku...

Страница 153: ...n Sie gleichzeitig das Ger t ein 2 Halten Sie die FEED Taste f r etwa eine Sekunde gedr ckt bis der Signalton ert nt Lassen Sie die Taste los um den Selbsttest zu starten Der Drucker druckt seine Mo d...

Страница 154: ...olge HEX dump print mode die empfangenen Daten in Form von Hexadezimalzeichen sowie einige weitere Zeichen aus Abbrechen eines Hexdump Ausdrucks Der Druckvorgang kann auf eine der folgenden Arten abge...

Страница 155: ...fortgesetzt Bei entsprechender Speicherschalter Einstellung kann es erforderlich sein einen Befehl zum Fortsetzen des Druckvorgangs zu senden Cutterfehler Wenn sich der automatische Papierschneider a...

Страница 156: ...schneider blockiert Leuchtet nicht Leuchtet nicht Leuchtet nicht Ja Unterspannungs fehler Leuchtet nicht Nein berspannungs fehler Leuchtet nicht Leuchtet nicht Leuchtet nicht Nein Systemfehler Leuchte...

Страница 157: ...it sich ndernder Druckgeschwindigkeit Beim Drucken mit sich ndernder Druckgeschwindigkeit werden eventuell wei e Linien gedruckt oder das Papier wird je nach Druckbedingungen wom glich nicht vorgescho...

Страница 158: ...158 5 SONSTIGES 5 1 u ere Ansicht und Abmessungen Einheit mm 125 165 108...

Страница 159: ...Mills HP220AB 1 F230AA P220AB Koehler KT48 FA Einheit mm Max Druckbreite 72 Papierbreite 80 0 1 Druckoberfl che 83 oder weniger Papierbreite 58 0 1 Druckoberfl che 48 384 Punkte Papierdicke m 53 bis 8...

Страница 160: ...ie Papierabdeckung Der Drucker wechselt in den Modus zum individuellen Einstellen der Speicherschalter Der Drucker druckt Memory SW 1 und die aktuelle Einstellung sowie 0 aus oder 1 ein Die aktuellen...

Страница 161: ...gen werden gedruckt 10 Wiederholen Sie die Schritte 4 bis 9 um die Funktionen einer anderen Speicherschal ternummer zu ndern 11 Dr cken Sie so lange auf die FEED Taste bis Save To Memory gedruckt wird...

Страница 162: ...2 2 Auto Cutter Invalid Valid MSW2 3 Spool Print Invalid Valid MSW2 4 Full Col Print LineFeed WaitData MSW2 5 Resume aft PE Next Top MSW2 6 Reserved Fixed MSW2 7 Reserved Fixed MSW2 8 PNE Sensor Valid...

Страница 163: ...2400 bps 4800 bps 9600 bps 19200 bps 38400 bps 57600 bps 115200 bps MSW7 2 Data Length 8bits 7bits 8bits MSW7 3 Stop Bit 1bit 1bit 2bits MSW7 4 Parity NONE NONE ODD EVEN MSW7 5 Flow Control DTR DSR DT...

Страница 164: ...CP932 Japan SJIS X0213 Japan GB18030 China KS Hangul South Korea EUC Hangul South Korea BIG5 Taiwan MSW10 1 Print Density 100 70 75 80 85 90 95 100 105 110 115 120 125 130 135 140 MSW10 2 Print Speed...

Страница 165: ...165 ITALIANO...

Страница 166: ...to non corretto dell apparecchiatura o all utilizzo in ambienti non adeguati specificati in questo manuale I dati della stampante sono principalmente destinati ad un utilizzo temporaneo e non vengono...

Страница 167: ...Code un marchio registrato di DENSO WAVE INCORPORATED Ethernet un marchio registrato di Fuji Xerox Corporation Bluetooth un marchio registrato di Bluetooth SIG Inc CITIZEN un marchio registrato di Ci...

Страница 168: ...verificar si se la stampante non viene usata correttamente ignorando le istruzioni fornite dai simboli di avvertenza Leggere attentamente queste informazioni AVVERTENZA La mancata osservanza delle pre...

Страница 169: ...ar cadere oggetti metallici come graffette punti metallici o viti nella stampante Evitare di collocare vasi da fiori tazze o oggetti contenenti acqua sulla stampante Attenzione a non versare caff bibi...

Страница 170: ...orare Non ostruire le aperture di sfogo dell aria Non depositare nessun oggetto sulla stampante Non coprire o avvolgere la stampante in un panno o una coperta In tal caso si accumulerebbe calore che p...

Страница 171: ...gas Linee telefoniche Parafulmini In caso di fulmini un forte picco di corrente potrebbe provocare incendi o scosse elettriche Tubazioni dell acqua Le tubazioni idrauliche in plastica non devono esse...

Страница 172: ...o di alimenta zione che pu eventualmente prendere fuoco o far scattare l interruttore di sicurezza Assicurarsi che non ci siano oggetti sul cavo di alimentazione Non mettere la stampante in un luogo d...

Страница 173: ...di azionare la stampante senza il rotolo di carta correttamente caricato Evitare l impiego di carta non conforme alle specifiche La stampa potrebbe risultare di scarsa qualit Evitare l utilizzo di fo...

Страница 174: ...i inconsueti durante la stampa interrompere immediatamente la stampa in corso e scollegare la stampante dalla presa di alimentazione MANUTENZIONE QUOTIDIANA Osservare le precauzioni seguenti per la ma...

Страница 175: ...stampante 197 3 7 Regolazione del sensore di quasi fine carta 198 3 8 Caricamento della carta 199 3 9 Divisorio per rotolo carta di larghezza 58 mm 201 3 10 Impostazione della funzione Long Life Print...

Страница 176: ...a d interfaccia intercambiabile Lo stato e gli errori della stampante sono segnalati da cinque LED Interfaccia di estrazione cassetto incorporata Funzione di spegnimento sincronizzato USB Scala di gri...

Страница 177: ...pante contenga i seguenti articoli NOME QUAN TIT ILLUSTRAZIONE Stampante 1 Alimentatore CA 37AD5 1 Cavo di alimentazione CA 1 Divisorio 1 Morsetto per cavi 1 Copertura del cavo 1 Rotolo di carta campi...

Страница 178: ...Specifiche di base Voce Caratteristiche Modello CT E651 Metodo di stampa Stampa termica a righe di punti Larghezze di stampa 72 mm 576 punti 68 25 mm 546 punti 64 mm 512 punti 52 5 mm 420 punti 48 75...

Страница 179: ...Tensione di alimen tazione 24 V CC 5 Consumo di corrente Circa 50 W media 2 W o meno standby 0 2 W o meno modalit di spegnimento sincronizzato USB Alimentatore CA 37AD5 Tensione nominale di ingresso...

Страница 180: ...erchio Utilizzare la leva per aprire il coperchio carta 3 Pulsante POWER Tenere premuto per due o tre secondi per accendere o spegnere la stampante 4 Pulsante FEED Premere il pulsante per fare avanzar...

Страница 181: ...peggiare quando sono rilevate altre anomali COVER LED Verde Si illumina o lampeggia se il coperchio carta aperto Pu illuminarsi o lampeggiare quando sono rilevate altre anomali SERVICE LED Arancione L...

Страница 182: ...a carta 3 Pulsante per cambio sensore di quasi fine carta Cambiare la posizione del sensore di quasi fine carta per confrontare la carta utilizzata Consultare 3 7 Regolazione del sensore di quasi fine...

Страница 183: ...rmazioni su come salvare i dati vedere Riferimento Comandi Memory switch possibile salvare le impostazioni di varie funzioni che restano memorizzate anche se la stampante viene spenta Spegnimento sinc...

Страница 184: ...ompressione ATTENZIONE Rimuovere la carta tagliata parzialmente prima di eseguire l arretramento per avviare la stampa La carta tagliata potrebbe strapparsi alla stampa successiva causando un problema...

Страница 185: ...a fonte di alimentazione CA che non stia gi alimentando apparecchiature che producono disturbi elettromagnetici Non tirare il cavo di alimentazione CA per evitare di danneggiarlo con possibili rischi...

Страница 186: ...re il cavo afferrarlo sempre dal connettore Prestare attenzione a non inserire il cavo USB nel connettore di estrazione del cassetto cas sa Per collegare pi di una stampante a un unico computer tramit...

Страница 187: ...onfigurazione Cavo 9 pin femmina 9 pin femmina Stampante PC Segnale Pin Pin Segnale RXD 2 2 RXD TXD 3 3 TXD DTR 4 4 DTR SG 5 5 SG DSR 6 6 DSR RTS 7 7 RTS CTS 8 8 CTS ATTENZIONE Sistemare il cavo di in...

Страница 188: ...ato LED Standby di rilevamento individuabile Standby per rilevamento e collegamento Standby di connessione collegabile Standby per collegamento Connessione iOS Sessione dati non aperta In comunicazion...

Страница 189: ...e dipende dal fatto se SSP secure simple pairing attivata sul PC host Se SSP abilitata sul PC host si pu effettuare la sincronizzazione senza operazioni aggiuntive Se SSP disabilitata sul PC host verr...

Страница 190: ...icazione Bluetooth al termine della stampa Quando ci sono vari dispositivi iOS che stampano con la stessa stampante In tali condizioni disattivare la ri connessione automatica Attivare e disattivare l...

Страница 191: ...azione Tenere premuto il pulsante pannello Un cicalino suoner una volta per indicare che avvenuto l accesso alla modalit di impostazione Si pu utilizzare la modalit di impostazione per leggere le impo...

Страница 192: ...cheda collegata con una stampante Collegato tramite LAN cablata Acceso Lampeggiante ciclo da 1 secondi Ottenimento di indirizzo IP da server DHCP tramite LAN cablata Funzionamento LAN cablata Acceso A...

Страница 193: ...ser web e modificare le impostazioni della scheda Avvio di Web Manager 1 Avviare un browser web 2 Nel campo indirizzo immettere l indirizzo IP della scheda e premere Invio Schermata HOME Si tratta del...

Страница 194: ...e il nome utente dell amministratore della scheda Impostazione iniziale admin Password Immettere la password utente dell amministratore Impostazione iniziale admin Pulsante Login Dopo aver immesso nom...

Страница 195: ...o connettore non collegare una linea telefonica I segnali non possono essere inviati dal connettore di estrazione del cassetto cassa durante la stampa Per collegare o scollegare il cavo di estrazione...

Страница 196: ...stato tramite comandi 4 Circuito di comando Connettore di estrazione del cassetto cassa Interruttore di apertura chiusura cassetto cassa Schermato Stampante Cassetto cassa ATTENZIONE I cassetti 1 e 2...

Страница 197: ...le ATTENZIONE Non utilizzare la stampante nelle seguenti condizioni Evitare luoghi soggetti a vibrazioni o instabilit Punti molto sporchi o polverosi Evitare luoghi in cui la stampante non si trova pe...

Страница 198: ...rta utilizzati sono illustrate di seguito Unit mm Posizione del sensore Diametro esterno rotolo di carta quando rilevato quasi fine carta Diametro esterno interno dell anima del rotolo di carta 1 Circ...

Страница 199: ...rare le dita nello spazio sovrastante 3 Caricare il rotolo di carta in modo che il lato stampabile sia rivolto verso l alto come indicato dalla freccia A 4 Tenendola dritta estrarre la carta di qualch...

Страница 200: ...tilizzare esclusivamente i rotoli di carta specificati Verificare che il rotolo di carta sia installato correttamente Se la carta inclinata e non esce diritta dal coperchio carta aprirlo e raddrizzarl...

Страница 201: ...manuale dei memory switch ATTENZIONE Aprendo il coperchio carta prestare attenzione a non toccare l ingresso della lama della taglierina automatica La testina di stampa molto calda subito dopo la stam...

Страница 202: ...l coperchio fino a bloccarlo con uno scatto Standard Vista frontale interruttore sporgente LLP ATTENZIONE Aprendo il coperchio carta prestare attenzione a non toccare l ingresso della lama della tagli...

Страница 203: ...1 Montaggio del coperchio del cavo 1 Togliere la vite del filo di massa 2 Avvitare la vite del filo di massa nel coperchio del cavo al corpo della stampante 1 2 1 Vite per filo di massa 2 Coperchio de...

Страница 204: ...mpa di grafici o testi graduati che richiedono una maggiore quantit di dati possono compa rire strisce Le interfacce USB sono suscettibili agli effetti delle interferenze elettromagnetiche ambientali...

Страница 205: ...re il raffreddamento della testina di stampa per qualche minuto 4 Passare un batuffolo di cotone inumidito con alcol etilico per eliminare lo sporco e la polvere presenti sulla testina di stampa e il...

Страница 206: ...io carta 3 Rimuovere la carta inceppata compresi eventuali pezzi di carta strappati togliere anche il rotolo di carta dal supporto 4 Ricaricare il rotolo di carta e chiudere il coperchio carta 5 Accen...

Страница 207: ...accendere la stampante 2 Tenere premuto il pulsante FEED per circa un secondo fino ad azionare il cicalino Rilasciare il pulsante per avviare l autodiagnosi La stampante stampa il nome del modello la...

Страница 208: ...rint mode modalit di stampa della copia del con tenuto memoria esadecimale quindi stampa tutti i dati ricevuti sotto forma di numeri esadecimali e caratteri Arresto della stampa della copia del conten...

Страница 209: ...seconda dell impostazione del memory switch per riprendere la stampa potrebbe essere necessario inviare un comando Errore taglierina Se la taglierina automatica non si pu muovere per un inceppamento...

Страница 210: ...S 2 Dispositivo di taglio bloccato Spento Spento Spento S Errore di tensione bassa Spento No Errore di tensione alta Spento Spento Spento No Errore sistema Spento Spento Spento No Errore di memoria S...

Страница 211: ...tampa a velocit variabile potrebbero comparire righe bianche o la carta potrebbe non avanzare a seconda delle condizioni di stampa Per prevenire questi problemi cambiare le seguenti impostazioni dei m...

Страница 212: ...212 5 ALTRO 5 1 Viste e dimensioni esterne Unit mm 125 165 108...

Страница 213: ...A Unit mm Larghezza massima dell area di stampa 72 Larghezza carta 80 0 1 Superficie di stampa 83 o meno Larghezza carta 58 0 1 Superficie di stampa 48 384 punti Spessore della carta m Da 53 a 85 Diam...

Страница 214: ...stampante accede alla modalit di configurazione individuale dei memory switch La stampante stampa Memory SW 1 e la configurazione attuale 0 off o 1 on Le impostazioni correnti per i memory switch da...

Страница 215: ...memory switch modificate 10 Ripetere i passaggi da 4 a 9 per modificare le funzioni di un numero diverso di memory switch 11 Premere il pulsante FEED fino a quando viene stampato Save To Memory 12 Pr...

Страница 216: ...SW2 2 Auto Cutter Invalid Valid MSW2 3 Spool Print Invalid Valid MSW2 4 Full Col Print LineFeed WaitData MSW2 5 Resume aft PE Next Top MSW2 6 Reserved Fixed MSW2 7 Reserved Fixed MSW2 8 PNE Sensor Val...

Страница 217: ...0 bps 4800 bps 9600 bps 19200 bps 38400 bps 57600 bps 115200 bps MSW7 2 Data Length 8bits 7bits 8bits MSW7 3 Stop Bit 1bit 1bit 2bits MSW7 4 Parity NONE NONE ODD EVEN MSW7 5 Flow Control DTR DSR DTR D...

Страница 218: ...P932 Japan SJIS X0213 Japan GB18030 China KS Hangul South Korea EUC Hangul South Korea BIG5 Taiwan MSW10 1 Print Density 100 70 75 80 85 90 95 100 105 110 115 120 125 130 135 140 MSW10 2 Print Speed L...

Страница 219: ...219 ESPA OL...

Страница 220: ...correcto o condiciones ambientales inadecuadas que no se especifi quen en este manual Los datos son b sicamente para uso temporal y no son almacenados durante un largo per odo de tiempo ni permanentem...

Страница 221: ...rcial registrada de DENSO WAVE INCORPORATED Ethernet es una marca comercial registrada de Fuji Xerox Corporation Bluetooth es una marca registrada de Bluetooth SIG Inc CITIZEN es una marca comercial r...

Страница 222: ...os que podr an producirse si la impresora no es utilizada de la forma correcta o si se ignoran las instrucciones indica das por los s mbolos de advertencia Aseg rese de leer esta informaci n atentame...

Страница 223: ...or ejemplo clips sujetapape les alfileres o tornillos en el interior de la impresora No coloque floreros macetas o recipientes que contengan agua encima de la impresora No derrame caf bebidas o cualqu...

Страница 224: ...podr a deteriorarse No bloquee los orificios de ventilaci n de la impresora No coloque ning n objeto encima de la impresora No cubra o envuelva la impresora con un pa o o una s bana De hacerlo podr a...

Страница 225: ...de la l nea telef nica Pararrayos Si cae un rayo la sobrecorriente podr a causar un incendio o una descarga el ctrica Tuber as de agua Para hacer la conexi n a tierra no deber n utilizarse tuber as d...

Страница 226: ...se incendie o se dispare el disyuntor No coloque nada encima del cable de alimentaci n No coloque la impresora en un lugar donde el cable de alimentaci n pueda ser pisado No doble retuerce o estire el...

Страница 227: ...vite utilizar la impresora sin estar correctamente cargado el papel Evite utilizar papel que no cumpla con las especificaciones Puede resultar en una calidad de impresi n inadecuada No utilice papel r...

Страница 228: ...la impresora emite humos u olores o ruidos extra os al imprimir cancele inmediatamente la sesi n de impresi n en curso y desench fela de la toma de corriente MANTENIMIENTO DIARIO Tome las precauciones...

Страница 229: ...uste del sensor de papel casi agotado 252 3 8 Carga del papel 253 3 9 Separador de papel en rollo de 58 mm de anchura 255 3 10 Ajuste de la funci n Impresi n de larga duraci n LLP 256 3 11 Fijaci n de...

Страница 230: ...rfaz intercambiable Indicaci n de estado y errores de la impresora mediante cinco pilotos LED Interfaz de caj n portamonedas integrada Disponibilidad de funci n de apagado por USB 16 niveles de escala...

Страница 231: ...luyen con la impresora NOMBRE CANTI DAD ILUSTRACI N Impresora 1 Adaptador de CA 37AD5 1 Cable de alimentaci n de CA 1 Separador 1 Abrazadera para cable 1 Tapa del cable 1 Rollo de papel de muestra 1 r...

Страница 232: ...s Modelo CT E651 M todo de impresi n M todo de impresi n t rmica por l neas de puntos Anchuras de impre si n 72 mm 576 puntos 68 25 mm 546 puntos 64 mm 512 puntos 52 5 mm 420 puntos 48 75 m 390 puntos...

Страница 233: ...nsi n de alimen taci n CC 24 V 5 Consumo de energ a Aproximadamente 50 W media 2 W o menos en espera 0 2 W o menos estado apagado conectado mediante USB Adaptador de CA 37AD5 Entrada nominal 100 a 240...

Страница 234: ...nca para abrir la tapa del papel 3 Bot n POWER Mantenga pulsado este bot n durante dos o tres segundos para conectar o desconectar la alimentaci n 4 Bot n FEED Pulse este bot n para alimentar papel En...

Страница 235: ...izalla Tambi n puede iluminarse o parpadear cuando se detectan otras anomal as COVER LED Verde Se ilumina o parpadea cuando se detecta que la tapa del papel est abierta Tambi n puede iluminarse o parp...

Страница 236: ...rollo de papel 3 Bot n para cambiar el sensor de papel casi agotado Cambie la posici n del sensor de papel casi agotado para adaptarla al papel que est utilizando Consulte 3 7 Ajuste del sensor de pap...

Страница 237: ...sobre c mo guardar datos consulte la Referencia de comandos Interruptor de memoria La configuraci n de varios tipos de funciones se puede guardar en la memoria Dicha configuraci n queda almacenada en...

Страница 238: ...Retire el papel cortado parcialmente antes de realizar el avance inverso para comenzar la impresi n El papel cortado puede arrancarse en el pr ximo proceso de impresi n lo que puede causar problemas...

Страница 239: ...de CA que no alimente a su vez a equipos que generen ruido electromagn tico Si tira del cable de alimentaci n de CA podr a da arlo producir un incendio una descarga el ctrica o la rotura de un hilo de...

Страница 240: ...o desconecte el cable suj telo siempre por el conector Tenga cuidado de no insertar el cable USB en el conector del caj n portamonedas Para conectar m s de una impresora a un solo ordenador a trav s d...

Страница 241: ...te esquema de conexiones Cable de 9 pines hembra 9 pines hembra Impresora PC Se al Pin Pin Se al RXD 2 2 RXD TXD 3 3 TXD DTR 4 4 DTR SG 5 5 SG DSR 6 6 DSR RTS 7 7 RTS CTS 8 8 CTS PRECAUCI N Sit e el c...

Страница 242: ...do Descripci n Estado del LED Detecci n en espera Detectable A la espera de detecci n y cone xi n Conexi n en espera Conectable A la espera de conexi n Conexi n iOS Sesi n de datos no abierta Comunica...

Страница 243: ...iones y modelos de PC no se pase directamente a los ajustes de emparejamiento una vez seleccionada la impresora durante la detecci n de dispositivos La operaci n necesaria para configurar los ajustes...

Страница 244: ...st no es un dispositivo iOS Aunque el dispositivo asociado sea un dispositivo iOS las circunstancias siguientes pueden interferir con la funci n de reconexi n autom tica Cuando desea que la comunicaci...

Страница 245: ...o de configuraci n Pulse prolongadamente el bot n del panel Sonar un zumbador una vez para indicar que ha entrado en el modo de configuraci n Puede utilizar el modo de configuraci n para leer los ajus...

Страница 246: ...minado La placa est conectada a una impresora Conectada mediante LAN con cable Iluminado Parpadeante ciclo de 1 segundo Obteniendo direcci n IP del servidor DHCP a trav s de LAN con cable Funcionamien...

Страница 247: ...n navegador Web y cambiar la configuraci n de la placa Inicio del Administrador Web 1 Abra un navegador Web 2 En el campo de direcci n escriba la direcci n IP de la plaza y luego pulse Intro Pantalla...

Страница 248: ...r Name Escriba un nombre de usuario administrador de la placa Valor inicial admin Password Escriba la contrase a del usuario administrador de la placa Valor inicial admin Bot n Login Una vez escrito e...

Страница 249: ...edas a este conector No conecte un cable de l nea telef nica Las se ales no pueden salir por el conector del caj n portamonedas mientras se est impri miendo Sujete el conector del cable del caj n rect...

Страница 250: ...te comandos 4 Circuito de activaci n Conector del caj n portamonedas Interruptor de apertura cierre del caj n portamonedas Blindado Impresora Caj n portamonedas PRECAUCI N Los cajones portamonedas 1 y...

Страница 251: ...No utilice la impresora en las siguientes condiciones Evite aquellos lugares inestables o sometidos a vibraciones Lugares muy sucios o polvorientos Evite aquellos lugares en los que la impresora no es...

Страница 252: ...el sensor seg n el di metro del rollo de papel utilizado Unidad mm Posici n del sensor Di metro externo del rollo de papel cuando se detecta papel casi agotado Di metro externo interno del tubo del ro...

Страница 253: ...pillarse los dedos en el espacio que hay encima de la parte superior de la palanca 3 Cargue el rollo de papel con la cara de impresi n hacia arriba como indica la flecha A 4 Saque unos cent metros de...

Страница 254: ...o Utilice siempre los tipos de rollo de papel especificados Compruebe que el rollo de papel est colocado correctamente Si el papel est torcido y no sale recto por la tapa del papel abra la tapa y ende...

Страница 255: ...interruptores de memoria PRECAUCI N Al abrir la tapa del papel tenga cuidado de no tocar la entrada de la hoja de la cizalla autom tica El cabezal de impresi n est muy caliente justamente despu s de i...

Страница 256: ...tapa del papel firmemente hasta que encaje en su sitio Normal Vista frontal del interruptor saliente LLP PRECAUCI N Al abrir la tapa del papel tenga cuidado de no tocar la entrada de la hoja de la ciz...

Страница 257: ...s cables 1 Extraiga el tornillo del cable de puesta a tierra 2 Enrosque el tornillo del cable de puesta a tierra en la tapa de los cables y en el cuerpo de la impresora 1 2 1 Tornillo del cable de pue...

Страница 258: ...s en las impresiones cuando se impriman gr ficos o texto con degradado que requieren grandes cantidades de datos Las interfaces USB pueden verse afectadas por los efectos de interferencias electro mag...

Страница 259: ...asta que se haya enfriado el cabezal de impresi n 4 Utilice un bast n de algod n humedecido en alcohol et lico para limpiar la suciedad y el polvo que pueda haberse acumulado en el cabezal de impresi...

Страница 260: ...de la tapa hacia arriba y abra la tapa del papel 3 Retire el papel atascado incluido cualquier residuo del mismo Retire tambi n el rollo de papel que haya en el portarrollo 4 Vuelva a colocar el roll...

Страница 261: ...ntenga pulsado el bot n FEED durante un segundo aproximadamente hasta que suena el zumbador Suelte el bot n para iniciar el autotest La impresora imprime el nombre de modelo la versi n la configuraci...

Страница 262: ...l papel 3 La impresora imprimir HEX dump print mode seguido de los datos recibidos impre sos en n meros hexadecimales y algunos caracteres C mo detener la impresi n de volcado hexadecimal Siga uno de...

Страница 263: ...a un par de cent metros y cierre la tapa La impresi n se reanuda Se debe enviar un comando para reiniciar la impresora seg n la configuraci n de los interruptores de memoria Error de cizalla Si la ciz...

Страница 264: ...queada No iluminado No iluminado No iluminado S Error de tensi n baja No iluminado No Error de tensi n alta No iluminado No iluminado No iluminado No Error de sistema No iluminado No iluminado No ilum...

Страница 265: ...realiza una impresi n en la que cambia la velocidad de impresi n se pueden imprimir l neas en blanco o el papel puede no alimentarse en funci n de las condiciones de impresi n Para evitar estos probl...

Страница 266: ...266 5 OTROS 5 1 Vistas externas y dimensiones Unidad mm 125 165 108...

Страница 267: ...oehler KT48 FA Unidad mm Anchura m x de impresi n 72 Anchura de papel 80 0 1 Superficie de impresi n 83 o menos Anchura de papel 58 0 1 Superficie de impresi n 48 384 puntos Grosor del papel m 53 a 85...

Страница 268: ...s y cierre la tapa del papel La impresora entra en el modo de configuraci n individual de los interruptores de memoria La impresora imprime Memory SW 1 y el ajuste actual 0 off o 1 on La configuraci n...

Страница 269: ...oria 10 Repita los pasos 4 al 9 para modificar las funciones de otro n mero de interruptor de memoria 11 Pulse el bot n FEED hasta que se imprima Save To Memory 12 Pulse el bot n FEED durante al menos...

Страница 270: ...2 Auto Cutter Invalid Valid MSW2 3 Spool Print Invalid Valid MSW2 4 Full Col Print LineFeed WaitData MSW2 5 Resume aft PE Next Top MSW2 6 Reserved Fixed MSW2 7 Reserved Fixed MSW2 8 PNE Sensor Valid I...

Страница 271: ...00 bps 2400 bps 4800 bps 9600 bps 19200 bps 38400 bps 57600 bps 115200 bps MSW7 2 Data Length 8bits 7bits 8bits MSW7 3 Stop Bit 1bit 1bit 2bits MSW7 4 Parity NONE NONE ODD EVEN MSW7 5 Flow Control DTR...

Страница 272: ...IS CP932 Japan SJIS X0213 Japan GB18030 China KS Hangul South Korea EUC Hangul South Korea BIG5 Taiwan MSW10 1 Print Density 100 70 75 80 85 90 95 100 105 110 115 120 125 130 135 140 MSW10 2 Print Spe...

Страница 273: ...CT E651_UM_100_5L PMC 1706 June 2017...

Отзывы: