53
—
—
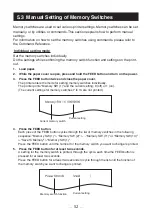
6. Press the FEED button.
A setting is printed each time the FEED button is pressed in order through the cycle.
When the current settings are printed, the COVER LED lights.
Press the FEED button until the setting you want is printed.
7. Press the FEED button for at least two seconds.
The selected settings are set.
The next memory switch function and settings are printed.
8. Repeat steps 5 to 7 to change different functions for the current memory switch num-
ber.
9. Open the paper cover and close it.
The changed memory switch settings are printed.
10. Repeat steps 4 to 9 to change functions for a different memory switch number.
11. Press the FEED button until “Save To Memory” is printed.
12. Press the FEED button for at least two seconds.
The changed memory switch settings are saved and a list of them is printed.
The printer exits individual setting mode when printing is finished.
Memory switch initialization
Set all the memory switches to the factory settings.
1. Do steps 1 through 3 of the procedure to enter individual setting mode.
2. Press the FEED button until “Save To Memory” is printed.
3. Open the paper cover.
4. Press the FEED button for at least two seconds.
All memory switches change to the factory settings.
5. Close the paper cover.
Содержание CT-E651
Страница 4: ...4 ENGLISH...
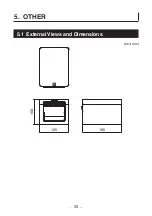
Страница 50: ...50 5 OTHER 5 1 External Views and Dimensions Unit mm 125 165 108...
Страница 57: ...57 FRAN AIS...
Страница 104: ...104 5 DIVERS 5 1 Vues et dimensions externes Unit mm 125 165 108...
Страница 111: ...111 DEUTSCH...
Страница 158: ...158 5 SONSTIGES 5 1 u ere Ansicht und Abmessungen Einheit mm 125 165 108...
Страница 165: ...165 ITALIANO...
Страница 212: ...212 5 ALTRO 5 1 Viste e dimensioni esterne Unit mm 125 165 108...
Страница 219: ...219 ESPA OL...
Страница 266: ...266 5 OTROS 5 1 Vistas externas y dimensiones Unidad mm 125 165 108...
Страница 273: ...CT E651_UM_100_5L PMC 1706 June 2017...

