background image

VIP-4R/4T Installation and Configuration  23

Versatile Interface Processor Functions

Upgrading VIP Microcode

The Cisco 7000 series and the Cisco 7500 series support downloadable microcode, which enables
you to upgrade microcode versions without having to physically replace the microcode Flash
memory device on the board. You can download new microcode versions and store multiple versions
in Flash memory, and you can boot from them just as you can with the system software images.
System software upgrades may also contain upgraded microcode images, which will load
automatically when the new software image is loaded (unless the configuration states otherwise).

Note

Software and interface processor microcode images are carefully optimized and bundled to

work together. Overriding the bundle can result in system incompatibilities. We recommend that you
use the microcode included in the software bundle.

You can download microcode to Flash memory by copying the TFTP image of a microcode version
to Flash memory. When the microcode image is stored in Flash memory you can use the
microcode reload command to manually load the new microcode file, and the configure command
to instruct the system to load the new image automatically at each system boot.

To compare the size of the microcode image and the amount of Flash memory available, you must
know the size of the new microcode image. The image size is specified in the README file that is
included on the floppy disk with the new image.

Note

Note the size of the new image before proceeding to ensure that you have sufficient available

Flash memory for the new image.

Caution

Before you copy a file to system Flash memory, be sure there is ample space available in

Flash memory. Compare the size of the file you want to copy to the amount of available Flash
memory shown. If the space available is less than the space required by the file you want to copy,
the copy process will continue, but the entire file will not be copied into Flash memory.

Содержание VIP-4R/4T

Страница 1: ...ps for VIP hardware installation and basic VIP configuration steps and examples for configuring the individual interfaces on a new VIP Also included are maintenance procedures for upgrading user configurable VIP components This publication has two main sections Versatile Interface Processor Functions page 3 this section discusses general VIP features maintenance considerations and overall function...

Страница 2: ...d Verifying VIP Status page 19 Upgrading VIP Microcode page 23 Upgrading and Replacing DRAM SIMMs page 26 VIP Port Adapter Functions page 29 4R Port Adapter page 29 4T Port Adapter page 45 Cisco Information Online page 74 If You Need More Configuration Information The Cisco Internetwork Operating System Cisco IOS software running the router contains extensive features and functionality The effecti...

Страница 3: ...tworking Command Reference Configuration Builder Getting Started Guide Troubleshooting Internetworking Systems Versatile Interface Processor Functions The following sections describe the Versatile Interface Processor VIP and discuss VIP specific features and functions such as installing and removing the VIP installing and removing port adapters using and configuring common VIP interface functions ...

Страница 4: ...pinouts refer to the section 4R Port Adapter Receptacles Cables and Pinouts on page 34 or to the section 4T Port Adapter Receptacles Cables and Pinouts on page 51 You can install VIPs in any available interface processor slots Figure 1 VIP with One 4R and One 4T Port Adapter Horizontal Orientation Shown Note In the Cisco 7000 Cisco 7507 and Cisco 7513 chassis the VIP is installed vertically In the...

Страница 5: ...nd CyBus in the Cisco 7500 series and operates with the optional RSP7000 and RSP7000CI RSP based processor modules in the Cisco 7000 series routers Cisco 7000 and Cisco 7010 The VIP will also operate with the Route Processor RP and Switch Processor SP in the Cisco 7000 series routers The VIP operates with all RSP based processor modules currently shipping in the Cisco 7000 series and Cisco 7500 se...

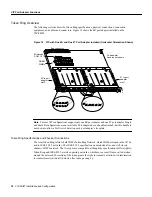
Страница 6: ... Switch Processor RSP7000 and the 7000 Series Chassis Interface RSP7000CI The remaining slots are for interface processors slots 0 through 4 in the Cisco 7000 and slots 0 through 2 in the Cisco 7010 Figure 2 Cisco 7000 Interface Processor End H5288 Interface processor slots 0 1 2 3 4 RSP 7000 slot 5 RSP 7000CI slot 6 Upper power supply Lower power supply I O DCFA IL ACPOWER I O DCFA IL ACPOWER Cap...

Страница 7: ...gure 4 Cisco 7505 Interface Processor End H5874 RSP7000CI slot 4 RSP7000 slot 3 Interface processor slot 1 DC OK LED Power switch Chassis ground screw Power receptacle Interface processor slot 2 Interface processor slot 0 AC input power supply E J E C T S L O T 0 S L O T 1 N O R M A L C P U H A L T R E S E T A U X C O N S O L E ROUTE SWITCH PROCESSOR E N A B L E E N A B L E H2761 RSP slot DC OK LE...

Страница 8: ...em processor and performs packet switching functions Slots 0 and 1 and 4 through 6 are for interface processors Figure 5 Cisco 7507 Interface Processor End ENABLE ENABLE EJECT SLOT 0 SLOT 1 NORMAL CPU HALT RESET AUX CONSOLE ROUTE SWITCH PROCESSOR 2 SLAVE MASTER SLAVE M ASTER H3888 Slot 0 1 2 3 4 5 6 pper ower supply hassis rounding eceptacles ower ower supply I O DCFA IL ACPOWER I O DCFA IL ACPOWE...

Страница 9: ...or and performs packet switching functions Slots 0 through 5 and 8 through 12 are for interface processors Figure 6 Cisco 7513 Interface Processor End ENABLE ENABLE H5268 EJE CT SLO T 0 SLO T 1 NORMAL CPU HALT RESET AUX CONSOLE ROUTE SWITCH PROCESSOR 2 SLA VE MASTER SLA VE M ASTER Blower module Cable management bracket Card cage and processor modules Air intake vent Power supplies Chassis groundin...

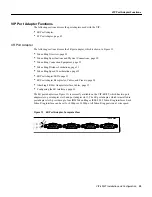
Страница 10: ... 45 FE TX port adapter IEEE 802 3u Fast Ethernet 100BASE TX using Media Independent Interface MII or RJ 45 4T port adapter synchronous serial EIA TIA 232 EIA TIA 449 EIA 530 V 35 and X 21 determined by the cable using DB 60 60 pin mini D sub connectors 4R port adapter IEEE 802 5 Token Ring using DB 9 9 pin D sub connectors Note The VIP 4R 4T is a fixed configuration The entire VIP 4R 4T assembly i...

Страница 11: ...ies routers each interface processor and VIP The show startup config EXEC command shows the current system instructions for loading microcode at startup Software and interface processor microcode images are carefully optimized and bundled to work together Overriding the bundle can result in system incompatibilities We recommend that you use the microcode included in the software bundle For a compl...

Страница 12: ...ninsulated telephone wires or terminals unless the telephone line has been disconnected at the network interface Use caution when installing or modifying telephone lines Preventing Electrostatic Discharge Damage Electrostatic discharge ESD damage which can occur when electronic cards or components are improperly handled results in complete or intermittent failures A processor module comprises a pr...

Страница 13: ... to the system backplane Each backplane connector comprises a set of tiered pins in three lengths The pins send specific signals to the system as they make contact with the card The system assesses the signals it receives and the order in which it receives them to determine what event is occurring and what task it needs to perform such as reinitializing new interfaces or shutting down removed ones...

Страница 14: ...g the handle to force or slam the interface processor all the way into the slot can damage the pins on the board connectors if they are not aligned properly with the backplane When using the handle rather than the ejector levers to seat the interface processor in the backplane you might need to pull the interface processor back out and push it in again to align it properly Even if the backplane pi...

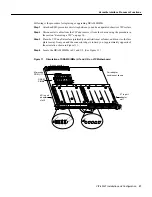
Страница 15: ...e Installation Screws on the VIP Horizontal Orientation Shown Note The VIP is oriented horizontally in the Cisco 7010 and Cisco 7505 and vertically in the Cisco 7000 Cisco 7507 and Cisco 7513 Interface processor card slot Interface processor card carrier guide black Ejector lever Captive installation screw H1984 a b c ...

Страница 16: ...t that a port adapter has failed you must replace the entire VIP processor module Port adapters are not available as FRUs Caution If you use the VIP with a single port adapter the port adapter must be in slot 0 for the VIP to function properly A single port adapter in slot 1 will not be recognized by the system Removing an Interface Processor Filler Select an unused interface processor slot for th...

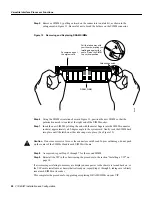
Страница 17: ...m error messages indicating a board failure Step 3 Place your thumbs on the ejector levers and simultaneously pull both of the ejectors outward in the opposite direction from that show in Figure 8c to release the VIP from the backplane connector Step 4 Use the VIP handle to carefully pull the VIP straight out of the slot keeping your other hand under the carrier to guide it See Figure 9 Keep the V...

Страница 18: ...he VIP handle with one hand and place your other hand under the carrier to support the VIP and guide it into the slot See Figure 9 Avoid touching the card or any connector pins Caution To prevent ESD damage handle interface processors by the handles and carrier edges only Note The processor modules are oriented horizontally in the Cisco 7010 and Cisco 7505 and vertically in the Cisco 7000 the Cisc...

Страница 19: ... should go on One or the other of the MII and RJ 45 LEDs should be on depending on your connection and the link LED should be on if the VIP is receiving a carrier signal from the network The console screen will also display a message as the system discovers each interface during its reinitialization When you remove and replace interface processors the system provides status messages on the console...

Страница 20: ...still fails to go on remove the VIP and try installing it in another available interface processor slot If the enabled LED goes on when the VIP is installed in the new slot suspect a failed backplane port in the original interface processor slot If the enabled LED still fails to go on but other LEDs on the VIP go on to indicate activity proceed to Step 5 to resume the installation checkout and sus...

Страница 21: ...command Verify that the new VIP appears in the correct slot Step 3 Specify one of the new VIP interfaces with the show interfaces type slot port adapter port command and verify that the first line of the display specifies the interface with the correct slot number Also verify that the interface and line protocol are in the correct state up or down Step 4 Display the protocols configured for the en...

Страница 22: ...bytes throttled 0 rxlo 4 rxhi 123 rxcurr 16 maxrxcurr 16 txq 48000240 txacc 480000EA value 77 txlimit 77 Serial3 1 1 addr 0000 0ca5 238e bia 0000 0ca5 238e gfreeq 48000140 lfreeq 48000238 1536 bytes throttled 0 rxlo 4 rxhi 123 rxcurr 16 maxrxcurr 16 txq 48000240 txacc 480000EA value 77 txlimit 77 display text omitted The show startup config command displays the contents of the system configuration...

Страница 23: ... bundle You can download microcode to Flash memory by copying the TFTP image of a microcode version to Flash memory When the microcode image is stored in Flash memory you can use the microcode reload command to manually load the new microcode file and the configure command to instruct the system to load the new image automatically at each system boot To compare the size of the microcode image and ...

Страница 24: ...u verify that there is sufficient space available in Flash memory for the new image use the command copy tftp filename flash slot0 slot1 filename to copy an image to Flash memory tftp filename is the file s source and flash slot0 slot1 filename is the destination in onboard Flash memory or on either of the Flash memory cards An example of the copy tftp filename command follows Router copy tftp vip...

Страница 25: ...utomatically added to your running configuration The new VIP microcode image will load automatically the next time the system boots or reinitializes Step 9 To load the new microcode immediately you can issue the microcode reload configuration command you must be in Configuration mode to enter this command Router config t Enter configuration commands one per line End with CNTL Z Router config micro...

Страница 26: ... SIMMs on the VIP You also might need to replace a single SIMM in the case of a diagnosed DRAM SIMM failure Note DRAM SIMMs should be upgraded or replaced in the field by a Cisco certified maintenance provider Both DRAM SIMMs are replaced for all upgrades Caution SIMMs are sensitive components that are susceptible to ESD damage Handle SIMMs by the edges only avoid touching the memory modules pins ...

Страница 27: ...VIP on a flat surface preferably an antistatic mat or foam and turn it so the face plate is away from you and the connector edge is toward you approximately opposite of the orientation shown in Figure 11 Step 4 Locate the DRAM SIMMs in U1 and U2 See Figure 11 Figure 11 Orientation of DRAM SIMMs U1 and U2 on VIP Motherboard H5985 DRAM SIMMs Microcode ROM U1 7 Bus connector E N T D T C R D R C L B C...

Страница 28: ... on either side snaps into place See Figure 12 Caution Do not use excessive force or the connector could break To prevent damage do not push on the center of the SIMMs Handle each SIMM with care Step 8 As required repeat Steps 5 through 7 for the second SIMM Step 9 Reinstall the VIP in the chassis using the procedure in the section Installing a VIP on page 18 If error messages relating to memory a...

Страница 29: ... 33 Token Ring Speed Considerations page 33 4R Port Adapter LEDs page 33 4R Port Adapter Receptacles Cables and Pinouts page 34 Attaching 4R Port Adapter Interface Cables page 35 Configuring the 4R Interfaces page 36 The 4R port adapter see Figure 13 is currently available on the VIP 4R 4T which has two port adapter slots port adapter slot 0 and port adapter slot 1 The 4R port adapter which is ins...

Страница 30: ...ng Specifications and Physical Connections The term Token Ring refers to both IBM s Token Ring Network which IBM developed in the 1970s and to IEEE 802 5 networks The IEEE 802 5 specification was modeled after and still closely shadows IBM s network The two types are compatible although the specifications differ slightly Token Ring and IEEE 802 5 are token passing networks which move a small frame...

Страница 31: ... token release disabled Both states are enabled with configuration commands in Configuration mode To enable 16 Mbps specify the slot port address and use the configuration command ring speed 16 to return to 4 Mbps operation use the command ring speed 4 To enable and disable early token release specify the slot port address and use the configuration command no early token release For complete descr...

Страница 32: ...ch you can change to 16 Mbps on any port using the ring speed n configuration command where n is the speed 4 or 16 in Mbps The speed of each Token Ring port must match the speed of the ring to which it is connected Before you enable the Token Ring interfaces ensure that each is set for the correct speed or it can bring down the ring Caution Each 4R port adapter interface must be configured for the...

Страница 33: ...ote If an interface has an undefined or incorrect ring speed and is not shut down the ring will beacon This effectively takes the ring down and makes it inoperable 4R Port Adapter LEDs The 4R port adapter s enabled LED shown in Figure 16 goes on to indicate the following status of the 4R port adapter Enabled for operation Correctly connected to the VIP card Receiving power from the VIP card Contai...

Страница 34: ...re Type 1 or Type 3 lobe cables Token Ring interface cables are not available from Cisco Systems but are commercially available through outside cable vendors Type 1 lobe cables use shielded twisted pair STP cable and terminate at the network end with a large MAU plug See Figure 17 The 4R port adapter end of the cable is a DB 9 plug Figure 17 Token Ring Type 1 Lobe Cable Connectors DB 9 and MAU Typ...

Страница 35: ... cable vendors Following is the procedure for attaching Token Ring cables to the 4R port adapter Step 1 Determine which 4R port adapter ports you want to use Note The IBM Token Ring specifies a star topology with all end stations connected through a device called an MSAU IEEE 802 5 does not specify any topology although most implementations are based on a star configuration with end stations attac...

Страница 36: ... the startup configuration for Cisco 7000 series and Cisco 7500 series routers through the software command interpreter called EXEC To configure the interfaces for interface processors you can use either one of the setup or configure EXEC commands setup configure The setup command facility can be used after first time startup to make basic changes at any time The changes you make will affect only ...

Страница 37: ...EC command follow the instructions in the section Using the Configure EXEC Command on page 39 Using the Setup Command The setup command facility identifies all interfaces including the Token Ring interfaces for the ports on the 4R port adapter that are installed and prompts you for configuration information for each installed interface When you finish configuring one interface the setup command fa...

Страница 38: ...f you do want to change the name of the router enter the new name before pressing Return Step 3 Proceed through the remainder of the global parameter prompts using the Return key to accept the defaults After the global parameters are configured the system prompts you for interface configuration information one interface at a time Following is a partial display of the script for a previously config...

Страница 39: ...cribes how to identify chassis slot port adapter and serial interface port numbers Note Although the processor slots in the seven slot Cisco 7000 and 13 slot Cisco 7513 are vertically oriented and those in the five slot Cisco 7010 and Cisco 7505 are horizontally oriented all models use the same method for slot and port numbering For interface processor slot orientation in your chassis refer to Fig...

Страница 40: ...7505 Shown Note Current VIP configurations support only one 4R port adapter and one 4T port adapter Single and dual 4R configurations are currently not available You can identify interface ports by physically checking the slot port adapter interface port location on the back of the router or by using software commands to display information about a specific interface or all interfaces in the route...

Страница 41: ... 2300 bia 0000 0ca5 238b MTU 1500 bytes BW 10000 Kbit DLY 1000 usec rely 255 255 load 1 255 Encapsulation ARPA loopback not set keepalive set 10 sec Router sh int tokenring 3 0 3 TokenRing3 0 3 is administratively down line protocol is down Hardware is cyBus TokenRing address is 0000 0ca5 2300 bia 0000 0ca5 238b MTU 1500 bytes BW 10000 Kbit DLY 1000 usec rely 255 255 load 1 255 Encapsulation ARPA ...

Страница 42: ...3 3 0 3 Slot 0 Adapter 0 Port n Slot 1 Adapter 0 Port n Slot 4 Adapter 0 Port n Slot 5 Adapter 0 Port n Slot 6 Adapter 0 Port n 0 0 0 1 0 0 4 0 0 5 0 0 6 0 0 0 0 1 1 0 1 4 0 1 5 0 1 6 0 1 0 0 2 1 0 2 4 0 2 5 0 2 6 0 2 0 0 3 1 0 3 4 0 3 5 0 3 6 0 3 Slot 0 Adapter1 Port 1 The 4R port adapter is always installed in port adapter slot 0 on the VIP 4R 4T Slot 1 Adapter Port n Slot 2 Adapter Port n Slot ...

Страница 43: ...rface resets 0 restarts 0 output buffer failures 0 output buffers swapped out Basic Configuration Guidelines Following are instructions for a basic configuration enabling an interface and specifying IP routing You might also need to enter other configuration subcommands depending upon the requirements for your system configuration Step 1 After you access the privileged level of the EXEC as describ...

Страница 44: ...new Token Ring interface appears Step 3 To obtain detailed status information about a specific Token Ring interface specify the interface with the following command Router show interface tokenring slot port adapter port Detailed information about the interface is displayed The first line of display specifies the interface along with its slot and port number It indicates whether the hardware is fun...

Страница 45: ...he 4T port adapter installed in port adapter slot 1 provides up to four synchronous serial interfaces Each serial interface allows a maximum bandwidth of 2 048 Mbps Figure 21 4T Port Adapter Faceplate View Synchronous Serial Overview The 4T port adapter provides four channel independent synchronous serial ports that support full duplex operation at T1 1 544 Mbps and E1 2 048 Mbps speeds Each port ...

Страница 46: ...nt DTE and data communications equipment DCE interfaces and as a result requires fewer circuits and a smaller connector than EIA TIA 232 You can install 4T configured VIPs in any available interface processor slot in the Cisco 7000 series and Cisco 7500 series routers there are no restrictions on slot locations or sequence All interface types except EIA 530 can be individually configured for opera...

Страница 47: ...urrent VIP configurations support only one 4R port adapter and one 4T port adapter on a VIP motherboard Single and dual 4T configurations are not available Port adapters have a handle attached but this handle is not shown to allow a full view of detail on each port adapter s faceplate H5985 DRAM SIMMs Microcode ROM U1 7 Bus connector E N T D T C R D R C L B C D FAST SERIAL E N T D T C R D R C L B ...

Страница 48: ...t The 4T port adapter supports synchronous serial connections at speeds of up to 2 Mbps per interface the speed depends on the type of electrical interface used Use EIA TIA 232 for speeds of 64 kilobits per second kbps and below and use X 21 EIA TIA 449 V 35 or EIA 530 for higher speeds EIA TIA 232 Connections The router VIP end of all EIA TIA 232 adapter cables is a high density 60 pin plug The o...

Страница 49: ...End V 35 Connections The router VIP end of all V 35 adapter cables is a high density 60 pin plug The opposite network end of the adapter cable provides a standard 34 pin Winchester type connector commonly used for V 35 connections Figure 25 shows the connectors at the network end of the V 35 adapter cable V 35 cables are available with a standard V 35 plug for DTE mode CAB V35MT or a V 35 receptac...

Страница 50: ...f the EIA 530 adapter cable is a high density 60 pin plug The opposite network end of the adapter cable is a standard DB 25 plug commonly used for EIA TIA 232 connections Figure 27 shows the DB 25 connector at the network end of the adapter cable Figure 27 EIA 530 Adapter Cable Connector Network End Available in DTE Only 4T Port Adapter LEDs The 4T port adapter contains the enabled LED standard on...

Страница 51: ... various serial interface cables Serial Port Adapter Receptacles and Cables The 4T port adapter and adapter cables allow a high density of interface ports regardless of the size of the connectors typically used with each electrical interface type All ports use an identical 60 pin D shell receptacle that supports all interface types EIA TIA 232 V 35 EIA TIA 449 X 21 and EIA 530 Each port requires a...

Страница 52: ...The mode is labeled on the molded plastic connector shell at the ends of all cables except V 35 which uses the standard Winchester block type connector instead of a molded plastic D shell Following are the available interface cable options for the mode and network end connectors for each cable EIA TIA 232 DTE mode with a DB 25 plug DCE mode with a DB 25 receptacle EIA TIA 449 DTE mode with a 37 pi...

Страница 53: ...TIA 449 X 21 V 35 and EIA 530 serial interfaces All 4T ports use a a 60 pin receptacle that supports all available interface types A special serial adapter cable which is required for each port determines the electrical interface type and mode of the interface The router VIP end of all of the adapter cables is a 60 pin plug the connectors at the network end are the standard connectors used for the...

Страница 54: ...HD 60 Position Plug Network End DB 25 Receptacle Signal Pin Pin Signal Signal Pin Pin Signal Shield ground 46 1 Shield ground Shield ground 46 1 Shield ground TxD RxD 41 2 TxD RxD TxD 36 2 TxD RxD TxD 36 3 RxD TxD RxD 41 3 RxD RTS CTS 42 4 RTS CTS RTS 35 4 RTS CTS RTS 35 5 CTS RTS CTS 42 5 CTS DSR DTR 34 6 DSR DTR DSR 43 6 DSR Circuit ground 45 7 Circuit ground Circuit ground 45 7 Circuit ground D...

Страница 55: ...xD RxD 12 24 RD RTS CTS 9 7 RS CTS RTS 1 7 RS RTS CTS 10 25 RS CTS RTS 2 25 RS RxC TxCE 26 8 RT TxC RxC 24 8 RT RxC TxCE 25 26 RT TxC RxC 23 26 RT CTS RTS 1 9 CS RTS CTS 9 9 CS CTS RTS 2 27 CS RTS CTS 10 27 CS LL DCD 44 10 LL NIL LL 29 10 LL Circuit ground 45 37 SC Circuit ground 30 37 SC DSR DTR 3 11 ON DTR DSR 7 11 ON DSR DTR 4 29 ON DTR DSR 8 29 ON DTR DSR 7 12 TR DSR DTR 3 12 TR DTR DSR 8 30 T...

Страница 56: ...Transmit TxD RxD 12 9 Transmit RxD TxD 12 9 Transmit RTS CTS 9 3 Control CTS RTS 9 3 Control RTS CTS 10 10 Control CTS RTS 10 10 Control RxD TxD 28 4 Receive TxD RxD 28 4 Receive RxD TxD 27 11 Receive TxD RxD 27 11 Receive CTS RTS 1 5 Indication RTS CTS 1 5 Indication CTS RTS 2 12 Indication RTS CTS 2 12 Indication RxC TxCE 26 6 Timing TxC RxC 26 6 Timing RxC TxCE 25 13 Timing TxC RxC 25 13 Timing...

Страница 57: ...DTR DSR 43 E DSR DCD LL 33 F RLSD LL DCD 44 F RLSD DTR DSR 43 H DTR DSR DTR 34 H DTR LL DCD 44 K LT DCD LL 33 K LT TxD RxD 18 P SD RxD TxD 28 P SD TxD RxD 17 S SD RxD TxD 27 S SD RxD TxD 28 R RD TxD RxD 18 R RD RxD TxD 27 T RD TxD RxD 17 T RD TxCE TxC 20 U SCTE RxC TxCE 26 U SCTE TxCE TxC 19 W SCTE RxC TxCE 25 W SCTE RxC TxCE 26 V SCR NIL RxC 22 V SCR RxC TxCE 25 X SCR NIL RxC 21 x SCR TxC RxC 24 ...

Страница 58: ...RxD 12 14 TxD RxD TxD 28 3 RxD RxD TxD 27 16 RxC RTS CTS 9 4 RTS RTS CTS 10 19 RTS CTS RTS 1 5 CTS CTS RTS 2 13 CTS DSR DTR 3 6 DSR DSR DTR 4 22 DSR DCD DCD 5 8 DCD DCD DCD 6 10 DCD TxC RxC 24 15 TxC TxC RxC 23 12 TxC RxC TxCE 26 17 RxC RxC TxCE 25 9 RxC LL DCD 44 18 LL Circuit ground 45 7 Circuit ground DTR DSR 7 20 DTR DTR DSR 8 23 DTR TxCE TxC 13 24 TxCE TxCE TxC 14 11 TxCE Mode_1 Ground Mode_2...

Страница 59: ... Serial interface cables must be attached correctly or damage to the cable plug will result Attempting to force a cable plug on the 60 pin receptacle can damage the plug See Figure 31 Figure 31 Connecting Serial Port Adapter Cables Step 2 Attach the network end of your serial cable to your DSU CSU DTE or other external synchronous serial equipment and tighten the strain relief screws H5988 To DTE ...

Страница 60: ... 32 bit CRC Configuration commands are executed from the privileged level of the EXEC command interpreter which usually requires password access See the section Using the EXEC Command Interpreter on page 69 Refer to the description that follows and contact your system administrator if necessary to obtain access Selecting Chassis Slot Port Adapter and Serial Interface Port Numbers The following sec...

Страница 61: ...se same ports become 2 1 0 through 2 1 3 Figure 32 4T Serial Interface Port Number Example Cisco 7505 Shown Note Current VIP configurations support only one 4R port adapter and one 4T port adapter on a VIP motherboard Single and dual 4T configurations are not available You can identify interface ports by physically checking the slot port adapter interface port location on the back of the router or...

Страница 62: ... 0ca5 238b MTU 1500 bytes BW 10000 Kbit DLY 1000 usec rely 255 255 load 1 255 Encapsulation ARPA loopback not set keepalive set 10 sec Router sh int serial 3 1 3 Serial3 1 3 is administratively down line protocol is down Hardware is cyBus Serial address is 0000 0ca5 2300 bia 0000 0ca5 238b MTU 1500 bytes BW 10000 Kbit DLY 1000 usec rely 255 255 load 1 255 Encapsulation ARPA loopback not set keepal...

Страница 63: ...1 3 3 1 3 Slot 0 Adapter 1 Port n Slot 1 Adapter 1 Port n Slot 4 Adapter 1 Port n Slot 5 Adapter 1 Port n Slot 6 Adapter 1 Port n 0 1 0 1 1 0 4 1 0 5 1 0 6 1 0 0 1 1 1 1 1 4 1 1 5 1 1 6 1 1 0 1 2 1 1 2 4 1 2 5 1 2 6 1 2 0 1 3 1 1 3 4 1 3 5 1 3 6 1 3 Slot 0 Adapter1 Port 1 The 4T port adapter is always installed in port adapter slot 1 on the VIP 4R 4T Slot 1 Adapter Port n Slot 2 Adapter Port n Slo...

Страница 64: ...388 MTU 1500 bytes BW 10000 Kbit DLY 1000 usec rely 255 255 load 1 255 Encapsulation ARPA loopback not set keepalive set 10 sec ARP type ARPA ARP Timeout 4 00 00 Last input never output never output hang never Last clearing of show interface counters 2 56 26 Output queue 0 40 0 drops input queue 0 75 0 drops 5 minute input rate 0 bits sec 0 packets sec 5 minute output rate 0 bits sec 0 packets sec...

Страница 65: ...Sector size 128K 8192K bytes of Flash internal SIMM Sector size 256K No slave installed in slot 6 Configuration register is 0x2 Configuring Timing Clock Signals All interfaces support both DTE and DCE mode depending on the mode of the interface cable attached to the port To use a port as a DTE interface you need only connect a DTE adapter cable to the port When the system detects the DTE mode cabl...

Страница 66: ... Both formats use two different voltage levels for transmission NRZ signals maintain constant voltage levels with no signal transitions no return to a zero voltage level during a bit interval and are decoded using absolute values 0 and 1 NRZI uses the same constant signal levels but interprets the presence of data at the beginning of a bit interval as a signal transition and the absence of data as...

Страница 67: ...rface serial 3 1 0 Router config int crc32 Router config int Z To disable CRC 32 and return to the default CRC 16 setting specify the slot and port address and use the no crc32 command For command descriptions refer to the related software documentation Replacing Port Adapter Cables The port adapter cable connected to each port determines the electrical interface type and mode of the port The defa...

Страница 68: ...nable Password Router configure terminal Enter configuration commands one per line End with CNTL Z Router config int serial 3 1 0 Router config int shutdown Router config int Z Router write memory Step 4 Enter Configuration mode again and bring the port back up Router configure terminal Enter configuration commands one per line End with CNTL Z Router config int serial 3 1 0 Router config int no sh...

Страница 69: ... an Interface Before you remove an interface that you will not replace or replace port adapters shut down disable the interfaces to prevent anomalies when you reinstall the new or reconfigured interface processor When you shut down an interface it is designated administratively down in the show command displays Follow these steps to shut down an interface Step 1 Enter the privileged level of the E...

Страница 70: ...mitted Step 8 To reenable the interfaces repeat the previous steps but use the no shutdown command in Step 4 then write the new configuration to memory as follows Router config int serial 1 1 0 Router config int no shutdown Router config int Z Router copy running config startup config OK Router show int serial 1 1 0 Serial 1 1 0 is up line protocol is up Hardware is cxBus VIP display text omitted ...

Страница 71: ... 0 Step 3 If IP routing is enabled on the system you can assign an IP address and subnet mask to the interface with the ip address configuration subcommand as in the following example Router config int ip address 145 22 4 67 255 255 255 0 Step 4 Add any additional configuration subcommands required to enable routing protocols and adjust the interface characteristics Step 5 If you are configuring a...

Страница 72: ...ow startup config command Verify that the configuration is accurate for the system and each interface If the interface is down and you configured it as up or if the displays indicate that the hardware is not functioning properly ensure that the network interface is properly connected and terminated If you still have problems bringing the interface up contact a customer service representative for a...

Страница 73: ...f the loopback test Note You must configure a clock rate on the port before performing a loopback test Depending on the mode of the port issuing the loopback command checks the following path When no interface cable is attached to the 4T port adapter interface or if a DCE cable is attached to the port the loopback command tests the path between the VIP and the interface port only without leaving t...

Страница 74: ...with a Cisco product that is under warranty or covered by a maintenance contract contact Cisco s Technical Assistance Center TAC at 800 553 2447 408 526 7209 or tac cisco com To obtain general information about Cisco Systems Cisco products or upgrades contact 800 553 6387 408 526 7208 or cs rep cisco com This document is to be used in conjunction with the Cisco 7000 Hardware Installation and Maint...

Отзывы: