background image

3-13

Cisco Interactive Experience Client 4600 Series User Guide

Chapter 3       Configuring Settings

  Network Settings

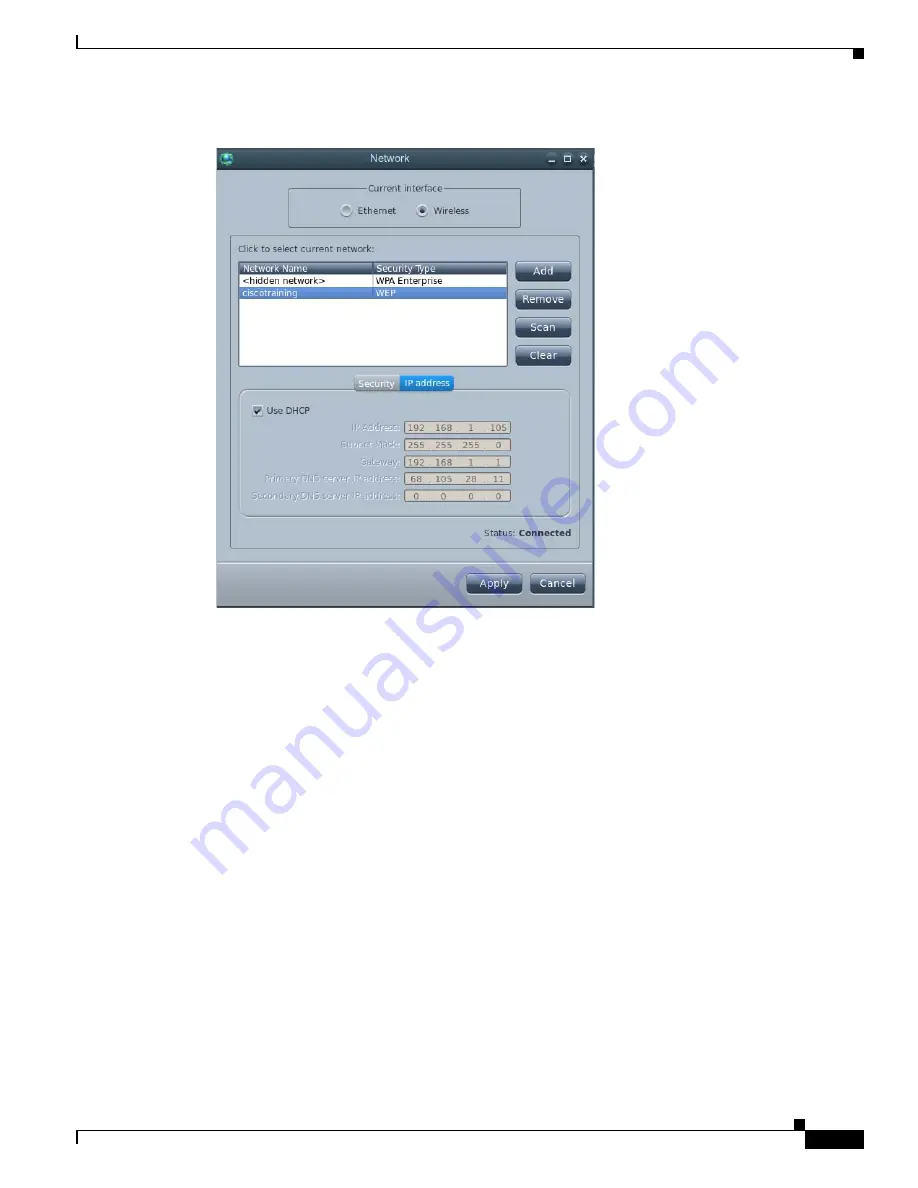
Figure 3-14

IP Address Tab

Step 8

If the DHCP check box is not checked, check the 

Use DHCP

 check box.

Step 9

Click 

Apply

.

Step 10

To exit the Network window, click 

Close

.

Step 11

In the System Settings window, click 

Reboot

.

Содержание IEC 4610

Страница 1: ...Inc 170 West Tasman Drive San Jose CA 95134 1706 USA http www cisco com Tel 408 526 4000 800 553 NETS 6387 Fax 408 527 0883 Cisco Interactive Experience Client 4600 Series User Guide Release 2 3 1 April 3 2015 Text Part Number OL 26457 08 ...

Страница 2: ...LIERS BE LIABLE FOR ANY INDIRECT SPECIAL CONSEQUENTIAL OR INCIDENTAL DAMAGES INCLUDING WITHOUT LIMITATION LOST PROFITS OR LOSS OR DAMAGE TO DATA ARISING OUT OF THE USE OR INABILITY TO USE THIS MANUAL EVEN IF CISCO OR ITS SUPPLIERS HAVE BEEN ADVISED OF THE POSSIBILITY OF SUCH DAMAGES CCDE CCENT CCSI Cisco Eos Cisco HealthPresence Cisco IronPort the Cisco logo Cisco Nurse Connect Cisco Pulse Cisco S...

Страница 3: ...A P T E R 7 Locally Configuring the IEC A P P E N D I X A Compatible Peripherals A P P E N D I X B Printers A P P E N D I X C Optical Scanners A P P E N D I X D Magnetic Card Readers and Barcode Scanners A P P E N D I X E Infrared Remote Controls A P P E N D I X F Video Conferencing Using the Session Initiation Protocol Client A P P E N D I X G Stream Live Video A P P E N D I X H Content Guideline...

Страница 4: ...Contents iv Cisco Interactive Experience Client 4600 Series User Guide ...

Страница 5: ...to the Cisco Interactive Experience Manager Installation Guide and the Cisco Interactive Experience Manager Administrator Guide for instructions on how to install and configure the software This chapter explains the audience and scope of this user guide and provides an overview of the Cisco Interactive Experience Client 4600 Series The topics in this chapter are the following What s New in This Re...

Страница 6: ...terminal shell commands to test the reachability of a host from the IEC Support for universal remote controllers By uploading a LIRC config file for the remote to the new IR Configuration property in the IEM a user can use that remote instead of the default Cisco remote Virtual keyboard support for the IEC s System Settings About This User Guide This section describes what is included in this guid...

Страница 7: ...sco s video collaboration and cloud architectures the solution allows large and small enterprises and public agencies to seamlessly provide the most updated product or service information including educational content in real time improving customer experience and increasing customer retention With built in remote management capabilities the solution enables organizations to get feedback instantan...

Страница 8: ...policy settings from the Cisco IEM Configuration settings are distributed between user and device settings Policies represent dynamic and transportable setup rules With Cisco IEM an administrator can perform the following functions Configuration A user can configure all device settings remotely including the startup URL VPN display behavior peripheral support Policy Management Policies provide an ...

Страница 9: ...reas Desktop mode allows multiple windows to be opened with access to various web resources The Cisco IEC 4600 Series is powered by the COBRA browser operating system This innovative operating system is built to provide a desktop in a browser environment giving the users a familiar feel of the desktop when interacting with Internet resources and applications The COBRA browser is compatible with al...

Страница 10: ...tings on the devices temporarily and will be reset by changing the settings within the policy by applying another IsAction policy with settings that will reverse the original settings or on the next reboot IsAction policies can only work for runtime properties which are marked by an orange arrow in the policy or profile 6 Notifications and alerts work on a subscription basis Once notification aler...

Страница 11: ...1 3 Cisco IEC 4600 Series and Mounting Bracket If any of the contents are missing contact http cisco com en US support What You Will Need Note To optimize the video quality the IEC 4600 Series should be connected to a 1080p LED or LCD video display using either HDMI preferred or VGA To install and configure the Cisco IEC 4600 Series you will need the following Video monitor non touch screen or tou...

Страница 12: ...eries User Guide Chapter 1 Introduction What You Will Need USB mouse wired or wireless Webcam optional Ethernet cable Wireless network credentials optional IEM installed and configured After you have assembled all the equipment proceed to Chapter 2 ...

Страница 13: ... 2 Environmental Tolerance Ranges page 2 4 Warnings page 2 5 Product Disposal page 2 10 RF Exposure page 2 12 Choosing a Location page 2 14 Mounting the Hardware page 2 14 Connecting and Powering Up page 2 15 Registering the IEC page 2 16 Configuring the System page 2 17 Connecting to the Network page 2 21 Configuring an Ethernet Wired Connection page 2 21 Configuring a Wireless Connection page 2 ...

Страница 14: ...nches 18 5 cm 18 8 cm 4 8 cm IEC Specifications The table below contains the IEC specifications for models IEC 4610 and IEC 4632 Table 2 2 Cisco IEC 4600 Series Specifications Features IEC 4610 IEC 4632 PCBA Form Factor Board size 6 0 in x 6 0 in 150 mm x 150 mm 6 0 in x 6 0 in 150 mm x 150 mm Processor CPU Intel Celeron M Processor Intel Core 2 Duo Processor Memory Type DDR3 800 1066 memory SO DI...

Страница 15: ... receiver USB 1 USB connector for preinstall device USB connector for preinstall device Back I O DC jack 1 12V DC in connector 1 12V DC in connector Video 1 VGA port 1 HDMI port 1 VGA port 1 HDMI port Ethernet 1 RJ45 connector with dual LEDs 1 RJ45 connector with dual LEDs USB 1 USB two stack connector 1 USB two stack connector Left I O COM 1 x 3 5 mm phone jack type 1 x 3 5 mm phone jack type IR ...

Страница 16: ...ndensing ambient Operating 10 percent Indoor 85 percent Indoor Non operating or storage 0 percent Indoor and Outdoor 95 percent Indoor and Outdoor Table 2 3 Part 3 Cisco IEC 4600 Series Environmental Tolerance Ranges Altitude Altitude1 1 Above sea level Minimum Maximum Minimum Maximum Operating and non operating 0 feet 6 561 feet 0 meters 2 000 meters Power Adapter 12V 4A 48W Input 100V 240V 1A 50...

Страница 17: ...hdistämistä virtalähteeseen Attention Avant de brancher le système sur la source d alimentation consulter les directives d installation Warnung Vor dem Anschließen des Systems an die Stromquelle die Installationsanweisungen lesen Avvertenza Consultare le istruzioni di installazione prima di collegare il sistema all alimentatore Advarsel Les installasjonsinstruksjonene før systemet kobles til strøm...

Страница 18: ...er Guide Chapter 2 Setting Up the IEC Connecting the Hardware Varning Läs installationsanvisningarna innan du kopplar systemet till strömförsörjningsenheten Figyelem Mielott áramforráshoz csatlakoztatná a rendszert olvassa el az üzembe helyezési útmutatót ...

Страница 19: ...les usagées conformément aux instructions du fabricant Warnung Bei Einsetzen einer falschen Batterie besteht Explosionsgefahr Ersetzen Sie die Batterie nur durch den gleichen oder vom Hersteller empfohlenen Batterietyp Entsorgen Sie die benutzten Batterien nach den Anweisungen des Herstellers Avvertenza Pericolo di esplosione se la batteria non è installata correttamente Sostituire solo con una di...

Страница 20: ...iet med samma batterityp som rekommenderas av tillverkaren eller motsvarande Följ tillverkarens anvisningar vid kassering av använda batterier Figyelem Existe risco de explosão se a bateria for substituída incorretamente Substitua a bateria somente com o mesmo tipo ou um tipo equivalente recomendado pelo fabricante Descarte as baterias usadas de acordo com as instruções do fabricante ...

Страница 21: ...Up the IEC Connecting the Hardware Advarsel Der er risiko for eksplosion hvis batteriet ikke udskiftes korrekt Batteriet må kun udskiftes med samme eller med en tilsvarende type som anbefales af producenten Bortskaf brugte batterier i overensstemmelse med producentens instruktioner ...

Страница 22: ...organisme compétent Warnung Die Entsorgung dieses Produkts sollte gemäß allen Bestimmungen und Gesetzen des Landes erfolgen Avvertenza Lo smaltimento di questo prodotto deve essere eseguito secondo le leggi e regolazioni locali Advarsel Endelig kassering av dette produktet skal være i henhold til alle relevante nasjonale lover og bestemmelser Aviso Deitar fora este produto em conformidade com toda...

Страница 23: ...ructions may cause harmful interference to radio communications However there is no guarantee that interference will not occur in a particular installation If this equipment does cause harmful interference to radio or television reception which can be determined by turning the equipment off and on the user is encouraged to try to correct the interference by one or more of the following measures Re...

Страница 24: ...rs IEEE C 95 1 99 International Commission on Non Ionizing Radiation Protection ICNIRP 98 Ministry of Health Canada Safety Code 6 Limits on Human Exposure to Radio Frequency Fields in the range from 3kHz to 300 GHz Australia Radiation Protection Standard Caution To ensure compliance with various national and international Electromagnetic Field EMF standards the system should only be operated with ...

Страница 25: ...or exposure to radio waves radio frequency electromagnetic fields recommended by international guidelines The guidelines were developed by an independent scientific organization ICNIRP and include a substantial safety margin designed to assure the safety of all persons regardless of age and health As such the systems are designed to be operated as to avoid contact with the antennas by the end user...

Страница 26: ... Tip Since Cisco IEC 4600 Series is designed for convectional cooling vertical mounting is highly recommended Note If you want to use a remote control and you will not use an IR extender as is recommended the infrared IR must be in sight of the user Hence you will need to determine an alternative mounting to that which is recommended here Step 1 Locate a vertical surface near the video display whe...

Страница 27: ... Cisco IEC 4600 Series Step 2 Connect an USB cable or wireless USB adapter for a mouse to an USB port on the Cisco IEC 4600 Series Step 3 Optional Connect an USB cable for a webcam to an USB port on the Cisco IEC 4600 Series Step 4 Optional Connect other peripherals such as speakers microphone magnetic card reader barcode scanner printer etc Note If using the RS232 port for a RCA TRS or TRRS conne...

Страница 28: ...inishes initializing the COBRA screen appears Figure 2 3 Initialization Screen Note After initialization Startup URL is not configured will appear at the top of the screen It is referring to the URL that the Cisco IEC 4600 Series will use to display content once it is configured Record the serial number and IP address shown on the COBRA screen Note If there are any problems with the initial config...

Страница 29: ...e Cisco Interactive Experience Manager Administrator Guide for instructions on how to add the device Configuring the System To configure the system you will need the Cisco IEM URL If you do not know the URL contact the administrator in your company who installed and configured the Cisco IEM Step 1 Press Ctrl Alt S The combination of these three keys opens the System Settings window Figure 2 4 Syst...

Страница 30: ...r the device description in the Device Description field Step 6 Enter the device location in the Device Location field Step 7 Enter the Cisco IEM address in the IEM URL field or check the Get IEM server address from DHCP check box Step 8 Click the Managed by Cisco IE Manager IEM radio button The Account Details dialog box opens The information entered here will be used to access the Cisco IEM If y...

Страница 31: ...e password in the Password field To verify that you entered the correct password check the Show password check box to view the password entered Step 12 Click Register Step 13 Once the account is registered you will see the word Success Figure 2 7 Registration Successful Notification Step 14 Click Reboot now Step 15 When you complete the selections in this window click Apply Step 16 To exit the Sys...

Страница 32: ...apter 2 Setting Up the IEC Configuring the System Step 17 In the System Settings window click Reboot Figure 2 8 Reboot Icon in the System Settings Window The COBRA screen appears Figure 2 9 COBRA Screen Next you will connect the Cisco IEC 4600 Series to the Cisco IEM ...

Страница 33: ...ing the Emergency Configuration Mode as described in Using Emergency Configuration Mode Once in Emergency Configuration Mode click the Network icon and then proceed to either Configuring an Ethernet Connection or Configuring a Wireless Connection Configuring an Ethernet Wired Connection If you want to configure an Ethernet wired connection to the network using DHCP or a static IP address follow th...

Страница 34: ...k the Use DHCP check box b Enter the IP address in the IP Address field c Enter the subnet mask in the Subnet Mask field d Enter the gateway address in the Gateway field e Enter the primary DNS server s IP address in the Primary DNS server IP Address field f If there is a second DNS server enter the secondary DNS server s IP address in the Secondary DNS server IP Address field ...

Страница 35: ...e Chapter 2 Setting Up the IEC Connecting to the Network Figure 2 12 Using a Static IP Address Step 5 Click Apply Step 6 To exit the Network window click Close Step 7 In the System Settings window click Reboot Figure 2 13 Reboot Icon in the System Settings Window ...

Страница 36: ...p 9 Click Apply Step 10 Enter the IP address in the IP Address field Step 11 Enter the subnet mask in the Subnet Mask field Step 12 Enter the gateway address in the Gateway field Step 13 Enter the primary DNS server s IP address in the Primary DNS server IP Address field Step 14 If there is a second DNS server enter the secondary DNS server s IP address in the Secondary DNS server IP Address field...

Страница 37: ... If you change the network connection the Cisco IEC 4600 Series device s IP address will change Be sure to record the new IP address Configuring a Wireless Connection If you want to configure a wireless connection to the network using DHCP or a static IP address follow these steps Step 1 Press Ctrl Alt S to display the System Settings window Step 2 Click the Network icon ...

Страница 38: ... User Guide Chapter 2 Setting Up the IEC Connecting to the Network Figure 2 16 Network Icon in System Settings Window Step 3 Click the Wireless radio button Figure 2 17 Wireless Interface Step 4 Click Scan All the wireless networks detected are displayed ...

Страница 39: ...e IEC Connecting to the Network Figure 2 18 Wireless Networks Detected Step 5 Click a network name to select a network Step 6 In the Security tab enter the information requested If the security type is WEP From the Key Type drop down list choose ASCII or HEX Enter the key in the Key field ...

Страница 40: ...ent 4600 Series User Guide Chapter 2 Setting Up the IEC Connecting to the Network Figure 2 19 WEP Security Key Field and Type Drop Down List If the security type is WPA Personal or WPA2 Personal Enter the passphrase in the Passphrase field ...

Страница 41: ...WPA Enterprise or WPA2 Enterprise Enter the user name in the User Name field Enter the password in the Password field Enter the anonymous identity in the Anonymous Identity field From the EAP Method drop down list choose the EAP method used From the Inner Method drop down list choose the inner method used If it requires a SSL certificate check the Use SSL Certificate check box ...

Страница 42: ...x If the security type is IEEE802 1X Enter the user name in the User Name field Enter the password in the Password field Enter the anonymous identity in the Anonymous Identity field From the EAP Method drop down list choose the EAP method used From the Inner Method drop down list choose the inner method used If it requires a SSL certificate check the Use SSL Certificate check box ...

Страница 43: ...o Interactive Experience Client 4600 Series User Guide Chapter 2 Setting Up the IEC Connecting to the Network Figure 2 22 IEEE802 1X Security Fields Drop Down Lists and Check Box Step 7 Click the IP address tab ...

Страница 44: ...CP check box b Enter the IP address in the IP Address field c Enter the subnet mask in the Subnet Mask field d Enter the gateway address in the Gateway field e Enter the primary DNS server s IP address in the Primary DNS server IP Address field f If there is a second DNS server enter the secondary DNS server s IP address in the Secondary DNS server IP Address field Step 9 Click Apply Step 10 To ex...

Страница 45: ...tion assumes that either you or an administrator at your company has already installed and configured the Cisco IEM If not use the Cisco Interactive Experience Manager Installation Guide and Cisco Interactive Experience Manager Administrator Guide to install and configure the Cisco IEM Applying a Policy The startup URL is the content that will be displayed on the kiosk Follow these steps to apply ...

Страница 46: ...5 Cisco IEM Login Step 3 Enter the account name in the Account field Step 4 Enter the user name in the User Name field Step 5 Enter the password in the Password field Step 6 Click Enter After login the Cisco IEM opens Step 7 In the left pane choose Devices Figure 2 26 Devices Step 8 Double click the device s icon in the center pane ...

Страница 47: ...e IEC Connecting to the Cisco IEM Figure 2 27 Choosing a Device Step 9 To get the startup URL you need to apply a policy Click the Policies tab Figure 2 28 Policies Tab Step 10 Ask your administrator which policy you should apply Step 11 From the Available policies list choose the policy ...

Страница 48: ... Step 12 Click the Green Arrow to move that policy to the Applied policies list Figure 2 30 Policy that has been Applied You can select more than one policy at a time by pressing Select for sequential policies or CTRL for non sequential policies Step 13 Click Apply Step 14 In the right pane click Predefined actions to display the list of Predefined actions ...

Страница 49: ...ed Actions List Step 15 Click Reboot Step 16 Click Ok in the Reboot Device dialog box to reboot the Cisco IEC 4600 Series Figure 2 32 Reboot Device Dialog Box The video display will now show the content from the startup URL If you want to change how the startup URL appears refer to the Cisco Interactive Experience Manager Administrator Guide ...

Страница 50: ...ating the Touchscreen When the calibration screen appears touch the crosses in the corners as instructed For example when the touchscreen is in portrait orientation touch the screen in this order top right bottom right top left and bottom left You can calibrate the screen at any time To calibrate the touchscreen follow these steps Step 1 Press Ctrl Alt S to access the System Settings menu ...

Страница 51: ...ergency Configuration Mode Note Using the emergency configuration mode should be your last resort This is primarily done if you do not have Internet access and you have tried to solve the issue to no avail Consult the Cisco Interactive Services Solution Troubleshooting Guide first If the system hangs during the initialization process enter the Emergency Configuration Mode to modify the configurati...

Страница 52: ...IEC Using Emergency Configuration Mode Figure 2 35 Devices Button Step 3 Double click on the device icon to display the tabs containing information about that particular device Step 4 In the General tab click on the Maintenance Code button Figure 2 36 Maintenance Code Button in General Tab ...

Страница 53: ...ency Configuration Mode Figure 2 37 Maintenance Code General Tab The maintenance code is displayed Write down the code Step 5 Go to the IEC 4600 Series Step 6 Click on the gear button on the screen Figure 2 38 Gear Button on Screen You will be prompted for an access code Step 7 Enter the maintenance code ...

Страница 54: ... 1 The IEC s Maintenance Code which can be found in the General Tab of the device see figure below 2 A VNC viewer Figure 2 39 Maintenance Code in General Tab of Device To use a VNC viewer to access an IEC follow these steps Step 1 Log into the IEM Step 2 Click Policies in the left pane Step 3 In the Edit menu click New Policy Step 4 Enter a policy name in the Policy Name field that indicates the p...

Страница 55: ...operty Step 10 Change the value to true Figure 2 41 remoteview enabled Property Step 11 Click Apply Step 12 When you are ready to use a VNC viewer to access an IEC go to the IEM and find the device that you want to access using a VNC viewer Step 13 From the Custom actions menu click the custom action that you created for VNC such as VNC_Start Step 14 Launch a VNC viewer Step 15 In the VNC Server f...

Страница 56: ... 17 When prompted for a password enter the IEC s Maintenance Code Note When entering the Maintenance Code as the password enter the letters of the Maintenance Code as upper case If for example the Maintenance Code is 6A54F3 enter 6A54F3 The password will not work if you enter 6a54f3 The screen will then show the application that is currently running on the IEC ...

Страница 57: ...to sort logs and reboot the IEC The topics in this chapter include the following Network Settings page 3 2 Configuring an Ethernet Connection using DHCP page 3 2 Configuring an Ethernet Connection using a Static IP Address page 3 4 Configuring a Wireless Connection using DHCP page 3 6 Configuring a Wireless Connection using a Static IP Address page 3 14 Proxy Server Settings page 3 21 Static Optio...

Страница 58: ...DHCP or an IP address Configuring an Ethernet Connection using DHCP If you want to configure an Ethernet wired connection to your network using DHCP follow these steps Step 1 Press Ctrl Alt S to display the System Settings window Step 2 Click the Network icon Figure 3 1 Network Icon in System Settings Window Step 3 If Ethernet is not the current interface click on the Ethernet radio button Step 4 ...

Страница 59: ...ience Client 4600 Series User Guide Chapter 3 Configuring Settings Network Settings Figure 3 2 Use DHCP Check Box Step 5 Click Apply Step 6 To exit the Network window click Close Step 7 In the System Settings window click Reboot ...

Страница 60: ... network connection the Cisco IEC 4600 Series device s IP address will change Be sure to record the new IP address Configuring an Ethernet Connection using a Static IP Address If you want to configure an Ethernet wired connection to your network using a static IP address follow these steps Step 1 Press Ctrl Alt S to display the System Settings window Step 2 Click the Network icon ...

Страница 61: ...work Settings Figure 3 4 Network Icon in System Settings Window Step 3 If Ethernet is not the current interface click on the Ethernet radio button Step 4 If the DHCP check box is checked uncheck the Use DHCP check box Figure 3 5 Use DHCP Check Box Step 5 Enter the IP address in the IP Address field ...

Страница 62: ...y DNS server IP Address field Step 10 When you complete the selections in this window click Apply Step 11 To exit the Network window click Close Step 12 In the System Settings window click Reboot Figure 3 6 Reboot Icon in the System Settings Window If you change the network connection the Cisco IEC 4600 Series device s IP address will change Be sure to record the new IP address Configuring a Wirel...

Страница 63: ...ve Experience Client 4600 Series User Guide Chapter 3 Configuring Settings Network Settings Figure 3 7 Network Icon in System Settings Window Step 3 Click the Wireless radio button Step 4 Click Scan Figure 3 8 Scan Button ...

Страница 64: ...3 Configuring Settings Network Settings Step 5 Click on a network name to select a network Figure 3 9 Step 6 In the Security tab enter the information requested If the security type is WEP From the Key Type drop down list choose ASCII or HEX Enter the key in the Key field ...

Страница 65: ...Client 4600 Series User Guide Chapter 3 Configuring Settings Network Settings Figure 3 10 WEP Security Key Field and Type Drop Down List If the security type is WPA Personal or WPA2 Personal Enter the passphrase in the Passphrase field ...

Страница 66: ...Enterprise or WPA2 Enterprise Enter the user name in the User Name field Enter the password in the Password field Enter the anonymous identity in the Anonymous Identity field From the EAP Method drop down list choose the EAP method used From the Inner Method drop down list choose the inner method used If it requires a SSL certificate check the Use SSL Certificate check box ...

Страница 67: ... the security type is IEEE802 1X Enter the user name in the User Name field Enter the password in the Password field Enter the anonymous identity in the Anonymous Identity field From the EAP Method drop down list choose the EAP method used From the Inner Method drop down list choose the inner method used If it requires a SSL certificate check the Use SSL Certificate check box ...

Страница 68: ...sco Interactive Experience Client 4600 Series User Guide Chapter 3 Configuring Settings Network Settings Figure 3 13 IEEE802 1X Security Fields Drop Down Lists and Check Box Step 7 Click on the IP address tab ...

Страница 69: ... Chapter 3 Configuring Settings Network Settings Figure 3 14 IP Address Tab Step 8 If the DHCP check box is not checked check the Use DHCP check box Step 9 Click Apply Step 10 To exit the Network window click Close Step 11 In the System Settings window click Reboot ...

Страница 70: ...e the network connection the Cisco IEC 4600 Series device s IP address will change Be sure to record the new IP address Configuring a Wireless Connection using a Static IP Address If you want to configure a wireless connection to your network using a static IP address follow these steps Step 1 Press Ctrl Alt S to display the System Settings window Step 2 Click the Network icon ...

Страница 71: ...Series User Guide Chapter 3 Configuring Settings Network Settings Figure 3 16 Network Icon in System Settings Window Step 3 Click the Wireless radio button Step 4 Click Scan Figure 3 17 Scan Button Step 5 Click on a network name to select a network ...

Страница 72: ...In the Security tab enter the information requested If the security type is WEP From the Key Type drop down list choose ASCII or HEX Enter the key in the Key field Figure 3 18 WEP Security Key Field and Type Drop Down List If the security type is WPA Personal or WPA2 Personal Enter the passphrase in the Passphrase field ...

Страница 73: ...Enterprise or WPA2 Enterprise Enter the user name in the User Name field Enter the password in the Password field Enter the anonymous identity in the Anonymous Identity field From the EAP Method drop down list choose the EAP method used From the Inner Method drop down list choose the inner method used If it requires a SSL certificate check the Use SSL Certificate check box ...

Страница 74: ... the security type is IEEE802 1X Enter the user name in the User Name field Enter the password in the Password field Enter the anonymous identity in the Anonymous Identity field From the EAP Method drop down list choose the EAP method used From the Inner Method drop down list choose the inner method used If it requires a SSL certificate check the Use SSL Certificate check box ...

Страница 75: ...sco Interactive Experience Client 4600 Series User Guide Chapter 3 Configuring Settings Network Settings Figure 3 21 IEEE802 1X Security Fields Drop Down Lists and Check Box Step 7 Click on the IP address tab ...

Страница 76: ...Enter the subnet mask in the Subnet Mask field Step 11 Enter the gateway address in the Gateway field Step 12 Enter the primary DNS server s IP address in the Primary DNS server IP Address field Step 13 If there is a second DNS server enter the secondary DNS server s IP address in the Secondary DNS server IP Address field Step 14 When you complete the selections in this window click Apply Step 15 ...

Страница 77: ... Server Settings The proxy settings only apply to standalone mode If you are in standalone mode you can enable a proxy server There are four configuration options Disabled Static Autoconfiguration script Autoconfiguration URL By default the proxy server is disabled Static Option Follow these steps to enable a proxy server using the static option Step 1 Press Ctrl Alt S to display the System Settin...

Страница 78: ...er 3 Configuring Settings Proxy Server Settings Figure 3 24 Proxy Server Icon in System Settings Window Step 4 In the Proxy Server dialog box choose the Static radio button as proxy type Figure 3 25 Proxy Server Dialog Box Step 5 Enter the host address in the Host field ...

Страница 79: ...ld Step 9 When you complete the selections in this window click Apply Step 10 To exit the Proxy Server window click Close Step 11 In the System Settings window click Reboot Figure 3 26 Reboot Icon in the System Settings Window Autoconfiguration Script Option Follow these steps to enable a proxy server using an autoconfiguration script Step 1 Press Ctrl Alt S to display the System Settings window S...

Страница 80: ...guring Settings Proxy Server Settings Figure 3 27 Proxy Server Icon in System Settings Window Step 4 In the Proxy Server dialog box choose the Autoconfiguration script radio button as proxy type Figure 3 28 Proxy Server Dialog Box Step 5 Enter the proxy script in the Script field ...

Страница 81: ...ck Close Step 8 In the System Settings window click Reboot Figure 3 29 Reboot Icon in the System Settings Window Autoconfiguration URL Option Follow these steps to enable a proxy server using an autoconfiguration URL Step 1 Press Ctrl Alt S to display the System Settings window Step 2 If the IEC is managed by an IEM enter its maintenance code Step 3 Click the Proxy Server icon ...

Страница 82: ... User Guide Chapter 3 Configuring Settings Proxy Server Settings Figure 3 30 Proxy Server Icon in System Settings Window Step 4 In the Proxy Server dialog box choose the Autoconfiguration URL radio button as proxy type Figure 3 31 Proxy Server Dialog Box ...

Страница 83: ...Settings Window System Settings There are three tabs in the System settings window Server Device and LAN To configure the system you will need the Cisco IEM URL If you do not know the URL contact the administrator in your company who installed and configured the Cisco IEM Setting Management Mode In managed mode the IEC 4600 Series is configured and controlled remotely Managed mode facilitates cons...

Страница 84: ...ings Figure 3 33 System Icon in System Settings Window Now you will configure the system to connect the Cisco IEC 4600 Series device to the Cisco IEM Step 3 Enter the device name in the Device name field The name you choose will be used in the Cisco IEM to identify this device Figure 3 34 System Dialog Box ...

Страница 85: ... will be used to access the Cisco IEM If you do not know this information obtain it from the administrator who installed and configured the Cisco IEM Step 8 Enter the account name in the Account field Figure 3 35 Account Details Dialog Box Step 9 Enter the user name in the User name field Step 10 Enter the password in the Password field To verify that you entered the correct password check the Sho...

Страница 86: ...ge the kiosk configure the Cisco IEC 4600 Series using the standalone mode Warning If you have already registered a Cisco IEM account choosing standalone will unregister that account Step 1 Press Ctrl Alt S to display the System Settings window Step 2 Click the System icon Figure 3 37 System Icon in System Settings Window Step 3 Enter the device name in the Device name field ...

Страница 87: ...em Settings Figure 3 38 System Dialog Box Step 4 Enter the device description in the Device Description field Step 5 Enter the device location in the Device Location field Step 6 Click the Switch to standalone button Step 7 In the Account Details dialog box enter the account name in the Account field ...

Страница 88: ... Show password check box to see the characters entered Step 10 Click Unregister Step 11 Once the account is unregistered you will see the word Success Figure 3 40 Success Message in the Account Details Dialog Box Step 12 Click the Reboot now button Changing the IEM s URL There may be times when you need to change the IEM s URL in the IEC to a different IEM URL such as when the IEC is used for demo...

Страница 89: ...Chapter 3 Configuring Settings System Settings Step 1 Press Ctrl Alt S to display the System Settings window Step 2 Click the System icon Figure 3 41 System Icon in System Settings Window Step 3 In the System dialog box enter the device name in the Device name field ...

Страница 90: ...em Settings Figure 3 42 System Dialog Box Step 4 Enter the device description in the Device Description field Step 5 Enter the device location in the Device Location field Step 6 Click the Switch to standalone button Step 7 In the Account Details dialog box enter the account name in the Account field ...

Страница 91: ...assword field To verify that you entered the correct password check the Show password check box to see the characters entered Step 10 Click the Unregister button Step 11 Once the account is unregistered you will see the word Success Figure 3 44 Account Details Dialog Box Showing Success Message Step 12 Click the Reboot now button The IEC will reboot Step 13 After the IEC reboots press Ctrl Alt S t...

Страница 92: ...Client 4600 Series User Guide Chapter 3 Configuring Settings System Settings Figure 3 45 System Icon in System Settings Window Step 14 Click the System icon Step 15 In the System dialog box enter the device name in the Device name field ...

Страница 93: ...6 System Dialog Box Step 16 Enter the device description in the Device Description field Step 17 Enter the device location in the Device Location field Step 18 Enter the new IEM address in the Manager host field Step 19 Click the Switch to managed button Step 20 Enter the account name for the new IEM in the Account field ...

Страница 94: ...lick the Register button Step 24 Once the account is registered you will see the word Success Figure 3 48 Account Details Dialog Box Showing Success Message Step 25 Click the Reboot now button Resetting the Device The Cisco IEC 4600 Series can be reset to factory settings at any time There are two methods for resetting the device to factory settings 1 Insert a pin in the Reset hole on the side of ...

Страница 95: ...t 4600 Series User Guide Chapter 3 Configuring Settings System Settings Step 1 Press Ctrl Alt S to display the System Settings window Step 2 Click the System icon Figure 3 49 System Icon in System Settings Window Step 3 Click the Device tab ...

Страница 96: ... Click Yes Figure 3 51 Reset Dialog Box System Logs The System Logs window displays all the data collected since the device was last powered on The Cisco IEC 4600 Series is a stateless device so if the device is unplugged or loses power the data is lost You can sort data five ways Severity You can sort by level of severity from highest to lowest critical error warning notice information debug ...

Страница 97: ...ge You can sort by message types Sorting Logs Follow these steps to sort the log entries Step 1 Press Ctrl Alt S to display the System Settings window Step 2 Click the System Logs icon Figure 3 52 System Logs Icon in System Settings Window Step 3 Click on check boxes and enter required values or information to sort the log entries To sort by severity Check the Severity check box From the Severity ...

Страница 98: ...els of severity make sure that you are choosing from highest level to lowest level not lowest level to highest level If no logs still display there may not be logs yet for those levels To clear the entry uncheck the Severity check box Scroll through the list of data to see if anything was logged for those levels If not you can reset those levels If the levels are logged reset those levels in rever...

Страница 99: ...x If you are familiar with Linux follow these steps to sort by applications Check the Application check box Enter one of the application names below in the Application field Make sure that you are entering it exactly as shown here the names are case sensitive usr sbin cron CRON acpid avahi daemon bluetoothhd co dhclient dmmd kernel management daemon system ntpd nptd_intres ntpdate replicator rsysl...

Страница 100: ...on check box and search for a log event of that application type If there are log events for that application check the Application check box and re enter the application name making sure that you are entering it exactly as shown in the log To sort by PID Check the PID check box Enter the lowest PID number desired into the from field by either pressing the Up Arrow or Down Arrow to pick a value or...

Страница 101: ... you want all entries to display the next time you access the logs uncheck all the check boxes and then Click Close Enabling the Debug Mode The Debug mode can be enabled Since debugging is an application that runs in the background it will affect performance of the Cisco IEC 4600 Series if it is enabled To enable the Debug mode follow these instructions Step 1 Press Ctrl Alt S to display the Syste...

Страница 102: ...con in System Settings Window Step 3 Check the Debug mode check box Figure 3 58 Debug Mode Check Box Step 4 Click Apply Step 5 To exit the System Logs window click Close Reboot The Reboot icon is used to reboot the Cisco IEC 4600 Series after any changes to settings Step 1 Press Ctrl Alt S to display the System Settings window ...

Страница 103: ...47 Cisco Interactive Experience Client 4600 Series User Guide Chapter 3 Configuring Settings Reboot Step 2 In the System Settings window click Reboot Figure 3 59 Reboot Icon in the System Settings Window ...

Страница 104: ...3 48 Cisco Interactive Experience Client 4600 Series User Guide Chapter 3 Configuring Settings Reboot ...

Страница 105: ...cted with before the IEC goes off line will not be cached and thus not visible to users For example if users only move an interactive map to the east and to the north of the central coordinates after the IEC goes off line the west and south portions of the map will not be visible to users Only static page content is cached Images and embedded videos are also cached Dynamic page content is NOT cach...

Страница 106: ... 4 Expand the cache property to show the media and web properties within it Step 5 Expand the media property to show the enabled and mode properties within it Figure 4 1 Media Property Step 6 Set the enabled property to true to enable media caching Step 7 Set the mode property to Content never expires Step 8 Optional Set the cache size for media Step 9 Expand the web property to show the enabled a...

Страница 107: ... in this chapter include IEC Firmware Upgrade Using the IEM page 5 1 Saving XML Files page 5 8 IEC Firmware Upgrade Using the Terminal Utility page 5 10 Warning Before upgrading an IEC to the latest version ensure that the software version of the IEM is the latest too IEC Firmware Upgrade Using the IEM You will need the following files that can be downloaded from www cisco com System file Applicat...

Страница 108: ...re Upgrade Using the IEM Figure 5 1 Maintenance Button Step 2 Click Supported Products Figure 5 2 Supported Products Button Step 3 Click IEC Figure 5 3 Product Name in the Left Pane Step 4 Click 4600 Figure 5 4 Model Name in the Left Pane Step 5 Go to the Edit menu in the right pane and click Versions ...

Страница 109: ... section of this chapter If a different or newer version should be loaded or no versions are listed continue this step set You will need the following files System file Application file Specification file Step 6 Click New Firmware in the Edit menu The Add firmware dialog box opens Figure 5 7 Add Firmware Dialog Box Step 7 In the New firmware version fields enter the latest version number Step 8 Cl...

Страница 110: ... desktop it will report Specification is not found when uploading to the IEM See Saving XML Files in this chapter to learn how to save this XML file to your desktop correctly Step 10 In the System Image column click Figure 5 8 Add Image Button The Upload Image dialog box opens Step 11 Click add Figure 5 9 Upload Image Dialog Box Step 12 Find the file on your desktop and click Open ...

Страница 111: ...EM Figure 5 10 Select Files Dialog Box The file appears in the Upload Image dialog box Figure 5 11 System File in Upload Image Dialog Box Step 13 Click upload The file will appear in the System Image list Step 14 In the Application column click Figure 5 12 Add Image Button The Upload Image dialog box opens Step 15 Click add ...

Страница 112: ... 13 Upload Image Dialog Box Step 16 Find the file on your desktop and click Open Figure 5 14 Select Files Dialog Box The file appears in the Upload Image dialog box Figure 5 15 Application File in Upload Image Dialog Box Step 17 Click upload The file will appear in the Applications Image list Step 18 In the Specification column click ...

Страница 113: ...C IEC Firmware Upgrade Using the IEM Figure 5 16 Add Image Button The Upload Image dialog box opens Step 19 Click add Figure 5 17 Upload Image Dialog Box Step 20 Find the file on your desktop and click Open Figure 5 18 Select Files Dialog Box The file appears in the Upload Image dialog box ...

Страница 114: ...column the word Yes appears Figure 5 20 Active Column The images will become available for pushing to the IECs that are registered and active in the IEM Deactivate the previous version if one was already activated You do not need to delete older versions Saving XML Files The specification file is an XML file If it is incorrectly saved it will report Specification is not found when uploading to the...

Страница 115: ...00 Series User Guide Chapter 5 Upgrading the IEC IEC Firmware Upgrade Using the IEM Figure 5 21 Specification File Step 3 Click page to expand the drop down list Figure 5 22 Page Menu Step 4 Click View source The file opens in a Notepad window ...

Страница 116: ...ve As dialog box choose a location on your computer Figure 5 24 Save As Dialog Box Step 8 In the Save as type drop down list choose All Files to save the file with the xml extension Step 9 Click Save IEC Firmware Upgrade Using the Terminal Utility In this method you will use the debugging console to upgrade the firmware The uloaders command switches from the old partition to the new partition The ...

Страница 117: ...ion file You will also need the URL of where you placed these files To upgrade the firmware follow these steps Step 1 Press Ctrl Alt S to open the System Settings menu Figure 5 25 System Settings Menu Step 2 Click the Terminal icon The console window opens with the password prompt Step 3 Type the DMC for the password and press the Enter key Figure 5 26 Console Window Step 4 To view a list of comma...

Страница 118: ...the Terminal Utility Step 5 Locate the upgrade commands in the list Figure 5 27 Upgrade Commands Step 6 Enter the usys url command where the URL is the location of the system firmware file Step 7 Enter the uapps url command where the URL is the location of the applications firmware file Step 8 Enter the uloaders command ...

Страница 119: ...page 6 1 General Commands page 6 3 Upgrade Commands page 6 4 Debugging Commands page 6 4 Management Commands page 6 6 Properties Commands page 6 7 Debugging Console The IEC has a custom debug shell that provides command line interface for running diagnostics commands and other debugging and troubleshooting activities You will need the Device Maintenance Code DMC to access the debugging console The...

Страница 120: ...gure 6 1 DMC in the General Tab To access the debugging console follow these steps Step 1 Press Ctrl Alt S to open the System Settings menu Figure 6 2 System Settings Menu Step 2 Click the Terminal icon The console window opens with the password prompt Step 3 Type the DMC for the password and press the Enter key ...

Страница 121: ...t Step 5 Type the command you desire and press the Enter key Step 6 To close the console window click the X in the upper left corner of the window General Commands Enter the following commands to show general information about this utility and the IEC such as the list of commands the IEC s serial number and Device Maintenance Code General commands also include those that reboot and reset the IEC t...

Страница 122: ...ers Upgrade loaders Upgrade Commands Note The angle brackets indicates a required value The square brackets indicate an optional value To upgrade the firmware 1 Enter the usys url command where the URL is the location of the system firmware file 2 Enter the uapps url command where the URL is the location of the applications firmware file 3 Enter the uloaders command to switch to the new partition ...

Страница 123: ...iostat Print I O statistics dstat Print local storage statistics lsusb List connected USB devices lsinput List connected input devices httphead url Send HEAD request to URL url Response header will be printed ifconfig Show network interfaces configuration traceroute host address Track the route packets taken from an IP network on their way to a given host nslookup host fqdn Query Internet domain n...

Страница 124: ...the IEM diload Load device s information name and description from the IEM dsave Save device s entire profile on the IEM disave Save device s information name and description on the IEM esave Save events on the IEM note that the saved events will be removed from the local event database dsync Save unsaved properties from the device s profile on the IEM pingmng Update device s status on the IEM pin...

Страница 125: ...wildcard List configuration parameters setc name value Set configuration parameters Although the device description field in the IEM accepts spaces between words e g located in lobby of San Jose branch the setc command within the IEC s terminal shell does not accept spaces for part of its value and returns the error ERROR Invalid command or parameters Type help to print usage information setc name...

Страница 126: ...6 8 Cisco Interactive Experience Client 4600 Series User Guide Chapter 6 Debugging Console Debugging Console ...

Страница 127: ...s in this chapter include the following Setting Stand Alone Mode page 7 2 Audio Settings page 7 4 Specifying the Audio Input Device page 7 4 Specifying the Audio Output Device page 7 6 Date and Time Settings page 7 7 Setting the Date and Time page 7 7 Selecting the Time Zone page 7 9 Display Settings page 7 11 Adjusting the Rotation page 7 11 Selecting the Master Video Display page 7 12 Keyboard S...

Страница 128: ... Cursor page 7 28 Setting Stand Alone Mode If you will not use the Cisco IEM to manage the kiosk configure the Cisco IEC 4600 Series using the stand alone mode Warning If you have already registered a Cisco IEM account choosing stand alone will unregister that account Step 1 Press Ctrl Alt S to display the System Settings window Step 2 Click the System icon Figure 7 1 System Icon in System Setting...

Страница 129: ...ter the device location in the Device Location field Step 7 Click the Switch to standalone button Step 8 Enter the account name in the Account field Step 9 Enter the user name in the User name field Step 10 Enter the password in the Password field To verify that you entered the correct password check the Show password check box to see the characters entered Step 11 Click Unregister Step 12 To exit...

Страница 130: ...dio Settings The Audio setting controls the input and output devices Specifying the Audio Input Device The default setting for audio input is Analog There are three types of input audio possible Analog Camera and USB headset If you want to change this setting follow the steps below Step 1 Press Ctrl Alt S to display the System Settings window Step 2 Click the Audio icon ...

Страница 131: ...the USB cable to an USB port on the Cisco IEC 4600 Series If the input audio is a camera with a TRS connector connect the TRS connector to the microphone port or RS232 port on the Cisco IEC 4600 Series Figure 7 5 The TRS audio connectors on the Cisco IEC 4600 Series Step 4 From the Input drop down list choose USB camera microphone or USB headset Figure 7 6 Audio Input Drop Down List Step 5 When yo...

Страница 132: ...s are HDMI USB headset and USB speaker Note The audio mode falls back to Analog when the audio output is configured as USB headset or USB speaker but a USB headset or speaker is not connected to the IEC Step 1 Press Ctrl Alt S to display the System Settings window Step 2 Click the Audio icon Figure 7 7 Audio Icon in the System Settings window Step 3 Connect the cable from the output device to a po...

Страница 133: ...e type of output Figure 7 9 Audio Output Drop Down List Step 5 Click Apply Step 6 To exit the Audio window click Close Date and Time Settings The date time and time zone are automatically set by default but can be manually changed if they are incorrect Setting the Date and Time Follow the steps below to change the date and time Step 1 Press Ctrl Alt S to display the System Settings window Step 2 C...

Страница 134: ...g the IEC Date and Time Settings Figure 7 10 Date and Time Icon in the System Settings window Step 3 Click the Date Time tab Figure 7 11 Date Time Tab Step 4 To change the date and time uncheck the Set date and time automatically check box Step 5 In the date field enter the month day and year ...

Страница 135: ...field enter the hour minute and second Step 7 Click Apply to set the new date and time Step 8 To exit the Date and Time window click Close Selecting the Time Zone The time zone is automatically determined by default If the time zone is incorrect or you want to change it follow the steps below Step 1 Press Ctrl Alt S to display the System Settings window Step 2 Click the Date and Time icon ...

Страница 136: ...he IEC Date and Time Settings Figure 7 13 Date and Time Icon in the System Settings window Step 3 Click the Time Zone tab Figure 7 14 Time Zone Tab Step 4 From the Closest city drop down list choose a city Step 5 Click Apply to set the time zone Step 6 To exit the Date and Time window click Close ...

Страница 137: ...o IEC 4600 Series to the video display Adjusting the Rotation The rotation is determined by the IEM policy that is applied The rotation is set to Normal by default To change the rotation in standalone mode follow these steps Step 1 Press Ctrl Alt S to display the System Settings window Step 2 Click the Display icon Figure 7 15 Display Icon in the System Settings window Step 3 Click the General tab...

Страница 138: ...lose Selecting the Master Video Display The Master setting indicates the input method that is used to connect the video display to the IEC 4600 Series if more than one display has been connected The two choices are VGA and HDMI Choose the display connection that you want as the master video display by following these steps Step 1 Press Ctrl Alt S to display the System Settings window Step 2 Click ...

Страница 139: ... Settings Figure 7 17 Display Icon in the System Settings window Step 3 Click the General tab Step 4 From the Master drop down list choose the type of connection used for the video display Figure 7 18 Master Drop Down List Step 5 Click Apply to set the master input Step 6 To exit the Display window click Close ...

Страница 140: ...nd change the keyboard settings Adjusting the Keyboard Parameters The keyboard parameters are by default set to a 400 millisecond delay and at a rate of 35 per second To change the parameters follow these steps Step 1 Press Ctrl Alt S to display the System Settings window Step 2 Click the Keyboard icon Figure 7 19 Keyboard Icon in System Settings Window Step 3 Check the Enable keyboard repeat chec...

Страница 141: ...e Step 6 When you complete the selections in this window click Apply Step 7 To exit the Keyboard window click Close Specifying the Keyboard Layout Keyboards are available in different languages The layout for keyboards can be different to accommodate the different characters in languages In order for the IEC 4600 Series to work with your keyboard make sure the correct language keyboard has been ch...

Страница 142: ...d Settings Figure 7 21 Keyboard Icon in System Settings Window Step 3 Click the Layout tab of the Keyboard window Figure 7 22 Layout Tab Step 4 Find the country language and keyboard type within the Available layouts list Step 5 Click the Right Arrow to move that keyboard layout to the Configured layouts list ...

Страница 143: ...ayouts Step 6 Click on the layout choice that you want to apply Note If the USA layout is not needed you can move it to the Available layouts Click the layout name and then click the Left Arrow Step 7 Click Apply to change the layout Note that the Current layout at the bottom of the window has now changed Figure 7 24 Current Layout Has Changed ...

Страница 144: ...ngs screen Title that appears on the top of the screen Navigational panel that appears on the top of the screen Web page that will display on the browser Tip Only enter a URL if you are not using the IEM to manage the startup URL Note The URL should not be used for the Remote Expert Displaying the Navigational Panel and Content Title Note If the navigational panel and content title are to be displ...

Страница 145: ... 25 Kiosk Icon in System Settings Window Step 3 Check the Title check box to display a title Figure 7 26 Navigational Panel Check Box Step 4 Check the Navigational panel check box to display the navigational panel Step 5 Click Apply Step 6 To exit the Kiosk window click Close Step 7 In the System Settings window click Reboot ...

Страница 146: ...estion Help button Go back one page button Stop loading this page button Go to startup URL button Reload current page button Go forward one page button Print currently loaded page button Displaying a Website using the Kiosk URL feature If the IEC 4600 Series is in standalone mode you can display a web page on the kiosk This feature is available for demos of the unit or when the connection to the I...

Страница 147: ...web page Step 1 Press Ctrl Alt S to display the System Settings window Step 2 Click the Kiosk icon Figure 7 29 Kiosk Icon in System Settings Window Step 3 Enter the website address in the URL field Step 4 If the navigational panel should be displayed on the kiosk display check the Navigational panel check box Figure 7 30 URL Field Step 5 Click Apply Step 6 To exit the Kiosk window click Close Step...

Страница 148: ...a page When Scroll bars or Kinetic scrolling is chosen as the scrolling method customers can use the mouse or their finger if the screen is a touchscreen to push the page content up down right or left When Scroll panes is the scrolling method four panes appear on the screen to allow customers to push scroll bars up down right or left Follow these steps to set the scrolling mode Step 1 Press Ctrl A...

Страница 149: ...gure 7 32 Kiosk Icon in System Settings Window Step 3 Enter the website address in the URL field Step 4 From the Scrolling mode drop down list choose a scrolling mode Figure 7 33 Scrolling Mode Drop Down List Step 5 Click Apply Step 6 To exit the Kiosk window click Close Step 7 In the System Settings window click Reboot ...

Страница 150: ...s Window Mouse Settings The mouse settings can be changed By default the mouse has the following settings Button order Right handed Acceleration 2 0 Threshold 4 Mouse cursor Hide Changing the Mouse Button Order Follow these steps to change the order of buttons on the mouse Step 1 Press Ctrl Alt S to display the System Settings window Step 2 Click the Mouse icon ...

Страница 151: ...ettings Figure 7 35 Mouse Icon in System Settings Window Step 3 To change the button order from right handed to left handed click the Left handed radio button Figure 7 36 Button Order Radio Buttons Step 4 Click Apply Step 5 To exit the Mouse window click Close Step 6 In the System Settings window click Reboot ...

Страница 152: ... Figure 7 37 Reboot Icon in the System Settings Window Changing the Mouse Acceleration and Threshold To change the mouse acceleration and threshold settings follow the steps below Step 1 Press Ctrl Alt S to display the System Settings window Step 2 Click the Mouse icon Figure 7 38 Mouse Icon in System Settings Window ...

Страница 153: ...w or Down Arrow to pick a value Figure 7 39 Acceleration and Threshold Slide Bars Step 4 To change the threshold slide the threshold bar enter a value between 0 and 20 or press the Up Arrow or Down Arrow to pick a value Step 5 When you complete the selections in this window click Apply Step 6 To exit the Mouse window click Close Step 7 In the System Settings window click Reboot Figure 7 40 Reboot ...

Страница 154: ...he kiosk screen follow these steps Step 1 Press Ctrl Alt S to display the System Settings window Step 2 Click the Mouse icon Figure 7 41 Mouse Icon in the System Settings Window Step 3 From the drop down list choose Show to change the mouse cursor setting Figure 7 42 Mouse Cursor Drop Down List Step 4 To exit the Mouse window click Close Step 5 In the System Settings window click Reboot ...

Страница 155: ...7 29 Cisco Interactive Experience Client 4600 Series User Guide Chapter 7 Locally Configuring the IEC Mouse Settings Figure 7 43 Reboot Icon in the System Settings Window ...

Страница 156: ...7 30 Cisco Interactive Experience Client 4600 Series User Guide Chapter 7 Locally Configuring the IEC Mouse Settings ...

Страница 157: ... page A 7 Remote Controls page A 7 Wireless Keyboard and Mouse Combination page A 7 Wired Mouse page A 7 Wired Keyboards page A 8 Analog Speakers page A 8 Digital Speakers page A 8 Analog Headsets page A 8 Analog Microphones page A 8 Digital Microphones page A 8 Webcams page A 9 Document Cameras page A 9 Video Encoder Dongles page A 9 Printers page A 9 Optical Scanners page A 10 Barcode Scanners p...

Страница 158: ...incidence Other manufacturers and models may also be compatible The following matrix indicates which of the following properties that peripherals should possess 1 Interface Indicates how the peripheral connects to the IEC 2 Emulates Indicates what device that the peripheral emulates when it communicates with the IEC 3 Compatibility Indicates any industry standards that the peripheral must meet 4 W...

Страница 159: ...more than four USB peripherals connect a USB hub to one of the USB ports Touchscreens and Touchscreen Overlays Touchscreens and touchscreen overlays must support Linux and be HID Human Interface Device compliant The following have been tested with version 2 3 and are supported Elo Touchscreen ET1928L Elo Touchscreen ET2243L NEC MultiSync V552 see next section for instructions on how to configure t...

Страница 160: ...tegory Family Name Type of Enclosure Size Inches Aspect Ratio Part Number 1215L Desktop 12 4 3 E432532 1215L Desktop 12 4 3 E991639 1247L Open Frame 12 4 3 E655204 1509L Desktop 15 16 9 E534869 1515L Desktop 15 4 3 E344320 1515L Desktop 15 4 3 E399324 1517L Desktop 15 4 3 E144246 1517L Desktop 15 4 3 E590483 1517L Desktop 15 4 3 E342516 1519L Desktop 15 6 16 9 E175716 1519L Desktop 15 6 16 9 E1148...

Страница 161: ...p 17 5 4 E763885 1729L Desktop 17 5 4 E274975 1729L Desktop 17 5 4 E461870 1729L Desktop 17 5 4 E629992 1739L Open Frame 17 5 4 E734455 1739L Open Frame 17 5 4 E607940 1739L Open Frame 17 5 4 E012584 1900L Desktop 19 16 10 E500662 1915L Desktop 19 5 4 E607608 1915L Desktop 19 5 4 E266835 1919L Desktop 18 5 16 9 E706956 1919L Desktop 18 5 16 9 E876321 1919L Desktop 18 5 16 9 E015447 1919L Desktop 1...

Страница 162: ...uchscreen to work on a LINUX platform follow these steps Step 1 Install the C T M application on a WIN OS platform Step 2 Plug in the USB connector Step 3 Log into CTM Step 4 Navigate to Administrator Functional Settings 1939L Open Frame 19 5 4 E945445 1939L Open Frame 19 5 4 E215546 1940L Open Frame 19 16 9 E855244 2200L Desktop 22 16 10 E808372 2201L Desktop 22 16 9 E107766 2201L Desktop 22 16 9...

Страница 163: ...ecommended that you use a 1920 x 1080 resolution Remote Controls The Cisco remote control that is supported for 2 3 is Cisco Remote Control IEP IR K9 Other remote controls can also be used See the Non Cisco Remote Controls section in Appendix E for instructions on how to configure remote controls Wireless Keyboard and Mouse Combination Note A wireless keyboard cannot be used during the installatio...

Страница 164: ... the IEC Digital Speakers Digital speakers must be USB The following digital speakers have been tested with 2 3 and are supported Altec Lansing Orbit USB speaker Logitech USB speaker S 0155A Logitech USB speaker S 150 Volume control on the device does not take effect The volume needs to be controlled from the IEC Analog Headsets All analog headsets except those with integrated microphones such as ...

Страница 165: ... Video Streamer for Live Events Printers Printers must be CUPS abstraction library compliant Cisco recommends the use of models that are 1 years old Cisco recommends the use of more mature commercial grade printers with longer lifespans Consumer grade printers where the models change frequently are less likely to be supported Please consult www openprinting org for printer compatibility Review the...

Страница 166: ...s Semiconductor Corp Barcode Reader Magnetic Card Readers Magnetic card readers must have keyboard emulation and be USB The following magnetic card readers have been tested with 2 3 and are supported MagTek 21040147 MagTek 21040108 HDMI Switches The following HDMI switches have been tested with 2 3 and are supported Extron HDMI Switcher Wi Fi 3G USB Mobile Broadband The following Wi Fi devices hav...

Страница 167: ... the following Vendors should confirm that the touchscreen is supported WITHOUT inserting special drivers Vendors should claim LINUX support Vendors should claim support of HID Webcams and Document Cameras Vendors who want to certify webcams or document cameras should ensure the following The cameras should be USB based The cameras should be V4L compatible Printers Vendors who want to certify prin...

Страница 168: ...ould emulate keyboard events Barcode scanners should not implement proprietary encryption protocols ID Readers Vendors who want to certify ID readers should ensure the following ID readers should be USB based or implement Serial on USB ID readers should emulate keyboard events ID readers should not implement proprietary encryption protocols Touchpads Vendors who want to certify touchpads should en...

Страница 169: ...page B 6 Best Practices and Tips page B 7 Testing the Printer Widget page B 8 Printer Compatibility Refer to Appendix A for a list of printers that have been tested with the IEC 4600 Series Note Other printers may also be compatible Printer Implementation global printer Object The global printer object implements a printer interface which allows control of the printer connected to the IEC 4600 Ser...

Страница 170: ... PaperSize paperSize attribute PaperSource paperSource readonly attribute PrinterState state attribute int resolution readonly attribute list int supportedResolutions readonly attribute list PaperSize supportedPaperSizes readonly attribute bool supportsMultipleCopies readonly attribute list string availablePrinters readonly attribute string defaultPrinter readonly attribute map status slot bool ab...

Страница 171: ...e setting is unset This is read only attribute Use the setFromTo method to set page range toPage Contains the number of the last page in a range of pages to be printed Pages in a document are numbered according to the convention that the first page is page 1 By default this attribute contains a special value of 0 meaning that the to page setting is unset This is a read only attribute Use the setFr...

Страница 172: ...success otherwise returns false getPageMargins Returns the page margins for this printer for the left top right and bottom margins The unit of the returned margins are specified with the unit parameter setPageMargins Sets the left top right and bottom page margins for this printer The unit of the margins are specified with the unit parameter setCurrentPrinter Sets the printer identified by its nam...

Страница 173: ...ption Variable Description state Contains current state of the print job and has one of the following values Downloading document is being downloaded from remote server Held job is held for printing Pending job is waiting to be printed Processing job is currently printing Completed job has completed successfully Stopped job has been stopped Aborted job has aborted due to an error errorString Conta...

Страница 174: ...unction onFinished ok document getElementById jobState innerHTML ok Successfully Unsuccessfully function onPagePrinted number pageNumber innerHTML number function init document getElementById name innerHTML global printer name document getElementById resolution innerHTML global printer resolution remove Instructs the browser to remove job object Information about all processed and finished jobs ar...

Страница 175: ... print http lenta ru news 2011 09 20 c27j script head body onload init table cellpadding 2 cellspacing 0 border 1 align center width 50 tr td Printer name td td id name td tr tr td Resolution td td id resolution td tr tr td State td td id state td tr tr td Page printed td td id pageNumber td tr tr td Job finished td td id jobState td tr table body html Best Practices and Tips Make sure to have the...

Страница 176: ...he printer widget 1 Using the policy 1 Create a policy with startup URL as the URL of the printer HMTL and apply the policy As a result the IEC boots up with the printer policy loaded 2 Using the Kiosk menu 1 On the IEC press Ctl Alt S and then choose Kiosk 2 Enter the printer widget URL 3 Reboot the IEC As a result the IEC boots up with the printer URL loaded ...

Страница 177: ...t page C 1 Best Practices and Tips page C 3 Testing the Scanner Widget page C 3 Optical Scanner Compatibility Refer to Appendix A for the list of optical scanners that have been tested with the IEC Note Other scanner models may also be compatible Optical Scanner Implementation global scanner Object The global scanner object implements an interface for optical scanners allowing an application displ...

Страница 178: ...l scanner Object Variables Variable Description dpiX DPI X of the selected scanner dpiY DPI Y of the selected scanner color Is selected scanner in color mode source Document source devices List of available scanners sources List of available document sources lastError Last error occurred base64Data Scanned image as base64 JPEG data busy Check if the scanner is busy setCurrentScanner in string devi...

Страница 179: ...ed The scanner must be connected to the IEC Reboot the IEC after connecting the scanner Testing the Scanner Widget There are two ways to test the scanner widget 1 Using the policy 1 Create a policy with startup URL as the URL of the scanner HTML and apply the policy As a result the IEC boots up with the scanner policy loaded 2 Using the Kiosk menu 1 On the IEC press Ctl Alt S and then choose Kiosk...

Страница 180: ...C 4 Cisco Interactive Experience Client 4600 Series User Guide Appendix C Optical Scanners Optical Scanner Implementation ...

Страница 181: ...mplement the global magstripe Object page D 4 Magnetic Card Reader and Barcode Scanner Compatibility HID or keyboard emulation type magnetic card readers and barcode scanners are supported by IEC 4600 Series devices Refer to Appendix A for a list of magnetic card readers and barcode scanners that have been tested with the IEC 4600 Series Magnetic Card Reader and Barcode Scanner Implementation To e...

Страница 182: ...ve pointer 2 Microsoft Microsoft Digital Media Keyboardid 12 slave pointer 2 Filtered Elo TouchSystems Inc Elo TouchSystems 2700 IntelliTouch r USB Touchid 14 slave pointer 2 MCE IR Keyboard Mouse ite cir id 15 slave pointer 2 Elo TouchSystems Inc Elo TouchSystems 2700 IntelliTouch r USB Touchmonitor Interfaceid 9 slave pointer 2 Virtual core keyboard id 3 master keyboard 2 Virtual core XTEST keyb...

Страница 183: ...ners In the case of a card reader the widget reacts to a scan of a card and returns the value of the data that is recorded on the magnetic stripe For credit cards the data returned is typically cardholder s name card number and expiration date The widget returns the data in an unparsed form so it is the responsibility of the developer to decrypt if necessary and parse the data For a barcode reader...

Страница 184: ... If deviceName is not empty use this device name and browser magstripe scanner property otherwise close Close the device opened The device has been open successfully scanning The device has started data scanning scanned out string data The device has finished scanning read the scanned data from deviceName error out string error Error has occurred Implement the global magstripe Object Step 1 Open y...

Страница 185: ...endix explains how to configure applications to allow use of either a Cisco and non Cisco remote control Topics in this appendix include Cisco Remote Control IEP IR K9 page E 1 Battery page E 2 Infrared Sensor page E 3 Remote Control Buttons page E 4 Remote Control Implementation page E 9 global ir Object page E 10 Usage of global ir Object page E 10 Non Cisco Remote Controls page E 12 Using the I...

Страница 186: ...kt in deze module Probeer deze batterijen niet te laden ontladen of vervangen Varoitus Moduulissa käytetään litiumparistoja Älä yritä ladata purkaa tai vaihtaa näitä paristoja Attention Ce module requiert des piles au lithium N essayez pas de les recharger les décharger ou de les remplacer Warnung In diesem Modul werden Lithium Batterien eingesetzt Versuchen Sie nicht diese Batterien aufzuladen zu...

Страница 187: ...of the remote control Step 3 To remove the old battery from the clip pivot the battery so that it touches only the opening of the clip Step 4 Insert a new battery so that positive charge symbols are visible simultaneously on the battery and the clip Step 5 Slide the clip back in to the remote control Infrared Sensor The IEC is equipped with an infrared IR sensor that receives recognizes and reacts...

Страница 188: ...ot work if the IR sensor is behind the touchscreen or blocked by another peripheral Remote Control Buttons All the buttons can be programmed The functions listed in the tables below are standard functions for the keys Table E 1 System Control Buttons Function Button IR Signal Frequency Power 0xff 00 0090 Input 0xef 10 0090 Information 0xe0 1f 0090 Help 0xf6 09 0090 Table E 2 Playback Control Butto...

Страница 189: ... the next channel or track Table E 3 Audio Control Buttons Function Button IR Signal Frequency volume up 0xbf 40 0090 volume down 0xbe 41 0090 mute 0xfe 01 009 Table E 4 Channel Control Buttons Rewind 0xfb 04 0090 Fast forward 0xfa 05 0090 Live 0xf7 08 0090 Function Button IR Signal Frequency Function Button IR Signal Frequency Channel down 0xbc 43 0090 Channel up 0xbd 42 0090 ...

Страница 190: ... Infrared Remote Controls Cisco Remote Control IEP IR K9 Return to previous 0xe3 1c 0090 1 0xf2 0d 0090 2 0xf1 0e 0090 3 0xf0 0f 0090 4 0xe1 1e 0090 5 0xe8 17 0090 6 0xe7 18 0090 7 0xe6 19 0090 8 0xe5 1a 0090 9 0xe4 1b 0090 0 0xe2 1d 0090 Function Button IR Signal Frequency ...

Страница 191: ...s User Guide Appendix E Infrared Remote Controls Cisco Remote Control IEP IR K9 Table E 5 Menu Control Buttons Function Button IR Signal Frequency Menu 0xb8 47 0090 Up 0xea 15 0090 Left 0xec 13 0090 OK 0xed 12 0090 Right 0xeb 14 0090 Down 0xe9 16 0090 ...

Страница 192: ...ntrols Cisco Remote Control IEP IR K9 Table E 6 Guide Control Buttons Function Button IR Signal Frequency Guide 0xf5 0a 0090 Page up 0xea 15 0090 Page down 0xf3 0c 0090 Exit 0xee 11 0090 Table E 7 Soft Keys Function Button IR Signal Frequency 0xa9 56 0090 0xaf 50 0090 0xad 52 0090 0xab 54 0090 ...

Страница 193: ...fwd playNextTrack break case rewind HUD rewind playPrevTrack break case stop HUD stop stopVideo break case right HUD right selectNext break case left HUD left selectPrevious break case okay HUD play playSelected break case power window location index html default break irFilterTimeout setTimeout function filterIR false 750 Remote Control Implementation The IR port is active by default No additiona...

Страница 194: ...ted remote controls setCurrentControl in string device Sets the current remote control to use The device name must be obtained from availableControls list Leave the device name empty to use browser ir configuration In this case you should set browser ir configuration enabled to true and browser ir configuration to the valid LIRC configuration event in uint key in string skey in string configName R...

Страница 195: ... ir error connect onError writeLog onError connected to signal global ir error global ir event connect onEvent writeLog onEvent connected to signal global ir event try var irconf global registry value browser ir configuration if irconf binary mimeType text plain CDATA binary irconf set default remote as current global ir setCurrentControl defaultRemote remoteInfo innerHTML Default Cisco remote con...

Страница 196: ...idth 15 min width 300px bottom 0 overflow x hidden border solid 1px 666666 overflow y scroll color white padding 20px font normal 10px 12px sans serif div script function writeLog msg var c document getElementById appDebugInfo if c c innerHTML c innerHTML msg br br script body html Non Cisco Remote Controls This section explains how to customize remote control programming so that non Cisco remote ...

Страница 197: ...n the left and center panes Add Devices to the New Group Add all the devices that will use the customized programming to this new group Step 1 Click Devices in the left pane Step 2 In the center pane double click the new group s icon Step 3 In the Edit menu click Properties Step 4 Click the Member Of tab in the center pane to view a list of devices in the group Step 5 Click Step 6 In the Add to Gr...

Страница 198: ...the IRConfig Policy to the Device Group Now apply the policy to the device group Step 1 Click Devices in the left pane Step 2 In the center pane click on the new groups icon Step 3 In the Edit menu click Properties Step 4 Click the Policies tab Step 5 In the Available policies list choose the IRConfig policy Step 6 Click the green arrow The policy now appears in the Applied policies list Step 7 Cl...

Страница 199: ...mple Test Code page F 5 IEC Preparation page F 13 SIP Client page F 14 Cisco IP Phone Set Up on the CUCM page F 14 Finding The IP Phone s MAC Address page F 25 Cisco IEC Set Up on the CUCM page F 26 Configuring Call Manager Information page F 38 Using a Policy on the IEM page F 38 Using the SipPhone Widget page F 44 SIP DTMF page F 45 Sample usage of sendDtmf API page F 46 SIP Recommendations The ...

Страница 200: ...ue SIP endpoint and supports both audio and video calls Both SD g711 and HD g7221 audio codecs are supported For video it supports H 263 and H 264 codecs The sipphone interface declaration is interface SipPhone attribute int height attribute int width attribute string backgroundColor attribute string idleImage attribute bool videoEnabled Is true by default attribute string status slots int start i...

Страница 201: ... call This method provides a mechanism for the widget to display an image when it is not in a call The parameters are imgUrl the URL for the image to be displayed and stretchFlag which indicates whether to auto resize or not the image to the given frame changeidleImage in string imgUrl in string sipUri This method is similar in functionality to setidleImage You could use this method to change the ...

Страница 202: ... the widget is receiving an incoming call request from another SIP peer established This signal is indicative that the call is in progress ring This signal means that the called party has been notified about the incoming call disconnected This signal means that the call has been terminated video This signal means that the call was negotiated as a video call and the remote site video is available t...

Страница 203: ...r gradient top rgba 180 180 177 1 0 rgba 214 213 212 1 32 rgba 255 255 255 1 100 ul ol li padding 0 margin 0 vbox hbox display webkit box display box webkit box pack justify box pack justify text align justify text align center vbox webkit box orient vertical box orient vertical hbox webkit box orient horizontal box orient horizontal fullwindow height 100 width 100 display webkit box display box c...

Страница 204: ...nButton callButton acceptButton webkit border image url img greenButton_idle png 1 10 1 10 stretch stretch greenButton hover callButton hover acceptButton hover webkit border image url img greenButton_hover png 1 10 1 10 stretch stretch greenButton active callButton active acceptButton active webkit border image url img greenButton_pressed png 1 10 1 10 stretch stretch greenButton disabled callBut...

Страница 205: ...icationData value sip transport dafault_transport writeLog username sip_username br password sip_password br domain sip_domain br transport sip_transport br target sip_target br sipbutton disabled true sipRegistered className LED_off countDown 0 sipStatus innerHTML Connecting to server writeLog Starting SIP daemon sipphone start sip_username sip_password sip_domain sip_transport writeLog Connectin...

Страница 206: ...meout setTimeout onRegistered 15000 function onPlacingCall writeLog sipphone status sipphone status sipbutton className hangupButton sipbutton innerHTML Cancel sipStatus innerHTML Placing call sipTimer className timerOn writeLog onPlacingCall function onIncomingCall writeLog sipphone status sipphone status sipbutton disabled false sipbutton className acceptButton sipbutton innerHTML Accept Call si...

Страница 207: ...answer span break case 401 sipStatus innerHTML span style color ff0000 Registration failed span break default sipStatus innerHTML span style color ff6920 Error span break t1 setTimeout function sipbutton disabled false sipStatus innerHTML Ready 30000 writeLog onError explanation SIP code code function makeCall targetID writeLog sipphone status sipphone status sipbutton disabled true var uri target...

Страница 208: ...ity hidden function init isDebugMode initSIP script head body onLoad init div class fullwindow hbox div class vbox style webkit box flex 1 box flex 1 webkit box pack center box pack center table border 0 cellpadding 0 cellspacing 0 width 100 height 100 tr td align center table border 0 cellpadding 0 cellspacing 1 align center bgcolor 000000 tr td class topPanel table border 0 cellpadding 0 cellspa...

Страница 209: ...images img src img call_idle png width 0 height 0 img src img call_hover png width 0 height 0 img src img call_pressed png width 0 height 0 img src img call_disabled png width 0 height 0 img src img endCall_idle png width 0 height 0 img src img endCall_hover png width 0 height 0 img src img endCall_pressed png width 0 height 0 img src img endCall_disabled png width 0 height 0 img src img accept_id...

Страница 210: ...eates a sample widget to test SIP 1 Copy the above contents to an HTML file and transfer the file to a web server from where it can be accessed Make sure to have the location of the file as a URL 2 Register the IEC and the other endpoint on CUCM see instructions below 3 Create a policy with startup URL as the URL of the above script Make changes to the application data property in the policy Apply...

Страница 211: ... It cannot be adjusted IEC Preparation The following steps must be done before setting up the SIP client Step 1 Make sure that the IEC is installed registered configured and up and running Confirm that the startup URL is displaying Step 2 Connect a webcam using a USB cable to a USB port on the IEC Step 3 Connect a microphone to the IEC You can connect the microphone to either a USB port or the MIC...

Страница 212: ...n configured on the Cisco IEM To install the SIP Client you will need the following CUCM version 9 x or 10 x Cisco IEC4610 or IEC4632 Cisco Unified IP Phone 9951 Cisco TelePresence PrecisionHD USB Camera Cisco IP Phone Set Up on the CUCM The following steps will set up a Cisco Unified IP Phone 9951 on the CUCM Modify the values entered if you are setting up a different phone Tandberg or TelePresnc...

Страница 213: ...IP Phone Set Up on the CUCM Figure F 4 CUCM Main Page You will be prompted to the Website s Security Certificate page Step 4 On the Website s Security Certificate page click Continue to this website Not Recommended Figure F 5 Website s Security Certificate Page Step 5 Enter admin in the Username field of the Cisco Unified CM Administration page ...

Страница 214: ... Session Initiation Protocol Client Cisco IP Phone Set Up on the CUCM Figure F 6 Cisco Unified CM Administration Page Step 6 Enter the password in the Password field Step 7 Click Login button Step 8 From the Device drop down menu choose Phone Figure F 7 Device Drop Down Menu Step 9 Click the Find button ...

Страница 215: ... the Session Initiation Protocol Client Cisco IP Phone Set Up on the CUCM Figure F 8 Find and List Phones Screen All the devices registered on the CUCM will be listed Step 10 To add a new phone click Add New Figure F 9 Add New Phone Button Step 11 From the Phone Type drop down menu choose Cisco 9951 ...

Страница 216: ...l Client Cisco IP Phone Set Up on the CUCM Figure F 10 Add a New Phone Screen Step 12 Click Next Step 13 Enter the IP phone s MAC address in the MAC Address field within the Device Information area Note If you do not know the IP phone s MAC address refer to the section Finding the IP Phone s MAC Address at the end of this section ...

Страница 217: ...on of the IP phone to easily distinguish it from others in the CUCM This field automatically enters the IP phone s MAC Address but can be modified Step 15 From the Device Pool drop down menu choose Default Step 16 From the Phone Button Template drop down menu choose Standard 9951 SIP Step 17 From the Device Security Profile drop down menu within the Protocol Specific Information area choose Cisco ...

Страница 218: ...e Session Initiation Protocol Client Cisco IP Phone Set Up on the CUCM Figure F 12 Protocol Specific Information Area Step 18 From the SIP Profile drop down menu choose Standard SIP Profile Step 19 Within the Protocol Specific Information area go to the Digest User drop down menu and choose the User ID ...

Страница 219: ...uide Appendix F Video Conferencing Using the Session Initiation Protocol Client Cisco IP Phone Set Up on the CUCM Figure F 13 Digest User Drop Down Menu Step 20 From the Cisco Camera drop down menu within the Product Specific Configuration Layout choose Enabled ...

Страница 220: ...ea Step 21 From the Video Capabilities drop down menu choose Enabled Step 22 From the Web Access drop down menu choose Enabled Step 23 Click Save Figure F 15 Save Button A dialog box appears Step 24 Click Apply Config Note It is important that you first save configurations before applying them Otherwise the configurations will be lost Step 25 Click OK Step 26 Click Line 1 Add a new DN within the A...

Страница 221: ...ep 28 Enter a description in the Description field It is good practice to enter the directory number in this field Step 29 Enter a value in the Alerting Name field It is good practice to enter the directory number in this field too Step 30 Enter a description in the ASCII Alerting Name field It is good practice to enter the directory number in this field too Step 31 Click Save Now that a directory...

Страница 222: ...4 on the Applications screen Figure F 19 Cisco Unified IP Phone 9951 Applications Screen Step 35 Choose the Network Setup icon which is button 1 on the Administrator Settings screen Step 36 Choose the Ethernet Setup icon which is button 1 on the Network Setup screen Step 37 Choose the IPv4 Setup icon which is button 1 on the Ethernet Setup screen Step 38 Choose the Alternative TFTP icon which is b...

Страница 223: ...UCM Finding The IP Phone s MAC Address The Cisco Unified IP phone 9951 has a MAC address which can be found by one of two methods First Method There is a label on the bottom of the phone that contains the MAC address Figure F 20 MAC Address Label Second Method Step 1 Press the System Settings button Figure F 21 System Settings Button on the Cisco Unified IP Phone 9951 ...

Страница 224: ...inistrator Settings screen Step 4 Choose the Ethernet Setup icon which is button 1 on the Network Setup screen Step 5 Choose the MAC Address icon which is button 2 on the Ethernet Setup screen Cisco IEC Set Up on the CUCM The Cisco IEC 4600 Series device set up on the CUCM is very similar to the Cisco IP Phone 9951 set up on the CUCM except for a few options An additional step is also required Thi...

Страница 225: ...o IEC Set Up on the CUCM Figure F 23 CUCM Main Page You will be prompted to the Website s Security Certificate page Step 4 On the Website s Security Certificate page click Continue to this website Not Recommended Figure F 24 Website s Security Certificate Page Step 5 Enter admin in the Username field of the Cisco Unified CM Administration page ...

Страница 226: ...he Session Initiation Protocol Client Cisco IEC Set Up on the CUCM Figure F 25 Cisco Unified CM Administration Page Step 6 Enter the password in the Password field Step 7 Click Login button Step 8 From the Device drop down menu choose Phone Figure F 26 Device Drop Down Menu Step 9 Click the Find button ...

Страница 227: ...ion Initiation Protocol Client Cisco IEC Set Up on the CUCM Figure F 27 Find and List Phones Screen All the devices registered on the CUCM will be listed Step 10 To add a new phone click Add New Figure F 28 Add New Phone Button Step 11 From the Phone Type drop down menu choose Third Party SIP Device Advanced ...

Страница 228: ...p 12 Click Next Step 13 Enter the Cisco IEC 4600 Series device s MAC address in the MAC Address field within the Device Information area Note The Cisco IEC 4600 Series device s MAC address is located on the label on the back of the device Figure F 30 IEC Mac Address Label Step 14 Enter a description of the Cisco IEC 4600 Series device This field automatically enters SEP plus the MAC Address but th...

Страница 229: ...e Phone Button Template drop down menu choose Third Party SIP Device Advanced Step 17 From the SIP Profile drop down menu choose Standard SIP Profile Step 18 From the Device Security Profile drop down menu choose Third party SIP Device Advanced Standard SIP Non secure profile Step 19 Click Save Step 20 Click Apply Config In order for the IEC 4600 Series device to be activated it must be associated...

Страница 230: ... 32 User Management Drop Down Menu Step 22 Click Add New Step 23 Enter a value in the User ID field A unique numeric value is required to identify the user This unique value will be the extension of the SIP device Note It is imperative that the value entered in the User ID field is a number The SIP device will not work if you enter alphabetic characters punctuation or spaces ...

Страница 231: ...ord in the Confirm Password field Step 26 Enter the last name of the user in the Last Name field Step 27 Click Save You will be redirected to a page where you can find the status of your User Profile creation If all fields have been entered properly the status will indicate Add Successful Figure F 34 Status The user profile and the Cisco IEC 4600 Series device on the CUSM must now be linked in ord...

Страница 232: ...on Initiation Protocol Client Cisco IEC Set Up on the CUCM Figure F 35 Device Drop Down Menu Step 29 Click the Find button Figure F 36 Find Button All the devices registered on the CUCM will be listed Step 30 Choose the Cisco IEC 4600 Series device which starts with the letters SEP followed by the MAC address ...

Страница 233: ...Set Up on the CUCM Figure F 37 List of Devices Step 31 On the Phone Configuration screen choose Line 1 Add a new DN within the Association Information area Figure F 38 Association Information Area The Directory Number Configuration page appears Step 32 Enter a number in the Directory Number field Step 33 Click Save Step 34 Click Associate End Users ...

Страница 234: ...itiation Protocol Client Cisco IEC Set Up on the CUCM Figure F 39 Associate End Users Button The user list screen appears Step 35 Click Find Step 36 Check the check box next to the user that you would like to associate the IEC directory number Figure F 40 List of Users Step 37 Click Add Selected Step 38 Click Close ...

Страница 235: ... 41 Close Button Step 39 From the Device drop down menu choose Phone Step 40 Click Save Step 41 Click Apply Config Step 42 Within the Protocol Specific Information area go to the Digest User drop down menu and choose the User ID Figure F 42 Digest User Drop Down Menu Step 43 Click Save Step 44 Click Apply Config This Cisco IEC 4600 Series device is now registered on the CUCM ...

Страница 236: ...IP phone You can enter the call manager information in a policy on the IEM You can hard code the call manager information in the sipphone widget Using a Policy on the IEM The following steps explain how to enter the call manager information into the IEC s policy on the IEM Step 1 Log in to the Cisco IEM which has the SIP policy enabled on it Step 2 Go to the policy that is applied to the Cisco IEC...

Страница 237: ...active Experience Client 4600 Series User Guide Appendix F Video Conferencing Using the Session Initiation Protocol Client Configuring Call Manager Information Figure F 44 Application Data Editor Step 7 Click key value ...

Страница 238: ...Client 4600 Series User Guide Appendix F Video Conferencing Using the Session Initiation Protocol Client Configuring Call Manager Information Figure F 45 Key Value in the Application Data Editor Step 8 Enter sip target in the key field ...

Страница 239: ... Series User Guide Appendix F Video Conferencing Using the Session Initiation Protocol Client Configuring Call Manager Information Figure F 46 Key and Value Fields in the Application Data Editor Step 9 Enter the directory number in the value field ...

Страница 240: ...tiation Protocol Client Configuring Call Manager Information Figure F 47 Key and Value Fields Filled in the Application Data Editor Step 10 Click Ok If you click on data property s Value field you will see the data in the form sip target directoryNumber as shown in the figure below where the directory number is 1234 ...

Страница 241: ...M will use to log into the CUCM This is the unique User ID that was entered in the CUCM Note It is imperative that the value entered in the User ID field is a number The SIP device will not work if you enter alphabetic characters punctuation or spaces Step 14 In the Application data editor click Step 15 Enter sip password in the key field Step 16 In the value field enter the password that the IEM ...

Страница 242: ...k Step 23 Click Ok Figure F 49 Entries in the Application Data Editor If you click on the data property s Value field you will see the data Step 24 Click Apply Using the SipPhone Widget You can hard code the call manager information in the sipphone widget If you want to hard code the SIP client information in this widget follow these steps Step 1 Open the sipphone widget code using a text editor S...

Страница 243: ...main with the IP address for the call manager Step 6 Replace transport with udp Step 7 Save your changes SIP DTMF Dual Tone Multifrequency DTMF for SIP is a feature that is available starting with version 2 1 1 The purpose of DTMF setup for SIP is to provide the audio prompts heard over the phone such as Press 1 to reach ____ You will need the following to set up DTMF for SIP calls Latest SipPhone...

Страница 244: ...F Reception checkbox should be unchecked 6 The Allow Presentation Sharing using BFCP checkbox should be unchecked 7 The Allow iX Applicable Media checkbox should be unchecked Figure F 51 CUCM Checkboxes Sample usage of sendDtmf API This section provides an example on how to use the sendDtmf API The following is the Javascript Function to send the DTMF keys function sendDtmf key var k String key va...

Страница 245: ...bind the keys to the function is tr td button onClick sendDtmf 1 class siphone_key 1 button td td button onClick sendDtmf 2 class siphone_key 2 button td td button onClick sendDtmf 3 class siphone_key 3 button td More such lines for each of the DTMF keys tr The figure below is a screenshot of the application using DTMF key Figure F 52 Application Using the DTMF Key ...

Страница 246: ...F 48 Cisco Interactive Experience Client 4600 Series User Guide Appendix F Video Conferencing Using the Session Initiation Protocol Client SIP DTMF ...

Страница 247: ...ve video is captured by a HD video camera and then streamed by the dongle to other IECs or remote computers The video stream is sent as part of the MPEG2 Transport Protocol MPEG TS The stream can be sent as either unicast or multicast Unicast The dongle can be used for a point to point video stream for example when a customer wants to share their document with a virtual agent at a remote site The ...

Страница 248: ...and the receiving endpoints Figure G 1 IEC Receiving the Video Stream of a Document from Another IEC Vaddio HD Document Camera The Vaddio CeilingVIEW HD 18 DocCAM is a high definition ceiling mounted document camera connected to the IEC via a video encoder dongle The Vaddio camera can capture documents that the customer is holding or places on the desk or table below the camera This camera can als...

Страница 249: ... DVI HDMI which delivers simultaneous analog component video YPbPr and digital video DVI D or HDMI outputs on separate connectors up to 100 feet over a single Cat 5 cable There is no API for the Vaddio document camera Instead a hex string is sent via RS232 to the camera using the serialPorts API For example Camera ON x81 x01 x04 x00 x02 xFF Camera OFF x81 x01 x04 x00 x03 xFF Stream Live Video To s...

Страница 250: ... the EZCamera power and HD Video Port cord to connect the Quick Connect to the camera Step 3 Use a RS 232 Control cord to connect the To Camera port on the Quick Connect and the camera Step 4 Connect another RS 232 cord into the Input port on the Quick Connect and plug the other end into the RS232 port on the IEC Step 5 Connect the HDMI input of the encoder dongle to the DVI D output of the Quick ...

Страница 251: ...camera and IR signals returned from the camera CAT 5e Ethernet cable 3 RS 232 Control Input A photo of this connection is shown in the figure below Input to SR interface from IEC RS 232 port Shown in figure below a 9 pin male to 3 5mm stereo jack adapter b 9 pin female to Ethernet port adapter comes with Vaddio camera no need to purchase c CAT 5e Ethernet cable 4 DVI D Output From SR interface DVI...

Страница 252: ...Input global videoEncoder Object The global videoEncoder object allows the web application to take a video feed from a HDMI Source and encode it to MPEG TS and stream it out to an endpoint either via UDP or via TCP This object can be coupled with the video player and can serve as a local view of the encoded frame that is being sent out on the wire ...

Страница 253: ...ibute int videoInputCount readonly attribute stringlist videoInputDescription readonly attribute string snapshot attribute string targetHost Target Host where MPEG2 TS has to be sent attribute int targetPort Target Port on Target Host to Receive it attribute int protocol Udp 0 Tcp 1 attribute int videoMode SD 0 HD 1 CUSTOM 2 attribute int videoSource Must be in 0 videoInputCount range 0 is for HDM...

Страница 254: ...eo sources including the HDMI input from the USB dongle and all available webcams videoInputDescription Returns the description of all video input devices present in the box targetHost Returns the target host to which the encoded stream is being sent targetPort Returns the port number on which the encoded stream is being sent protocol Returns integer value for the Transport Protocol 0 for UDP or 1...

Страница 255: ...t Bit Rate being sent from the encoder in bps setTargetHost in string targetHost Allows you to set the Target Host IP Address either as Unicast or Multicast ipv4 Address setTargetPort in string targetPort Allows you to set the Target Host s Layer4 port Number TCP or UDP port number setProtocol in int transportProtocol Allows the Transport Layer4 Protocol to be used when sending the encoded stream ...

Страница 256: ... PS 1 for TS default 2 for Mp4 3 for ES and 4 for Raw setInputFrameRate in int frameRate Allows you to set the Incoming Video In Frame rate in fps Choices are 0 for 15fps 1 for 24fps 2 for 30fps and 3 for 60fps setOutputFrameRate in int frameRate Allows you to set the Output Video Out Frame rate in fps Choices are 0 for 15fps 1 for 24fps 2 for 30fps and 3 for 60fps setAverageOutputFrameRate in int...

Страница 257: ... 0 InputResolution1280x720 1 InputResolution1024x600 2 enum OutputResolution OutputResolution1920x1080 0 OutputResolution1280x720 1 OutputResolution1200x672 2 OutputResolution1168x656 3 OutputResolution1024x576 4 OutputResolution768x432 5 enum StreamType StreamPgoram 0 StreamTransport 1 StreamMp4 2 StreamElementary 3 StreamRaw 4 enum InputFrameRate Input15fps 0 Input24fps 1 Input30fps 2 Input60fps...

Страница 258: ...G 12 Cisco Interactive Experience Client 4600 Series User Guide Appendix G Stream Live Video Stream Live Video ...

Страница 259: ...player including AVI MOV MP4 MPEG2 and MPEG 2 TS extensions wmv avi mov mp4 mpg ts Formats not recommended On2 VP 6 used by old FLV Note Native video is strongly preferred over Flash video Note The IEC 4600 series supports WebM VP8 Vorbis and Ogg Theora Vorbis for HTML5 video Note Use of the native player strongly preferred over HTML5 video Note The native player s video compatibility can be valid...

Страница 260: ...ing capability on the native player Note The size of the native player object does not affect the CPU usage If the video source is the same the CPU usage is the same regardless of the player s height and width That is if the video source is 1280x720 the CPU usage will not change by setting the native player s size to 320x180 or 1920x1080 Screen Resolutions Up to 1920x1080 1080p IEC4600 Series defa...

Страница 261: ... Encoder Card VEC The VEC is a Peripheral Component Interconnect Express PCIe based encoder that allows IEC 4600 Series devices to record and transcode video using the H 264 video codec As a result HD video calls can be made between two IECs with VECs as an alternative to making a SIP call between an IEC and a Cisco Unified IP Phone 9951 Note SIP calls between an IEC and an IP phone are not high d...

Страница 262: ...ECs found in Release 2 1 and later Note Calls between two IECs cannot be accomplished with older versions of the IEC hardware such as 2 0 or 1 0 3 IEC Firmware 2 1 1 or later High definition video cameras such as the Cisco PrecisionHD or the Logitech C110 with USB cables Microphones CUCM 9 1 1 10000 5 Connect the Hardware Follow the steps below to connect the hardware Step 1 Make sure that both IE...

Страница 263: ... conferencing you will need CUCM version 9 1 1 10000 5 and the SipPhone widget Note This set up is not compatible with Cisco Contact Center Express To configure call information Step 1 Configure both IECs on the CUCM See the Cisco IEC Set Up on the CUCM section of Appendix F for instructions Step 2 Configure the call information either using a policy or the SipPhone widget See either the Using a P...

Страница 264: ...I 4 Cisco Interactive Experience Client 4600 Series User Guide Appendix I HD Video Conferencing Between Two IECs Using the Video Encoder Card Set Up Video Calls Between Two IECs with VECs ...

Отзывы: